battery OPEL GT-R 1973 Workshop Manual
[x] Cancel search | Manufacturer: OPEL, Model Year: 1973, Model line: GT-R, Model: OPEL GT-R 1973Pages: 625, PDF Size: 17.22 MB
Page 358 of 625
2. If inspection of contact points indicates excessive
burning, pitting or wear, check condenser and re-
place if necessary.
3. Inspect all connections and wires in the primary
ignition circuit. Correct any abnormal conditions
found.Carburetor1. Clean fuel strainer in fuel pump. To prevent fuel
leakage in pump, disconnect “IN” line from pump
and raise end above fuel level. The in-line fuel filter
should be replaced every 12,000 miles or every 12
months.
2. Check for freedom of choke valve operation and
clean shaft if necessary, with suitable solvent.
3. Inspect throttle cable or linkage bracket and re-
turn spring for wear. With helper depressing acceler-
ator pedal to floor, check for wide open throttle.
Adjust accelerator pedal height so wide open throttle
is obtained when pedal is within
l/2 inch from floor.
Lubricate linkage pivot points with engine oil.
Air CleanerCheck paper element every 6,000 miles and replace
every
24,ooO miles. If a vehicle is operated in dusty
territory, check condition of air cleaner element
more frequently and replace if necessary.
Fan Belt1. Inspect belt for wear, cracks or frayed points.
Replace and/or adjust as necessary. Specified ten-
sion for belt using Gauge J-23600 is 45 lbs.
Cooling System1. Inspect the radiator, water pump, cylinder head
areas and all radiator and heater hose connections
for evidence of engine coolant leaks.
2. Inspect all hoses for deterioration from gas and oil
contact. Correct as required.
Inspection should be made with engine operating at
normal temperature, cooling system completely
filled, temperature control lever fully open and nor-
mal pressure in the system. Normal pressure should
be 13.2 to 15.2 psi.
Engine Lubrication SystemInspect engine for evidence of oil leakage. Correctany abnormal condition with sealastic or new seals
and gaskets.
Battery
1. Inspect battery, battery mount and cables and
check electrolyte level. Proper level should be just
above the cell plates.
CAUTION:Do not over fill.
2. Determine the serviceability of the battery by ap-
plying the 421 Battery Test.
Positive Crankcase VentilationClean crankcase ventilator metered orifice in the in-
take manifold fitting every 6,000 miles. Also all hoses
and fittings should be inspected, cleaned and re-
placed, if necessary.
To clean, remove rubber hose from metered orifice
and apply air pressure to orifice to remove any for-
eign particles that may be trapped.
Valve Lifter AdjustmentRefer to Engine Mechanical and Mounts section for
valve lifter adjustment procedure.
Engine Tune-Up Instrument ChecksThe following instrument checks and adjustments
serve as a final check on engine condition. These
checks may discover some new problems that may
not have been obvious before. The engine is also
given its final adjustments that will assure maximum
performance, reliability, and proper emission con-
trol.
Refer to Electrical Group for checking procedures of
the following:
Cranking Voltage Check
Ignition Timing
Distributor Advance
Ignition Output
Secondary Resistance
Current Output and Voltage Setting
Idle Speed and Mixture AdjustmentsRefer to carburetor section.
Page 383 of 625
78.221973 OPEL SERVICE MANUAL
3. Install new bellows. Adhere to distance A
- 8.07”.
See Figure 7B-I 1.
4. Heat up new gearshift lever knob in boiling water
to 176 degrees F. and push it onto gearshift lever
tube. Adhere to distance A .3”, see Figure
7B-15.The gearshift lever tube end is provided with trans-
verse grooves for which reason the old button cannot
be reused. Install gearshift lever.
REPLACING RUBBER DAMPENING PARTS IN
GEARSHIFT LEVER1. Remove gearshift lever.
2. Knock off gearshift lever button and loosen
threaded pin for Bowden control wire attachment.
3. Remove lower snap ring from gearshift lever tube
and pull tube off shift finger.
4. Take off and replace rubber dampening parts.
5. After installation of tube, tighten Bowden control
wire with threaded pin. Prior to tightening, pull ring
must rest on gearshift lever tube and clamping block
on pull ring. See Figure
7B-15.6. Heat up new gearshift lever knob in boiling water
to 176 degrees F. and push it onto gearshift lever
tube. Adhere to distance A
- .3”, see Figure 7B-15.The gearshift lever tube end is provided with trans-
verse grooves for which reason the old button cannot
be reused.
7. Install gearshift lever.
MAJOR REPAIR
TRANSMISSION REMOVAL1. Remove air cleaner. Remove throttle rod from
carburetor and rear support and disconnect battery.
2. Remove screws from fan shroud.
3. Remove gearshift lever (refer to paragraph on ser-
vicing gearshift lever).
4. Support car with frame or wheel stands in the
front or frame stands in the rear.
5. Loosen front exhaust pipe to manifold flange.
6. Remove clutch cable from fork by pushing fork to
disengage the clutch and unsnap cable from slot.
7. Disconnect both wires from backup lamp switch.8. Disconnect speedometer cable from transmission
case extension housing.
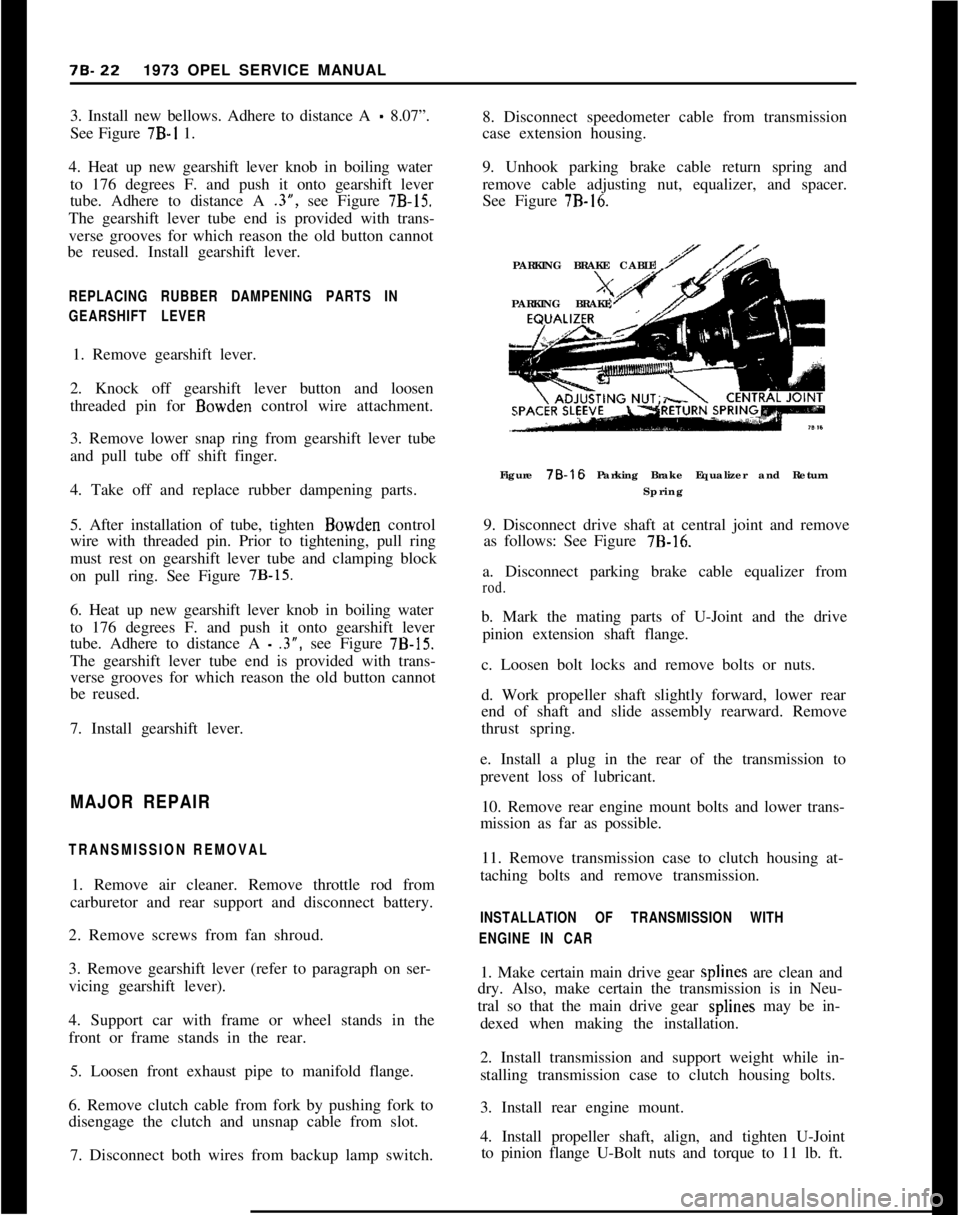
9. Unhook parking brake cable return spring and
remove cable adjusting nut, equalizer, and spacer.
See Figure
7B-16.PARKING BRAKE CABLE
PARKING BRAKE
Figure 78-16 Parking Brake Equalizer and Return
Spring
9. Disconnect drive shaft at central joint and remove
as follows: See Figure
7B-16.a. Disconnect parking brake cable equalizer from
rod.b. Mark the mating parts of U-Joint and the drive
pinion extension shaft flange.
c. Loosen bolt locks and remove bolts or nuts.
d. Work propeller shaft slightly forward, lower rear
end of shaft and slide assembly rearward. Remove
thrust spring.
e. Install a plug in the rear of the transmission to
prevent loss of lubricant.
10. Remove rear engine mount bolts and lower trans-
mission as far as possible.
11. Remove transmission case to clutch housing at-
taching bolts and remove transmission.
INSTALLATION OF TRANSMISSION WITH
ENGINE IN CAR1. Make certain main drive gear splines are clean and
dry. Also, make certain the transmission is in Neu-
tral so that the main drive gear splines may be in-
dexed when making the installation.
2. Install transmission and support weight while in-
stalling transmission case to clutch housing bolts.
3. Install rear engine mount.
4. Install propeller shaft, align, and tighten U-Joint
to pinion flange U-Bolt nuts and torque to 11 lb. ft.
Page 455 of 625

7C. 941973 OPEL SERVICE MANUAL
7. Drive out retaining pin and shaft and remove se-
lector detent. See Figure 7C-93.Figure
7C-93Figure
7C-94 - Exploded View of Selector Lever
8. To replace bowden cable in selector lever, knock
off selector handle, remove screws from clamping
piece and pull knob.
9. Remove pull knob and bowden cable, taking care
not to lose lock bolt bushing, thrust springs, ‘and
washer.
10. Place thrust spring, bushing, washer, and thrust
spring onto new bowden cable, in that order, and
insert cable into selector lever.
1 I. Slide pull onto selector lever and clamping piece
onto cable.
12. Heat up new selector lever handle in water to 176
degrees F. and push onto selector lever.
13. Set dimension between pull knob and selector
lever handle at
.4 inch and tighten set screws.
14. Lubricate selector lever detent and shaft. Install
detent, align selector lever with support, install shaft,
and drive in new retaining pin.
15. Install assembly to support housing and install
intermediate selector lever.
16. Install assembly to vehicle and install neutral
start switch.
17. Install console lights and cigar lighter connec-
tions to console and install console to vehicle.
18. Lubricate and connect selector rod to intermedi-
ate selector lever and adjust according to Figure 7C-
198.
MAJOR REPAIRREMOVAL AND INSTALLATION OF AUTOMATIC
TRANSMISSION
Removal
- Opel 1900 and Manta
I. Disconnect battery.
2. Remove dipstick.
3. Remove screws from fan shroud.
4. Remove 2 upper starter bolts.
5. Raise car and provide support for front and rear
and drain oil.
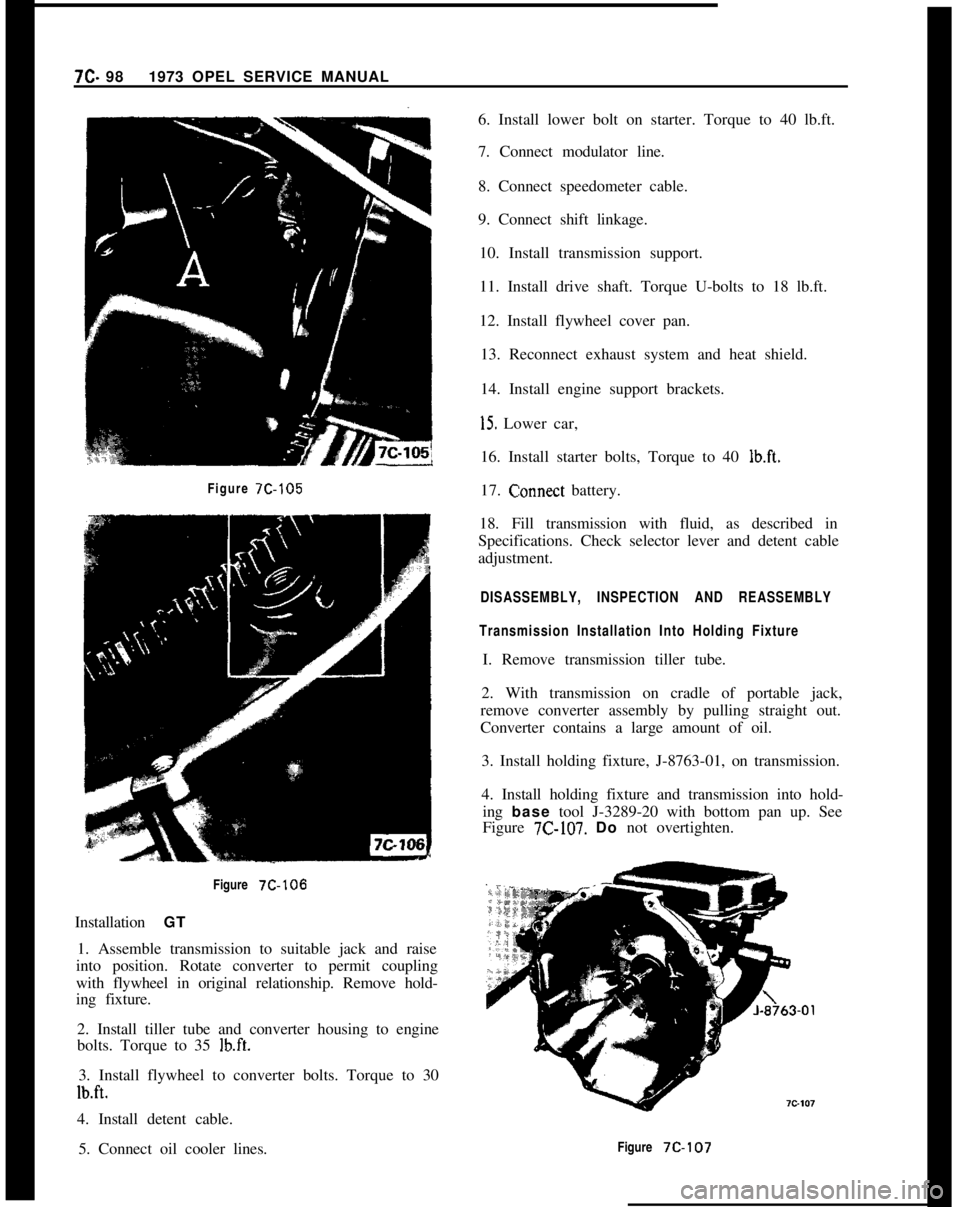
6. Remove bolts from engine support brackets, both
sides. Let brackets hang by front bolts. See Figure7c-105.
7. Remove flywheel cover pan.
8. Remove exhaust pipe from manifold and unhook
rubber tailpipe suspension.
9. Remove drive shaft. Do not misplace thrust spring
in spline.
10. Disconnect cooler lines at flexible hoses.
II. Detach both stabilizer supports from
crossmem-ber to body supports and loosen stabilizer bolts in
lower control arms. See Figure X-84, Callout “B”,
Page 456 of 625
AUTOMATIC TRANSMISSION 7C- 95
12. Place suitable jack under transmission and
remove transmission support bolts.
13. Lower transmission enough to remove detent
cable and modulator vacuum line.
14. Remove speedometer cable.
15. Remove selector lever.
16. Mark flywheel and converter for reassembly in
same position, and remove converter to flywheel
bolts. See Figure 7C-106.17. Remove converter housing to engine bolts and
tiller tube.
18. Pry transmission loose from engine.
19. Keep rear of transmission lower than front to
prevent converter from falling and install converter
holding fixture J-21366. Lower transmission and
move to bench.
Installation. Opel 1900 and Manta1. Assemble transmission to suitable jack and raise
transmission into position. Rotate converter to per-
mit coupling of fly wheel and converter with original
relationship. Remove J-21366.
2. Install tiller tube and converter housing to engine
block bolts. Torque to 35 lb. ft. DO NOT over
torque.
3. Install flywheel to converter bolts. Torque to 30 lb.
ft.4. Install detent cable to transmission.
5. Connect oil cooler lines.
6. Install lower bolt on starter. Torque to 40 lb. ft.
7. Connect shift linkage to transmission.
8. Connect modulator line.
9. Connect speedometer cable.
10. Install transmission support.
11. Install drive shaft. Torque U-Bolts to 18 lb. ft.
12. Install flywheel cover pan. Torque to 15 lb. ft.
13. Install engine support brackets.
14. Reconnect exhaust system.15. Attach stabilizer supports and tighten stabilizer
bolts in lower control arms.
16. Lower car.
17. Install starter bolts. Torque to 40 lb. ft.
18. Reconnect battery.
19. Fill transmission with fluid as described in
Specifications. Check selector lever and detent cable
adjustment.
Removal GT1. Disconnect battery.
2. Remove dipstick.
3. Pull throttle control rod off ball pin.
4. Remove screws from fan shroud.
5. Raise car and provide support for front and rear.
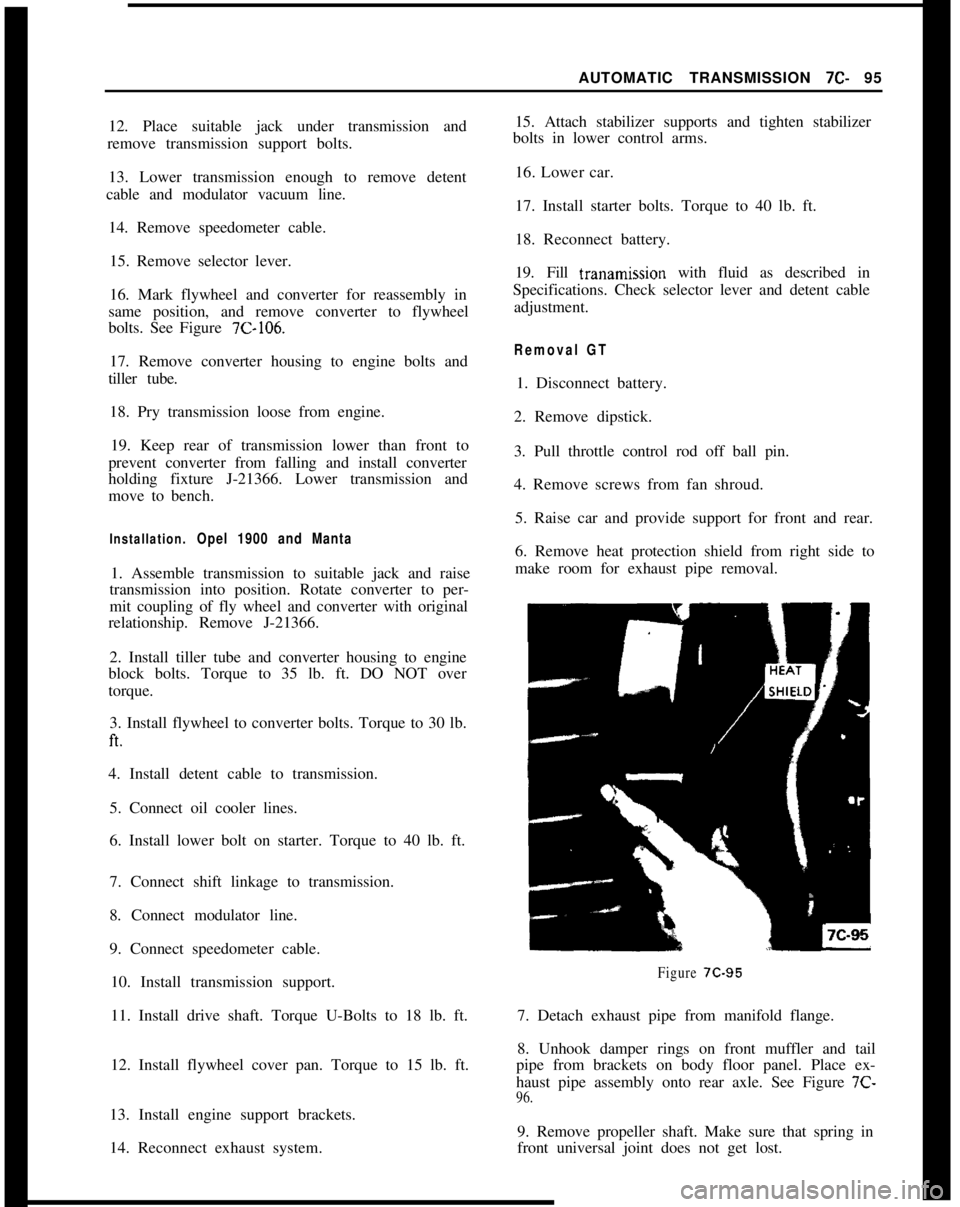
6. Remove heat protection shield from right side to
make room for exhaust pipe removal.
Figure 7C-957. Detach exhaust pipe from manifold flange.
8. Unhook damper rings on front muffler and tail
pipe from brackets on body floor panel. Place ex-
haust pipe assembly onto rear axle. See Figure 7C-
96.9. Remove propeller shaft. Make sure that spring in
front universal joint does not get lost.
Page 459 of 625
7C- 981973 OPEL SERVICE MANUAL
Figure 7C-105Figure
7C-106Installation GT
1. Assemble transmission to suitable jack and raise
into position. Rotate converter to permit coupling
with flywheel in original relationship. Remove hold-
ing fixture.
2. Install tiller tube and converter housing to engine
bolts. Torque to 35
lb.ft.3. Install flywheel to converter bolts. Torque to 30
lb.ft.4. Install detent cable.
5. Connect oil cooler lines.6. Install lower bolt on starter. Torque to 40 lb.ft.
7. Connect modulator line.
8. Connect speedometer cable.
9. Connect shift linkage.
10. Install transmission support.
11. Install drive shaft. Torque U-bolts to 18 lb.ft.
12. Install flywheel cover pan.
13. Reconnect exhaust system and heat shield.
14. Install engine support brackets.
15. Lower car,
16. Install starter bolts, Torque to 40
lb.ft.17.
C:onnect battery.
18. Fill transmission with fluid, as described in
Specifications. Check selector lever and detent cable
adjustment.
DISASSEMBLY, INSPECTION AND REASSEMBLY
Transmission Installation Into Holding FixtureI. Remove transmission tiller tube.
2. With transmission on cradle of portable jack,
remove converter assembly by pulling straight out.
Converter contains a large amount of oil.
3. Install holding fixture, J-8763-01, on transmission.
4. Install holding fixture and transmission into hold-
ing base tool J-3289-20 with bottom pan up. See
Figure
7C-107. Do not overtighten.
Figure
7C-107
Page 557 of 625
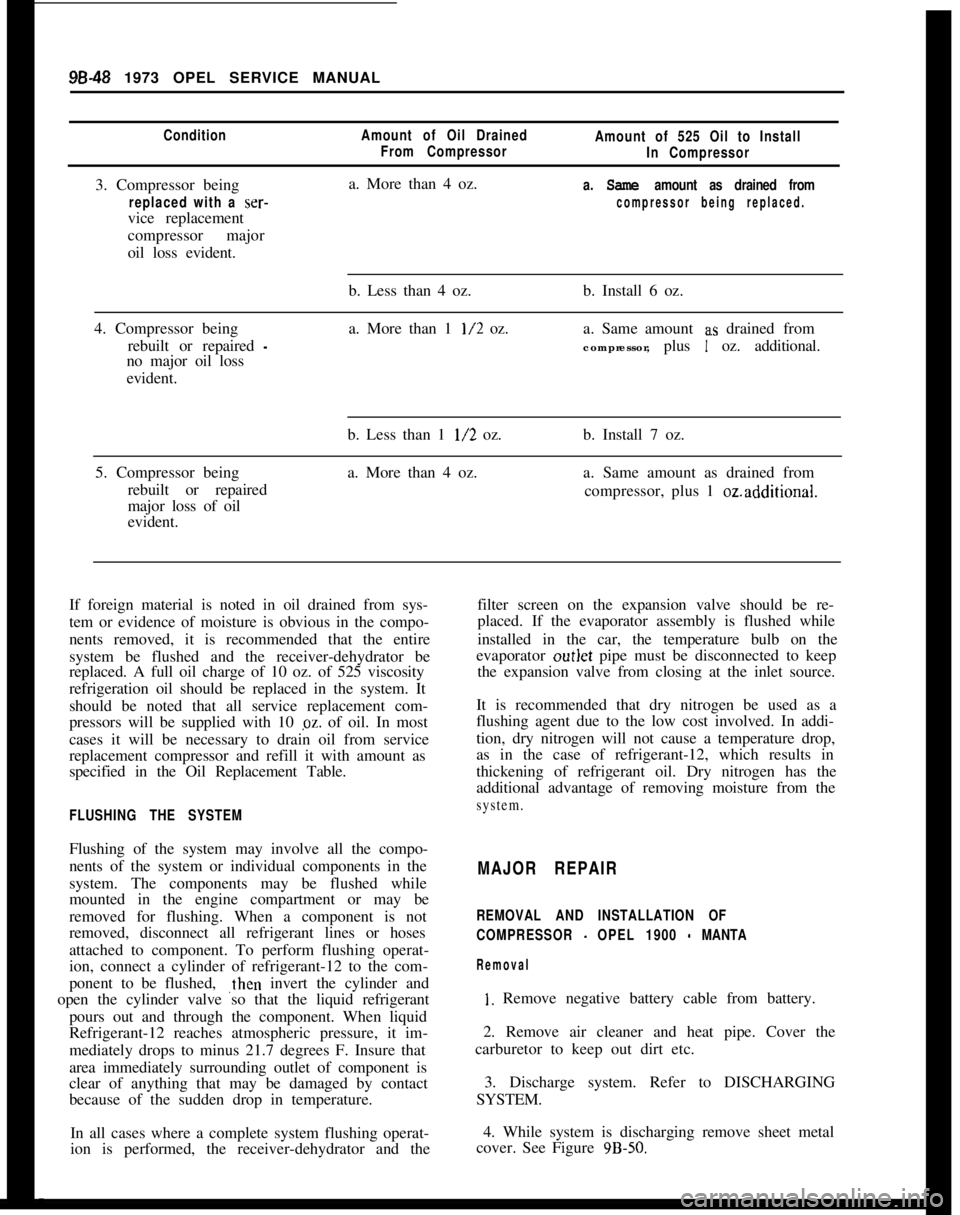
98-48 1973 OPEL SERVICE MANUALCondition3. Compressor being
replaced with a ser-vice replacement
compressor major
oil loss evident.
Amount of Oil Drained
From Compressora. More than 4 oz.Amount of 525 Oil to Install
In Compressor
a.
Same amount as drained from
compressor being replaced.4. Compressor being
rebuilt or repaired
-no major oil loss
evident.b. Less than 4 oz.
a. More than 1
l/2 oz.b. Install 6 oz.
a. Same amount a.s drained from
compressor, plus
1 oz. additional.
5. Compressor being
rebuilt or repaired
major loss of oil
evident.b. Less than 1
l/2 oz.
a. More than 4 oz.b. Install 7 oz.
a. Same amount as drained from
compressor, plus 1
ozadditional.If foreign material is noted in oil drained from sys-
tem or evidence of moisture is obvious in the compo-
nents removed, it is recommended that the entire
system be flushed and the receiver-dehydrator be
replaced. A full oil charge of 10 oz. of 525 viscosity
refrigeration oil should be replaced in the system. It
should be noted that all service replacement com-
pressors will be supplied with 10 pz. of oil. In most
cases it will be necessary to drain oil from service
replacement compressor and refill it with amount as
specified in the Oil Replacement Table.filter screen on the expansion valve should be re-
placed. If the evaporator assembly is flushed while
installed in the car, the temperature bulb on the
evaporator outlet pipe must be disconnected to keep
the expansion valve from closing at the inlet source.
FLUSHING THE SYSTEMIt is recommended that dry nitrogen be used as a
flushing agent due to the low cost involved. In addi-
tion, dry nitrogen will not cause a temperature drop,
as in the case of refrigerant-12, which results in
thickening of refrigerant oil. Dry nitrogen has the
additional advantage of removing moisture from thesystem.Flushing of the system may involve all the compo-
nents of the system or individual components in the
system. The components may be flushed while
mounted in the engine compartment or may be
removed for flushing. When a component is not
removed, disconnect all refrigerant lines or hoses
attached to component. To perform flushing operat-
ion, connect a cylinder of refrigerant-12 to the com-
ponent to be flushed, ,then invert the cylinder and
open the cylinder valve so that the liquid refrigerant
pours out and through the component. When liquid
Refrigerant-12 reaches atmospheric pressure, it im-
mediately drops to minus 21.7 degrees F. Insure that
area immediately surrounding outlet of component is
clear of anything that may be damaged by contact
because of the sudden drop in temperature.MAJOR REPAIR
REMOVAL AND INSTALLATION OF
COMPRESSOR
- OPEL 1900 - MANTA
Removal
I. Remove negative battery cable from battery.
2. Remove air cleaner and heat pipe. Cover the
carburetor to keep out dirt etc.
3. Discharge system. Refer to DISCHARGING
SYSTEM.
In all cases where a complete system flushing operat-4. While system is discharging remove sheet metal
ion is performed, the receiver-dehydrator and thecover. See Figure
9B-50.
Page 558 of 625
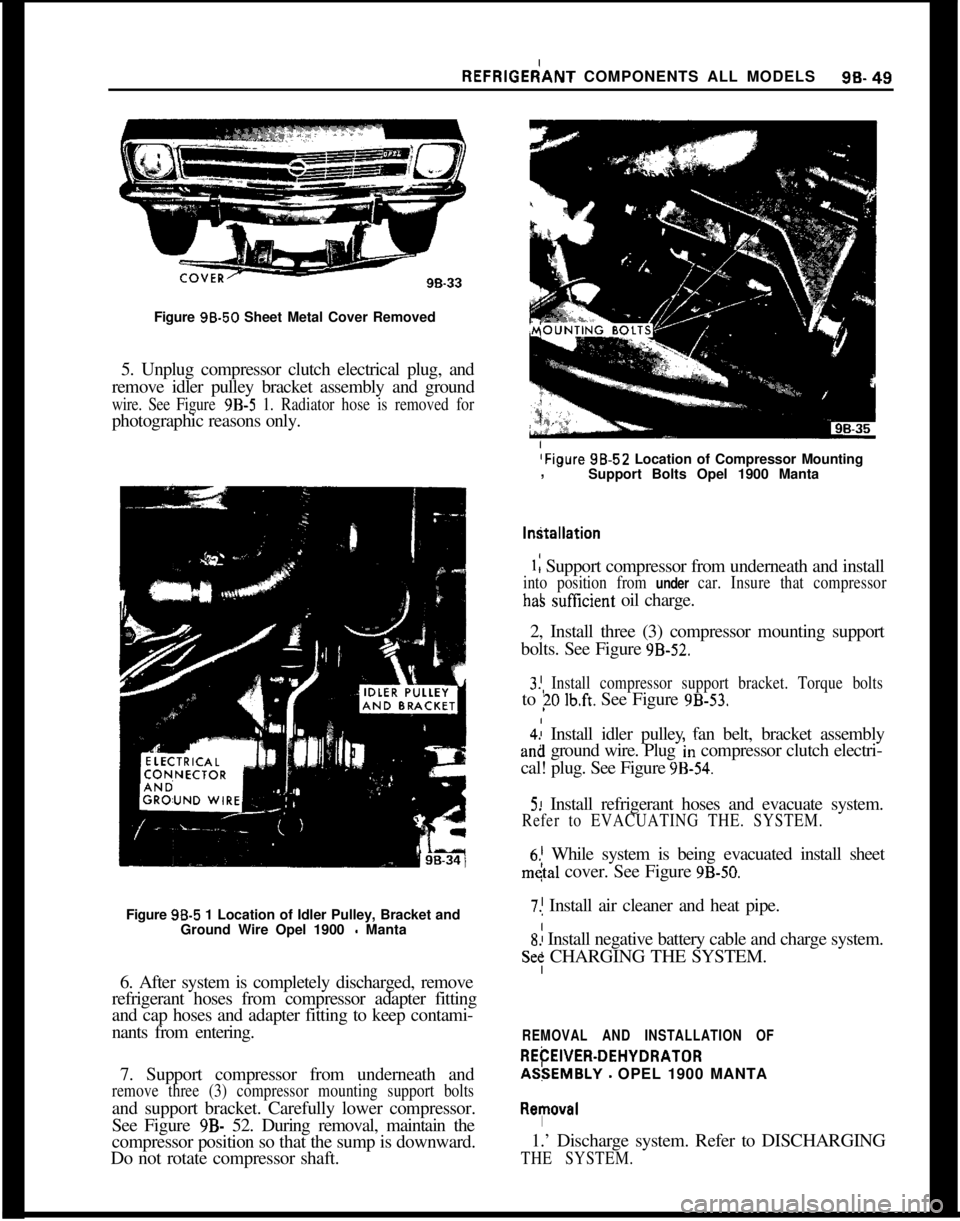
REFRlGEdANT COMPONENTS ALL MODELS96-49Figure 96.50 Sheet Metal Cover Removed
5. Unplug compressor clutch electrical plug, and
remove idler pulley bracket assembly and ground
wire. See Figure 9B-5 1. Radiator hose is removed forphotographic reasons only.
(Figure 98.52 Location of Compressor Mounting
,
Support Bolts Opel 1900 Manta
I
Figure 98-5 1 Location of Idler Pulley, Bracket and
Ground Wire Opel 1900
- Manta
6. After system is completely discharged, remove
refrigerant hoses from compressor adapter fitting
and cap hoses and adapter fitting to keep contami-
nants from entering.
7. Support compressor from underneath and
remove three (3) compressor mounting support boltsand support bracket. Carefully lower compressor.
See Figure
9B- 52. During removal, maintain the
compressor position so that the sump is downward.
Do not rotate compressor shaft.
1: Support compressor from underneath and install
into position from under car. Insure that compressor
haS sutXcient oil charge.
2, Install three (3) compressor mounting support
bolts. See Figure
9B-52.I
3! Install compressor support bracket. Torque boltsto
?O lb.ft. See Figure 9B-53.
4.: Install idler pulley fan belt, bracket assemblyan8 ground wire. Plug
‘In compressor clutch electri-
cal! plug. See Figure
9B-54.
5! Install refrigerant hoses and evacuate system.
Refer to EVACUATING THE. SYSTEM.
6.’ While system is being evacuated install sheet
m&l cover. See Figure 9B-50.
7.1 Install air cleaner and heat pipe.
S! Install negative battery cable and charge system.
Se: CHARGING THE SYSTEM.
REMOVAL AND INSTALLATION OF
REtiEWEFt-DEHYDRATORAS:EMBLY
- OPEL 1900 MANTA
I
R~l!lOV~lI1.’ Discharge system. Refer to DISCHARGING
THE SYSTEM.
Page 561 of 625

96-52 1973 OPEL SERVICE MANUAL
REMOVAL AND INSTALLATION OF EVAPORATOR
AND EXPANSION VALVE. OPEL 1900 - MANTA
Removal
1. Remove negative battery cable from battery.
2. Remove left side of distributor duct, and in line
fuse. See Figure
9B-61.3. Remove glove box. See Figure
9B-62.Figure 96-64 Delay Restrictor
and Check Valve Hose
Assembly Location
5. Disconnect the delay restrictor and check valve
hose assembly from the vacuum cut-off switch and
disconnect the electrical wiring. See Figures 9B-63
and 64.
6. Remove evaporator inlet and outlet pipes re-
tainer and rubber grommet. See Figure
9B-65.Figure
98.62 Glove Box Removed
4. Discharge refrigerant from system. (Refer to
DISCHARGING SYSTEM) and disconnect refrig-
erant hose from evaporator outlet and pipe from
evaporator inlet and tape the open ends of the refrig-
erant lines and evaporator pipes. See Figure
9B-63.Figure
98.65 Inlet and Outlet Pipes retainer and
Rubber Grommet-Opel 1900 - Manta
Figure
98.63 Location of Refrigerant Hoses, Pipes,
Vacuum Cut Off Switch and Evaporator Attaching Bolt
(Left Side) - Opel 1900
- Manta
Page 563 of 625

96-54 1973 OPEL SERVICE MANUAL
valve. The filter screen at the inlet port may be re-
placed. Remove screen by threading a lo-32 NF
screw into old filter screen. With a washer and a nut
on the screw arranged to work as a puller screw, hold
the body of the screw and turn the nut. Insert the
new filter screen into the inlet port and lightly tap
screen only enough to seat.
1. Install expansion valve using new o-rings during
installation. Lubricate o-rings prior to installation
using No. 525 viscosity oil.
2. Install evaporator assembly and case attaching
screws. See Figure 9B-70.3. Install blower motor assembly into case and se-
cure with attaching screws. See Figure
9B-69.4. Install finger guard shields and fan housing case.
See Figure
9B-69.5. Install resistor assembly and electrical connector.
Install blower motor connector. See Figure
9B-69.6. Install assembly into car carefully guiding
evaporator pipes up through cowl opening. See Fig-
ure
9B-71.Figure 93-7 1 Inlet and Outlet Pipes and O-Rings
-Opel 1900 Manta
7. Install two (2) upper attaching evaporator at-
taching nuts. See Figures 9B-66 and
9B-67.8. Install two (2) attaching case mounting bracket
to instrument panel screws. See Figure
9B-67.9. Connect two (2) drain hoses underneath evapora-
tor.10. Install evaporator inlet and outlet pipes retainer
and rubber grommet. See Figure
9B-65.11. Connect vacuum cut-off switch and electrical
wiring, making sure the delay restrictor and checkvalve hoses are installed correctly. See Figures
9B-63and 64.
.gB-72 Delay Restrictor and Check Valve Hose.Assembly
12. Install refrigerant hoses and pipes using new
o-rings on line fittings and evacuate system. Refer to
EVACUATING SYSTEM.
13. While system is being evacuated, install in-line
fuse and left side of distributor duct. See Figure 9B-
61.14. Install glove box.
15. Install negative battery cable and charge system.
Refer to CHARGING SYSTEM.
REMOVAL AND INSTALLATION OF CONDENSER
ASSEMBLY -OPEL 1900. MANTA
Removal
1. Remove negative battery cable from battery.
2. Remove air cleaner.
3. Discharge system. Refer to DISCHARGING
SYSTEM.
4. While system is discharging, remove lower radia-
tor hose from radiator and drain coolant into a suita-
ble container.
5. Remove fan shroud.
6. On vehicles with automatic transmission, un-
screw oil lines from connectors on lower radiator
tank and plug lines. It is essential that no dirt enters
the oil lines. When unscrewing oil lines, hold connec-
tors on lower radiator tank with pliers to avoid leak-
ages. Ensure that no dirt enters oil cooler.
7. Remove upper radiator hose from radiator.
8. Remove lower attaching nut and slide radiator
upward and out of engine compartment.
9. Remove inlet and outlet hoses from condenser
Page 565 of 625
98-56 1973 OPEL SERVICE MANUAL
oil cooler lines to lower radiator tank. It is essential
that no dirt enters the oil lines. When tightening oil
lines hold connectors on lower radiator tank with
pliers to avoid leakages. Ensure that no dirt enters oil
cooler. Torque to 11-15 Ibs. ft.
7. Install fan shroud.
8. Install upper radiator hose.
9. Install lower radiator hose and add collected coo-
lant.
All Opel
1900’s and Manta’s are provided with a
radiator initial fill of an anti-freeze solution contain-
ing corrosion inhibitor. The anti-freeze has either a
glycol or glycerin base and protects the engine
against freezing, down to minus 22 degrees F. (minus
30 degrees C.). Before the start of the cold season,
coolant must be checked with a hydrometer and if
necessary, brought to the necessary specific gravity
by adding anti-freeze. Anti-freeze added, must have
a glycol or glycerin base. As the specific gravities of
all anti-freeze solutions having a glycol or glycerin
base are practically the same, the hydrometer can be
used for all these types. Because of the tolerances of
the hydrometer, or slight differences in specific
gravity, variations of plus or minus 5 degrees can be
expected. Coolant must be checked at a temperature
of plus 68 degrees F. (plus 20 degrees C.).
IO. Install negative battery cable and air cleaner.
11. Charge system. Refer to CHARGING SYS-
TEM.
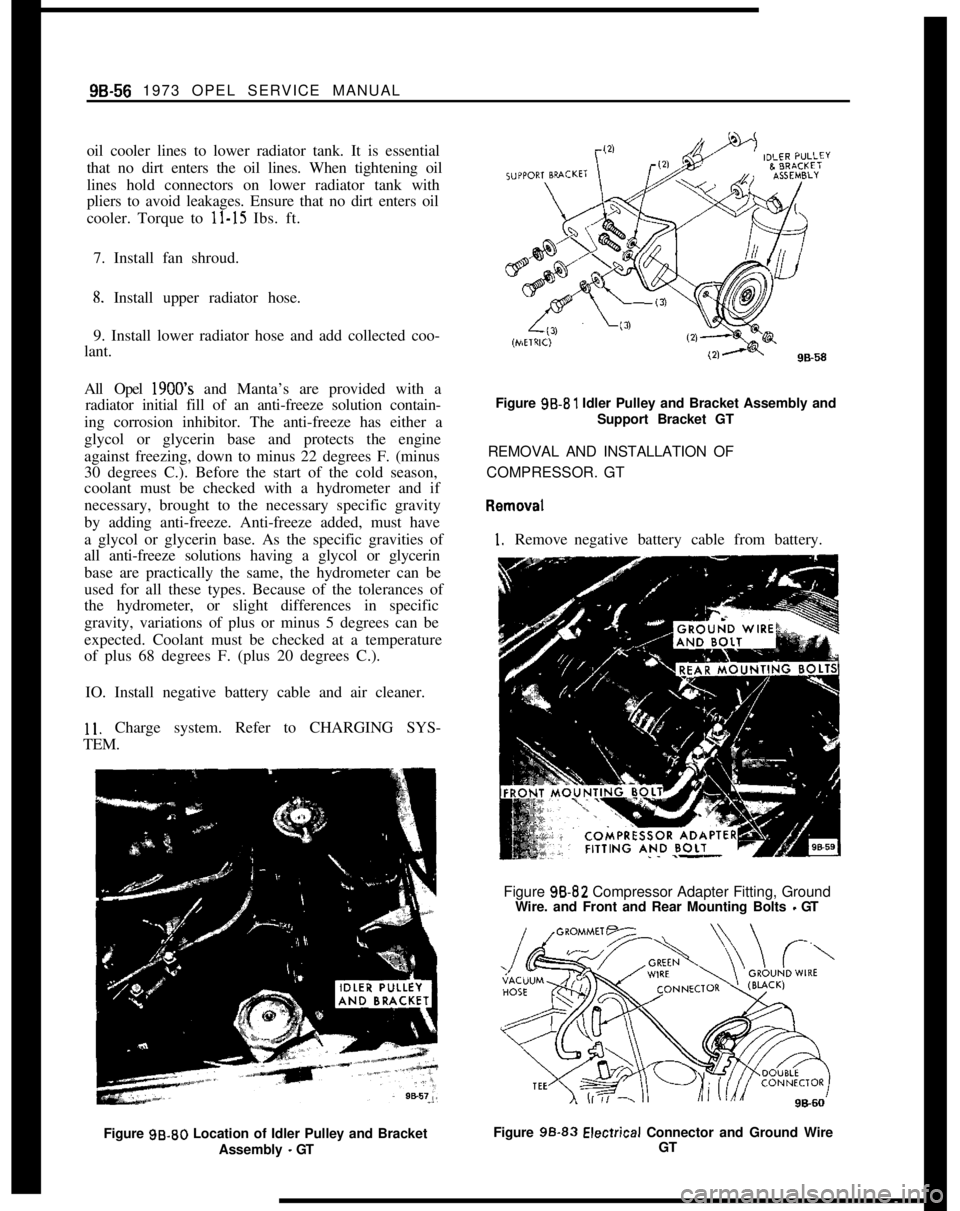
Figure 99.80 Location of Idler Pulley and Bracket
Assembly
- GTFigure 99.81 Idler Pulley and Bracket Assembly and
Support Bracket GT
REMOVAL AND INSTALLATION OF
COMPRESSOR. GT
I. Removenegative battery cable from battery.
Figure 98-82 Compressor Adapter Fitting, Ground
Wire. and Front and Rear Mounting Bolts
- GT
Figure 99.83
Elecirical Connector and Ground Wire
GT