tow OPEL INSIGNIA 2014 Manual user
[x] Cancel search | Manufacturer: OPEL, Model Year: 2014, Model line: INSIGNIA, Model: OPEL INSIGNIA 2014Pages: 321, PDF Size: 8.95 MB
Page 152 of 321
150Driving and operating
Ignition on power mode: press and
hold Engine Start/Stop button for
6 seconds without operating clutch or brake pedal. The green LED in the
button illuminates, diesel engine is
preheating. Control indicators light up
and the most electrical functions are
operable.
Engine start: operate clutch pedal
(manual transmission) or brake pedal (automatic transmission) and press
Engine Start/Stop button once more.
Release button after starting
procedure begins.
Ignition off: press Engine Start/Stop
button briefly in each mode or when
engine is running. Some functions
remain active until driver's door is
opened, if ignition was on before.
Steering wheel lock
The steering wheel lock activates
automatically when:
■ the vehicle is stationary and
■ the ignition has been switched off and
■ the driver's door is opened.To release steering wheel lock, open
and close driver's door and switch on accessory mode or start the engine
directly.9 Warning
If the vehicle battery is discharged,
the vehicle must not be towed,
tow-started or jump-started as the
steering wheel lock cannot be
disengaged.
Emergency operation on
vehicles with electronic key
system
If either the electronic key fails or the
battery of the electronic key is weak,
the Driver Information Centre may
display No Remote Detected or
Replace Battery in Remote Key when
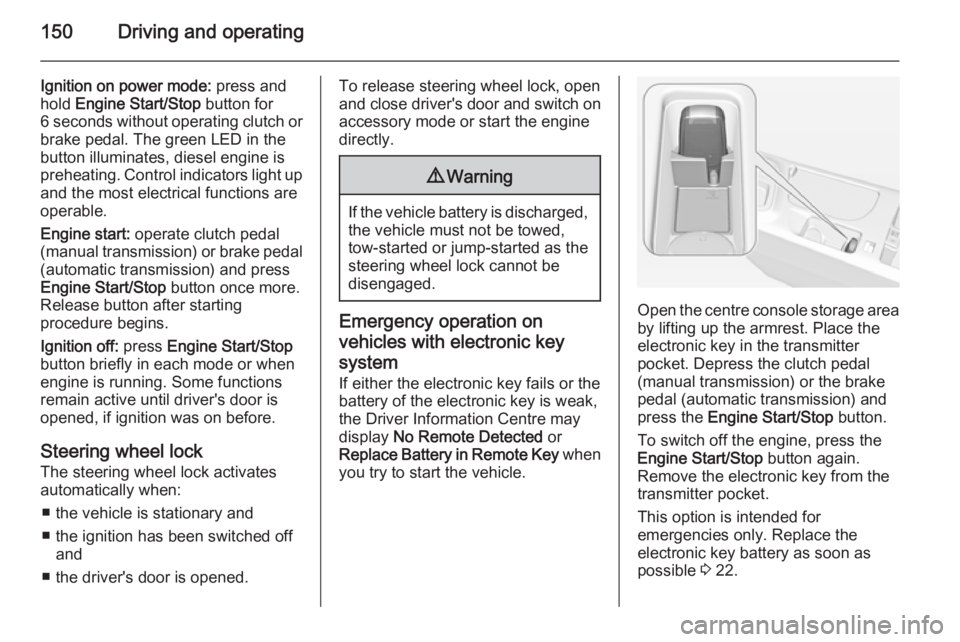
you try to start the vehicle.Open the centre console storage area by lifting up the armrest. Place the
electronic key in the transmitter
pocket. Depress the clutch pedal
(manual transmission) or the brake
pedal (automatic transmission) and
press the Engine Start/Stop button.
To switch off the engine, press the Engine Start/Stop button again.
Remove the electronic key from the
transmitter pocket.
This option is intended for
emergencies only. Replace the
electronic key battery as soon as
possible 3 22.
Page 157 of 321
Driving and operating155
■ The stop-start system is manuallydeactivated
■ the bonnet is opened
■ the driver's seat belt is unfastened and the driver's door is opened
■ the engine temperature is too low
■ the charging level of the vehicle battery is below a defined level
■ the brake vacuum is not sufficient
■ the vehicle is driven at least at walking speed
■ the climate control system requests
an engine start
■ the air conditioning is manually switched on
If the bonnet is not fully closed, a
warning message is displayed in the
Driver Information Centre.
If an electrical accessory, e.g. a
portable CD player, is connected to
the power outlet, a brief power drop during the restart might be noticeable.Parking
■ Do not park the vehicle on an easily
ignitable surface. The high
temperature of the exhaust system
could ignite the surface.
■ Always apply parking brake. Pull electric parking brake switch
m for approx. one second.
Apply manual parking brake
without pressing release button.
Apply as firmly as possible on
downhill or uphill slopes. Depress the foot brake at the same time to
reduce operating force.
■ Switch off the engine and ignition. Turn the steering wheel until the
steering wheel lock engages.
■ If the vehicle is on a level surface or
uphill slope, engage first gear or set
the selector lever to P before
switching off the ignition. On an
uphill slope, turn the front wheels
away from the kerb.
If the vehicle is on a downhill slope, engage reverse gear or set theselector lever to P before switchingoff the ignition. Turn the front
wheels towards the kerb.
■ Lock the vehicle and activate the anti-theft alarm system.
Note
In the event of an accident with
airbag deployment, the engine is
turned off automatically if the vehicle comes to a standstill within a certain
time.
Page 159 of 321
Driving and operating157
The control indicator % extinguishes
as soon as the self-cleaning
operation is complete.
Catalytic converter
The catalytic converter reduces the
amount of harmful substances in the
exhaust gases.Caution
Fuel grades other than those listed on pages 3 202, 3 269 could
damage the catalytic converter or
electronic components.
Unburnt petrol will overheat and
damage the catalytic converter.
Therefore avoid excessive use of the starter, running the fuel tank
dry and starting the engine by
pushing or towing.
In the event of misfiring, uneven
engine running, a reduction in engine performance or other unusual
problems, have the cause of the fault
rectified by a workshop as soon as
possible. In an emergency, driving
can be continued for a short period,
keeping vehicle speed and engine
speed low.Automatic transmission
The automatic transmission permits
automatic gearshifting (automatic
mode) or manual gearshifting
(manual mode).
Manual shifting is possible in manual mode by tapping the selector lever or
pulling the steering wheel paddles
3 159.
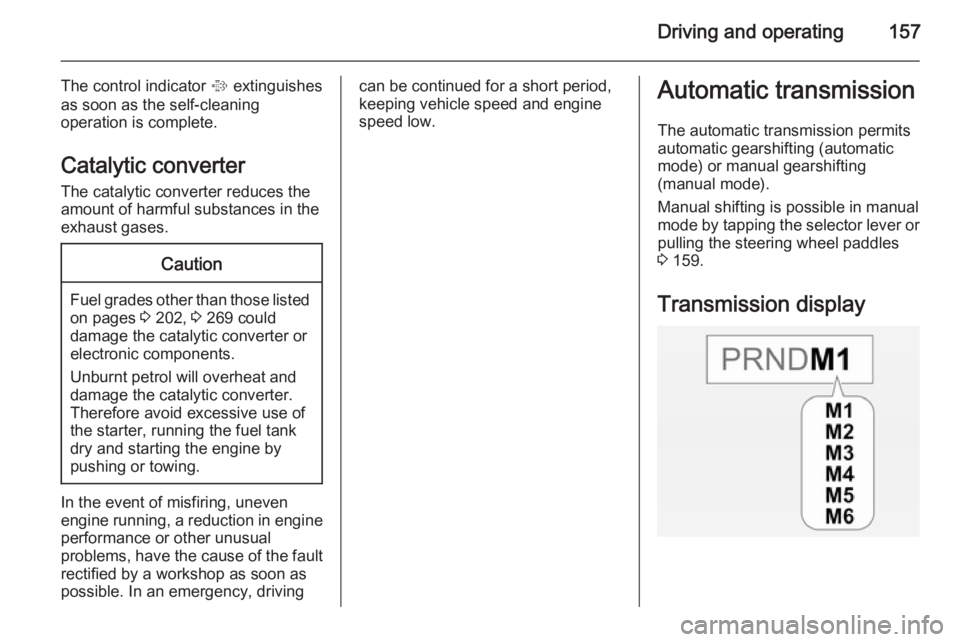
Transmission display
Page 161 of 321
Driving and operating159
Parking
Apply the parking brake and engage P .
The ignition key can only be removed
when the selector lever is in position
P .
Manual mode
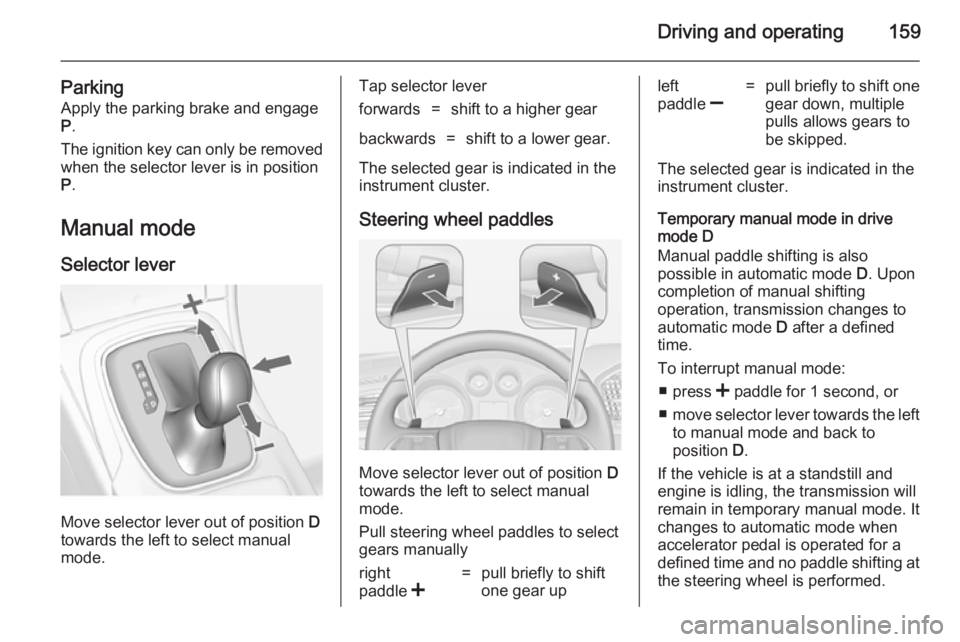
Selector lever
Move selector lever out of position D
towards the left to select manual
mode.
Tap selector leverforwards=shift to a higher gearbackwards=shift to a lower gear.
The selected gear is indicated in the
instrument cluster.
Steering wheel paddles
Move selector lever out of position D
towards the left to select manual
mode.
Pull steering wheel paddles to select
gears manually
right
paddle <=pull briefly to shift
one gear upleft
paddle ]=pull briefly to shift one
gear down, multiple
pulls allows gears to
be skipped.
The selected gear is indicated in the instrument cluster.
Temporary manual mode in drive
mode D
Manual paddle shifting is also
possible in automatic mode D. Upon
completion of manual shifting
operation, transmission changes to
automatic mode D after a defined
time.
To interrupt manual mode: ■ press < paddle for 1 second, or
■ move selector lever towards the left
to manual mode and back to
position D.
If the vehicle is at a standstill and
engine is idling, the transmission will remain in temporary manual mode. It
changes to automatic mode when
accelerator pedal is operated for a
defined time and no paddle shifting at
the steering wheel is performed.
Page 165 of 321
Driving and operating163Drive systems
All-wheel drive The All-wheel drive system enhances
driving characteristics and stability,
and helps to achieve the best
possible driveability regardless of
ground surface. The system is always
active and cannot be deactivated.
The torque is distributed steplessly
between the wheels of the front and rear axle, depending on the driving
conditions. Additionally the torque
between the rear wheels is distributed depending on the surface.
For optimum system performance,
the vehicle's tyres should not have
varying degrees of wear.
If a service message is displayed in
the Driver Information Centre, the
system may have limited functionality
(or be completely disabled in some
cases, i.e. the vehicle switches to
Front-wheel drive). Seek the
assistance of a workshop.
Towing the vehicle 3 254.Brakes
The brake system comprises twoindependent brake circuits.
If a brake circuit fails, the vehicle can
still be braked using the other brake
circuit. However, braking effect is
achieved only when the brake pedal
is depressed firmly. Considerably
more force is needed for this. The
braking distance is extended. Seek the assistance of a workshop before
continuing your journey.
When the engine is not running, the
support of the brake servo unit
disappears once the brake pedal has
been depressed once or twice.
Braking effect is not reduced, but
braking requires significantly greater
force. It is especially important to bear this in mind when being towed.
Control indicator R 3 102.
Antilock brake system
Antilock brake system (ABS)
prevents the wheels from locking.ABS starts to regulate brake pressure as soon as a wheel shows a tendency to lock. The vehicle remains
steerable, even during hard braking.
ABS control is made apparent
through a pulse in the brake pedal
and the noise of the regulation
process.
For optimum braking, keep the brake
pedal fully depressed throughout the
braking process, despite the fact that the pedal is pulsating. Do not reduce
the pressure on the pedal.
After starting off, the system performs a self-test which may be audible.
Control indicator u 3 103.
Adaptive brake light During full braking, all three brakelights flash for the duration of ABS
control.
Page 182 of 321
180Driving and operating
brake the vehicle in time to avoid a
collision with a much slower vehicle or after a lane change. This is
particularly true if driving fast or if the
visibility is reduced due to weather
conditions.
While entering or exiting a motorway,
adaptive cruise control may lose the
vehicle ahead and accelerate up to
the set speed. For this reason,
decrease the set speed before the
exit or before the entry.
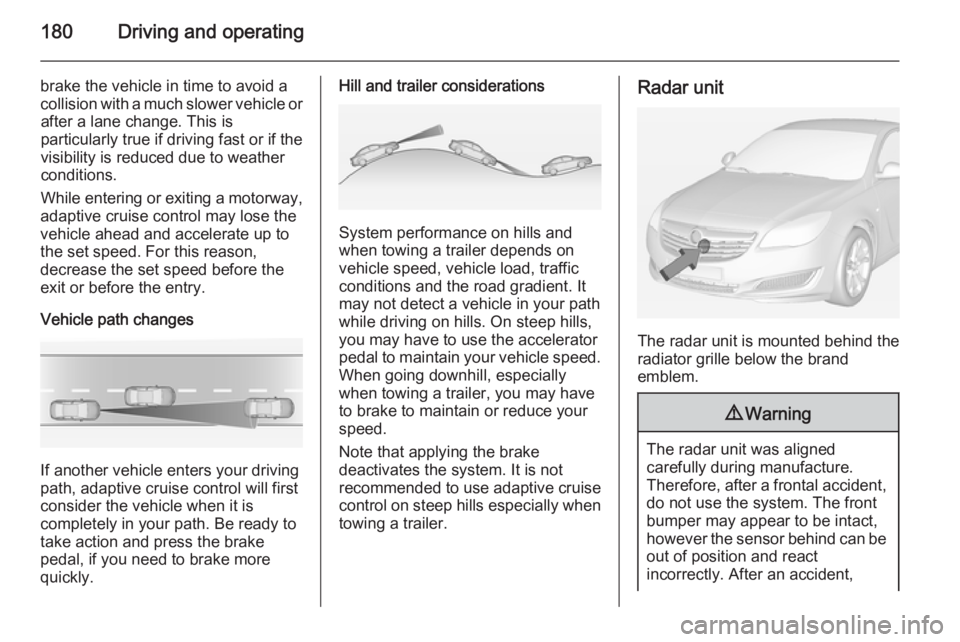
Vehicle path changes
If another vehicle enters your driving
path, adaptive cruise control will first
consider the vehicle when it is
completely in your path. Be ready to
take action and press the brake
pedal, if you need to brake more
quickly.
Hill and trailer considerations
System performance on hills and
when towing a trailer depends on
vehicle speed, vehicle load, traffic
conditions and the road gradient. It
may not detect a vehicle in your path
while driving on hills. On steep hills,
you may have to use the accelerator
pedal to maintain your vehicle speed.
When going downhill, especially
when towing a trailer, you may have
to brake to maintain or reduce your
speed.
Note that applying the brake
deactivates the system. It is not
recommended to use adaptive cruise
control on steep hills especially when towing a trailer.
Radar unit
The radar unit is mounted behind the
radiator grille below the brand
emblem.
9 Warning
The radar unit was aligned
carefully during manufacture.
Therefore, after a frontal accident, do not use the system. The front
bumper may appear to be intact,
however the sensor behind can be
out of position and react
incorrectly. After an accident,
Page 193 of 321
Driving and operating191
deactivated. Press button ( to
activate the system and search for a
new parking slot.
Important hints for using the
parking assist systems9 Warning
Under certain circumstances,
various reflective surfaces on
objects or clothing as well as
external noise sources may cause the system to fail to detect
obstacles.
Special attention must be paid to
low obstacles which can damage
the lower part of the bumper.
Caution
Performance of the system can be reduced when sensors are
covered, e.g. by ice or snow.
Performance of the parking assist
system can be reduced due to
heavy loading.
Special conditions apply if there
are taller vehicles in the vicinity
(e.g. off-road vehicles, mini vans,
vans). Object identification and correct distance indication in the
upper part of these vehicles
cannot be guaranteed.
Objects with a very small reflection
cross-section, e.g. objects of
narrow size or soft materials, may
not be detected by the system.
Parking assist systems do not
detect objects outside the
detection range.
Note
The parking assist system
automatically detects factory-fitted
towing equipment. It is deactivated
when the connector is plugged in.
It is possible that the sensor detects a non-existing object (echo
disturbance) caused by external acoustical or mechanic
disturbances.
Advanced parking assist system
may not respond to changes in the
parking space after initiating a
parallel parking manoeuvre.
Note
After use the advanced parking
assist requires a calibration. For
optimal parking guidance, a driving
distance of at least 10 km, including
a number of bends, is required.
Side blind spot alert The side blind spot alert system
detects and reports objects on either
side of the vehicle, within a specified
"blind spot" zone. The system alerts
visually in each exterior mirror, when
detecting objects that may not be
visible in the interior and exterior
mirrors.
The system's sensors are located in
the bumper on the left and right side
of the vehicle.
Page 195 of 321
Driving and operating193
exterior mirror and extends rearwardsby approx. 3 metres. The height of the
zone is approx. between 0.5 metres
and 2 metres off the ground.
The system is deactivated if the
vehicle is towing a trailer.
Side blind spot alert is designed to ignore stationary objects such as
guardrails, posts, curbs, walls and
beams. Parked vehicles or oncoming vehicles are not detected.
Fault Occasional missed alerts can occurunder normal circumstances and will
increase in wet conditions.
Side blind spot alert does not operate when the left or right corners of the
rear bumper are covered with mud,
dirt, snow, ice, slush, or in heavy
rainstorms. Cleaning instructions
3 257.
In the event of a fault in the system or if the system does not work due to
temporary conditions, a message is
displayed in the Driver Information
Centre (DIC). Seek the assistance of
a workshop.Lane change alert
Additional to the side blind spot alert
3 191, lane change alert recognizes
rapidly approaching vehicles from
behind on parallel lanes next to your
vehicle.
If the vehicle is equipped with lane
change alert, side blind spot alert is
always included.
The system alerts visually in each
exterior mirror when detecting rapidly approaching vehicles from behind.
The radar distance sensors are
located in the rear bumper.9 Warning
Lane change alert does not
replace driver vision.
Before changing a lane, always
check all mirrors, look over the
shoulder and use the turn signal.
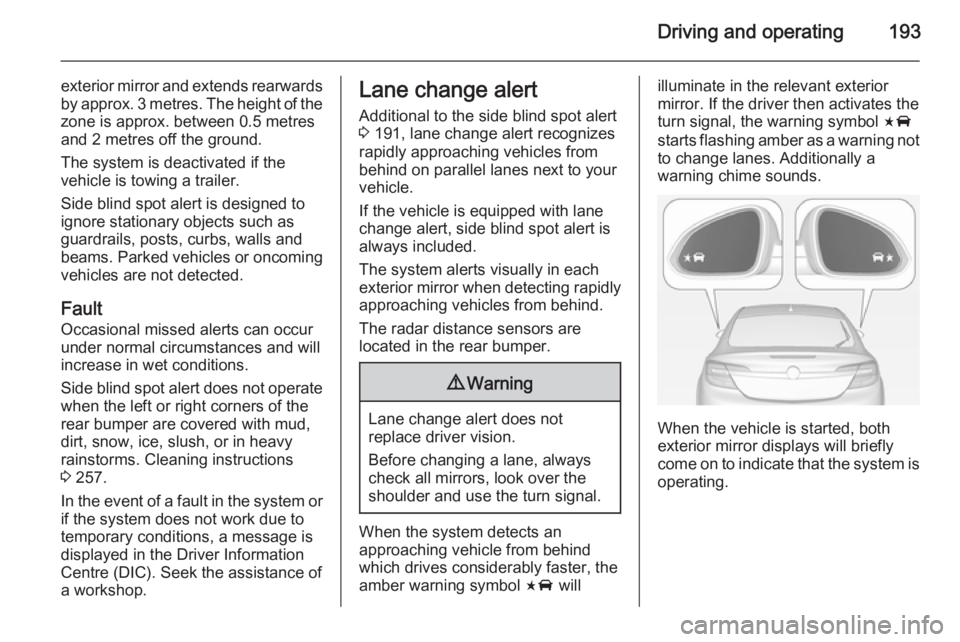
When the system detects an
approaching vehicle from behind
which drives considerably faster, the
amber warning symbol F will
illuminate in the relevant exterior
mirror. If the driver then activates the
turn signal, the warning symbol F
starts flashing amber as a warning not to change lanes. Additionally a
warning chime sounds.
When the vehicle is started, both
exterior mirror displays will briefly come on to indicate that the system is operating.
Page 196 of 321
194Driving and operating
Detection zones
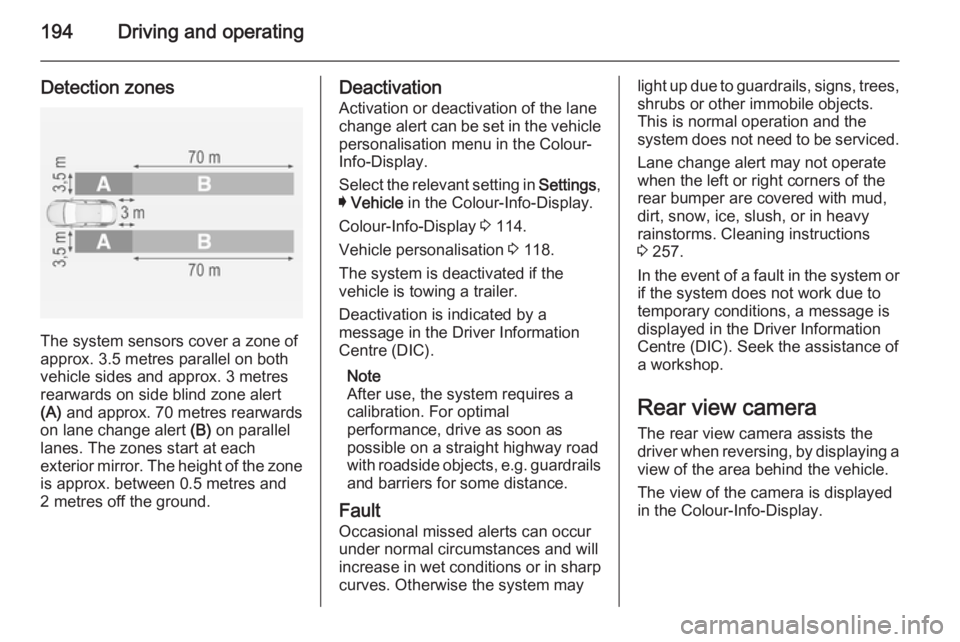
The system sensors cover a zone of
approx. 3.5 metres parallel on both
vehicle sides and approx. 3 metres
rearwards on side blind zone alert
(A) and approx. 70 metres rearwards
on lane change alert (B) on parallel
lanes. The zones start at each
exterior mirror. The height of the zone
is approx. between 0.5 metres and
2 metres off the ground.
Deactivation
Activation or deactivation of the lane
change alert can be set in the vehicle personalisation menu in the Colour-
Info-Display.
Select the relevant setting in Settings,
I Vehicle in the Colour-Info-Display.
Colour-Info-Display 3 114.
Vehicle personalisation 3 118.
The system is deactivated if the
vehicle is towing a trailer.
Deactivation is indicated by a
message in the Driver Information
Centre (DIC).
Note
After use, the system requires a
calibration. For optimal
performance, drive as soon as
possible on a straight highway road
with roadside objects, e.g. guardrails
and barriers for some distance.
Fault Occasional missed alerts can occurunder normal circumstances and will
increase in wet conditions or in sharp
curves. Otherwise the system maylight up due to guardrails, signs, trees,
shrubs or other immobile objects.
This is normal operation and the
system does not need to be serviced.
Lane change alert may not operate
when the left or right corners of the
rear bumper are covered with mud,
dirt, snow, ice, slush, or in heavy
rainstorms. Cleaning instructions
3 257.
In the event of a fault in the system or if the system does not work due to
temporary conditions, a message is
displayed in the Driver Information
Centre (DIC). Seek the assistance of
a workshop.
Rear view camera
The rear view camera assists the
driver when reversing, by displaying a view of the area behind the vehicle.
The view of the camera is displayed
in the Colour-Info-Display.
Page 198 of 321
196Driving and operating
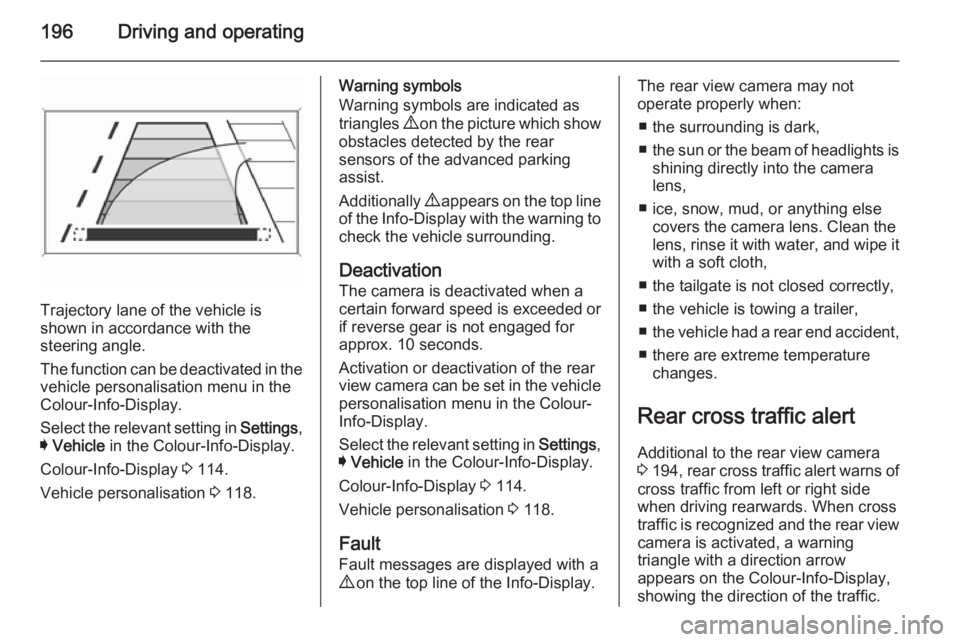
Trajectory lane of the vehicle is
shown in accordance with the
steering angle.
The function can be deactivated in the
vehicle personalisation menu in the
Colour-Info-Display.
Select the relevant setting in Settings,
I Vehicle in the Colour-Info-Display.
Colour-Info-Display 3 114.
Vehicle personalisation 3 118.
Warning symbols
Warning symbols are indicated as
triangles 9 on the picture which show
obstacles detected by the rear
sensors of the advanced parking
assist.
Additionally 9 appears on the top line
of the Info-Display with the warning to
check the vehicle surrounding.
Deactivation The camera is deactivated when a
certain forward speed is exceeded or
if reverse gear is not engaged for
approx. 10 seconds.
Activation or deactivation of the rear
view camera can be set in the vehicle
personalisation menu in the Colour-
Info-Display.
Select the relevant setting in Settings,
I Vehicle in the Colour-Info-Display.
Colour-Info-Display 3 114.
Vehicle personalisation 3 118.
Fault
Fault messages are displayed with a
9 on the top line of the Info-Display.The rear view camera may not
operate properly when:
■ the surrounding is dark,
■ the sun or the beam of headlights is
shining directly into the camera
lens,
■ ice, snow, mud, or anything else covers the camera lens. Clean the
lens, rinse it with water, and wipe it
with a soft cloth,
■ the tailgate is not closed correctly,
■ the vehicle is towing a trailer,
■ the vehicle had a rear end accident,
■ there are extreme temperature changes.
Rear cross traffic alert Additional to the rear view camera
3 194 , rear cross traffic alert warns of
cross traffic from left or right side
when driving rearwards. When cross
traffic is recognized and the rear view
camera is activated, a warning
triangle with a direction arrow
appears on the Colour-Info-Display,
showing the direction of the traffic.