suspension OPEL MANTA 1973 Service Manual
[x] Cancel search | Manufacturer: OPEL, Model Year: 1973, Model line: MANTA, Model: OPEL MANTA 1973Pages: 625, PDF Size: 17.22 MB
Page 4 of 625
1973
GTOPEL1900
MANTA
CHASSISSERVICE
MANUAL
This manual contains service informationfor the 1973 Opel 1900, Manta and GT
models. Refer to the introduction for
adescription of the arrangement of this
manual for locating desired information
easily.All
infotmation, illustrations and specifi-cations contained in this manual are basedon the latest product information aveil-able at the time of publication approval.
Therefore, the right is reserved to make
changes at any time without notice.TABLE OF CONTENTS
SUBJECT
I I
1ELECTRICAL
I I2FRAME AND BUMPERS
I I3SUSPENSION AND STEERING
I I4REAR AXLE
I I5BRAKES
I I
6ENGINE
I I7TRANSMISSION
I I
8CHASSIS SHEET METAL
I I
9ACCESSORIES
Page 5 of 625
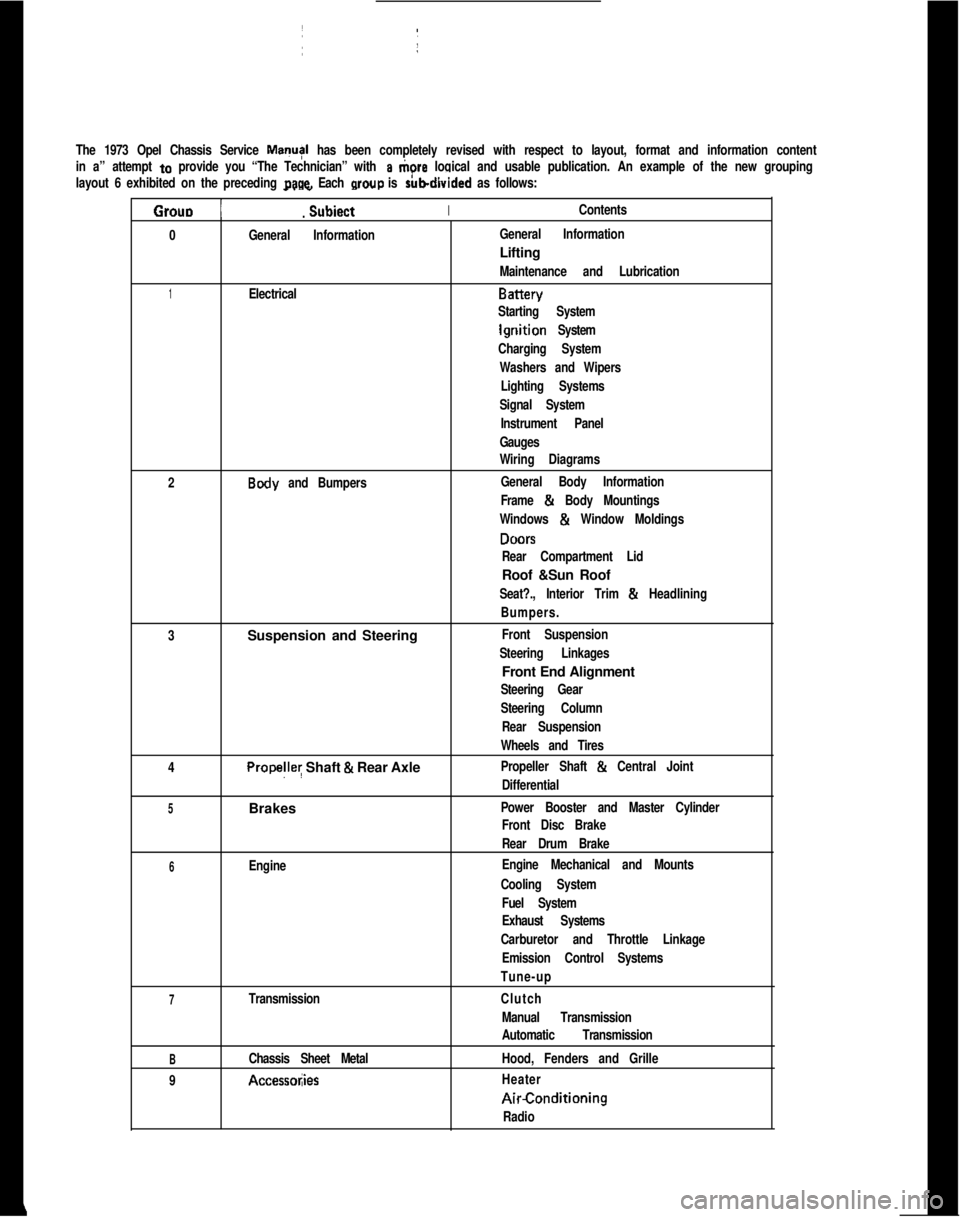
The 1973 Opel Chassis Service MayI has been completely revised with respect to layout, format and information content
in a” attempt
to provide you “The Technician” with a tiore logical and usable publication. An example of the new grouping
layout 6 exhibited on the preceding
page. Each wow is rubdivided as follows:
Grouo 1
_. _
Subiect IIContents.
0
General InformationIGeneral InformationLifting
Maintenance and Lubrication
1ElectricalBattery
Starting System
lgriition System
Charging System
Washers and Wipers
Lighting Systems
Signal SystemI
Instrument Panel
Gauges
Wiring Diagrams
2
Body and Bumpers:General Body InformationI
Frame & Body Mountings
Windows
& Window Moldings
DONS
Rear Compartment LidRoof &Sun Roof
Seat?., Interior Trim & Headlining
Bumpers.
3Suspension and Steering
Front Suspension
Steering Linkages1Front End Alignment
Steering Gear
Steering Column
Rear Suspension
Wheels and Tires
4
Propelley Shaft & Rear AxlePropeller Shaft & Central Joint
Differential
5Brakes ~Power Booster and Master Cylinder
Front Disc BrakeI
Rear Drum Brake
6EngineEngine Mechanical and Mounts
Cooling System
Fuel System
Exhaust Systems
Carburetor and Throttle Linkage
Emission Control Systems
Tune-up
7TransmissionClutch
Manual Transmission
Automatic Transmission
BChassis Sheet MetalHood, Fenders and Grille
9
Accessol;iesHeaterAirConditioning
Radio
Page 18 of 625
LUBRICATION AND MAINTENANCE OC-9
4. Remove dipstick and wipe clean.
5. Reinsert dipstick untip cap seats.
6. Remove dipstick and note reading.
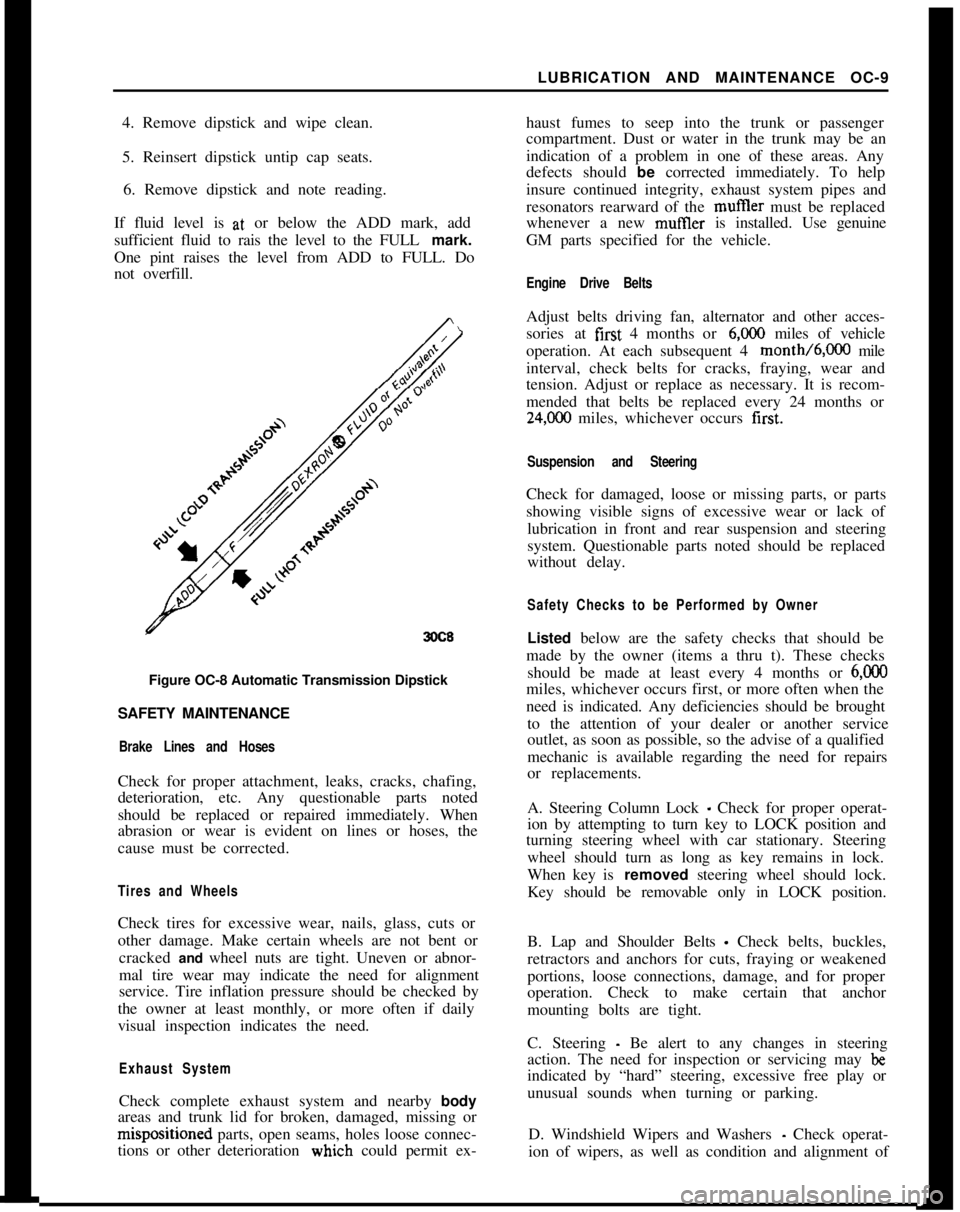
If fluid level is at, or below the ADD mark, add
sufficient fluid to rais the level to the FULL mark.
One pint raises the level from ADD to FULL. Do
not overfill.
3OC8Figure OC-8 Automatic Transmission Dipstick
SAFETY MAINTENANCE
Brake Lines and HosesCheck for proper attachment, leaks, cracks, chafing,
deterioration, etc. Any questionable parts noted
should be replaced or repaired immediately. When
abrasion or wear is evident on lines or hoses, the
cause must be corrected.
Tires and WheelsCheck tires for excessive wear, nails, glass, cuts or
other damage. Make certain wheels are not bent or
cracked and wheel nuts are tight. Uneven or abnor-
mal tire wear may indicate the need for alignment
service. Tire inflation pressure should be checked by
the owner at least monthly, or more often if daily
visual inspection indicates the need.
Exhaust SystemCheck complete exhaust system and nearby body
areas and trunk lid for broken, damaged, missing orm&positioned parts, open seams, holes loose connec-
tions or other deterioration wiuch could permit ex-haust fumes to seep into the trunk or passenger
compartment. Dust or water in the trunk may be an
indication of a problem in one of these areas. Any
defects should be corrected immediately. To help
insure continued integrity, exhaust system pipes and
resonators rearward of the muftler must be replaced
whenever a new mufIler is installed. Use genuine
GM parts specified for the vehicle.
Engine Drive BeltsAdjust belts driving fan, alternator and other acces-
sories at first 4 months or
6,ooO miles of vehicle
operation. At each subsequent 4 month/6,000 mile
interval, check belts for cracks, fraying, wear and
tension. Adjust or replace as necessary. It is recom-
mended that belts be replaced every 24 months or
24,C00 miles, whichever occurs first.
Suspension and SteeringCheck for damaged, loose or missing parts, or parts
showing visible signs of excessive wear or lack of
lubrication in front and rear suspension and steering
system. Questionable parts noted should be replaced
without delay.
Safety Checks to be Performed by OwnerListed below are the safety checks that should be
made by the owner (items a thru t). These checks
should be made at least every 4 months or
6,ooOmiles, whichever occurs first, or more often when the
need is indicated. Any deficiencies should be brought
to the attention of your dealer or another service
outlet, as soon as possible, so the advise of a qualified
mechanic is available regarding the need for repairs
or replacements.
A. Steering Column Lock
_ Check for proper operat-
ion by attempting to turn key to LOCK position and
turning steering wheel with car stationary. Steering
wheel should turn as long as key remains in lock.
When key is removed steering wheel should lock.
Key should be removable only in LOCK position.
B. Lap and Shoulder Belts
- Check belts, buckles,
retractors and anchors for cuts, fraying or weakened
portions, loose connections, damage, and for proper
operation. Check to make certain that anchor
mounting bolts are tight.
C. Steering
- Be alert to any changes in steering
action. The need for inspection or servicing may
beindicated by “hard” steering, excessive free play or
unusual sounds when turning or parking.
D. Windshield Wipers and Washers
- Check operat-
ion of wipers, as well as condition and alignment of
Page 168 of 625
I
GROUP 3
SUSPENSION
AND
STEERING I
SectionTitlePage No
3AFrontSuspension. . . . . . . . . .3A- 2
3BSteering Linkages38-l 9
3C Front End Alignment3C-22
3DSteering Gear.._........3D-27
Steering Column
3E1900 - Manta ,._________...3E-35
GT
. . . . . . . . . . . . . . . . . . . . . . . . . . . . . . . . . . . .3E-42
3FRear Suspension. . . . . . . . .3F-51
3GWheelsand Tires. . . . . . . . . .36-55
Page 169 of 625
3A- 21973 OPEL SERVICE MANUAL
FRONT SUSPENSION
CONTENTS
Subject
DESCRIPTION AND OPERATION:SuspensionDescription. . . . . . . . . . . . . . . . . . . . . . . . . . . . . . . . . . . . . . . . . . . . . . . . . . . .DIAGNOSIS: (Not Applicable)
MAINTENANCE AND ADJUSTMENTS:
FrontWheel
BearingAdjustments. . . . . . . . . . . . . . . . . . . . . . . . . . . . . .MAJOR REPAIR:
Removal and Installation of Front Suspension . . . . . . . .Upper Ball Joint Removal and Installation
. . . . . . . . . . . . . .Lower Ball Joint Removal and
Installation
. . . . . . . . . . . . . .Upper Control Arm
Removal andInstallation
. . . . . . . . . .Lower Control Arm Removal and Installation
. . . . . . . .Steering
Knuckle
RemovalandInstallation. . . . . . . . . . . . . .Shock Absorber
RemovalandInstallation. . . . . . . . . . . . . . . .Front Spring Removal and Installation
. . . . . . . . . . . . . . . . . . . . . .SPECIFICATIONS:Page No.
3A- 2
3A- 4
3A- 4
3A- 7
3A- 73A-103A-113A-133A-153A-15
Bolt Torque and Front End Alignment Specifications
. . . . . . . . . . . . . . . . . . . . . . . . . . . . . . . . . . . . . . . . . . . . . . . . . . . . . . . . . . . . . . . . . . . . . . . . . . . . . . . . . . . . . . . . . . . . . . . . . .3A-18
DESCRIPTION AND OPERATION
SUSPENSION DESCRIPTION
GTThe GT uses a maintenance-free independent front
wheel suspension and features unequal length con-
trol arms and a transverse three-leaf spring. The en-
tire front suspension is attached to the front cross
member and can be removed as a unit if so desired.
The engines installed in the GT are not supported by
mounting brackets but rest on a separate cross mem-
ber. The front suspension cross member is reinforced
in the area of the attachment to the frame. A one-
part damper plate is installed between cross member
and frame.
Ball joints are employed in the conventional manner
to provide pivoting joints between the control arms
and steering knuckles. Upward movement of the
control arms is limited by two large rubber bumpers
attached to the cross member.Road shock is dampened by the double direct acting
shock absorbers and a transverse double or triple
steel band spring. In addition, the shock absorber
limits downward travel of the control arms.
All moving parts, including ball joints, have no need
for lubrication as they have been pre-lubricated for
the life of the vehicle.
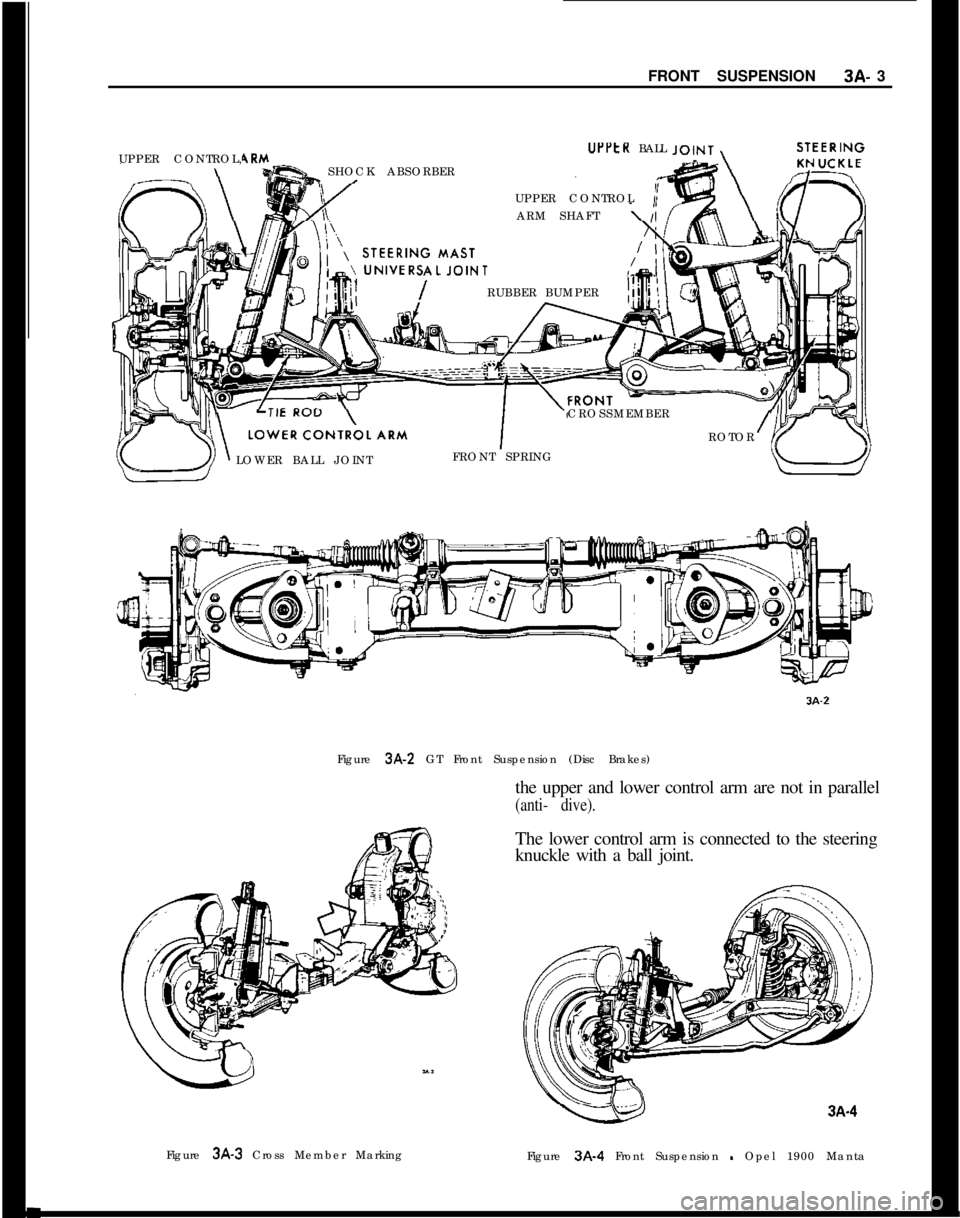
For distinguishing the individual front suspension
cross members,.a red label with black letters is stuck
onto the front side of the shock absorber support. See
Figure 3A-3.
Opel 1900. Manta
The front wheel suspension has coil springs and con-
trol arms of different length.
The stabilizer is designed to act as a tie strut. The end
is supported in a rubber bushing which is located in
a piece of tubing welded into the longer control arm.
To minimize brake torque, the horizontal shafts of
Page 170 of 625
FRONT SUSPENSION3A- 34RM“PPtR BALL
SHOCK ABSORBER UPPER CONTROL,
UPPER CONTROL
ARM SHAFT
“:,‘,:“,‘,“,“, ,“pd,,‘, T/RUBBER BUMPER
\CROSSMEMBER
ROTOR
/LOWER BALL JOINTFRONT SPRING
Figure 3A-2 GT Front Suspension (Disc Brakes)
the upper and lower control arm are not in parallel
(anti- dive).The lower control arm is connected to the steering
knuckle with a ball joint.3A-4
Figure 3A-3 Cross Member Marking
Figure 3A-4 Front Suspension
- Opel 1900 Manta
Page 171 of 625
3A- 41973 OPEL SERVICE MANUAL
The two cross-members to body supports are at-
tached to the horizontal part of the cross-member
with two bolts. The oufererbolt serves simultaneously
as support for the lower control arm. As the bolt is
inserted from the front, the cross-member to body
support can be removed without the lower control
arm. The inner bolt attaches simultaneously to the
steering.
The stabilizer is U-shaped and supported in rubber
bushings in the two cross-members to body supports.
The complete front suspension is attached to the
underbody in four places.
The engine damper blocks are bolted to the inside of
the inclined parts of the cross-member.
The front wheel bearings are roller bearings.
All front suspension joints are maintenance-free.
MAINTENANCE AND ADJUSTMENTSFRONT WHEEL BEARING ADJUSTMENT
1. If wheel has not previously been removed from the
car, remove grease cap, cotter pin, and spindle nut.
Discard cotter pin.
2. Torque spindle nut to 18
lb.ft. while rotating
wheel. This will allow the bearings to settle.
3. Back offspindle nut
l/4 turn. If slot and cotter pin
hole are staggered, further back off nut
l/l2 turn,
but do not tighten, until next slot in nut is in align-
ment with hole in spindle. Install new cotter pin. A
properly adjusted wheel bearing has a small amount
of end play and a loose nut when adjusted in the
above manner.
MAJOR REPAIRREMOVAL AND INSTALLATION OF FRONT
SUSPENSION
(COMPLETE ASSEMBLY)
Removal GT1. Prior to raising front end of car, apply parking
brake and block rear wheels.
2. Raise front end of car with a jack. It is recom-
mended that a wood block be placed between thejack and the front cross member to prevent damage
to the cross member.
3. Support front end of car by placing floor standsunde:r jacking brackets.
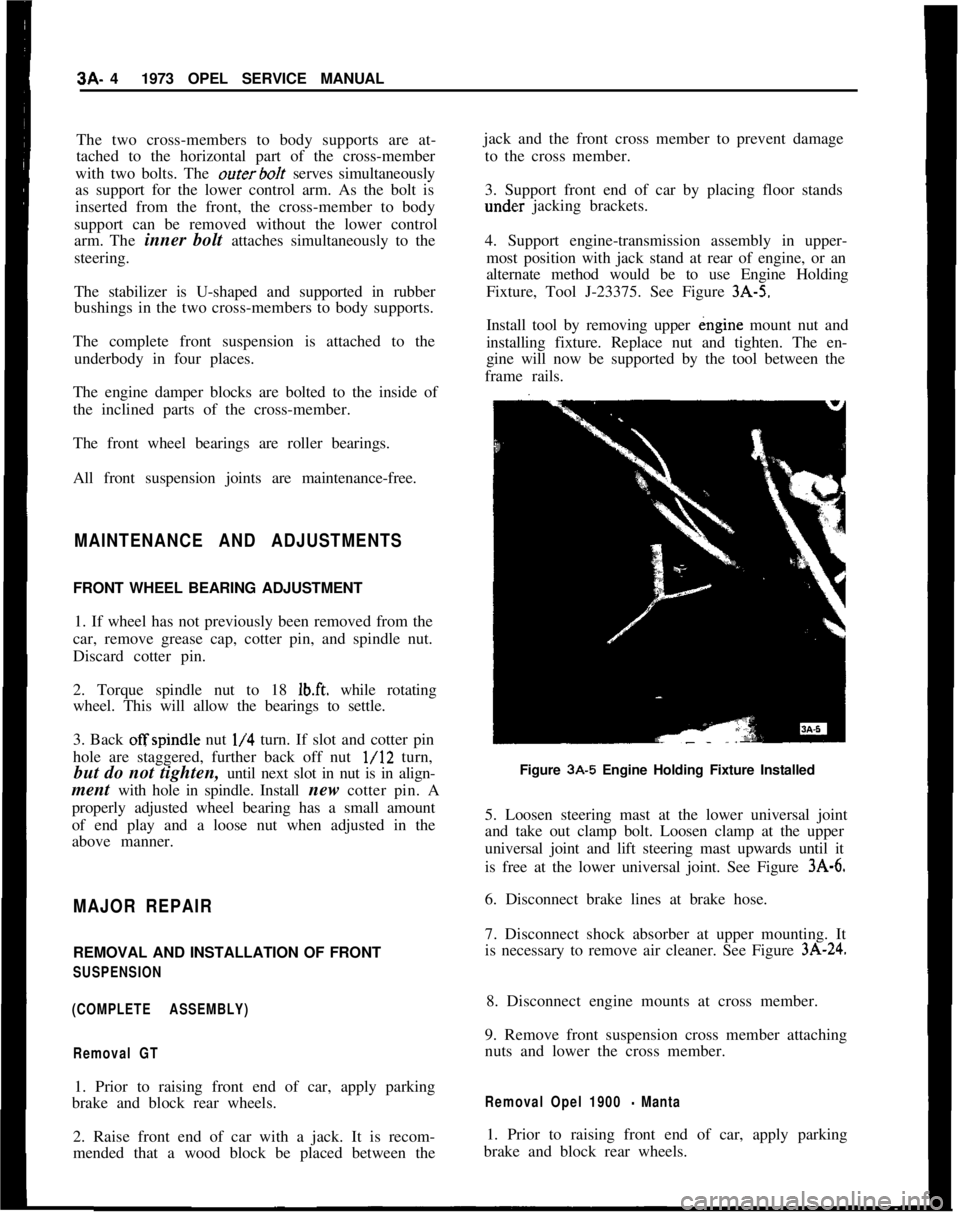
4. Support engine-transmission assembly in upper-
most position with jack stand at rear of engine, or an
alternate method would be to use Engine Holding
Fixture, Tool J-23375. See Figure 3A-5.
Install tool by removing upper kngine mount nut and
installing fixture. Replace nut and tighten. The en-
gine will now be supported by the tool between the
frame rails.
Figure
3A-5 Engine Holding Fixture Installed
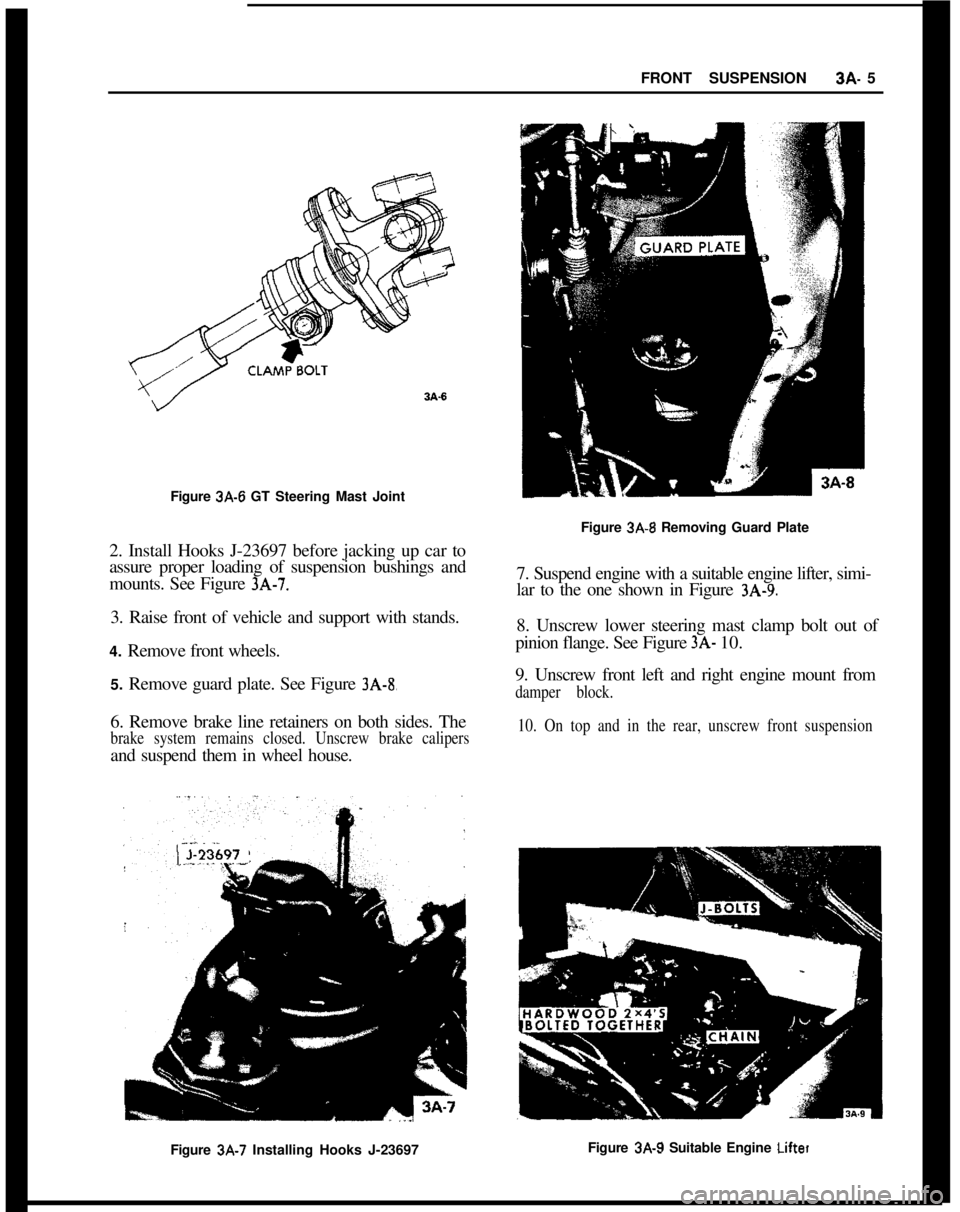
5. Loosen steering mast at the lower universal joint
and take out clamp bolt. Loosen clamp at the upper
universal joint and lift steering mast upwards until it
is free at the lower universal joint. See Figure
3A-6.6. Disconnect brake lines at brake hose.
7. Disconnect shock absorber at upper mounting. It
is necessary to remove air cleaner. See Figure
3A-24.8. Disconnect engine mounts at cross member.
9. Remove front suspension cross member attaching
nuts and lower the cross member.
Removal Opel 1900 - Manta1. Prior to raising front end of car, apply parking
brake and block rear wheels.
Page 172 of 625
FRONT SUSPENSION3A- 5
Figure 3A-6 GT Steering Mast Joint
2. Install Hooks J-23697 before jacking up car to
assure proper loading of suspension bushings and
mounts. See Figure
3A-7.3. Raise front of vehicle and support with stands.
4. Remove front wheels.
5. Remove guard plate. See Figure
3A-8,6. Remove brake line retainers on both sides. The
brake system remains closed. Unscrew brake calipersand suspend them in wheel house.Figure
3A-9 Removing Guard Plate
7. Suspend engine with a suitable engine lifter, simi-
lar to the one shown in Figure
3A-9.8. Unscrew lower steering mast clamp bolt out of
pinion flange. See Figure
3A- 10.
9. Unscrew front left and right engine mount from
damper block.
10. On top and in the rear, unscrew front suspensionFigure
3A-7 Installing Hooks J-23697Figure 3A-9 Suitable Engine Liftel
Page 173 of 625
3A- 6 1973 OPEL SERVICE MANUAL
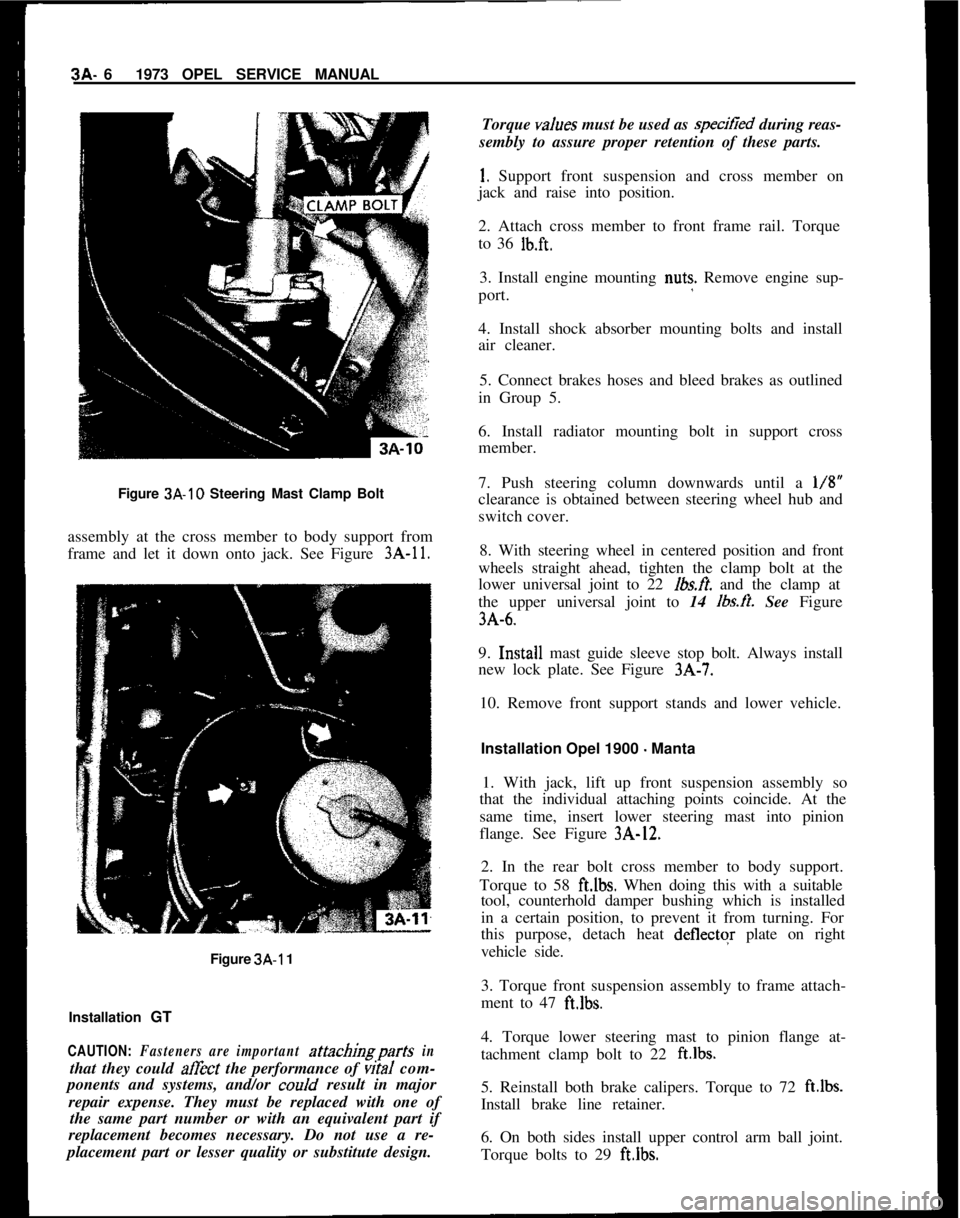
Figure 3A-10 Steering Mast Clamp Bolt
assembly at the cross member to body support from
frame and let it down onto jack. See Figure
3A-11.
Figure 3A-1 1
Installation
GT
CAUTION: Fasteners are important attachingparts in
that they could affect the performance of vitaI com-
ponents and systems, and/or
coo/d result in major
repair expense. They must be replaced with one of the same part number or with an equivalent part if
replacement becomes necessary. Do not use a re-
placement part or lesser quality or substitute design. Torque
values
must be used as speciiied during reas-
sembly to assure proper retention of these parts.
I. Support front suspension and cross member on
jack and raise into position.
2. Attach cross member to front frame rail. Torque
to 36
lb.ft.
3. Install engine mounting nut? Remove engine sup-
port.
4. Install shock absorber mounting bolts and install
air cleaner.
5. Connect brakes hoses and bleed brakes as outlined
in Group 5.
6. Install radiator mounting bolt in support cross
member.
7. Push steering column downwards until a
l/8”
clearance is obtained between steering wheel hub and
switch cover.
8. With steering wheel in centered position and front
wheels straight ahead, tighten the clamp bolt at the
lower universal joint to 22
fbs.fi. and the clamp at
the upper universal joint to 14
lbs.ft. See Figure
3A-6.
9. Inr;tall mast guide sleeve stop bolt. Always install
new lock plate. See Figure
3A-7.
10. Remove front support stands and lower vehicle.
Installation Opel 1900 - Manta
1. With jack, lift up front suspension assembly so
that the individual attaching points coincide. At the
same time, insert lower steering mast into pinion
flange. See Figure
3A-12.
2. In the rear bolt cross member to body support.
Torque to 58
ft.lbs. When doing this with a suitable
tool, counterhold damper bushing which is installed
in a certain position, to prevent it from turning. For
this purpose, detach heat
deflectqr plate on right
vehicle side.
3. Torque front suspension assembly to frame attach-
ment to 47
ft.lbs.
4. Torque lower steering mast to pinion flange at-
tachment clamp bolt to 22
ft.lbs.
5. Reinstall both brake calipers. Torque to 72 ft.lbs.
Install brake line retainer.
6. On both sides install upper control arm ball joint.
Torque bolts to 29
ft.lbs.
Page 174 of 625
FRONT SUSPENSION3A- 7
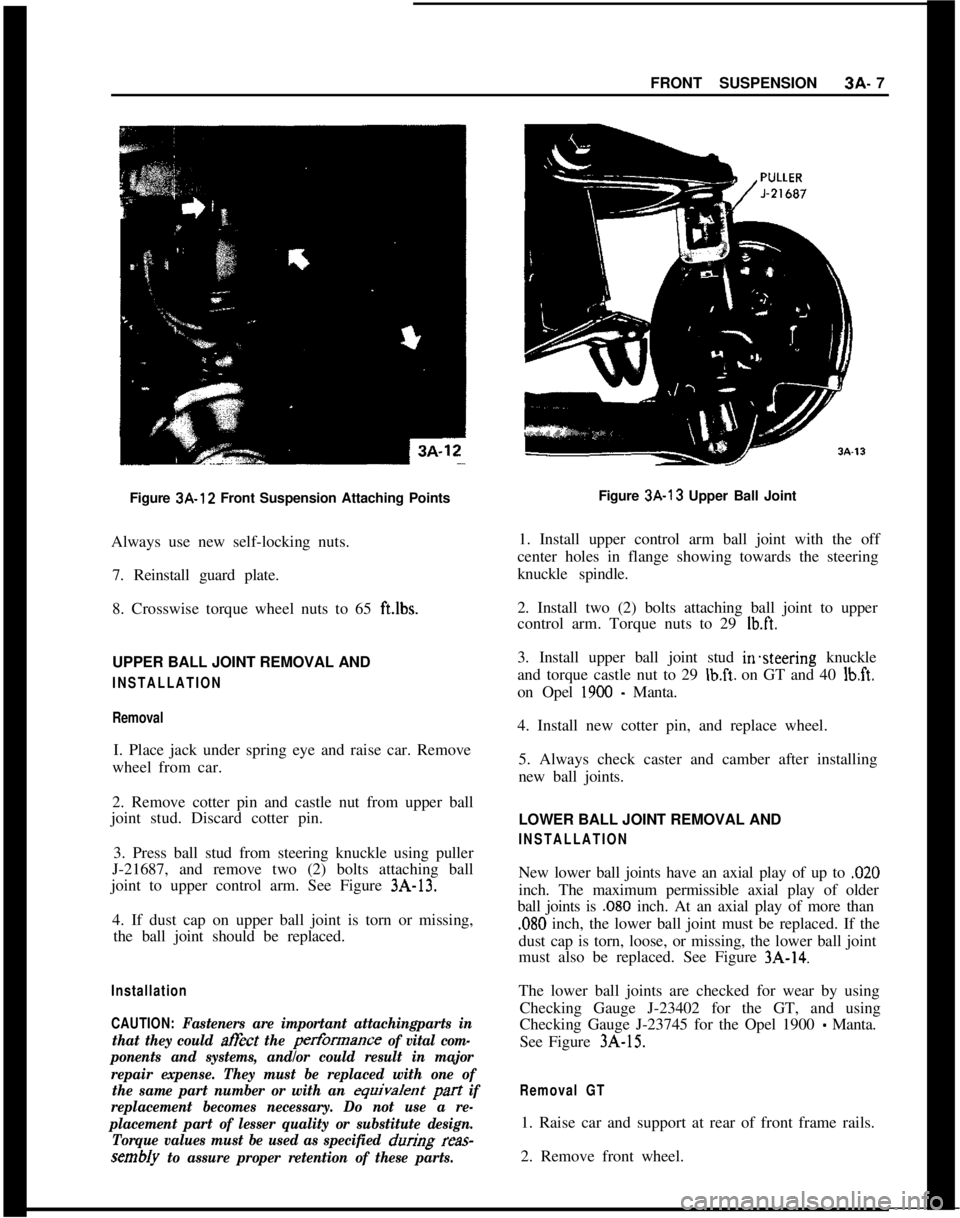
Figure 3A-12 Front Suspension Attaching Points
Always use new self-locking nuts.
7. Reinstall guard plate.
8. Crosswise torque wheel nuts to 65 ft.lbs.UPPER BALL JOINT REMOVAL AND
INSTALLATION
RemovalI. Place jack under spring eye and raise car. Remove
wheel from car.
2. Remove cotter pin and castle nut from upper ball
joint stud. Discard cotter pin.
3. Press ball stud from steering knuckle using puller
J-21687, and remove two (2) bolts attaching ball
joint to upper control arm. See Figure 3A-13.
4. If dust cap on upper ball joint is torn or missing,
the ball joint should be replaced.
Installation
CAUTION:
Fasteners are important attachingparts in
that they could
afEct the pertkmance of vital com-
ponents and systems, and/or could result in major
repair expense. They must be replaced with one of
the same part number or with an
equivaknt pa-t if
replacement becomes necessary. Do not use a re-
placement part of lesser quality or substitute design.
Torque values must be used as specified
durikg reas-
sembly to assure proper retention of these parts.Figure 3A-13 Upper Ball Joint
1. Install upper control arm ball joint with the off
center holes in flange showing towards the steering
knuckle spindle.
2. Install two (2) bolts attaching ball joint to upper
control arm. Torque nuts to 29 Ibft.
3. Install upper ball joint stud in%eering knuckle
and torque castle nut to 29
Ib.ft. on GT and 40 lb&.
on Opel
1900 - Manta.
4. Install new cotter pin, and replace wheel.
5. Always check caster and camber after installing
new ball joints.
LOWER BALL JOINT REMOVAL AND
INSTALLATIONNew lower ball joints have an axial play of up to
,020inch. The maximum permissible axial play of older
ball joints is
,080 inch. At an axial play of more than
,080 inch, the lower ball joint must be replaced. If the
dust cap is torn, loose, or missing, the lower ball joint
must also be replaced. See Figure
3A-14.The lower ball joints are checked for wear by using
Checking Gauge J-23402 for the GT, and using
Checking Gauge J-23745 for the Opel 1900
- Manta.
See Figure
3A-15.
Removal GT1. Raise car and support at rear of front frame rails.
2. Remove front wheel.