tow OPEL VIVARO B 2017.5 Manual user
[x] Cancel search | Manufacturer: OPEL, Model Year: 2017.5, Model line: VIVARO B, Model: OPEL VIVARO B 2017.5Pages: 233, PDF Size: 5.43 MB
Page 163 of 233

Driving and operating161If the trailer starts snaking, drive more
slowly, do not attempt to correct the
steering and brake sharply if
necessary.
When driving downhill, drive in the
same gear as if driving uphill and
drive at a similar speed.
Adjust tyre pressure to the value
specified for full load 3 218.
Trailer towing Trailer loads
The permissible trailer loads are
vehicle and engine-dependent
maximum values which must not be exceeded. The actual trailer load is
the difference between the actual
gross weight of the trailer and the
actual coupling socket load with the
trailer coupled.
The permissible trailer loads are
specified in the vehicle documents. In
general, they are valid for gradients
up to max. 12%.
The permitted trailer load applies up
to the specified incline and up to an
altitude of 1000 metres above sealevel. Since engine power decreases
as altitude increases due to the air
becoming thinner, therefore reducing
climbing ability, the permissible gross
train weight also decreases by 10% for every 1000 metres of additional
altitude. The gross train weight does
not have to be reduced when driving
on roads with slight inclines (less than 8%, e.g. motorways).
The permissible gross train weight
must not be exceeded. This weight is
specified on the identification plate
3 206.
Vertical coupling load
The vertical coupling load is the load
exerted by the trailer on the coupling
ball. It can be varied by changing the
weight distribution when loading the
trailer.
The maximum permissible vertical
coupling load is specified on the
towing equipment identification plate
and in the vehicle documents. Always aim for the maximum load, especially in the case of heavy trailers. The
vertical coupling load should never
fall below 25 kg.In the case of trailer loads of
1200 kg or more, the vertical coupling load should not be less than 50 kg.
Rear axle load When the trailer is coupled and the
towing vehicle fully loaded (including all occupants), the permissible rear
axle load (see identification plate or
vehicle documents) must not be
exceeded.
Trailer stability assist If the system detects snaking
movements, engine power is reduced
and the vehicle/trailer combination is
selectively braked until the snaking ceases. While the system is working,keep steering wheel as still as
possible.
Trailer stability assist (TSA) is a
function of the Electronic Stability
Program (ESP® Plus
) 3 149.
Page 164 of 233

162Vehicle careVehicle careGeneral Information...................163
Accessories and vehicle modifications .......................... 163
Vehicle storage ........................163
End-of-life vehicle recovery .....164
Vehicle checks ........................... 164
Performing work ......................164
Bonnet ..................................... 164
Engine oil ................................. 165
Engine air filter ........................ 166
Engine coolant ......................... 167
Power steering fluid .................167
Washer fluid ............................ 168
Brakes ..................................... 168
Brake fluid ............................... 168
Vehicle battery ......................... 169
Diesel fuel filter ........................171
Diesel fuel system bleeding .....171
Wiper blade replacement ........172
Bulb replacement .......................173
Headlights ............................... 173
Fog lights ................................. 173
Front turn signal lights .............174
Tail lights ................................. 174
Side turn signal lights ..............175Centre high-mounted brake
light ......................................... 175
Reversing light ......................... 176
Number plate light ...................177
Fog tail light ............................. 177
Interior lights ............................ 178
Instrument panel illumination ...178
Electrical system ........................179
Fuses ....................................... 179
Instrument panel fuse box .......180
Vehicle tools .............................. 183
Tools ........................................ 183
Wheels and tyres .......................184
Tyres ....................................... 184
Winter tyres ............................. 184
Tyre designations ....................184
Tyre pressure .......................... 184
Tyre pressure monitoring system .................................... 186
Tread depth ............................. 188
Changing tyre and wheel size . 188
Wheel covers ........................... 188
Tyre chains .............................. 189
Tyre repair kit .......................... 189
Wheel changing .......................192
Spare wheel ............................ 193
Jump starting ............................. 195Towing....................................... 196
Towing the vehicle ...................196
Towing another vehicle ...........197
Appearance care .......................198
Exterior care ............................ 198
Interior care ............................. 200
Page 168 of 233

166Vehicle care
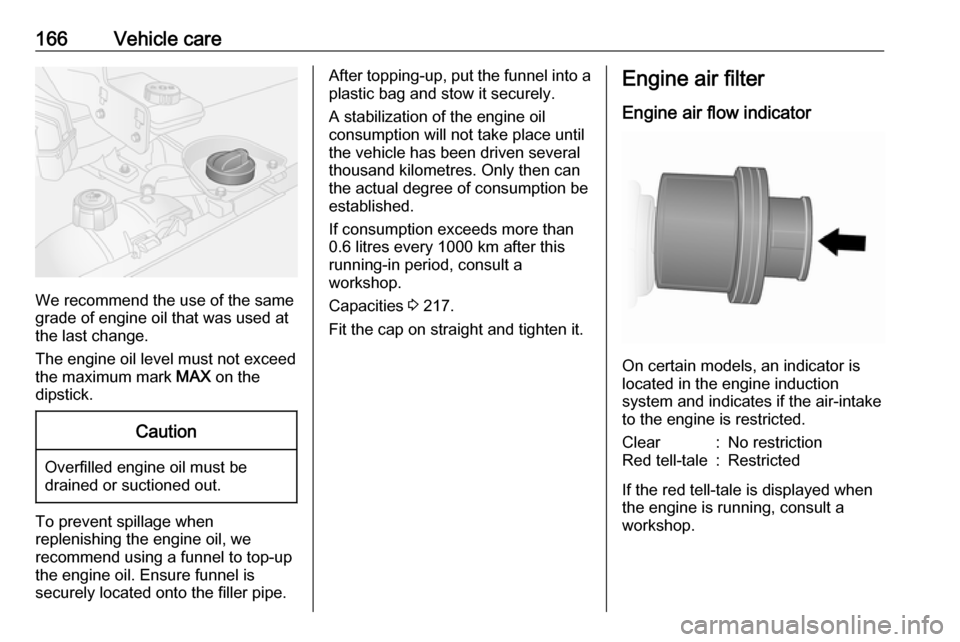
We recommend the use of the same
grade of engine oil that was used at
the last change.
The engine oil level must not exceed
the maximum mark MAX on the
dipstick.
Caution
Overfilled engine oil must be
drained or suctioned out.
To prevent spillage when
replenishing the engine oil, we
recommend using a funnel to top-up the engine oil. Ensure funnel is
securely located onto the filler pipe.
After topping-up, put the funnel into a
plastic bag and stow it securely.
A stabilization of the engine oil
consumption will not take place until the vehicle has been driven several
thousand kilometres. Only then can
the actual degree of consumption be
established.
If consumption exceeds more than
0.6 litres every 1000 km after this
running-in period, consult a
workshop.
Capacities 3 217.
Fit the cap on straight and tighten it.Engine air filter
Engine air flow indicator
On certain models, an indicator is
located in the engine induction
system and indicates if the air-intake
to the engine is restricted.
Clear:No restrictionRed tell-tale:Restricted
If the red tell-tale is displayed when
the engine is running, consult a
workshop.
Page 185 of 233

Vehicle care183No.Circuit40Rear power outlet41Starting / Body control module42Heated seats43Tachograph44Windscreen wiper45Heating / Air conditioning
After having changed defective fuses,
replace the trim panel.
Vehicle tools
Tools
The jack, wheel wrench, wheel bolt
sleeve, torx key, adapters, wheel
cover hook, towing eye are contained
in a unit, stowed under the driver's
seat.
Slide seat forwards and fold the
backrest forwards 3 48 to access the
tool box. The tool box may be secured
in position with a wing nut. Rotate
wing nut anticlockwise to release.
Wheel changing 3 192, Spare wheel
3 193.
Vehicles with tyre repair kit: The
wheel cover hook and torx key are
stored within the tyre repair kit case,
stowed under the driver's seat.
Tyre repair kit 3 189.
Page 188 of 233

186Vehicle careTrailer towing
When towing a trailer with a fully
laden vehicle, the tyre pressure must
be increased by 20 kPa/0.2 bar
(3.0 psi) and the maximum speed
limited to 100 km/h.
Trailer towing 3 161.
Tyre pressure monitoring
system
The tyre pressure monitoring system
uses radio and sensor technology to
check tyre pressure levels.Caution
Tyre pressure monitoring system
warns only about low tyre pressure condition and does not replace
regular tyre maintenance by the
driver.
All wheels must be equipped with pressure sensors and the tyres must
have the prescribed pressure.
Note
In countries where the tyre pressure
monitoring system is legally
required, the use of wheels without
pressure sensors will invalidate the
vehicle type approval.
The tyre pressure monitoring system
sensors monitor the air pressure in
the tyres and transmit tyre pressure
readings to a receiver located in the
vehicle.
Tyre pressure chart 3 218.
Low tyre pressure conditionA detected low tyre pressure
condition is indicated by illumination
of control indicator w 3 100 and a
corresponding message appears in
the Driver Information Centre.
If w illuminates, stop as soon as
possible and inflate the tyres as
recommended 3 218.
After inflating, some driving may be
required to update the tyre pressure
values in the system. During this time
w may illuminate.
If w illuminates at lower temperatures
and extinguishes after some driving,
this could be an indicator for
approaching a low tyre pressure
condition. Check tyre pressure of all
four tyres.
If the tyre pressure must be reduced
or increased, switch off ignition.
Only mount wheels with pressure
sensors, otherwise w flashes for
several seconds then illuminates
continuously together with control
indicator F 3 98 and a corresponding
message appears in the Driver
Information Centre.
Page 193 of 233

Vehicle care191
12. The prescribed tyre pressureshould be obtained within
15 minutes. Tyre pressure
3 218 . When the correct pressure
is obtained, switch off the
compressor.
If the prescribed tyre pressure is
not obtained within 15 minutes,
remove the tyre repair kit. Move
the vehicle one tyre rotation
(approx. two metres). Reattach
the tyre repair kit and continue the
filling procedure for 15 minutes. If
the prescribed tyre pressure is still not obtained, the tyre is too badly
damaged. Seek the assistance of
a workshop.
Drain excess tyre pressure with
the button beside the pressure
indicator.
Do not run the compressor for
longer than 15 minutes.
13. Detach the tyre repair kit.
14. Remove any excess sealant using a cloth.
15. Take the label indicating maximum permitted speed from
the tyre repair kit and affix in the
driver's field of view.
16. Store the sealant bottle in the plastic bag. Return tyre repair kit
to case and stow under the driver's seat.17. Continue driving immediately so that the sealant is evenlydistributed throughout the tyre.
After driving approx. ten km, but
no more than ten minutes, stop
and check tyre pressure using the
compressor. Screw air hose from
compressor directly onto tyre
valve when doing this.
18. If the tyre pressure is more than 2.2 bar (220 kPa/31 psi), set it to
the correct value. Repeat the
procedure until there is no more
loss of pressure.
If the tyre pressure has fallen
below 2.2 bar (220 kPa/31 psi),
the vehicle must not be driven.
Seek the assistance of a
workshop.
19. Detach the tyre repair kit, return to
case and stow under the driver's
seat.9 Warning
Do not allow the sealant to contact
skin, eyes or clothing. If swallowed seek medical assistance
immediately.
Page 195 of 233

Vehicle care193
3.Place lifting pad spigot of the jack
under the jacking hole located
nearest the wheel concerned.
Ensure the jack is positioned
correctly. The jack base must be
on the ground directly below the
jacking hole in a manner that
prevents it from slipping.
4. Install wrench onto the jack and raise the vehicle by turning the
wrench until the wheel is clear of
the ground.
5. Unscrew wheel bolts completely by turning anticlockwise and wipe
clean with a cloth.
Put wheel bolts somewhere
where the threads will not be
soiled.
6. Change the wheel. Spare wheel 3 193.
7. Screw in the wheel bolts.
8. Lower the vehicle and remove jack.
9. Tighten each of the wheel bolts in
a crosswise sequence using the
wheel wrench. Ensure the wrench locates securely. The wrench
should turn clockwise to tighten
the bolts. Invert the wrench if
necessary.
Tightening torque is 160 Nm.
10. Replace the wheel cover, ensuring that the valve hole in thewheel cover is aligned with the
tyre valve before installing.
Note
If applicable, fit anti-theft bolts
nearest the tyre valve (otherwise it
may not be possible to refit the wheel
cover).11. Stow the replaced wheel 3 193
and the vehicle tools 3 183.
12. Have the new wheel balanced on the vehicle.
Check the tyre pressure of the
installed tyre 3 218.
Check the wheel bolt torque.
Have the defective tyre renewed or
repaired as soon as possible.
Spare wheel
Some vehicles are equipped with a tyre repair kit instead of a spare wheel
3 189.
If mounting a spare wheel which is
different from the other wheels, this
wheel might be classified as a
temporary spare wheel and the
corresponding speed limits apply,
even though no label indicates this.
Seek the assistance of a workshop to
check the applicable speed limit.
Page 198 of 233

196Vehicle care
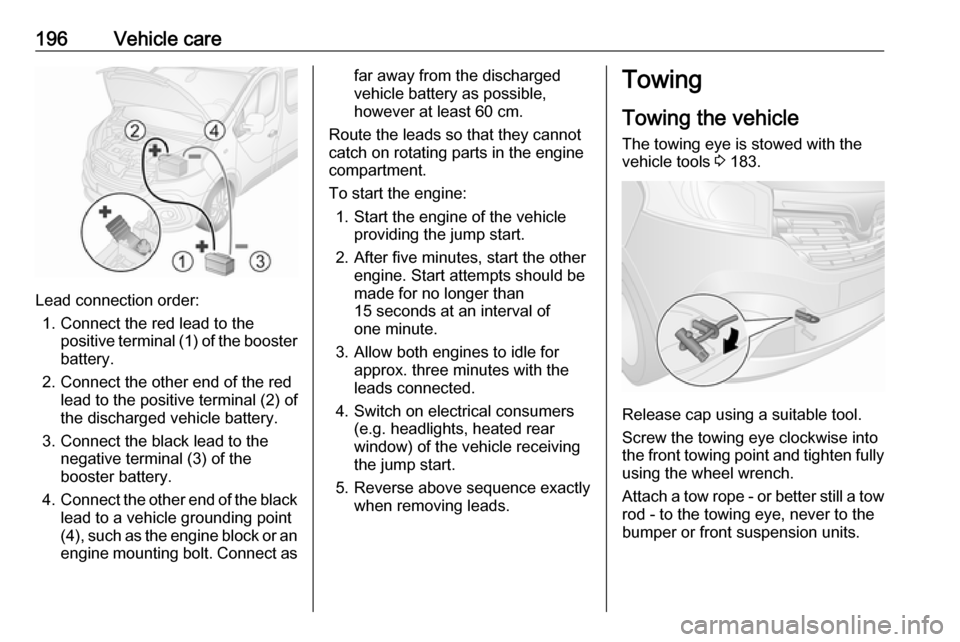
Lead connection order:1. Connect the red lead to the positive terminal (1) of the booster
battery.
2. Connect the other end of the red lead to the positive terminal (2) of
the discharged vehicle battery.
3. Connect the black lead to the negative terminal (3) of the
booster battery.
4. Connect the other end of the black
lead to a vehicle grounding point
(4), such as the engine block or an
engine mounting bolt. Connect as
far away from the discharged
vehicle battery as possible,
however at least 60 cm.
Route the leads so that they cannot
catch on rotating parts in the engine
compartment.
To start the engine: 1. Start the engine of the vehicle providing the jump start.
2. After five minutes, start the other engine. Start attempts should be
made for no longer than
15 seconds at an interval of
one minute.
3. Allow both engines to idle for approx. three minutes with the
leads connected.
4. Switch on electrical consumers (e.g. headlights, heated rear
window) of the vehicle receiving
the jump start.
5. Reverse above sequence exactly when removing leads.Towing
Towing the vehicle The towing eye is stowed with thevehicle tools 3 183.
Release cap using a suitable tool.
Screw the towing eye clockwise into
the front towing point and tighten fully
using the wheel wrench.
Attach a tow rope - or better still a tow rod - to the towing eye, never to the
bumper or front suspension units.
Page 199 of 233

Vehicle care197Caution
Do not tow the vehicle from the
rear. The front towing eye must
only be used for towing and not
recovering a vehicle.
Caution
Activate the child locks in the rear
doors if the rear seats are
occupied. Child locks 3 32.
Switch on ignition to permit operation
of brake lights, horn and windscreen
wipers, and move the steering wheel
slightly to release the steering wheel
lock.
Note
Depending on version, it may be
necessary to switch on the engine to
permit operation of brake lights.
Transmission in neutral.
Caution
Drive slowly. Do not drive jerkily.
Excessive tractive force can
damage the vehicle.
When the engine is not running,
considerably more force is needed to
brake and steer.
Switch on hazard warning flashers
3 111.
To prevent the entry of exhaust fumes
from the towing vehicle, switch on the air recirculation system 3 117 and
close the windows.
Seek the assistance of a workshop.
After towing, unscrew the towing eye
and replace cap.
Towing another vehicle
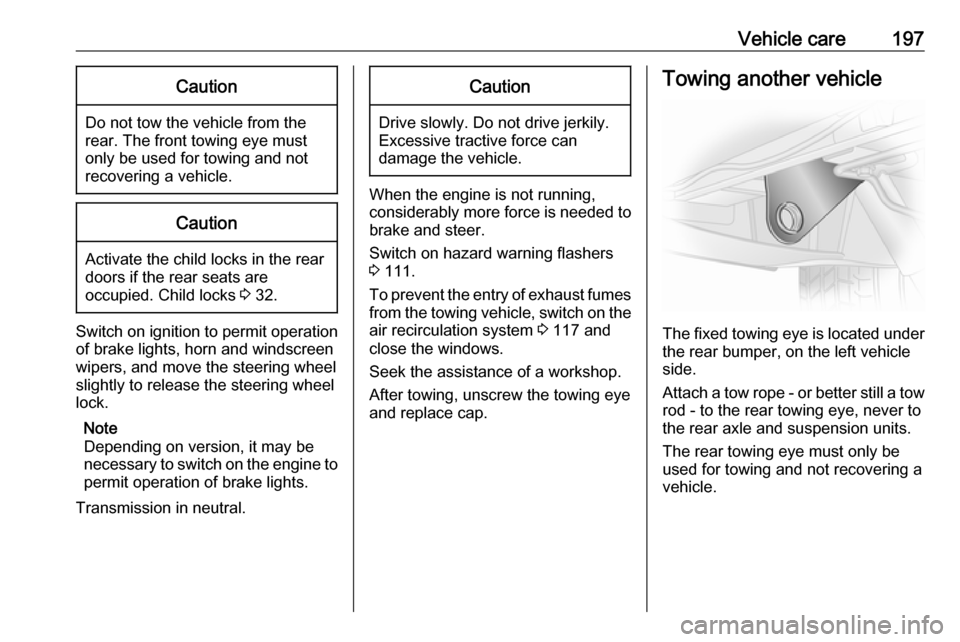
The fixed towing eye is located under the rear bumper, on the left vehicle
side.
Attach a tow rope - or better still a tow
rod - to the rear towing eye, never to
the rear axle and suspension units.
The rear towing eye must only be
used for towing and not recovering a
vehicle.
Page 202 of 233

200Vehicle careClean rims with a pH-neutral wheel
cleaner.
Rims are painted and can be treated
with the same agents as the body.
Paintwork damageRectify minor paintwork damage with
a touch-up pen before rust forms.
Have more extensive damage or rust
areas repaired by a workshop.
Underbody Some areas of the vehicle underbody
have a PVC undercoating while other
critical areas have a durable
protective wax coating.
After the underbody is washed, check
the underbody and have it waxed if
necessary.
Bitumen/rubber materials could
damage the PVC coating. Have
underbody work carried out by a
workshop.
Before and after winter, wash the
underbody and have the protective
wax coating checked.Towing equipment
Do not clean the coupling ball bar with
a steam-jet or high-pressure jet
cleaner.
Interior care
Interior and upholstery Only clean the vehicle interior,
including the instrument panel fascia
and panelling, with a dry cloth or
interior cleaner.
Clean any leather upholstery with
clear water and a soft cloth. In case of
heavy soiling, use leather care.
The instrument cluster and the
displays should only be cleaned using a soft damp cloth. If necessary use aweak soap solution.
Clean fabric upholstery with a
vacuum cleaner and brush. Remove
stains with an upholstery cleaner.
Clothing fabrics may not be
colourfast. This could cause visible
discolourations, especially on light-coloured upholstery. Removable
stains and discolourations should be
cleaned as soon as possible.
Clean seat belts with lukewarm water or interior cleaner.Caution
Close Velcro fasteners as open
Velcro fasteners on clothing could
damage seat upholstery.
The same applies to clothing with
sharp-edged objects, like zips or
belts or studded jeans.
Plastic and rubber parts
Plastic and rubber parts can be
cleaned with the same cleaner as
used to clean the body. Use interior cleaner if necessary. Do not use any
other agent. Avoid solvents and petrol in particular. Do not use high-
pressure jet cleaners.