light OPEL ZAFIRA C 2014 Manual user
[x] Cancel search | Manufacturer: OPEL, Model Year: 2014, Model line: ZAFIRA C, Model: OPEL ZAFIRA C 2014Pages: 299, PDF Size: 9.03 MB
Page 244 of 299

242Vehicle care
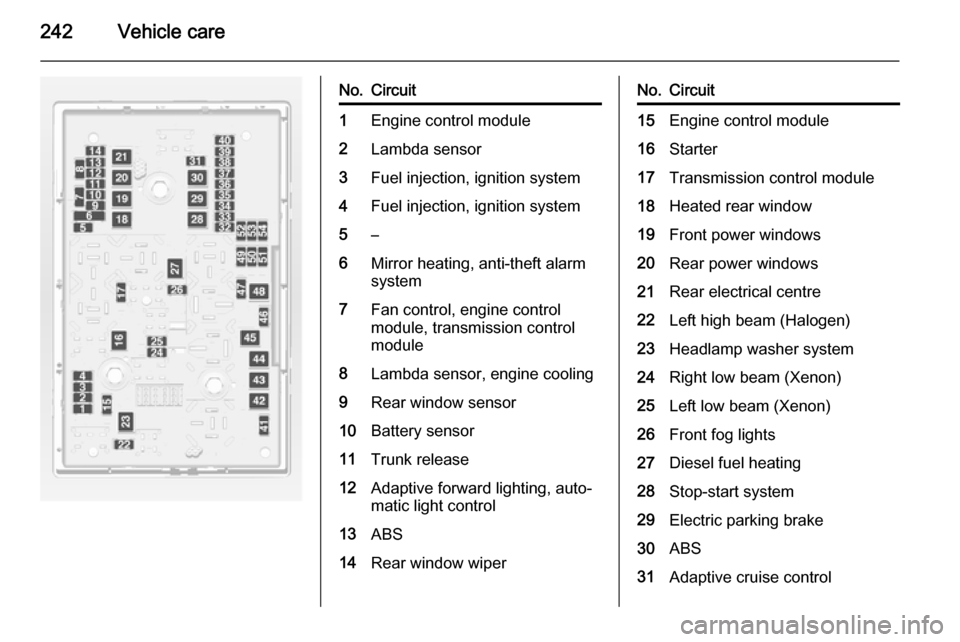
No.Circuit1Engine control module2Lambda sensor3Fuel injection, ignition system4Fuel injection, ignition system5–6Mirror heating, anti-theft alarm
system7Fan control, engine control
module, transmission control
module8Lambda sensor, engine cooling9Rear window sensor10Battery sensor11Trunk release12Adaptive forward lighting, auto‐
matic light control13ABS14Rear window wiperNo.Circuit15Engine control module16Starter17Transmission control module18Heated rear window19Front power windows20Rear power windows21Rear electrical centre22Left high beam (Halogen)23Headlamp washer system24Right low beam (Xenon)25Left low beam (Xenon)26Front fog lights27Diesel fuel heating28Stop-start system29Electric parking brake30ABS31Adaptive cruise control
Page 245 of 299

Vehicle care243
No.Circuit32Airbag33Adaptive forward lighting, auto‐
matic light control34Exhaust gas recirculation35Outside rear view mirror, rain
sensor36Climate control37Canister vent solenoid38Vacuum pump39Central control module40Windscreen washer, rear
window washer system41Right high beam (Halogen)42Radiator fan43Windscreen wiper44Windscreen wiper45Radiator fan46–No.Circuit47Horn48Radiator fan49Fuel pump50Headlamp levelling, adaptive
forward lighting51Air shutter52Auxiliary heater, diesel engine53Transmission control module,
engine control module54Vacuum pump, instrument
panel cluster, heating ventila‐
tion, air conditioning system
After having changed defective fuses
close the fuse box cover and press
until it engages.
If the fuse box cover is not closed
correctly, malfunction may occur.
Instrument panel fuse box
In left-hand drive vehicles, the fuse
box is behind the storage
compartment in the instrument panel.
Open the compartment and push it to the left to unlock. Fold the
compartment down and remove it.
Page 246 of 299

244Vehicle care
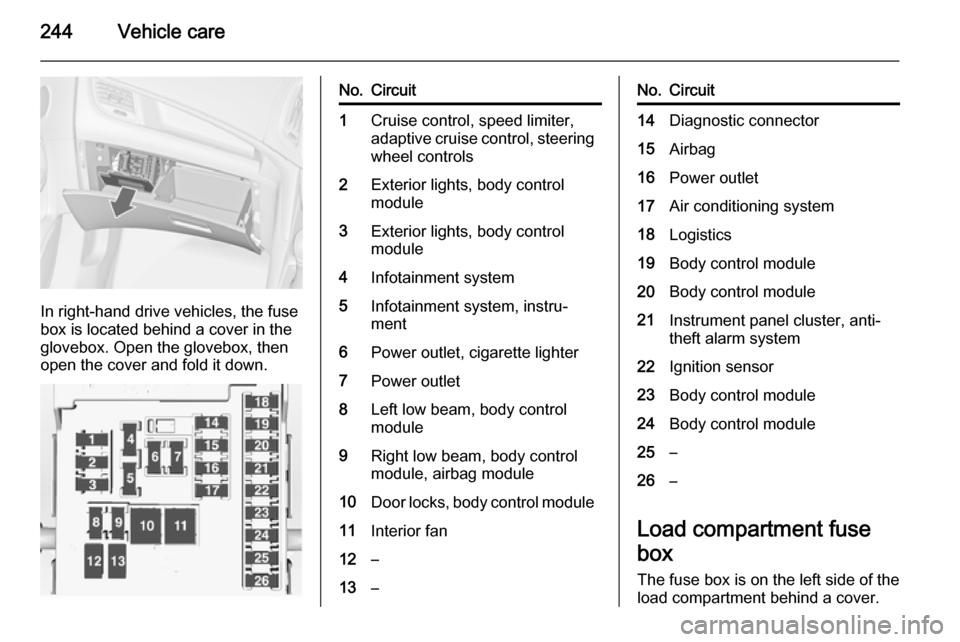
In right-hand drive vehicles, the fuse
box is located behind a cover in the
glovebox. Open the glovebox, then
open the cover and fold it down.
No.Circuit1Cruise control, speed limiter,
adaptive cruise control, steering wheel controls2Exterior lights, body control
module3Exterior lights, body control
module4Infotainment system5Infotainment system, instru‐
ment6Power outlet, cigarette lighter7Power outlet8Left low beam, body control
module9Right low beam, body control
module, airbag module10Door locks, body control module11Interior fan12–13–No.Circuit14Diagnostic connector15Airbag16Power outlet17Air conditioning system18Logistics19Body control module20Body control module21Instrument panel cluster, anti-
theft alarm system22Ignition sensor23Body control module24Body control module25–26–
Load compartment fuse
box
The fuse box is on the left side of the
load compartment behind a cover.
Page 252 of 299

250Vehicle care
The use of commercially available
liquid tyre repair kits can impair the
function of the system. Factory-
approved repair kits can be used.
External high-power radio equipment
could disrupt the tyre pressure
monitoring system.
Each time the tyres are replaced, tyre pressure monitoring system sensors
must be dismounted and serviced.
For the screwed sensor, replace
valve core and sealing ring. For
clipped sensor, replace complete
valve stem.
Vehicle loading status Adjust tyre pressure to load condition according to the tyre information labelor tyre pressure chart 3 285, and
select the appropriate setting in the
menu Tire Load in the Driver
Information Centre, Vehicle
Information Menu 3 117.
Select:
■ Light for comfort pressure up to
3 people
■ Eco for Eco pressure up to
3 people
■ Max for full loading
Auto learn function
After changing wheels, the vehicle
must be stationary for approx.
20 minutes, before the system
recalculates. The following relearn
process takes up to 10 minutes of
driving with a minimum speed of
20 km/h. In this case $ can be
displayed or pressure values can
swap in the Driver Information Centre.
If problems occur during the relearn
process, a warning message is
displayed in the Driver Information
Centre.
Temperature dependency Tyre pressure depends on the
temperature of the tyre. During
driving, tyre temperature and
pressure increase.
The tyre pressure value displayed in
the Driver Information Centre shows
the actual tyre pressure. Therefore it
is important to check tyre pressure
with cold tyres.
Tread depth Check tread depth at regular
intervals.
Tyres should be replaced for safety
reasons at a tread depth of 2-3 mm (4 mm for winter tyres).
Page 255 of 299

Vehicle care253
3. Remove the electrical connectioncable and air hose from the
stowage compartments on the
underside of the compressor.
4. Screw the compressor air hose to
the connection on the sealant
bottle.
5. Fit the sealant bottle into the retainer on the compressor.
Set the compressor near the tyre
in such a way that the sealant
bottle is upright.
6. Unscrew valve cap from defective
tyre.
7. Screw the filler hose to the tyre valve.
8. The switch on the compressor must be set to J.
9. Connect the compressor plug to
the power outlet or cigarette
lighter socket.
To avoid discharging the battery,
we recommend running the
engine.
10. Set the rocker switch on the compressor to I. The tyre is filled
with sealant.
11. The compressor pressure gauge briefly indicates up to 6 bar whilstthe sealant bottle is emptying
(approx. 30 seconds). Then the
pressure starts to drop.
Page 264 of 299

262Vehicle care
3. Connect the black lead to thenegative terminal of the booster
battery.
4. Connect the other end of the black
lead to a vehicle grounding point,
such as the engine block or an
engine mounting bolt. Connect as far away from the discharged
battery as possible, however at
least 60 cm.
Route the leads so that they cannot
catch on rotating parts in the engine
compartment.
To start the engine: 1. Start the engine of the vehicle providing the jump.
2. After 5 minutes, start the other engine. Start attempts should be
made for no longer than
15 seconds at an interval of 1 minute.
3. Allow both engines to idle for approx. 3 minutes with the leads
connected.4. Switch on electrical consumers (e.g. headlights, heated rear
window) of the vehicle receiving
the jump start.
5. Reverse above sequence exactly when removing leads.Towing
Towing the vehicle
Insert a screwdriver in the slot at the
short edge of the cap. Release the
cap by carefully moving the
screwdriver sidewards. To prevent
damage it is recommended to place a cloth between the screwdriver and
the frame.
The towing eye is stowed with the vehicle tools 3 246.
Page 265 of 299

Vehicle care263
Screw in the towing eye as far as it will
go until it stops in a horizontal
position.
Attach a tow rope – or better still a tow
rod – to the towing eye.
The towing eye must only be used for towing and not for recovering the
vehicle.
Switch on ignition to release steering
wheel lock and to permit operation of
brake lights, horn and windscreen
wiper.
Transmission in neutral.
Caution
Drive slowly. Do not drive jerkily.
Excessive tractive force can
damage the vehicle.
When the engine is not running,
considerably more force is needed to
brake and steer.
To prevent the entry of exhaust gases from the towing vehicle, switch on the
air recirculation and close the
windows.
Vehicles with automatic transmission: The vehicle must be towed facing
forwards, not faster than 80 km/h nor further than 100 km. In all other cases
and when the transmission is
defective, the front axle must be
raised off the ground.
Seek the assistance of a workshop.
After towing, unscrew the towing eye.
Insert cap at the bottom and close.
Towing another vehicle
Insert a screwdriver in the slot at the
lower edge of the cap. Release the
cap by carefully moving the
screwdriver downwards. To prevent
damage it is recommended to place a cloth between the screwdriver and
the frame.
The towing eye is stowed with the vehicle tools 3 246.
Page 267 of 299

Vehicle care265
If using a vehicle wash, comply with
the vehicle wash manufacturer's
instructions. The windscreen wiper and rear window wiper must be
switched off. Remove antenna and
external accessories such as roof
racks etc.
If you wash your vehicle by hand,
make sure that the insides of the
wheel housings are also thoroughly
rinsed out.
Clean edges and folds on opened
doors and the bonnet as well as the
areas they cover.Caution
Always use a cleaning agent with
a pH value of 4 to 9.
Do not use cleaning agents on hot surfaces.
Have the door hinges of all doors
greased by a workshop.
Do not clean the engine compartment with a steam-jet or high-pressure jet
cleaner.
Thoroughly rinse and leather-off the vehicle. Rinse leather frequently. Use
separate leathers for painted and
glass surfaces: remnants of wax on
the windows will impair vision.
Do not use hard objects to remove
spots of tar. Use tar removal spray on
painted surfaces.
Exterior lights
Headlight and other light covers are
made of plastic. Do not use any
abrasive or caustic agents, do not use an ice scraper, and do not clean them
dry.
Polishing and waxing Wax the vehicle regularly (at the
latest when water no longer beads).
Otherwise, the paintwork will dry out.
Polishing is necessary only if the paint
has become dull or if solid deposits
have become attached to it.
Paintwork polish with silicone forms a
protective film, making waxing
unnecessary.
Plastic body parts must not be treated with wax or polishing agents.Windows and windscreen wiper
blades
Use a soft lint-free cloth or chamois
leather together with window cleaner and insect remover.
When cleaning the rear window from
inside, always wipe in parallel to the
heating element to prevent damage.
For mechanical removal of ice, use a
sharp-edged ice scraper. Press the
scraper firmly against the glass so
that no dirt can get under it and
scratch the glass.
Clean smearing wiper blades with a
soft cloth and window cleaner.
Glass panel Never clean with solvents or abrasive
agents, fuels, aggressive media
(e.g. paint cleaner, acetone-
containing solutions etc.), acidic or
highly alkaline media or abrasive
pads.
Wheels and tyres Do not use high-pressure jet
cleaners.
Page 268 of 299

266Vehicle care
Clean rims with a pH-neutral wheel
cleaner.
Rims are painted and can be treated
with the same agents as the body.
Paintwork damageRectify minor paintwork damage with
a touch-up pen before rust forms.
Have more extensive damage or rust areas repaired by a workshop.
Underbody Some areas of the vehicle underbody
have a PVC undercoating while other
critical areas have a durable
protective wax coating.
After the underbody is washed, check the underbody and have it waxed if
necessary.
Bitumen/rubber materials could
damage the PVC coating. Have
underbody work carried out by a
workshop.
Before and after winter, wash the
underbody and have the protective
wax coating checked.Liquid gas system9 Danger
Liquid gas is heavier than air and
can collect in sink points.
Take care when performing work
at the underbody in a pit.
For painting work and when using a
drying booth at a temperature above
60 °C, the liquid gas tank must be
removed.
Do not make any modifications to the
liquid gas system.
Towing equipment Do not clean the coupling ball bar with
a steam-jet or high-pressure jet
cleaner.
Rear carrier system Clean the rear carrier system with a
steam-jet or high-pressure jet cleaner
at least once a year.
Operate the rear carrier system
periodically if not in regular use, in
particular during winter.
Air shutter
Clean the shutter system in the front
bumper to maintain correct
functionality.
Interior care Interior and upholsteryOnly clean the vehicle interior,
including the instrument panel fascia
and panelling, with a dry cloth or
interior cleaner.
Clean the leather upholstery with
clear water and a soft cloth. In case of
heavy soiling, use leather care.
The instrument cluster and the
displays should only be cleaned using
a soft damp cloth. If necessary use a weak soap solution.
Clean fabric upholstery with a
vacuum cleaner and brush. Remove
stains with an upholstery cleaner.
Clothing fabrics may not be
colourfast. This could cause visible
discolourations, especially on light-
Page 294 of 299

292IndexAAccessories and vehicle modifications .......................... 223
Active Emergency Braking .........192
Active head restraints ...................38
Adaptive cruise control .......116, 182
Adaptive forward lighting ..........
................................ 116, 141, 233
AdBlue ........................ 114, 166, 269
Adjustable air vents ...................156
Advanced parking assist ............197
Airbag and belt tensioners .........111
Airbag deactivation ..............57, 111
Airbag system .............................. 55
Air conditioning regular operation ................................ 158
Air conditioning system .............. 151
Air intake .................................... 157
Air vents...................................... 156
Antilock brake system ................ 173
Antilock brake system (ABS) .....113
Anti-theft alarm system ................27
Anti-theft locking system .............. 27
Appearance care ........................264
Armrest ......................................... 44
Armrest storage ........................... 68
Ashtrays ..................................... 103
Automatic anti-dazzle ..................31
Automatic light control ...............139Automatic locking ........................25
Automatic transmission .............169
Auxiliary heater ........................... 156
B
Battery discharge protection ......149
Battery voltage ........................... 127
Bicycle rack .................................. 70
BlueInjection ............................... 166
Bonnet ....................................... 225
Brake and clutch fluid .................269
Brake and clutch system ...........112
Brake assist ............................... 175
Brake fluid .................................. 228
Brakes ............................... 173, 228
Breakdown.................................. 262
Bulb replacement ....................... 231
C
Capacities .................................. 284
Cargo management system ........88
Car Pass ...................................... 21
Catalytic converter .....................166
Central locking system ................23
Centre console lighting ..............148
Centre console storage ...............69
Changing tyre and wheel size ...251
Charging system ........................ 111
Child locks ................................... 25