Peugeot 206 Dag 2002 Owner's Manual
Manufacturer: PEUGEOT, Model Year: 2002, Model line: 206 Dag, Model: Peugeot 206 Dag 2002Pages: 155, PDF Size: 2.09 MB
Page 121 of 155
17-06-2002
PRACTICAL INFORMATION
116
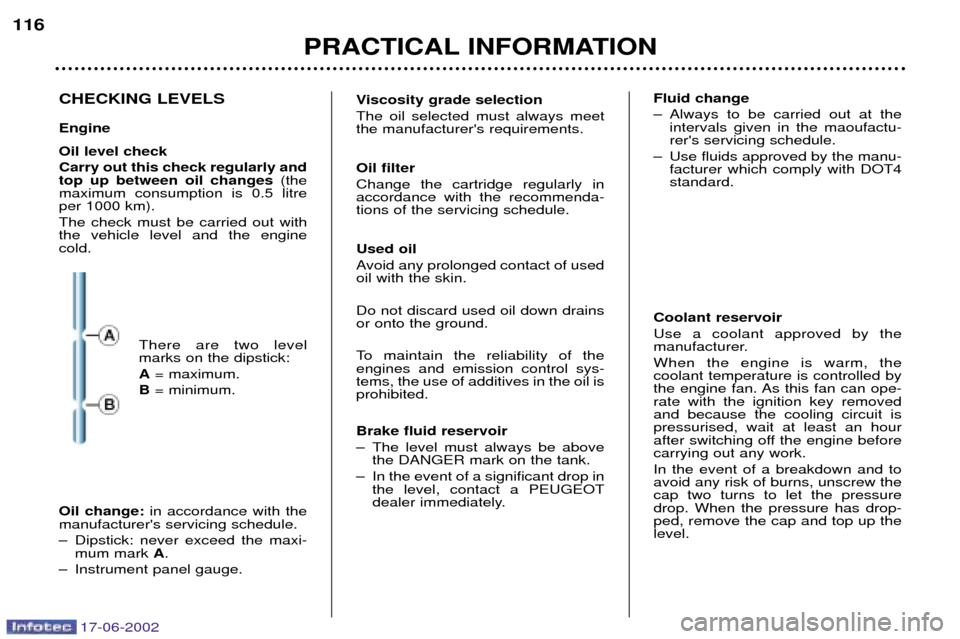
CHECKING LEVELS Engine Oil level check Carry out this check regularly and top up between oil changes (the
maximum consumption is 0.5 litreper 1000 km). The check must be carried out with the vehicle level and the enginecold.
There are two levelmarks on the dipstick: A= maximum.
B = minimum. Viscosity grade selectionThe oil selected must always meet the manufacturer's requirements. Oil filter Change the cartridge regularly in accordance with the recommenda-tions of the servicing schedule. Used oil
Avoid any prolonged contact of used oil with the skin. Do not discard used oil down drains or onto the ground.
To maintain the reliability of the engines and emission control sys-tems, the use of additives in the oil isprohibited. Brake fluid reservoir
Ð The level must always be above
the DANGER mark on the tank.
Ð In the event of a significant drop in the level, contact a PEUGEOT
dealer immediately. Fluid change
Ð Always to be carried out at the
intervals given in the maoufactu- rer's servicing schedule.
Ð Use fluids approved by the manu- facturer which comply with DOT4standard.
Coolant reservoir Use a coolant approved by the
manufacturer. When the engine is warm, the coolant temperature is controlled by
the engine fan. As this fan can ope-rate with the ignition key removedand because the cooling circuit ispressurised, wait at least an hour
after switching off the engine beforecarrying out any work. In the event of a breakdown and to avoid any risk of burns, unscrew thecap two turns to let the pressuredrop. When the pressure has drop-ped, remove the cap and top up thelevel.
Oil change: in accordance with the
manufacturer's servicing schedule.
Ð Dipstick: never exceed the maxi- mum mark A.
Ð Instrument panel gauge.
Page 122 of 155
17-06-2002
PRACTICAL INFORMATION117
Power steering reservoir
Open the reservoir, with the engine
cold. The level should always beabove the MINI mark, close to theMAXI mark. Manual gearbox This does not need an oil change. Check the level according to themanufacturer's servicing schedule.
Windscreen and headlamp washreservoir For best quality cleaning and for
your safety, we recommend that youuse products approved by
PEUGEOT (capacity 2.8 litres or
6.6 litres with headlamp wash).
Air filter Regular replacement of the filter ele- ment is essential. If you drive in verydusty conditions, change it twice asoften.
Battery
At the start of winter, have your bat-
tery checked by a PEUGEOT dea-
ler. Brake pads Brake pad wear depends on the style of driving, in particular forvehicles used in town, for short jour-neys. It may be necessary to checkthe thickness of the pads even bet-ween services. Autoadaptive automatic gearbox This does not need an oil change: have the level checked by a
PEUGEOT dealer according to themanufacturer's servicing schedule.
Only use products
approved by PEUGEOT.
To ensure best perfor- mance from compo-
nents as important as the powersteering and the braking system, PEUGEOT selects and offersquite specific products.
RUNNING OUT OF FUEL (DIESEL) If you should run out of fuel, it is necessary to re-prime the circuit: 1.4 litre HDI engine
- fill the fuel tank with at least five litres of diesel,
- operate the manual re-priming pump, until fuel appears in the transparent pipe under the bon-net,
- operate the starter until the engi- ne starts.
Page 123 of 155
17-06-2002
PRACTICAL INFORMATION117
Power steering reservoir
Open the reservoir, with the engine
cold. The level should always beabove the MINI mark, close to theMAXI mark. Manual gearbox This does not need an oil change. Check the level according to themanufacturer's servicing schedule.
Windscreen and headlamp washreservoir For best quality cleaning and for
your safety, we recommend that youuse products approved by
PEUGEOT (capacity 2.8 litres or
6.6 litres with headlamp wash).
Air filter Regular replacement of the filter ele- ment is essential. If you drive in verydusty conditions, change it twice asoften.
Battery
At the start of winter, have your bat-
tery checked by a PEUGEOT dea-
ler. Brake pads Brake pad wear depends on the style of driving, in particular forvehicles used in town, for short jour-neys. It may be necessary to checkthe thickness of the pads even bet-ween services. Autoadaptive automatic gearbox This does not need an oil change: have the level checked by a
PEUGEOT dealer according to themanufacturer's servicing schedule.
Only use products
approved by PEUGEOT.
To ensure best perfor- mance from compo-
nents as important as the powersteering and the braking system, PEUGEOT selects and offersquite specific products.
RUNNING OUT OF FUEL (DIESEL) If you should run out of fuel, it is necessary to re-prime the circuit: 1.4 litre HDI engine
- fill the fuel tank with at least five litres of diesel,
- operate the manual re-priming pump, until fuel appears in the transparent pipe under the bon-net,
- operate the starter until the engi- ne starts.
Page 124 of 155
17-06-2002
PRACTICAL INFORMATION
118
CHANGING A WHEEL (saloon) Parking the vehicle
Ð If possible, park the vehicle on
level, stable and non-slippery ground.
Ð Apply the handbrake, engage first or reverse gear (position Pfor the
automatic gearbox).
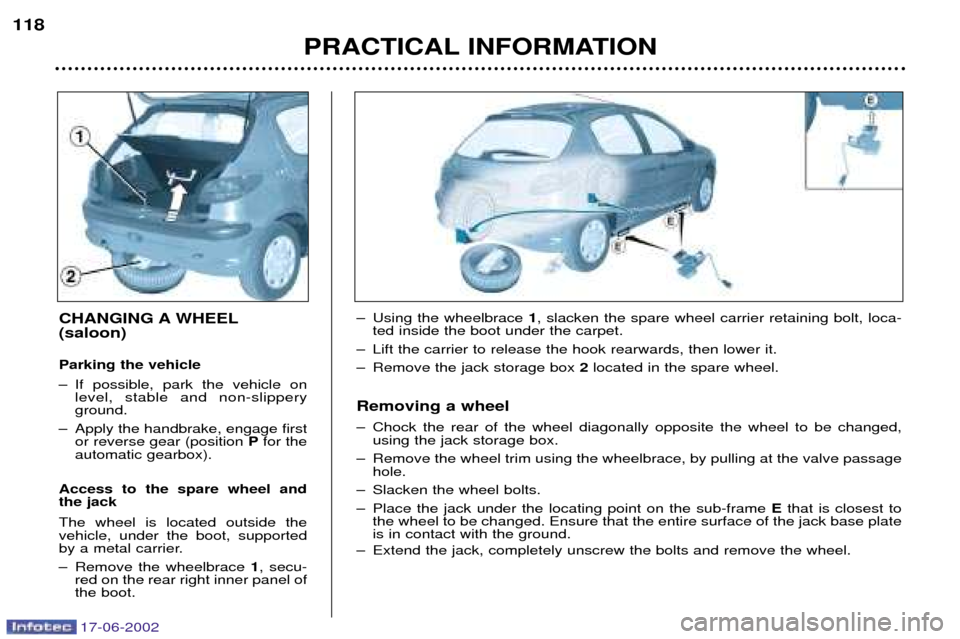
Access to the spare wheel andthe jack The wheel is located outside the vehicle, under the boot, supported
by a metal carrier.
Ð Remove the wheelbrace 1, secu-
red on the rear right inner panel of the boot. Ð Using the wheelbrace
1, slacken the spare wheel carrier retaining bolt, loca-
ted inside the boot under the carpet.
Ð Lift the carrier to release the hook rearwards, then lower it.
Ð Remove the jack storage box 2located in the spare wheel.
Removing a wheel
Ð Chock the rear of the wheel diagonally opposite the wheel to be changed, using the jack storage box.
Ð Remove the wheel trim using the wheelbrace, by pulling at the valve passage hole.
Ð Slacken the wheel bolts.
Ð Place the jack under the locating point on the sub-frame Ethat is closest to
the wheel to be changed. Ensure that the entire surface of the jack base plate is in contact with the ground.
Ð Extend the jack, completely unscrew the bolts and remove the wheel.
Page 125 of 155
17-06-2002
PRACTICAL INFORMATION
120
Refitting the wheel
Ð After positioning the wheel, lightly pre-tighten the bolts using the wheelbrace.
Ð Compress the jack and release it.
Ð Fully tighten the bolts using the wheelbrace.
Ð Replace the trim except in the case of a space-saver spare wheel, starting atthe valve passage hole, and press it on using the palm of the hand.
Note: If the vehicle is fitted in production with a wheel anti-theft lock, the trim cap on the anti-theft bolt is in two parts.
Replacing the wheel in the carrier
Ð Replace the jack storage box in the wheel.
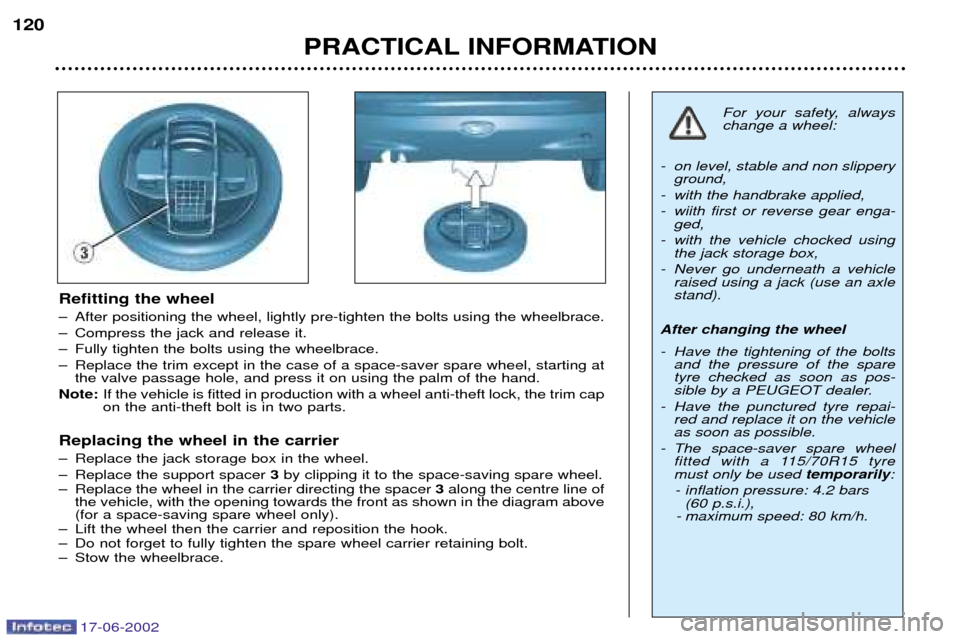
Ð Replace the support spacer 3by clipping it to the space-saving spare wheel.
Ð Replace the wheel in the carrier directing the spacer 3along the centre line of
the vehicle, with the opening towards the front as shown in the diagram above (for a space-saving spare wheel only).
Ð Lift the wheel then the carrier and reposition the hook.
Ð Do not forget to fully tighten the spare wheel carrier retaining bolt.
Ð Stow the wheelbrace.
For your safety, always change a wheel:
- on level, stable and non slippery ground,
- with the handbrake applied,
- wiith first or reverse gear enga- ged,
- with the vehicle chocked using the jack storage box,
- Never go underneath a vehicle raised using a jack (use an axle stand).
After changing the wheel
- Have the tightening of the bolts and the pressure of the spare tyre checked as soon as pos-
sible by a PEUGEOT dealer.
- Have the punctured tyre repai- red and replace it on the vehicleas soon as possible.
- The space-saver spare wheel fitted with a 115/70R15 tyremust only be used temporarily:
- inflation pressure: 4.2 bars(60 p.s.i.),
- maximum speed: 80 km/h.
Page 126 of 155
17-06-2002
PRACTICAL INFORMATION121
SPECIAL FEATURES OF
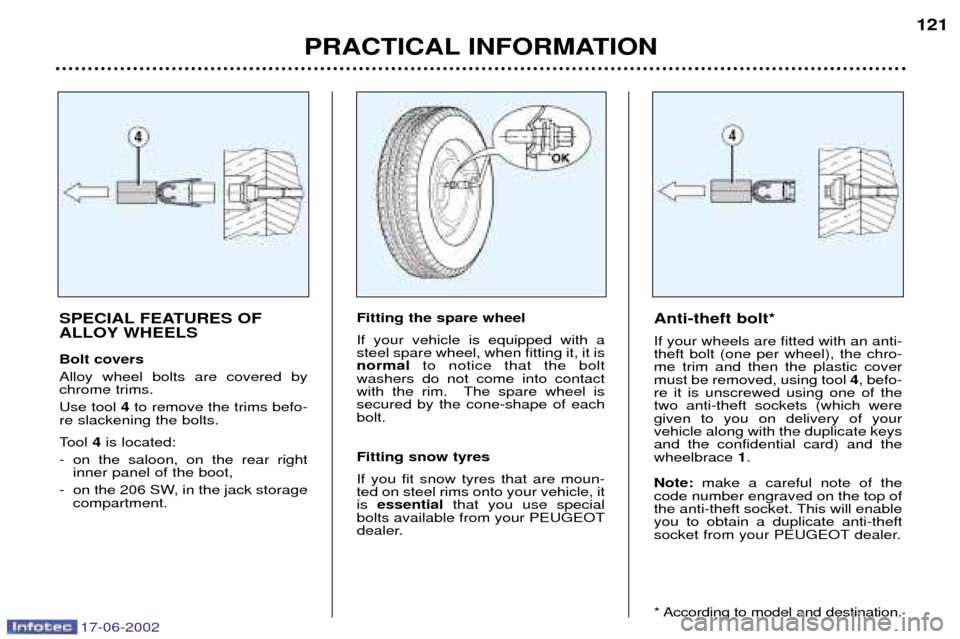
ALLOY WHEELS Bolt covers Alloy wheel bolts are covered by chrome trims. Use tool 4to remove the trims befo-
re slackening the bolts.
Tool 4is located:
- on the saloon, on the rear right inner panel of the boot,
- on the 206 SW, in the jack storage compartment. Fitting the spare wheelIf your vehicle is equipped with a steel spare wheel, when fitting it, it isnormal
to notice that the bolt
washers do not come into contact
with the rim. The spare wheel issecured by the cone-shape of eachbolt. Fitting snow tyres If you fit snow tyres that are moun- ted on steel rims onto your vehicle, itis essential that you use special
bolts available from your PEUGEOT
dealer. Anti-theft bolt* If your wheels are fitted with an anti- theft bolt (one per wheel), the chro-me trim and then the plastic covermust be removed, using tool
4, befo-
re it is unscrewed using one of thetwo anti-theft sockets (which weregiven to you on delivery of yourvehicle along with the duplicate keysand the confidential card) and thewheelbrace 1.
Note: make a careful note of the
code number engraved on the top of
the anti-theft socket. This will enableyou to obtain a duplicate anti-theft
socket from your PEUGEOT dealer.
* According to model and destination.
Page 127 of 155
17-06-2002
PRACTICAL INFORMATION119
CHANGING A WHEEL (206 SW) Parking the vehicle
Ð If possible, park the vehicle on
level, stable and non-slippery ground.
Ð Apply the handbrake, engage first or reverse gear, (position Pfor the
automatic gearbox).
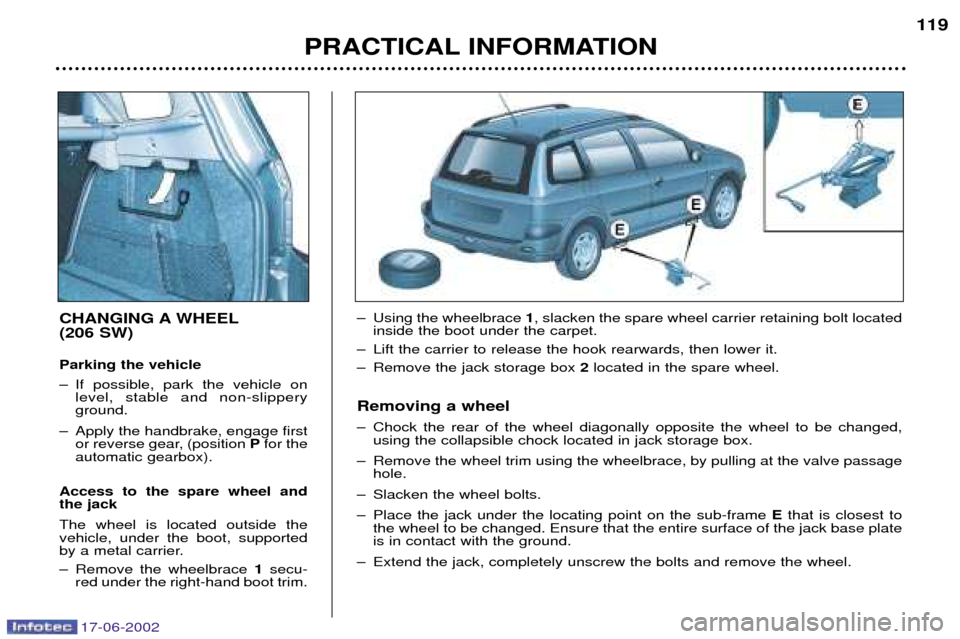
Access to the spare wheel andthe jack The wheel is located outside the vehicle, under the boot, supported
by a metal carrier.
Ð Remove the wheelbrace 1secu-
red under the right-hand boot trim. Ð Using the wheelbrace
1, slacken the spare wheel carrier retaining bolt located
inside the boot under the carpet.
Ð Lift the carrier to release the hook rearwards, then lower it.
Ð Remove the jack storage box 2located in the spare wheel.
Removing a wheel
Ð Chock the rear of the wheel diagonally opposite the wheel to be changed, using the collapsible chock located in jack storage box.
Ð Remove the wheel trim using the wheelbrace, by pulling at the valve passage hole.
Ð Slacken the wheel bolts.
Ð Place the jack under the locating point on the sub-frame Ethat is closest to
the wheel to be changed. Ensure that the entire surface of the jack base plate is in contact with the ground.
Ð Extend the jack, completely unscrew the bolts and remove the wheel.
Page 128 of 155
17-06-2002
PRACTICAL INFORMATION
120
Refitting the wheel
Ð After positioning the wheel, lightly pre-tighten the bolts using the wheelbrace.
Ð Compress the jack and release it.
Ð Fully tighten the bolts using the wheelbrace.
Ð Replace the trim except in the case of a space-saver spare wheel, starting atthe valve passage hole, and press it on using the palm of the hand.
Note: If the vehicle is fitted in production with a wheel anti-theft lock, the trim cap on the anti-theft bolt is in two parts.
Replacing the wheel in the carrier
Ð Replace the jack storage box in the wheel.
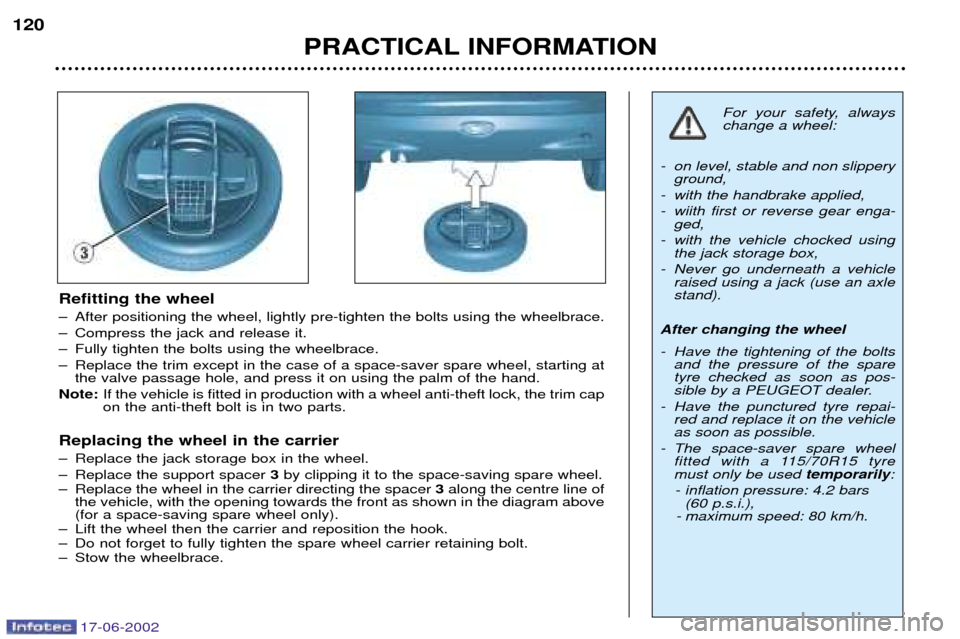
Ð Replace the support spacer 3by clipping it to the space-saving spare wheel.
Ð Replace the wheel in the carrier directing the spacer 3along the centre line of
the vehicle, with the opening towards the front as shown in the diagram above (for a space-saving spare wheel only).
Ð Lift the wheel then the carrier and reposition the hook.
Ð Do not forget to fully tighten the spare wheel carrier retaining bolt.
Ð Stow the wheelbrace.
For your safety, always change a wheel:
- on level, stable and non slippery ground,
- with the handbrake applied,
- wiith first or reverse gear enga- ged,
- with the vehicle chocked using the jack storage box,
- Never go underneath a vehicle raised using a jack (use an axle stand).
After changing the wheel
- Have the tightening of the bolts and the pressure of the spare tyre checked as soon as pos-
sible by a PEUGEOT dealer.
- Have the punctured tyre repai- red and replace it on the vehicleas soon as possible.
- The space-saver spare wheel fitted with a 115/70R15 tyremust only be used temporarily:
- inflation pressure: 4.2 bars(60 p.s.i.),
- maximum speed: 80 km/h.
Page 129 of 155

17-06-2002
PRACTICAL INFORMATION121
SPECIAL FEATURES OF
ALLOY WHEELS Bolt covers Alloy wheel bolts are covered by chrome trims. Use tool 4to remove the trims befo-
re slackening the bolts.
Tool 4is located:
- on the saloon, on the rear right inner panel of the boot,
- on the 206 SW, in the jack storage compartment. Fitting the spare wheelIf your vehicle is equipped with a steel spare wheel, when fitting it, it isnormal
to notice that the bolt
washers do not come into contact
with the rim. The spare wheel issecured by the cone-shape of eachbolt. Fitting snow tyres If you fit snow tyres that are moun- ted on steel rims onto your vehicle, itis essential that you use special
bolts available from your PEUGEOT
dealer. Anti-theft bolt* If your wheels are fitted with an anti- theft bolt (one per wheel), the chro-me trim and then the plastic covermust be removed, using tool
4, befo-
re it is unscrewed using one of thetwo anti-theft sockets (which weregiven to you on delivery of yourvehicle along with the duplicate keysand the confidential card) and thewheelbrace 1.
Note: make a careful note of the
code number engraved on the top of
the anti-theft socket. This will enableyou to obtain a duplicate anti-theft
socket from your PEUGEOT dealer.
* According to model and destination.
Page 130 of 155
17-06-2002
PRACTICAL INFORMATION
122
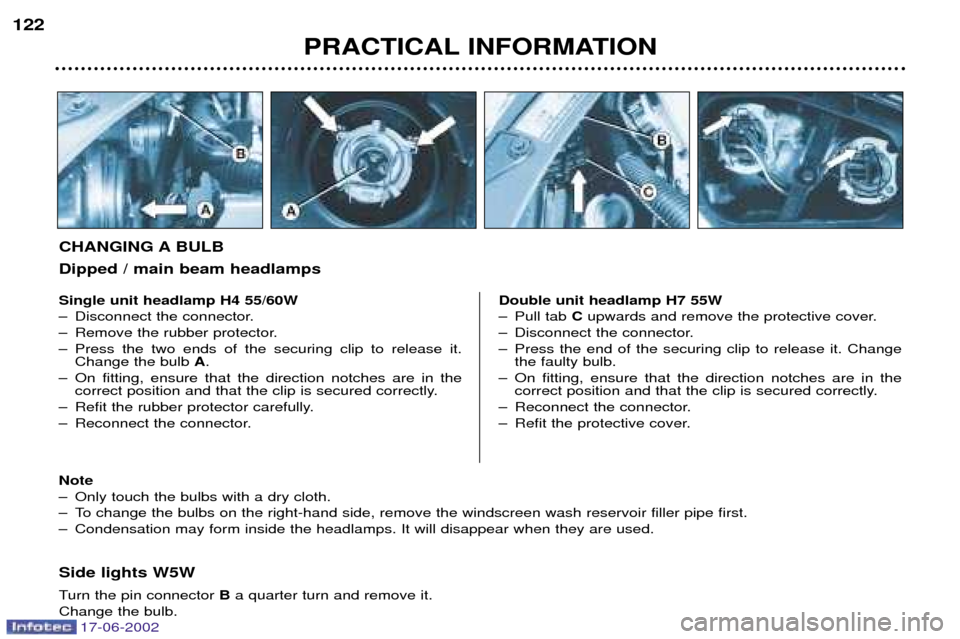
Side lights W5W
Turn the pin connector
Ba quarter turn and remove it.
Change the bulb.
Single unit headlamp H4 55/60W
Ð Disconnect the connector.
Ð Remove the rubber protector.
Ð Press the two ends of the securing clip to release it.
Change the bulb A.
Ð On fitting, ensure that the direction notches are in the correct position and that the clip is secured correctly.
Ð Refit the rubber protector carefully.
Ð Reconnect the connector. Double unit headlamp H7 55W
Ð Pull tab
Cupwards and remove the protective cover.
Ð Disconnect the connector.
Ð Press the end of the securing clip to release it. Change the faulty bulb.
Ð On fitting, ensure that the direction notches are in the correct position and that the clip is secured correctly.
Ð Reconnect the connector.
Ð Refit the protective cover.
CHANGING A BULB Dipped / main beam headlamps
Note
Ð Only touch the bulbs with a dry cloth.
Ð To change the bulbs on the right-hand side, remove the windscreen wash reservoir filler pipe first.
Ð Condensation may form inside the headlamps. It will disappear when they are used.