ECO mode Peugeot 207 CC 2014 User Guide
[x] Cancel search | Manufacturer: PEUGEOT, Model Year: 2014, Model line: 207 CC, Model: Peugeot 207 CC 2014Pages: 232, PDF Size: 11.11 MB
Page 52 of 232
2
i
i
COMFORT
50
207CC_EN_CHAP02_CONFORT_ED01-2014
When the engine is cold, to prevent
too great a distribution of cold air,
the air fl ow will only reach its opti-
mum level gradually.
In cold weather, it favours the distri-
bution of warm air to the windscreen,
the side windows and the footwells
only. On entering the vehicle, if the in-
terior temperature is much colder
or warmer than the comfort value,
there is no need to alter the value
displayed in order to obtain the re-
quired level of comfort. The system
corrects the temperature differ-
ence automatically and as quickly
as possible.
The air conditioning can only operate
with the engine running.
The driver and front passen-
ger can each set the tempera-
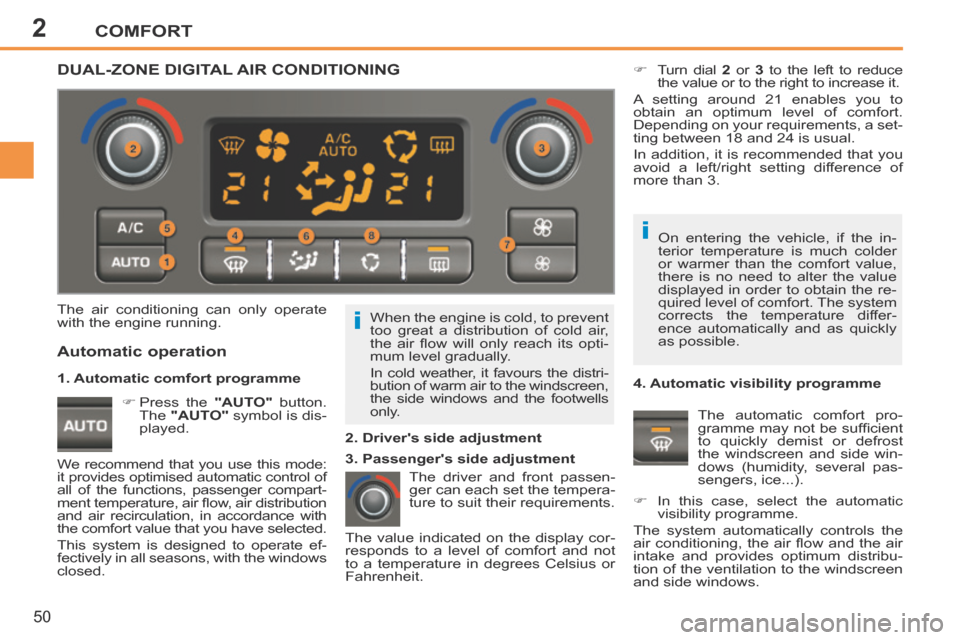
ture to suit their requirements. Turn dial
2 or 3 to the left to reduce
the value or to the right to increase it.
A setting around 21 enables you to
obtain an optimum level of comfort.
Depending on your requirements, a set-
ting between 18 and 24 is usual.
In addition, it is recommended that you
avoid a left/right setting difference of
more than 3.
4. Automatic visibility programme The automatic comfort pro-
gramme may not be suffi cient
to quickly demist or defrost
the windscreen and side win-
dows (humidity, several pas-
sengers, ice...).
In this case, select the automatic visibility programme.
The system automatically controls the
air conditioning, the air fl ow and the air
intake and provides optimum distribu-
tion of the ventilation to the windscreen
and side windows.
Automatic operation
Press the "AUTO" button.
The "AUTO" symbol is dis-
played. 2. Driver's side adjustment
DUAL-ZONE DIGITAL AIR CONDITIONING
We recommend that you use this mode:
it provides optimised automatic control of
all of the functions, passenger compart-
ment temperature, air fl ow, air distribution
and air recirculation, in accordance with
the comfort value that you have selected.
This system is designed to operate ef-
fectively in all seasons, with the windows
closed. The value indicated on the display cor-
responds to a level of comfort and not
to a temperature in degrees Celsius or
Fahrenheit.
1. Automatic comfort programme
3. Passenger's side adjustment
Page 83 of 232
4
!
81
VISIBILITY
207CC_EN_CHAP04_VISIBILITE_ED01-2014
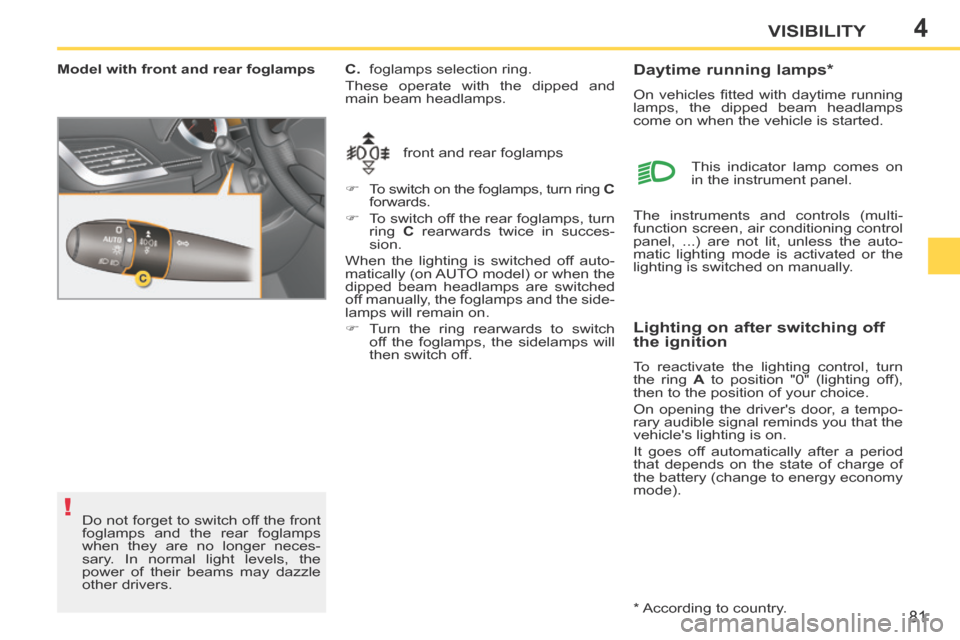
Model with front and rear foglamps front and rear foglamps
C. foglamps selection ring.
These operate with the dipped and
main beam headlamps.
To switch on the foglamps, turn ring
C
forwards.
To switch off the rear foglamps, turn ring C rearwards twice in succes-
sion.
When the lighting is switched off auto-
matically (on AUTO model) or when the
dipped beam headlamps are switched
off manually, the foglamps and the side-
lamps will remain on.
Turn the ring rearwards to switch off the foglamps, the sidelamps will
then switch off.
Do not forget to switch off the front
foglamps and the rear foglamps
when they are no longer neces-
sary. In normal light levels, the
power of their beams may dazzle
other drivers.
Lighting on after switching off
the ignition
To reactivate the lighting control, turn
the ring A to position "0" (lighting off),
then to the position of your choice.
On opening the driver's door, a tempo-
rary audible signal reminds you that the
vehicle's lighting is on.
It goes off automatically after a period
that depends on the state of charge of
the battery (change to energy economy
mode). This indicator lamp comes on
in the instrument panel.
* According to country.
Daytime running lamps *
On vehicles fi tted with daytime running
lamps, the dipped beam headlamps
come on when the vehicle is started.
The instruments and controls (multi-
function screen, air conditioning control
panel, ...) are not lit, unless the auto-
matic lighting mode is activated or the
lighting is switched on manually.
Page 87 of 232
4
i
85
VISIBILITY
207CC_EN_CHAP04_VISIBILITE_ED01-2014
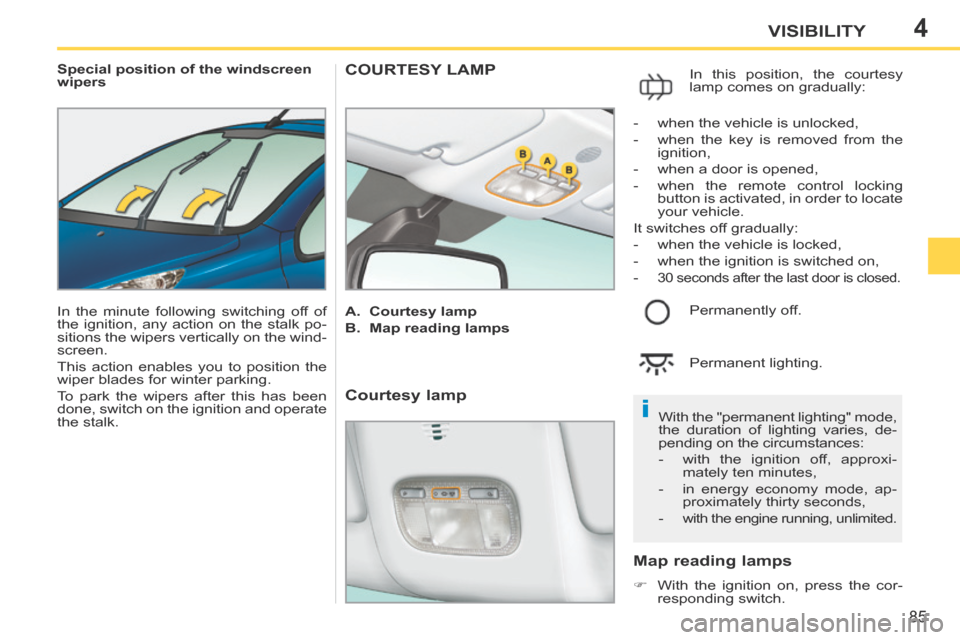
Special position of the windscreen
wipers
In the minute following switching off of
the ignition, any action on the stalk po-
sitions the wipers vertically on the wind-
screen.
This action enables you to position the
wiper blades for winter parking.
To park the wipers after this has been
done, switch on the ignition and operate
the stalk. COURTESY LAMP
A. Courtesy lamp
B. Map reading lamps In this position, the courtesy
lamp comes on gradually:
Map reading lamps
With the ignition on, press the cor-
responding switch. With the "permanent lighting" mode,
the duration of lighting varies, de-
pending on the circumstances:
- with the ignition off, approxi-
mately ten minutes,
- in energy economy mode, ap- proximately thirty seconds,
- with the engine running, unlimited.
- when the vehicle is unlocked,
- when the key is removed from the ignition,
- when a door is opened,
- when the remote control locking button is activated, in order to locate
your vehicle.
It switches off gradually:
- when the vehicle is locked,
- when the ignition is switched on,
-
30 seconds after the last door is closed.
Permanently off.
Permanent lighting.
Courtesy lamp
Page 112 of 232
7
!
DRIVING
11 0
207CC_EN_CHAP07_CONDUITE_ED01-2014
* According to engine.
GEAR SHIFT INDICATOR *
System which reduces fuel consumption
by advising the driver to change up on
vehicles fi tted with a manual gearbox.
Operation
The system intervenes only when driv-
ing economically.
Depending on the driving situation and
your vehicle's equipment, the system
may advise you to skip one or more
gears. You can follow this instruction
without engaging the intermediate
gears.
The gear recommended should not
be considered compulsory. In fact, the
confi guration of the road, the amount
of traffi c and safety remain determining
factors when choosing the best gear.
Therefore, the driver remains responsi-
ble for deciding whether or not to follow
the advice given by the system.
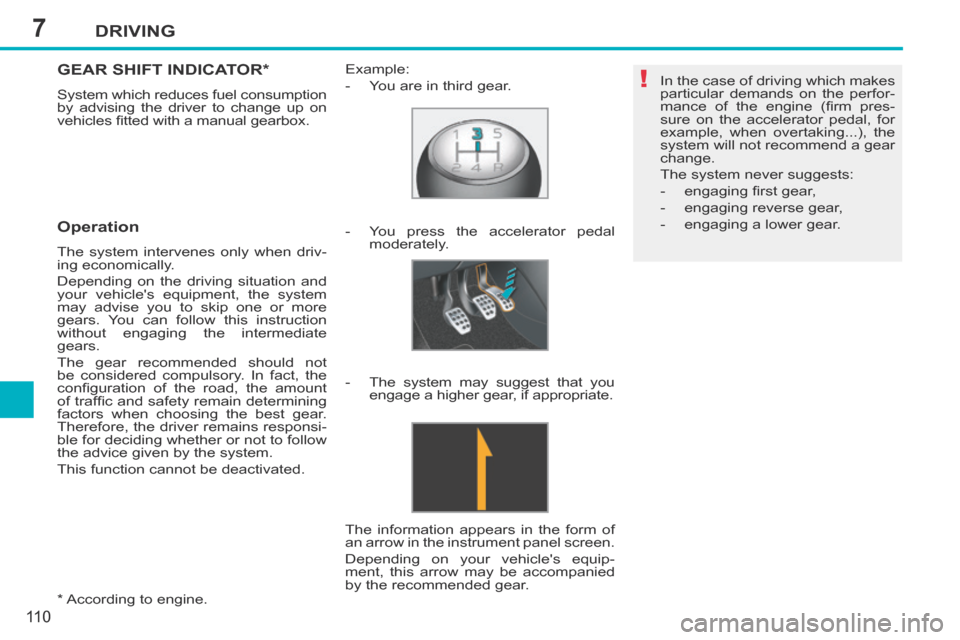
This function cannot be deactivated. Example:
- You are in third gear.
- You press the accelerator pedal
moderately.
- The system may suggest that you engage a higher gear, if appropriate.
The information appears in the form of
an arrow in the instrument panel screen.
Depending on your vehicle's equip-
ment, this arrow may be accompanied
by the recommended gear. In the case of driving which makes
particular demands on the perfor-
mance of the engine (fi rm pres-
sure on the accelerator pedal, for
example, when overtaking...), the
system will not recommend a gear
change.
The system never suggests:
- engaging fi rst gear,
- engaging reverse gear,
- engaging a lower gear.
Page 115 of 232
7
!i
i
DRIVING
11 3
207CC_EN_CHAP07_CONDUITE_ED01-2014
Stopping the vehicle
Before switching off the engine, you
can engage position P or N to place the
gearbox in neutral.
In both cases, apply the parking brake
to immobilise the vehicle.
Operating fault
There is a risk of damage to the
gearbox:
- if you press the accelerator and brake pedals at the same time,
- if you force the movement of the gear lever from the P posi-
tion to another position when
the battery is fl at.
To reduce fuel consumption when
at a prolonged standstill with the
engine running (traffi c jam...), put
the gear lever in the N position and
apply the parking brake.
Manual operation
Select position M for sequential
changing of the four gears.
Push the lever towards the + sign to
change up a gear.
Pull the lever towards the - sign to
change down a gear.
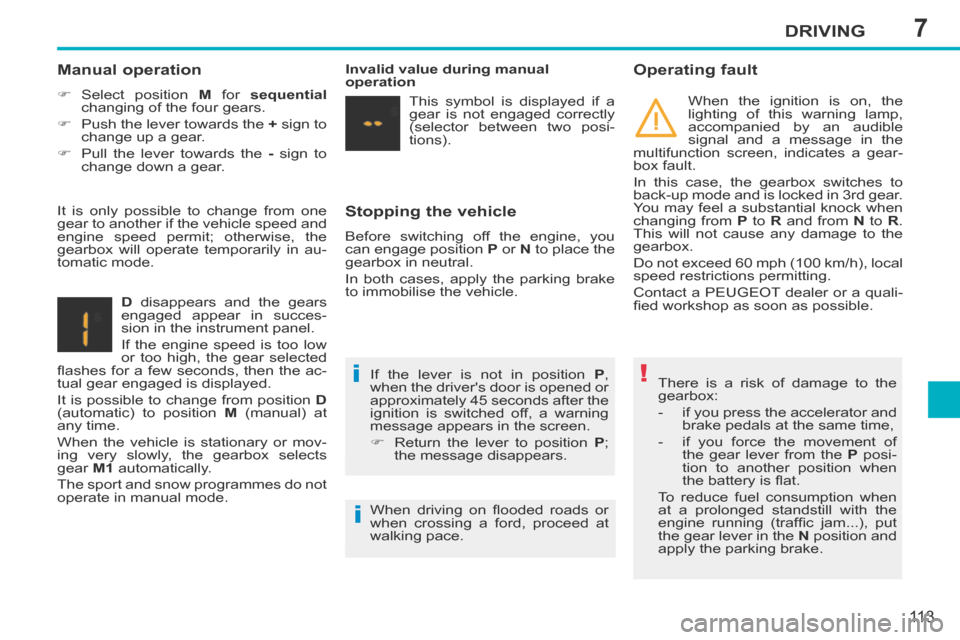
D disappears and the gears
engaged appear in succes-
sion in the instrument panel.
If the engine speed is too low
or too high, the gear selected
fl ashes for a few seconds, then the ac-
tual gear engaged is displayed.
It is possible to change from position D
(automatic) to position M (manual) at
any time.
When the vehicle is stationary or mov-
ing very slowly, the gearbox selects
gear M1 automatically.
The sport and snow programmes do not
operate in manual mode. If the lever is not in position
P ,
when the driver's door is opened or
approximately 45 seconds after the
ignition is switched off, a warning
message appears in the screen.
Return the lever to position P ;
the message disappears.
It is only possible to change from one
gear to another if the vehicle speed and
engine speed permit; otherwise, the
gearbox will operate temporarily in au-
tomatic mode.
Invalid value during manual
operation
This symbol is displayed if a
gear is not engaged correctly
(selector between two posi-
tions). When the ignition is on, the
lighting of this warning lamp,
accompanied by an audible
signal and a message in the
multifunction screen, indicates a gear-
box fault.
In this case, the gearbox switches to
back-up mode and is locked in 3rd gear.
You may feel a substantial knock when
changing from P to R and from N to R .
This will not cause any damage to the
gearbox.
Do not exceed 60 mph (100 km/h), local
speed restrictions permitting.
Contact a PEUGEOT dealer or a quali-
fi ed workshop as soon as possible.
When driving on fl ooded roads or
when crossing a ford, proceed at
walking pace.
Page 117 of 232
7
!
DRIVING
11 5
207CC_EN_CHAP07_CONDUITE_ED01-2014
On a steep descent, the speed lim-
iter will not be able to prevent the
vehicle from exceeding the pro-
grammed speed.
To avoid any risk of jamming of the
pedals:
- ensure that the mat is secured correctly,
- do not fi t one mat on top of an- other.
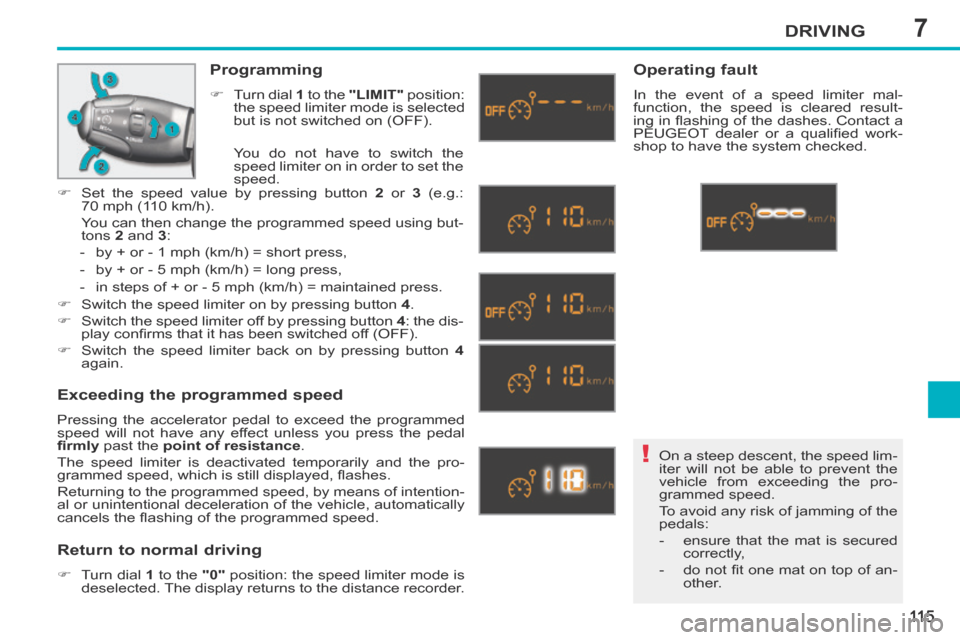
Programming
Turn dial 1 to the "LIMIT" position:
the speed limiter mode is selected
but is not switched on (OFF).
Exceeding the programmed speed
Pressing the accelerator pedal to exceed the programmed
speed will not have any effect unless you press the pedal
fi rmly past the point of resistance .
The speed limiter is deactivated temporarily and the pro-
grammed speed, which is still displayed, fl ashes.
Returning to the programmed speed, by means of intention-
al or unintentional deceleration of the vehicle, automatically
cancels the fl ashing of the programmed speed.
Return to normal driving
Turn dial 1 to the "0" position: the speed limiter mode is
deselected. The display returns to the distance recorder.
Operating fault
In the event of a speed limiter mal-
function, the speed is cleared result-
ing in fl ashing of the dashes. Contact a
PEUGEOT dealer or a qualifi ed work-
shop to have the system checked.
You do not have to switch the
speed limiter on in order to set the
speed.
Set the speed value by pressing button 2 or 3 (e.g.:
70 mph (110 km/h).
You can then change the programmed speed using but- tons 2 and 3 :
- by + or - 1 mph (km/h) = short press,
- by + or - 5 mph (km/h) = long press,
- in steps of + or - 5 mph (km/h) = maintained press.
Switch the speed limiter on by pressing button 4 .
Switch the speed limiter off by pressing button 4 : the dis-
play confi rms that it has been switched off (OFF).
Switch the speed limiter back on by pressing button 4
again.
Page 118 of 232
7
i
DRIVING
11 6
207CC_EN_CHAP07_CONDUITE_ED01-2014
CRUISE CONTROL
System which automatically maintains
the speed of the vehicle at the value
programmed by the driver, without any
action on the accelerator pedal.
The cruise control is switched on
manually: it requires a minimum vehicle
speed of 25 mph (40 km/h), as well as
the engaging of:
- fourth gear on a manual gearbox,
- second gear on an automatic gear- box in sequential mode,
- position D on an automatic gearbox.
The cruise control is switched off man-
ually or by pressing the brake or clutch
pedal or on triggering of the ESP sys-
tem for safety reasons.
It is possible to exceed the programmed
speed temporarily by pressing the ac-
celerator pedal.
To return to the programmed speed,
simply release the accelerator pedal.
Switching off the ignition cancels any
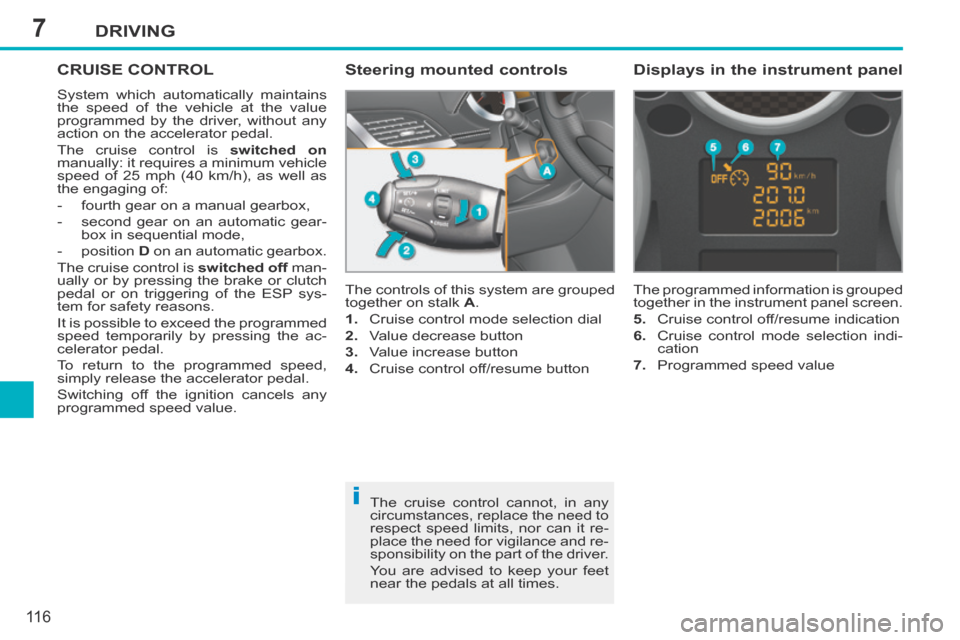
programmed speed value. The controls of this system are grouped
together on stalk
A .
1. Cruise control mode selection dial
2. Value decrease button
3. Value increase button
4. Cruise control off/resume button The programmed information is grouped
together in the instrument panel screen.
5. Cruise control off/resume indication
6. Cruise control mode selection indi-
cation
7. Programmed speed value
Steering mounted controls Displays in the instrument panel
The cruise control cannot, in any
circumstances, replace the need to
respect speed limits, nor can it re-
place the need for vigilance and re-
sponsibility on the part of the driver.
You are advised to keep your feet
near the pedals at all times.
Page 119 of 232
7
!
DRIVING
11 7
207CC_EN_CHAP07_CONDUITE_ED01-2014
When the cruise control is switched
on, be careful if you maintain the
pressure on one of the programmed
speed changing buttons: this may
result in a very rapid change in the
speed of your vehicle.
Do not use the cruise control on
slippery roads or in heavy traffi c.
On a steep descent, the cruise
control will not be able to prevent
the vehicle from exceeding the pro-
grammed speed.
To avoid any risk of jamming of the
pedals:
- ensure that the mat is secured correctly,
- never fi t one mat on top of an- other.
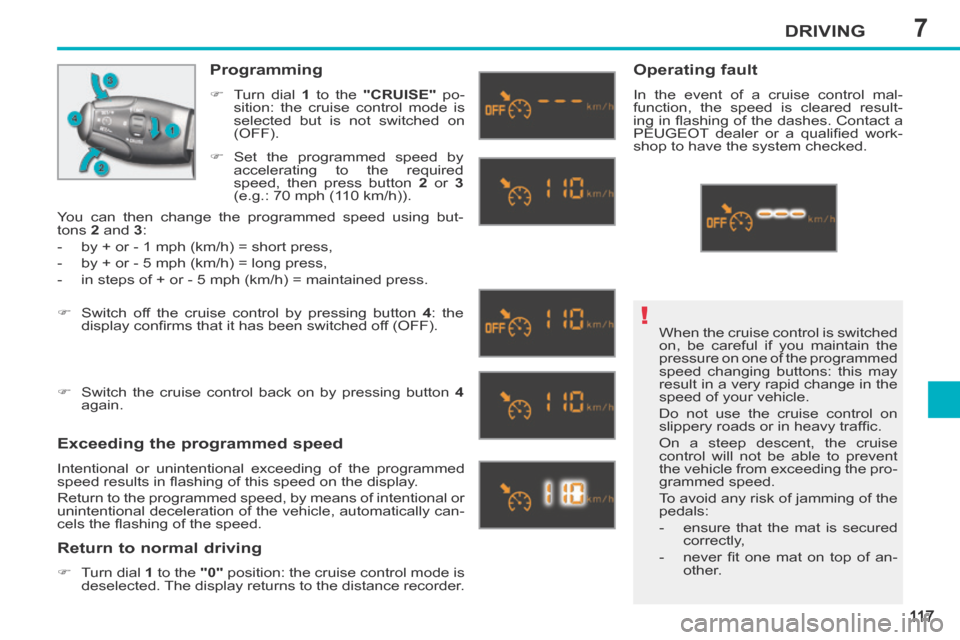
Programming
Turn dial 1 to the "CRUISE" po-
sition: the cruise control mode is
selected but is not switched on
(OFF).
Exceeding the programmed speed
Intentional or unintentional exceeding of the programmed
speed results in fl ashing of this speed on the display.
Return to the programmed speed, by means of intentional or
unintentional deceleration of the vehicle, automatically can-
cels the fl ashing of the speed.
Return to normal driving
Turn dial 1 to the "0" position: the cruise control mode is
deselected. The display returns to the distance recorder.
Operating fault
In the event of a cruise control mal-
function, the speed is cleared result-
ing in fl ashing of the dashes. Contact a
PEUGEOT dealer or a qualifi ed work-
shop to have the system checked.
Set the programmed speed by
accelerating to the required
speed, then press button 2 or 3
(e.g.: 70 mph (110 km/h)).
Switch off the cruise control by pressing button 4 : the
display confi rms that it has been switched off (OFF).
Switch the cruise control back on by pressing button 4
again.
You can then change the programmed speed using but-
tons
2 and 3 :
- by + or - 1 mph (km/h) = short press,
- by + or - 5 mph (km/h) = long press,
- in steps of + or - 5 mph (km/h) = maintained press.
Page 151 of 232
9
!
i
PRACTICAL INFORMATION
149
207CC_EN_CHAP09_INFO PRATIQUES_ED01-2014
A fl at battery prevents the engine
from starting (refer to the corre-
sponding paragraph).
If a roof operation is in progress,
it will be completed, but no further
operation is possible.
ENERGY ECONOMY MODE
System which manages the duration of
use of certain functions to conserve a
suffi cient level of charge in the battery.
After the engine has stopped, you can
still use functions such as the audio
equipment, windscreen wipers, dipped
beam headlamps, courtesy lamp, etc.
for a maximum combined duration of
thirty minutes.
Exiting economy mode
These functions are reactivated auto-
matically next time the vehicle is driven.
In order to resume the use of these
functions immediately, start the
engine and let it run for a few minutes.
The time available to you will then be
double the duration for which the engine
is left running. However, this period will al-
ways be between fi ve and thirty minutes.
Switching to economy mode
Once the thirty minutes are over, a
message appears on the multifunction
screen indicating that the vehicle has
switched to economy mode and the ac-
tive functions are put on standby.
CHANGING A WIPER BLADE
Procedure for replacing a worn wiper
blade with a new one without the use
of tools.
Removing a front wiper blade
Raise the corresponding wiper arm.
Unclip the wiper blade and remove it.
Fitting a front wiper blade
Check the size of the wiper blade as the shorter blade is fi tted on the
right-hand side of the vehicle.
Put the corresponding new wiper blade in place and clip it.
Fold down the wiper arm carefully.
LOAD REDUCTION MODE
System which manages the use of cer-
tain functions according to the level of
charge remaining in the battery.
When the vehicle is being driven, the
load reduction function temporarily deac-
tivates certain functions, such as the air
conditioning, the heated rear screen...
The deactivated functions are reactivated
automatically as soon as conditions permit.
Page 165 of 232
163
207CC_EN_CHAP11B_RNEG_ED01-2014
The PEUGEOT Connect Navigation (RNEG) is protected in such a way that it will only operate in your vehicle.
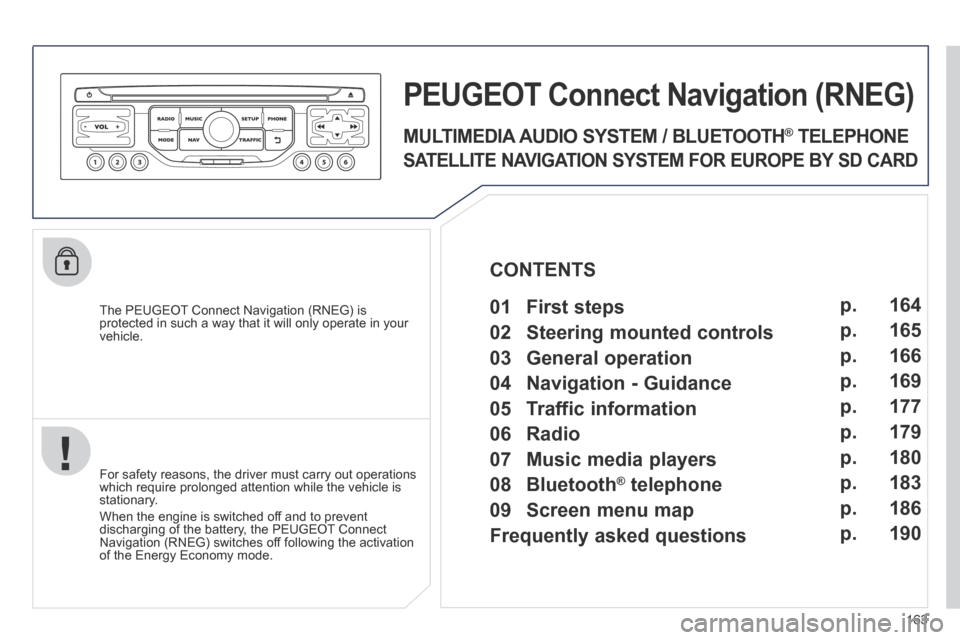
PEUGEOT Connect Nonnect Nonnectavigation (RNEG)
For safety reasons, the driver must carry out operations which require prolonged attention while the vehicle is stationary.
When the engine is switched off and to prevent discharging of the battery, the PEUGEOT Connect Navigation (RNEG) switches off following the activation of the Energy Economy mode.
MULTIMEDIA AUDIO SYSTEM / BLUETOOTH ® TELEPHONE
SATELLITE NAVIGATION SYSTEM FOR EUROPE BY SD CARD
01 First steps CONTENTS
02 Steering mounted controls
03 General operation
04 Navigation - Guidance
05 Traffic information
06 Radio
07 Music media players
08 Bluetooth
® telephone
09 Screen menu map
Frequently asked questions p.
p.
p.
p.
p.
p.
p.
p.
p.
p.
164
165
166
169
177
179
180
183
186
190