tow bar PEUGEOT 208 2021 Owners Manual
[x] Cancel search | Manufacturer: PEUGEOT, Model Year: 2021, Model line: 208, Model: PEUGEOT 208 2021Pages: 276, PDF Size: 8.02 MB
Page 5 of 276
3
Contents
Parking sensors 127
Visiopark 1 129
Park Assist 131
7Practical informationCompatibility of fuels 136
Refuelling 136
Misfuel prevention (Diesel) 137
Charging system (Electric) 137
Charging the traction battery (Electric) 143
Towing device 146
Towing device with quickly detachable towball 147
Roof bars 150
Snow chains 150
Very cold climate screens 151
Energy economy mode 152
Bonnet 153
Engine compartment 154
Checking levels 155
Checks 157
AdBlue® (BlueHDi) 159
Free-wheeling 161
Advice on care and maintenance 162
8In the event of a breakdownWarning triangle 164
Running out of fuel (Diesel) 164
Tool kit 164
Temporary puncture repair kit 166
Spare wheel 168
Changing a bulb 171
Fuses 175
12
V battery
/ Accessory battery 175
Towing the vehicle 178
9Technical dataEngine technical data and towed loads 181
Petrol engines 182
Diesel engines 184
Electric motor 185
Dimensions 186
Identification markings 186
10Touch screen BLUETOOTH audio systemFirst steps 187
Steering mounted controls 187
Menus 188
Radio 189
DAB (Digital Audio Broadcasting) radio 190
Media 191
Telephone 192
Settings 194
Frequently asked questions 194
11PEUGEOT Connect RadioFirst steps 196
Steering mounted controls 197
Menus 198
Applications 199
Radio 199
DAB (Digital Audio Broadcasting) radio 201
Media 201
Telephone 203
Settings 206
Frequently asked questions 207
12PEUGEOT Connect NavFirst steps 209
Steering mounted controls 210
Menus 210
Voice commands 212
Navigation 215
Connected navigation 218
Applications 220
Radio 223
DAB (Digital Audio Broadcasting) radio 224
Media 224
Telephone 226
Settings 228
Frequently asked questions 230
13Event data recorders
■
Alphabetical index
bit.ly/helpPSA
Access to additional videos
Page 62 of 276
60
Lighting and visibility
Automatic headlamp dipping
For more information, refer to the
General recommendations for
automatic lighting systems.
With the ring of the lighting control stalk in the
"AUTO" position and the function activated on
the touch screen, this system automatically
switches between dipped and main beam
headlamps, according to lighting and traffic
conditions, using a camera located at the top of
the windscreen.
This system is a driving aid. The driver remains responsible for
the vehicle's lighting, its correct use in the
prevailing light, visibility and traffic conditions,
and for compliance with driving and vehicle
regulations.
Guide-me-home and
welcome lighting
Guide-me-home lighting
Automatic
With the ring of the lighting control stalk in the
"AUTO" position and when the light is poor, the
dipped beam headlamps come on automatically
when the ignition is switched off.
You can activate/deactivate this function and adjust the guide-me-
home lighting duration in the Driving/Vehicle
touch screen menu.
Manual
► With the ignition off, pull the lighting control
stalk toward you ("headlamp flash") to activate/
deactivate the function.
Manual guide-me-home lighting goes off
automatically after a period of time.
Welcome lighting
When the vehicle is unlocked, if the ambient
light is low and the "Automatic illumination of
headlamps" function is activated, this system
automatically turns on certain exterior lamps
as well as certain lamps in the passenger
compartment.
You can activate/deactivate this function and adjust the welcome
lighting duration in the Driving
/ Vehicle touch
screen menu.
Door mirror spotlamps
These spotlamps facilitate access to the vehicle
by lighting the ground near the front doors.
The spotlamps come on automatically:
–
when the vehicle is unlocked.
–
when a door is opened.
–
when a request to locate the vehicle is
received from the remote control.
They also come on with the welcome lighting
and guide-me-home lighting functions.
They go off automatically after 30 seconds.
Automatic lighting systems - General
recommendations
The automatic lighting systems use a detection
camera, located at the top of the windscreen.
Operating limits
The system may be disrupted or not work
correctly:
–
When visibility conditions are poor
(e.g.
snowfall, heavy rain).
–
If the windscreen is dirty
, misted-up or
masked (e.g.
sticker) in front of the camera.
–
If the vehicle is facing highly reflective signs
or safety barrier reflectors.
The system is not able to detect:
–
Road users that do not have their own
lighting, such as pedestrians.
–
V
ehicles with hidden lighting (e.g. travelling
behind a safety barrier on the motorway).
–
V
ehicles at the top or bottom of a steep
slope, on winding roads, on crossroads.
Maintenance
Clean the windscreen regularly,
particularly the area in front of the camera.
The internal surface of the windscreen can
also become misted around the camera.
In humid and cold weather, demist the
windscreen regularly.
Do not allow snow to accumulate on the
bonnet or roof of the vehicle as this could
obstruct the camera.
Page 117 of 276
11 5
Driving
6can lead to an incorrect evaluation of
distances and result in inappropriate
acceleration or braking of the vehicle.
Pay particular attention:
– When motorcycles are present and
when there are vehicles staggered across the
traffic lane.
–
When entering a tunnel or crossing a
bridge.
If any of the following malfunctions
occurs, do not use the system:
–
Following an impact on the windscreen
close to the camera or on the front bumper
(versions with radar).
–
Brake lamps not working.
If the vehicle has undergone any of the
following modifications, do not use the
system:
–
Carrying long objects on roof bars.
–
Towing.
–
Front end of the vehicle modified (for
example by adding long-range headlamps or
painting the front bumper).
–
Obstructed radar
.
Lane positioning assist
For more information, refer to the
General recommendations on the use
of driving and manoeuvring aids .
The system identifies the limits of the traffic
lane and steers the vehicle inside this lane to
maintain it in the lateral position chosen by the
driver.
To do this, the system uses a camera placed on
the upper part of the windscreen.
This function is primarily suitable for driving on
motorways and main roads.
Operating conditions
– Adaptive cruise control active.
– T raffic lane marked out by lines on both sides.
–
ESC system operational.
–
ASR system activated.
–
No trailer detected.
–
No 'space-saver' spare wheel in use.
–
V
ehicle not subject to strong lateral g-forces.
–
Direction indicators not activated.
Activation/Deactivation
► With the Adaptive cruise control with Stop &
Go function activated, press this button.
The action is confirmed by:
–
The indicator lamp in the button lighting up
green.
–
The following symbol being displayed on the
instrument panel.
The colour of the symbol on the instrument panel
depends on the operating status of the system:
(grey colour)
One or more operating conditions is not
met; the system is paused.
(green colour)
All operating conditions are met; the
system is active.
(orange colour)
System malfunction.
If the driver no longer wishes to use the system
for a while, they can deactivate it by pressing the
button again.
The indicator lamp in the button goes off and the
symbol disappears from the instrument panel.
Page 130 of 276
128
Driving
Adjusting the audible signalDepending on version, with
PEUGEOT Connect Radio or
PEUGEOT Connect Nav, pressing this button
opens the window for adjusting the volume of
the audible signal.
Visual assistance
This supplements the audible signal by
displaying bars on the screen whose location
represents the distance between the obstacle
and the vehicle (white: more distant, orange:
close, red: very close).
When the obstacle is very close, the "Danger"
symbol is displayed on the screen.
Front parking sensors
Supplementing the rear parking sensors, the
front parking sensors are triggered when an
obstacle is detected in front and the speed of the
vehicle is below 6 mph (10
km/h).
Front parking sensor operation is suspended if
the vehicle stops for more than three seconds in
forward gear, if an obstacle is no longer detected
or the vehicle speed exceeds 6 mph (10 km/h).
The sound emitted by the speaker (front or rear) locates the obstacle relative to
the vehicle, in front or behind it.
Side parking sensors
Using four additional sensors located on the
sides of the bumpers, the system records the
position of obstacles during the manoeuvre and
indicates them when they are located alongside
the vehicle.
Only fixed obstacles are indicated
correctly. Moving obstacles detected at
the beginning of the manoeuvre may be
indicated mistakenly, while moving obstacles
that appear alongside the vehicle but were
not previously recorded will not be indicated.
Objects memorised during the
manoeuvre will no longer be stored after
switching off the ignition.
Deactivation/Activation
The settings are changed via the Driving/Vehicle touch screen
menu.
The system status is memorised when the
ignition is switched off.
The rear parking sensors system will be deactivated automatically if a trailer or
bicycle carrier is connected to a towing device
installed in accordance with the
manufacturer's recommendations.
In this case, the outline of a trailer is displayed
at the rear of the image of the vehicle.
The parking sensors are deactivated while the
Park Assist function is measuring a space.
For more information on the Park
Assist
function, refer to the corresponding
section.
When starting the vehicle, the graphic
and audible aids are only available after
the touch screen has started up.
Operating limits
If the boot is heavily loaded, the vehicle may tilt,
affecting distance measurements.
Malfunction
In the event of a malfunction when
changing into reverse gear, one of
these warning lamps lights up on the instrument
panel, accompanied by the display of a message
and an audible signal (short beep).
Have it checked by a PEUGEOT dealer or a
qualified workshop.
Visiopark 1
For more information, refer to the
General recommendations on the use
of driving and manoeuvring aids .
As soon as reverse gear is engaged with the
engine running, this system displays views of
your vehicle’s close surroundings on the touch
Page 136 of 276
134
Driving
(pavements, studs, etc.) or too thin (trees, posts,
wire fences, etc.).
–
If the boot is heavily loaded, the tilt of the
vehicle towards the rear may interfere with the
distance measurements.
Do not use the function under the
following exterior conditions:
–
Alongside a soft shoulder (e.g. ditch) or
quay or on the edge of a drop.
–
When the road surface is slippery (e.g. ice).
If any of the following malfunctions
occurs, do not use the system:
–
If a tyre is under-inflated.
–
If one of the bumpers is damaged.
–
If one of the cameras is faulty
.
If the vehicle has undergone any of the
following modifications, do not use the
function:
–
When carrying an object extending beyond
the dimensions of the vehicle (ladder on the
roof bars, bicycle carrier on the tailgate, etc.).
–
With a non-approved towball in place.
–
With snow chains fitted.
–
When driving on a small-diameter or
"space-saver" type spare wheel.
–
When the wheels fitted are a different size
from the original ones.
–
After modifying one or both bumpers
(added protection).
– If the sensors have been repainted other
than by the PEUGEOT dealer network.
–
With sensors not approved for the vehicle.
Malfunctions
When the function is not activated, this
indicator lamp will flash briefly and an
audible signal will be emitted to indicate a
system malfunction.
If the malfunction occurs while the system is in
use, the warning lamp goes off.
If the parking sensor malfunction
occurs during use, indicated by
one of these warning lamps coming on, it causes
the function to deactivate.
In the event of a malfunction, have the system
checked by a PEUGEOT dealer or a qualified
workshop.
In the event of a power steering
malfunction, this warning lamp is
displayed on the instrument panel, accompanied
by a warning message.
You must stop as soon as it is safe to do so.
Contact a PEUGEOT dealer or a qualified
workshop.
Page 152 of 276
150
Practical information
Only use chains that have been designed to be
fitted on the type of wheel on the vehicle:Original tyre size Maximum link size185/65 R15 9 mm (Polaire XP9)
195/55 R16 9 mm (Polaire XP9)
205/45 R17 Cannot be fitted with
chains
For more information on snow chains, contact a
PEUGEOT dealer or a qualified workshop.
Installation tips
► To fit the snow chains during a journey, stop
the vehicle on a flat surface at the side of the
road.
► Apply the parking brake and position any
wheel chocks under the wheels to prevent
movement of the vehicle.
► Fit the snow chains following the instructions
provided by the manufacturer.
► Move off gently and drive for a few moments,
without exceeding 31 mph (50 km/h).
► Stop the vehicle and check that the snow
chains are correctly tightened.
It is strongly recommended that you
practise fitting the snow chains on a level
and dry surface before setting off.
Avoid driving with snow chains on roads that have been cleared of snow to avoid
damaging the vehicle's tyres and the road
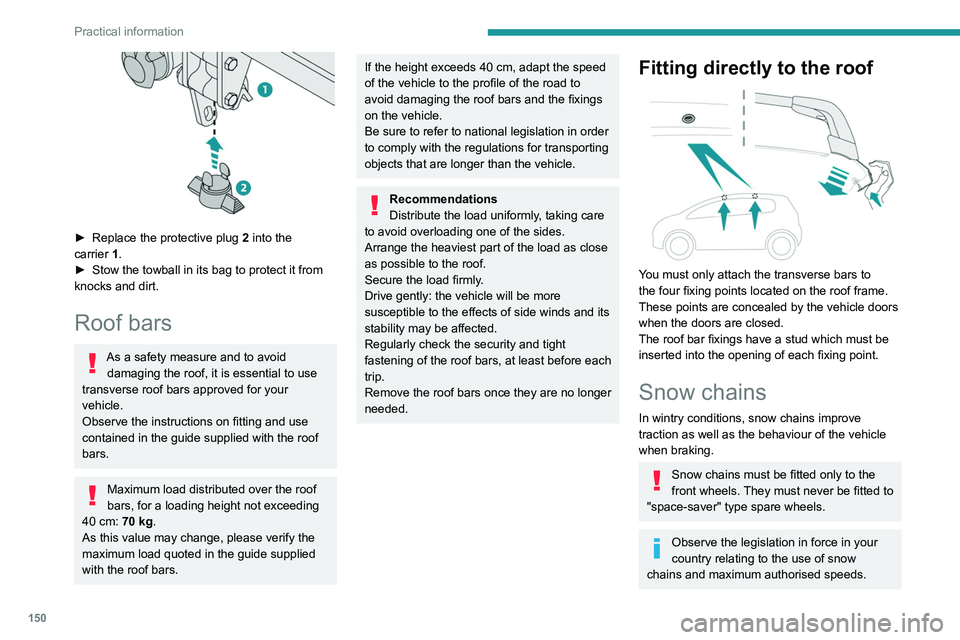
► Replace the protective plug 2 into the
carrier 1.
►
Stow the towball in its bag to protect it from
knocks and dirt.
Roof bars
As a safety measure and to avoid damaging the roof, it is essential to use
transverse roof bars approved for your
vehicle.
Observe the instructions on fitting and use
contained in the guide supplied with the roof
bars.
Maximum load distributed over the roof
bars, for a loading height not exceeding
40 cm: 70
kg.
As this value may change, please verify the
maximum load quoted in the guide supplied
with the roof bars.
If the height exceeds 40 cm, adapt the speed
of the vehicle to the profile of the road to
avoid damaging the roof bars and the fixings
on the vehicle.
Be sure to refer to national legislation in order
to comply with the regulations for transporting
objects that are longer than the vehicle.
Recommendations
Distribute the load uniformly, taking care
to avoid overloading one of the sides.
Arrange the heaviest part of the load as close
as possible to the roof.
Secure the load firmly.
Drive gently: the vehicle will be more
susceptible to the effects of side winds and its
stability may be affected.
Regularly check the security and tight
fastening of the roof bars, at least before each
trip.
Remove the roof bars once they are no longer
needed.
Fitting directly to the roof
You must only attach the transverse bars to
the four fixing points located on the roof frame.
These points are concealed by the vehicle doors
when the doors are closed.
The roof bar fixings have a stud which must be
inserted into the opening of each fixing point.
Snow chains
In wintry conditions, snow chains improve
traction as well as the behaviour of the vehicle
when braking.
Snow chains must be fitted only to the
front wheels. They must never be fitted to
"space-saver" type spare wheels.
Observe the legislation in force in your
country relating to the use of snow
chains and maximum authorised speeds.
Page 160 of 276
158
Practical information
Timing and accessory kits
The timing and accessory kits are used from the time the engine is started until it
is switched off. It is normal for them to wear over
time.
A faulty timing or accessory kit can damage
the engine, rendering it unusable. Observe the
recommended replacement frequency, stated in
distance travelled or time elapsed, whichever is
reached first.
AdBlue® (BlueHDi)
To respect the environment and ensure compliance with the Euro 6 standard, without
adversely affecting the performance or fuel
consumption of its Diesel engines, PEUGEOT
has taken the decision to equip its vehicles with
a system that combines SCR (Selective Catalytic
Reduction) with a Diesel Particle Filter (DPF) for
the treatment of exhaust gases.
SCR system
Using a liquid called AdBlue® that contains
urea, a catalytic converter turns up to 85% of
the nitrogen oxides (NOx) into nitrogen and
water, which are harmless to health and the
environment.
The AdBlue® is contained in a special
tank holding about 15 litres.
Its capacity allows a driving range of
approximately 3,900 miles (6,500 km), which
Manual gearbox
The gearbox does not require any
maintenance (no oil change).
Automatic gearbox
The gearbox does not require any maintenance (no oil change).
Manual parking brake
If you notice excessive brake lever travel
or decreased effectiveness, the parking
brake must be adjusted, even between two
services.
This system must be checked by a PEUGEOT
dealer or a qualified workshop.
Electric parking brake
This system does not require any routine servicing. However, in the event of a
problem, do not hesitate to have the system
checked by a PEUGEOT dealer or a qualified
workshop.
For more information on the Electric
parking brake, refer to the
corresponding section.
Brake pads
Brake wear depends on the style of
driving, particularly in the case of vehicles
used in town, over short distances. It may be
necessary to have the condition of the brakes
checked, even between vehicle services.
Unless there is a leak in the circuit, a drop in the
brake fluid level indicates that the brake pads
are worn.
After washing the vehicle, moisture, or in wintry conditions, ice can form on the
brake discs and pads: braking efficiency may
be reduced. Gently dab the brakes to dry and
defrost them.
Brake disc/drum wear
For any information on checking brake
disc/drum wear, contact a PEUGEOT
dealer or a qualified workshop.
Wheels and tyres
The inflation pressure of all tyres, including the spare wheel, must be
checked on "cold” tyres.
The pressures indicated on the tyre pressure
label are valid for "cold" tyres. If you have driven
for more than 10 minutes or more than 6 miles
(10 kilometres) at over 31 mph (50
km/h), add
0.3 bar (30 kPa) to the values indicated on the
label.
Under-inflation increases energy
consumption. Non-compliant tyre
pressures cause tyres to wear prematurely
and have an adverse effect on the vehicle's
road holding - risk of accident! Driving with worn or damaged tyres reduces the
braking and road holding performance of the
vehicle. Regularly check the condition of the
tyres (tread and sidewalls) and rims as well as
the presence of the valve caps.
When the wear indicators no longer appear set
back from the tread, the depth of the grooves is
less than 1.6 mm; replace the tyres as soon as
possible.
Using different size wheels and tyres from those
specified can affect the lifetime of tyres, wheel
rotation, ground clearance, the speedometer
reading and have an adverse effect on road
holding.
Fitting different tyres on the front and rear axles
can cause the ESC to mistime.
Always mark the direction of rotation on the tyres
that will be stored when fitting winter or summer
tyres. Store them in a cool, dry place and away
from direct exposure to the sun's rays.
Winter or 4-seasons tyres can be
identified by this symbol on their
sidewalls.
Shock absorbers
It is not easy for drivers to detect when
shock absorbers are worn. Nevertheless,
the shock absorbers have a major impact on
road holding and braking performance.
For your safety and driving comfort, it is
important to have them regularly checked by a
PEUGEOT dealer or a qualified workshop.
Page 169 of 276
167
In the event of a breakdown
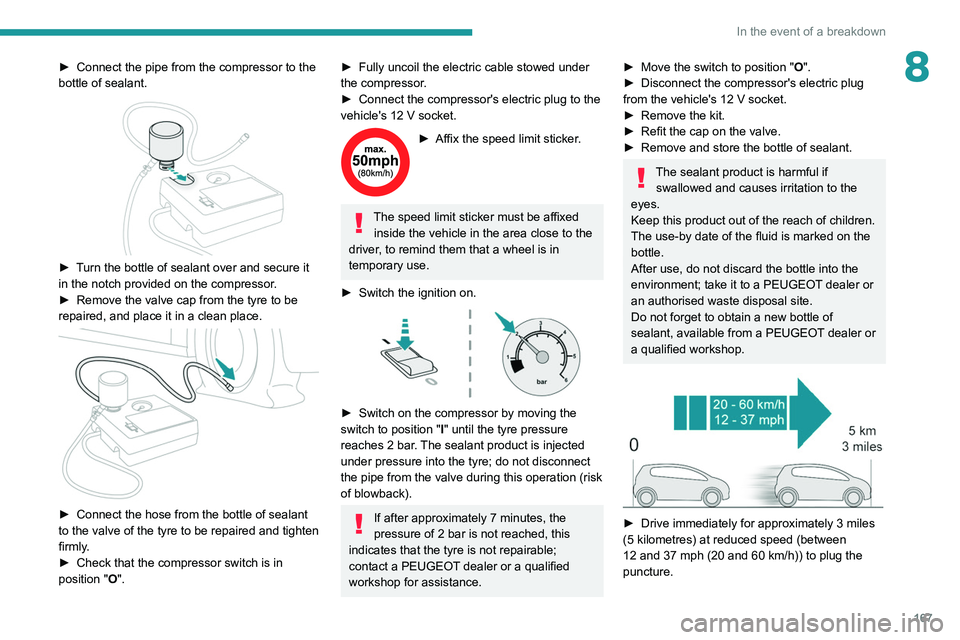
8► Connect the pipe from the compressor to the
bottle of sealant.
► Turn the bottle of sealant over and secure it
in the notch provided on the compressor.
►
Remove the valve cap from the tyre to be
repaired, and place it in a clean place.
► Connect the hose from the bottle of sealant
to the valve of the tyre to be repaired and tighten
firmly
.
►
Check that the compressor switch is in
position
"O".
► Fully uncoil the electric cable stowed under
the compressor .
►
Connect the compressor's electric plug to the
vehicle's 12
V socket.
► Affix the speed limit sticker .
The speed limit sticker must be affixed
inside the vehicle in the area close to the
driver, to remind them that a wheel is in
temporary use.
►
Switch the ignition on.
► Switch on the compressor by moving the
switch to position " I
" until the tyre pressure
reaches 2 bar. The sealant product is injected
under pressure into the tyre; do not disconnect
the pipe from the valve during this operation (risk
of blowback).
If after approximately 7 minutes, the
pressure of 2 bar is not reached, this
indicates that the tyre is not repairable;
contact a PEUGEOT dealer or a qualified
workshop for assistance.
► Move the switch to position " O ".
► Disconnect the compressor's electric plug
from the vehicle's 12
V socket.
►
Remove the kit.
►
Refit the cap on the valve.
►
Remove and store the bottle of sealant.
The sealant product is harmful if swallowed and causes irritation to the
eyes.
Keep this product out of the reach of children.
The use-by date of the fluid is marked on the
bottle.
After use, do not discard the bottle into the
environment; take it to a PEUGEOT dealer or
an authorised waste disposal site.
Do not forget to obtain a new bottle of
sealant, available from a PEUGEOT dealer or
a qualified workshop.
► Drive immediately for approximately 3 miles
(5 kilometres) at reduced speed (between
12 and 37 mph (20 and 60
km/h)) to plug the
puncture.
Page 170 of 276
168
In the event of a breakdown
► Stop to check the repair and the tyre
pressure using the kit.
With a tyre repaired using this type of kit,
do not exceed a speed of 50
mph
(80
km/h) and do not drive more than
50
miles (80 km).
You must contact a PEUGEOT dealer or a
qualified workshop to have the repair checked
and the tyre changed.
Checking/adjusting tyre
pressures
The compressor can be used, without injecting
sealant, to check and, if necessary, adjust the
tyre pressures.
►
Remove the valve cap from the tyre and keep
it in a clean place.
►
Uncoil
the pipe stowed under the compressor.
►
Screw the pipe onto the valve and tighten
firmly
.
►
Check that the compressor switch is in
position " O
".
►
Fully uncoil the electric cable stowed under
the compressor
.
►
Connect the compressor's electric plug to the
vehicle's 12
V socket.
►
Switch the ignition on.
►
Start the compressor by placing the switch at
position " I
" and adjust the pressure to the value
shown on the vehicle's tyre pressure label. To
deflate: press the black button located on the
compressor pipe, near the valve connection.
If after 7 minutes the pressure of 2 bar is
not reached, the tyre is damaged;
contact a PEUGEOT dealer or a qualified
workshop for assistance.
►
Once the correct pressure is reached, put the
switch in position " O
".
►
Remove the kit and stow it.
►
Refit the cap on the valve.
Spare wheel
Scan the QR Code on page 3 to view
explanatory videos.
For more information on the Tool kit,
refer to the corresponding section.
Spare wheel tyre pressure
The inflation pressure for the spare
wheel is indicated on the tyre pressure label
- ensure that its inflation pressure is checked
regularly.
For more information on Identification
markings, particularly the tyre pressure label,
refer to the corresponding section.
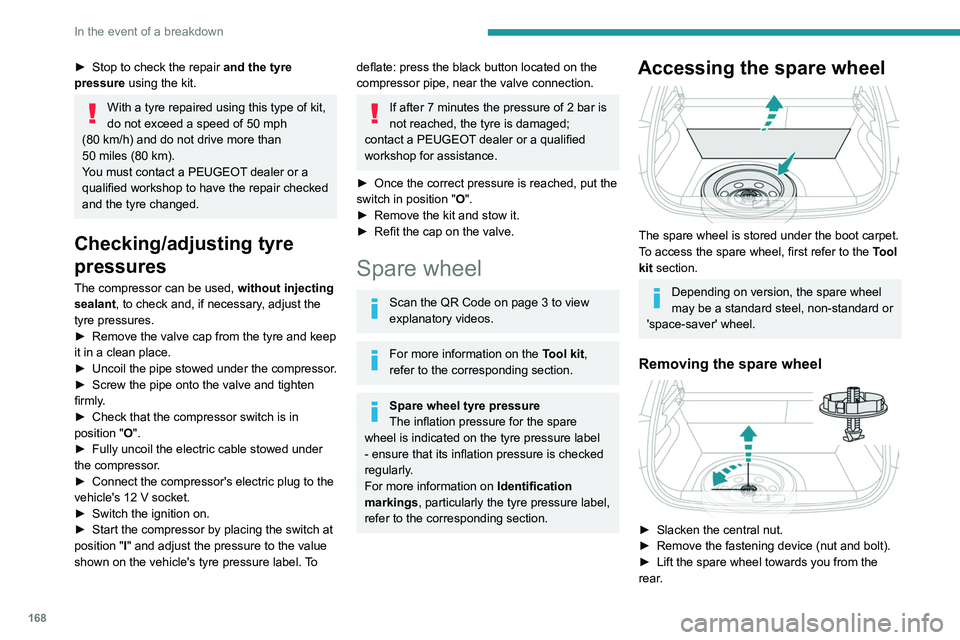
Accessing the spare wheel
The spare wheel is stored under the boot carpet.
To access the spare wheel, first refer to the Tool
kit
section.
Depending on version, the spare wheel
may be a standard steel, non-standard or
'space-saver' wheel.
Removing the spare wheel
► Slacken the central nut.
► Remove the fastening device (nut and bolt).
►
Lift the spare wheel towards you from the
rear
.
► Take the wheel out of the boot.
Putting the spare wheel back in place
The punctured wheel cannot be put
under the boot floor.
► Put the spare wheel back in place in its
housing.
► Slacken the nut on the bolt by a few turns.
► Position the fastening device (nut and bolt) in
the middle of the wheel.
► Tighten the central nut sufficiently to retain
the wheel correctly.
► Depending on version, put the tool box back
in place in the middle of the wheel and clip it in
place.
Removing a wheel
Parking the vehicle
Immobilise the vehicle where it does
not obstruct traffic: the ground must be level,
stable and non-slippery.
Page 180 of 276
178
In the event of a breakdown
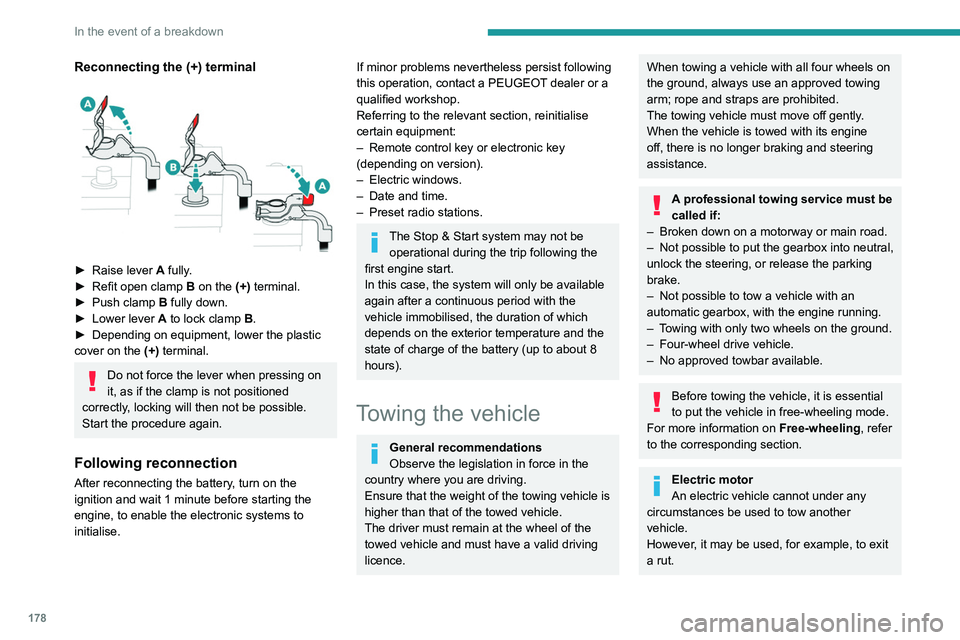
Reconnecting the (+) terminal
► Raise lever A fully.
► Refit open clamp B on the (+) terminal.
►
Push clamp
B fully down.
►
Lower lever
A
to lock clamp B.
►
Depending on equipment, lower the plastic
cover on the
(+) terminal.
Do not force the lever when pressing on
it, as if the clamp is not positioned
correctly, locking will then not be possible.
Start the procedure again.
Following reconnection
After reconnecting the battery, turn on the
ignition and wait 1 minute before starting the
engine, to enable the electronic systems to
initialise.
If minor problems nevertheless persist following
this operation, contact a PEUGEOT dealer or a
qualified workshop.
Referring to the relevant section, reinitialise
certain equipment:
–
Remote control key or electronic key
(depending on version).
–
Electric windows.
–
Date and time.
–
Preset radio stations.
The Stop & Start system may not be operational during the trip following the
first engine start.
In this case, the system will only be available
again after a continuous period with the
vehicle immobilised, the duration of which
depends on the exterior temperature and the
state of charge of the battery (up to about 8
hours).
Towing the vehicle
General recommendations
Observe the legislation in force in the
country where you are driving.
Ensure that the weight of the towing vehicle is
higher than that of the towed vehicle.
The driver must remain at the wheel of the
towed vehicle and must have a valid driving
licence.
When towing a vehicle with all four wheels on
the ground, always use an approved towing
arm; rope and straps are prohibited.
The towing vehicle must move off gently.
When the vehicle is towed with its engine
off, there is no longer braking and steering
assistance.
A professional towing service must be
called if:
–
Broken down on a motorway or main road.
–
Not possible to put
the gearbox into neutral,
unlock the steering, or release the parking
brake.
–
Not possible to tow a vehicle with an
automatic gearbox, with the engine running.
–
T
owing with only two wheels on the ground.
–
Four-wheel drive vehicle.
–
No approved towbar available.
Before towing the vehicle, it is essential
to put the vehicle in free-wheeling mode.
For more information on Free-wheeling, refer
to the corresponding section.
Electric motor
An electric vehicle cannot under any
circumstances be used to tow another
vehicle.
However, it may be used, for example, to exit
a rut.
Accessing the tools
For more information on accessing the Tool kit,
refer to the corresponding section.
Towing your vehicle
To access the front screw thread: