display PEUGEOT 3008 2013 Owners Manual
[x] Cancel search | Manufacturer: PEUGEOT, Model Year: 2013, Model line: 3008, Model: PEUGEOT 3008 2013Pages: 352, PDF Size: 15.64 MB
Page 5 of 352
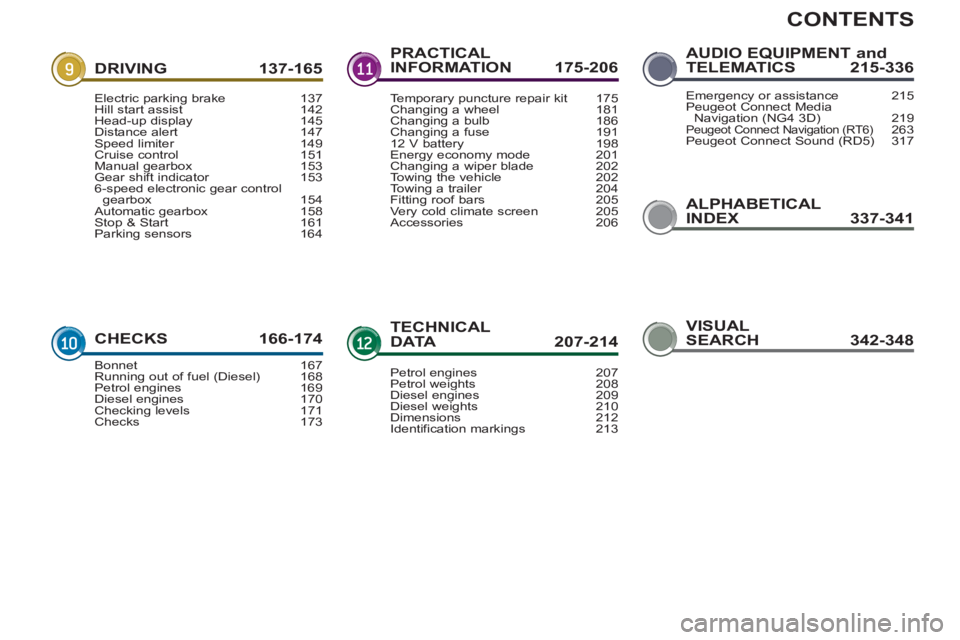
CONTENTS
ALPHABETICAL
INDEX 337-341
DRIVING 137-165
CHECKS 166-17
4
PRACTICAL
INFORMATION 175-206
TECHNICALDATA 207-214
AUDIO EQUIPMENT andTELEMATICS 215-336
Electric parking brake 137Hill start assist 142Head-up display 145Distance alert 147Speed limiter 149Cruise control 151Manual gearbox 153Gear shift indicator 1536-speed electronic gear control gearbox 154Automatic gearbox 158Stop & Start 161Parking sensors 164
Bonnet 167Running out of fuel (Diesel) 168Petrol engines 169Diesel engines 170Checking levels 171Checks 173
Temporary puncture repair kit 175Changing a wheel 181Changing a bulb 186Changing a fuse 19112 V battery 198Energy economy mode 201Changing a wiper blade 202
Towing the vehicle 202Towing a trailer 204Fitting roof bars 205Very cold climate screen 205Accessories 206
Petrol engines 207Petrol weights 208Diesel engines 209Diesel weights 210Dimensions 212
Identification markings 213
Emergency or assistance 215Peugeot Connect Media
Navigation (NG4 3D) 219Peugeot Connect Navigation (RT6)263Peugeot Connect Sound (RD5) 317
VISUAL
SEARCH 342-348
Page 10 of 352
8
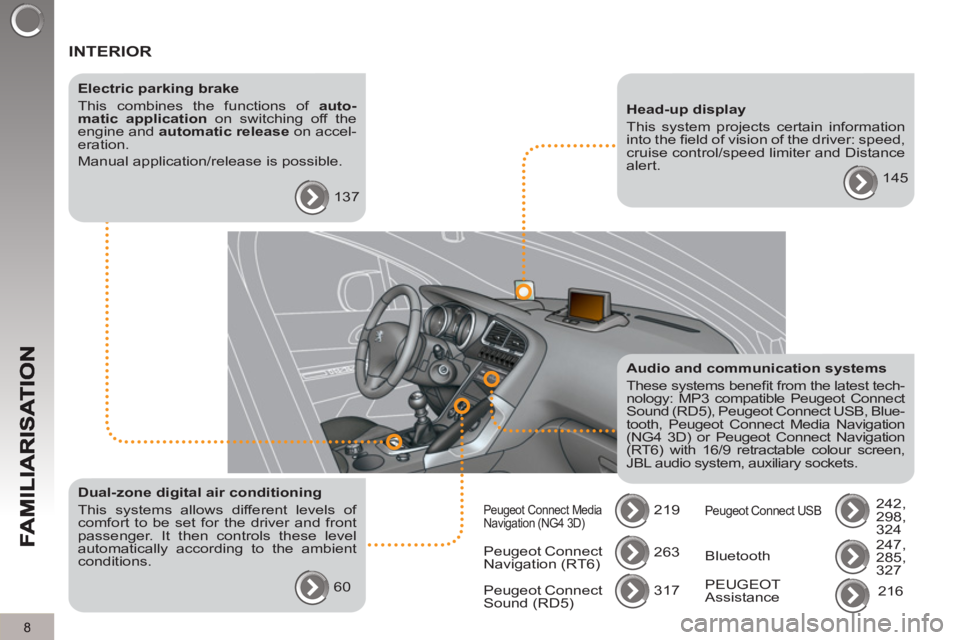
INTERIOR
Electric parking brake
This combines the functions of auto-
matic application
on switching off the
engine and automatic release
on accel-
eration.
Manual application/release is possible.
137
Audio and communication systems
These systems benefi t from the latest tech-
nology: MP3 compatible Peugeot Connect
Sound (RD5), Peugeot Connect USB, Blue-
tooth, Peugeot Connect Media Navigation
(NG4 3D) or Peugeot Connect Navigation
(RT6) with 16/9 retractable colour screen,
JBL audio system, auxiliary sockets.
219
Head-up display
This system projects certain information
into the fi eld of vision of the driver: speed,
cruise control/speed limiter and Distance
alert.
145
Dual-zone digital air conditioning
This systems allows different levels of
comfort to be set for the driver and front
passenger. It then controls these level
automatically according to the ambient
conditions.
60 Peugeot Connect
Navigation (RT6) 263
317
Peugeot Connect
Sound (RD5)
Peugeot Connect Media
Navigation (NG4 3D) Peugeot Connect USB
242,
298,
324
247,
285,
327 Bluetooth
PEUGEOT
Assistance 216
Page 12 of 352
10
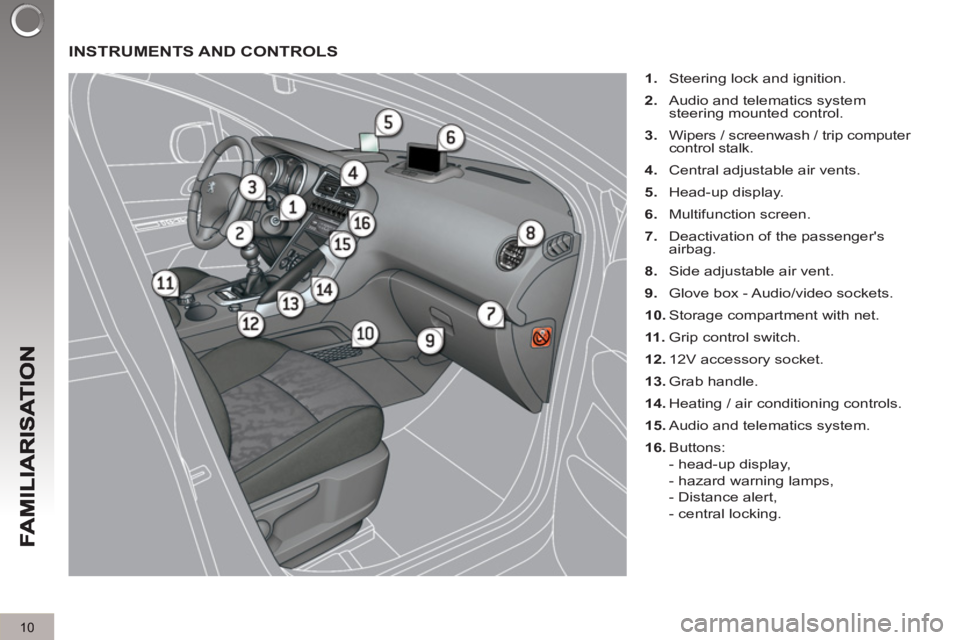
INSTRUMENTS AND CONTROLS
1.
Steering lock and ignition.
2.
Audio and telematics system
steering mounted control.
3.
Wipers / screenwash / trip computer
control stalk.
4.
Central adjustable air vents.
5.
Head-up display.
6.
Multifunction screen.
7.
Deactivation of the passenger's
airbag.
8.
Side adjustable air vent.
9.
Glove box - Audio/video sockets.
10.
Storage compartment with net.
11 .
Grip control switch.
12.
12V accessory socket.
13.
Grab handle.
14.
Heating / air conditioning controls.
15.
Audio and telematics system.
16.
Buttons:
- head-up display,
- hazard warning lamps,
- Distance alert,
- central locking.
Page 18 of 352
16
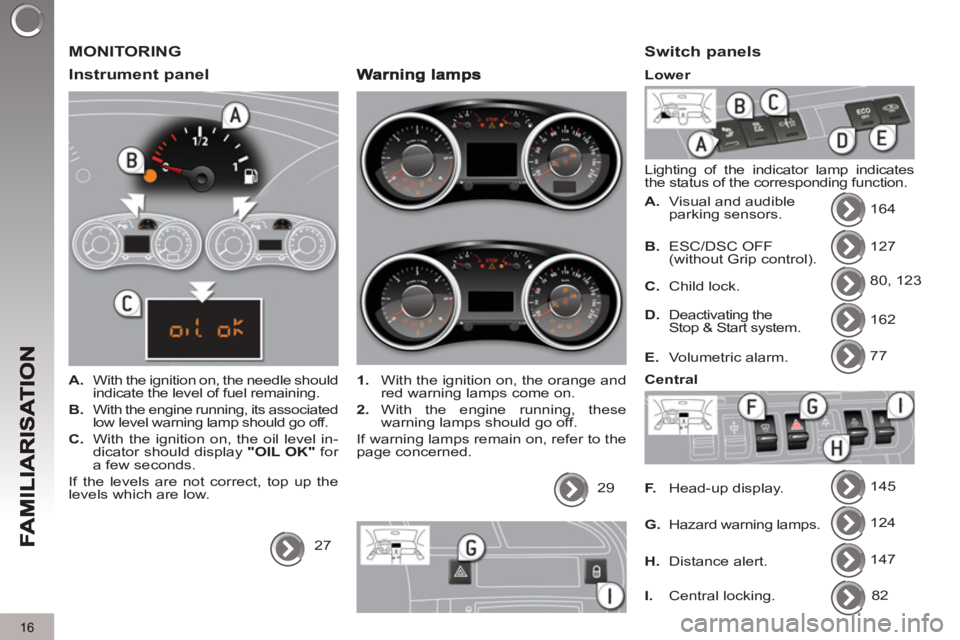
MONITORING
Instrument
panel
A.
With the ignition on, the needle should
indicate the level of fuel remaining.
B.
With the engine running, its associated
low level warning lamp should go off.
C.
With the ignition on, the oil level in-
dicator should display "OIL OK"
for
a few seconds.
If the levels are not correct, top up the
levels which are low.
27
1.
With the ignition on, the orange and
red warning lamps come on.
2.
With the engine running, these
warning lamps should go off.
If warning lamps remain on, refer to the
page concerned.
29
Switch panels
Lighting of the indicator lamp indicates
the status of the corresponding function.
A.
Visual and audible
parking sensors. 164
127
80, 123
162
77
145
124
147
B.
ESC/DSC OFF
(without Grip control).
C.
Child lock.
D.
Deactivating the
Stop & Start system.
E.
Volumetric alarm.
F.
Head-up display.
G.
Hazard warning lamps.
H.
Distance alert.
Lower
Central
I.
Central locking. 82
Page 24 of 352
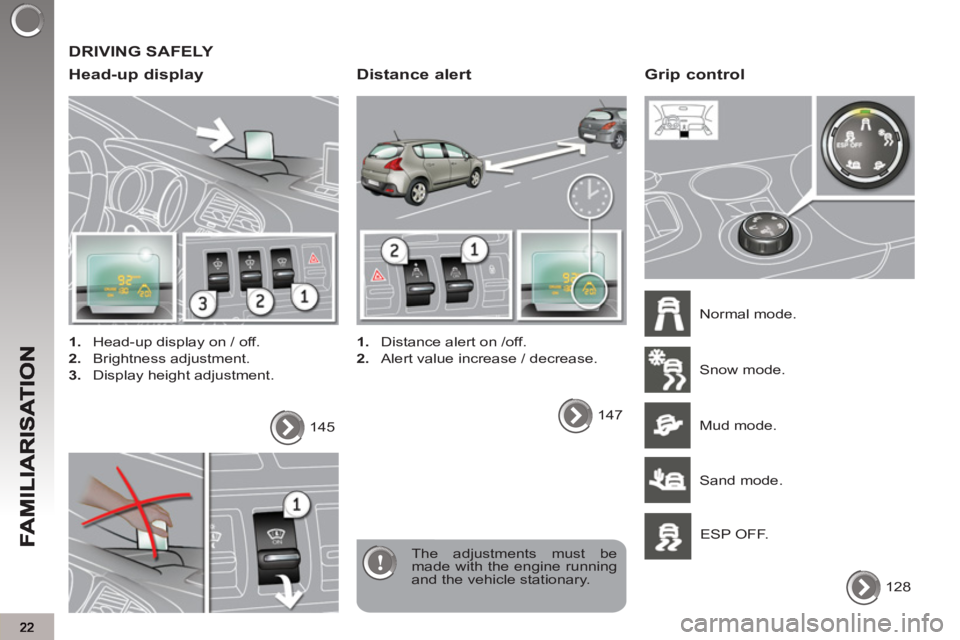
DRIVING SAFELY
Head-up displa
y
1.
Head-up display on / off.
2.
Brightness adjustment.
3.
Display height adjustment.
The adjustments must be
made with the engine running
and the vehicle stationary. 145
Distance alert
1.
Distance alert on /off.
2.
Alert value increase / decrease.
147
Grip control
Normal mode.
128 Snow mode.
Mud mode.
Sand mode.
ESP OFF.
2222
Page 25 of 352
23
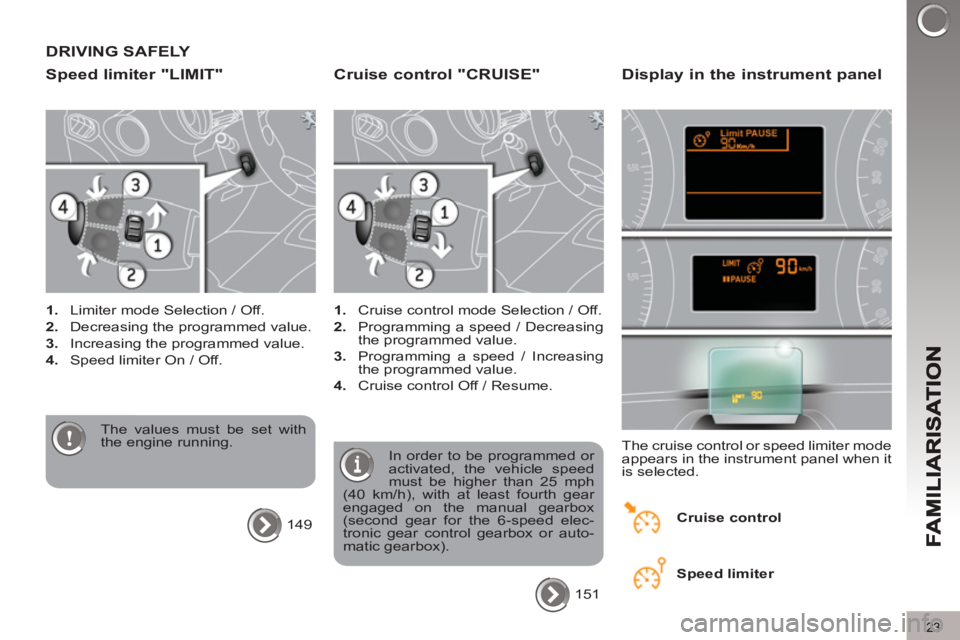
DRIVING SAFELY
S
peed limiter "LIMIT"
1.
Limiter mode Selection / Off.
2.
Decreasing the programmed value.
3.
Increasing the programmed value.
4.
Speed limiter On / Off.
The values must be set with
the engine running.
149
Cruise control "CRUISE"
1.
Cruise control mode Selection / Off.
2.
Programming a speed / Decreasing
the programmed value.
3.
Programming a speed / Increasing
the programmed value.
4.
Cruise control Off / Resume.
In order to be programmed or
activated, the vehicle speed
must be higher than 25 mph
(40 km/h), with at least fourth gear
engaged on the manual gearbox
(second gear for the 6-speed elec-
tronic gear control gearbox or auto-
matic gearbox).
151
Display in the instrument panel
The cruise control or speed limiter mode
appears in the instrument panel when it
is selected.
Cruise control
Speed limiter
Page 27 of 352
Optimise the use of your gearbox
With a manual gearbox, move off gen-
tly, change up without waiting and
drive by changing up quite soon. If
your vehicle has the system, the gear
shift indicator invites you to change up;
it is displayed in the instrument panel,
follow its instructions.
With an automatic or electronic gear-
box, stay in Drive "D"
or Auto "A"
, ac-
cording to the type of gearbox, without
pressing the accelerator pedal heavily
or suddenly.
Drive smoothly
Maintain a safe distance between ve-
hicles, use engine braking rather than
the brake pedal, and press the accel-
erator progressively. These practices
contribute towards a reduction in fuel
consumption and CO
2 emissions and
also helps reduce the background traf-
fi c noise.
If your vehicle has cruise control, make
use of the system at speeds above
25 mph (40 km/h) when the traffi c is
fl owing well.
Control the use of your electrical equipment
Before moving off, if the passenger
compartment is too warm, ventilate it by
opening the windows and air vents be-
fore using the air conditioning.
Above 30 mph (50 km/h), close the win-
dows and leave the air vents open.
Remember to make use of equipment
that can help keep the temperature in
the passenger compartment down (sun-
roof and window blinds...).
Switch off the air conditioning, unless
it has automatic digital regulation, as
soon as the desired temperature is at-
tained.
Switch off the demisting and defrosting
controls, if not automatic.
Switch off the heated seat as soon as
possible.
Switch off the headlamps and front
foglamps when the level of light does
not require their use.
Avoid running the engine before mov-
ing off, particularly in winter; your ve-
hicle will warm up much faster while
driving.
As a passenger, if you avoid connect-
ing your multimedia devices (fi lm, mu-
sic, video game...), you will contribute
towards limiting the consumption of
electrical energy, and so of fuel.
Disconnect your portable devices be-
fore leaving the vehicle.
ECO-DRIVING
25
Eco-driving is a range of everyday practices that allow the motorist to optimise their fuel consumption and CO2 emis-
sions.
Page 29 of 352
27
IN
S
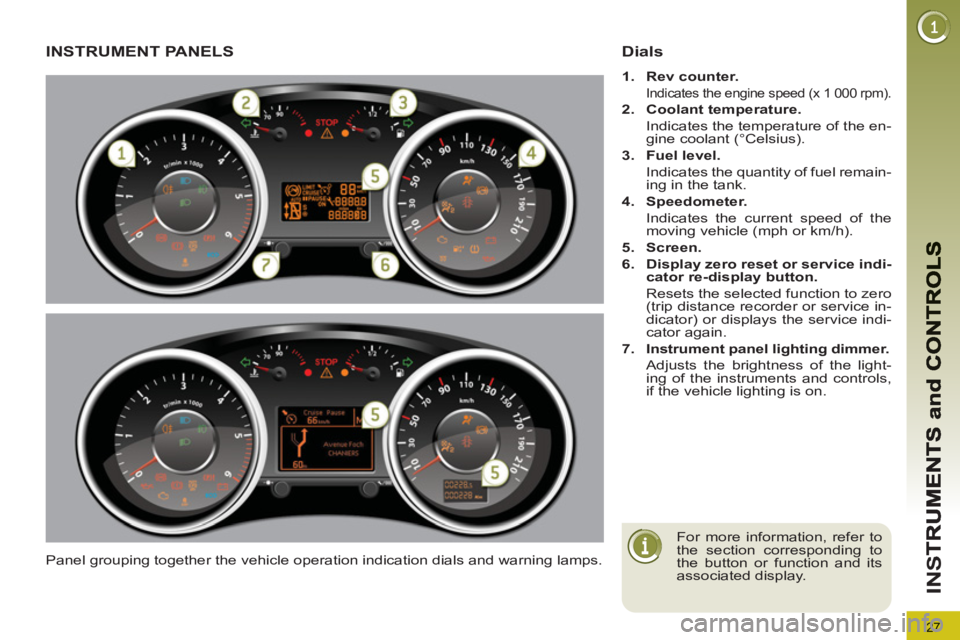
INSTRUMENT PANELS
Panel grouping together the vehicle operation indication dials and warning lamps.
Dials
1.
Rev counter.
Indicates the engine speed (x 1 000 rpm).
2.
Coolant temperature.
Indicates the temperature of the en-
gine coolant (°Celsius).
3.
Fuel level.
Indicates the quantity of fuel remain-
ing in the tank.
4.
Speedometer.
Indicates the current speed of the
moving vehicle (mph or km/h).
5.
Screen.
6.
Display zero reset or service indi-
cator re-display button.
Resets the selected function to zero
(trip distance recorder or service in-
dicator) or displays the service indi-
cator again.
7.
Instrument panel lighting dimmer.
Adjusts the brightness of the light-
ing of the instruments and controls,
if the vehicle lighting is on.
For more information, refer to
the section corresponding to
the button or function and its
associated display.
Page 30 of 352
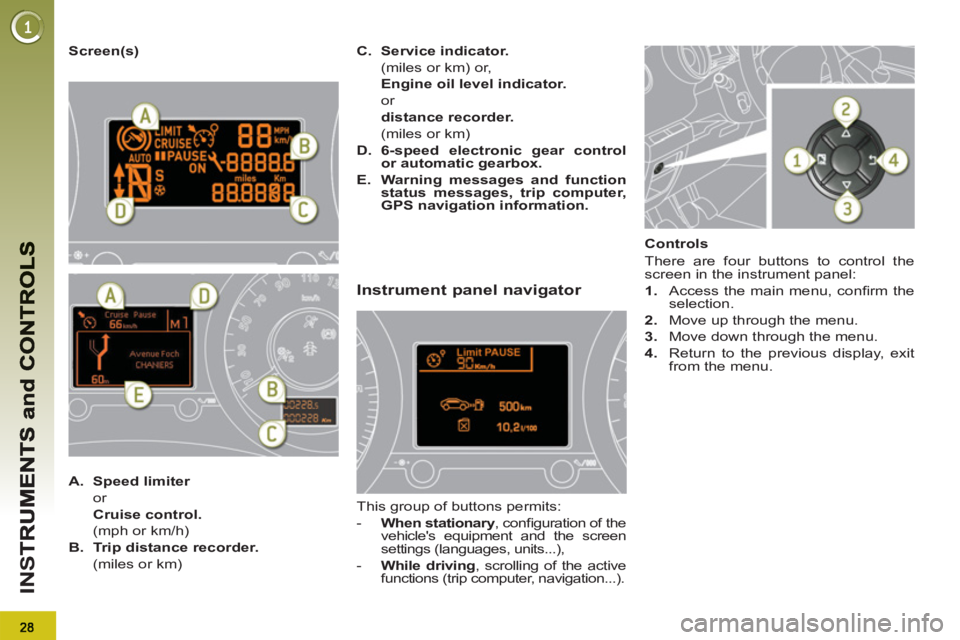
IN
S
Screen(s)
A.
Speed limiter
or
Cruise control.
(mph or km/h)
B.
Trip distance recorder.
(miles or km)
C.
Service indicator.
(miles or km) or,
Engine oil level indicator.
or
distance recorder.
(miles or km)
D.
6-speed electronic gear control
or automatic gearbox.
E.
Warning messages and function
status messages, trip computer,
GPS navigation information.
Instrument panel navigator
This group of buttons permits:
- When stationary
, confi guration of the
vehicle's equipment and the screen
settings (languages, units...),
- While driving
, scrolling of the active
functions (trip computer, navigation...).
Controls
There are four buttons to control the
screen in the instrument panel:
1.
Access the main menu, confi rm the
selection.
2.
Move up through the menu.
3.
Move down through the menu.
4.
Return to the previous display, exit
from the menu.
Page 31 of 352

29
IN
S
Vehicle parameters
This menu allows you to activate or
deactivate certain driving and comfort
equipment * :
- wiper linked with reverse gear (refer
to the "Visibility" section),
- selective unlocking (refer to the "Ac-
cess" section),
- guide-me-home and welcome light-
ing (refer to the "Visibility" section),
- interior mood lighting (refer to the
"Visibility" section),
- daytime running lamps (refer to the
"Visibility" section),
- directional headlamps (refer to the
"Visibility" section),
- automatic or manual parking brake
(refer to the "Driving" section).
Choice of units
This menu allows you to select the units:
temperature (°Celsius or °Fahrenheit) and
fuel consumption (l/100 km, mpg or km/l).
Choice of language
This menu allows you to select the
display language: Deutsch, English,
Espanol, Français, Italiano, Nederlands,
Portugues, Türkçe * .
The main menu and its asso-
ciated functions can only be
accessed when stationary, via
buttons 1
to 4
.
A message appears in the screen,
above a certain speed threshold, in-
dicating that the main menu cannot
be displayed.
The trip computer displays can only
be accessed while driving, via but-
tons 2
and 3
(refer to the "Trip com-
puter" section).
Main menu
�)
Press button 1
for access to the
main menu and select one of the fol-
lowing functions:
- "Vehicle parameters",
- "Choice of language",
- "Choice of units".
�)
Press button 2
or 3
to move in the
screen.
�)
Press button 1
again to confi
rm the
selection.
*
According to country.
INDICATOR AND WARNING LAMPS
When the ignition is switched on
Certain warning lamps come on for a
few seconds when the vehicle's ignition
is switched on.
When the engine is started, these same
warning lamps should go off.
If they remain on, before moving off,
refer to the information on the warning
lamp concerned.
Associated warnings
The illumination of certain warning
lamps may be accompanied by an au-
dible signal and a message in the multi-
function screen.
The warning lamps may come
on continuously (fi xed) or
fl ash.
Certain warning lamps may come on
in one of two different modes. Only
by relating the type of illumination to
the operating status of the vehicle
can it be ascertained whether the
situation is normal or whether a fault
has occurred.
Visual indicators informing the driver
that a system is in operation (operation
or deactivation indicator lamps) or of the
occurrence of a fault (warning lamp).