sat nav PEUGEOT 3008 2013 Owners Manual
[x] Cancel search | Manufacturer: PEUGEOT, Model Year: 2013, Model line: 3008, Model: PEUGEOT 3008 2013Pages: 352, PDF Size: 15.64 MB
Page 4 of 352
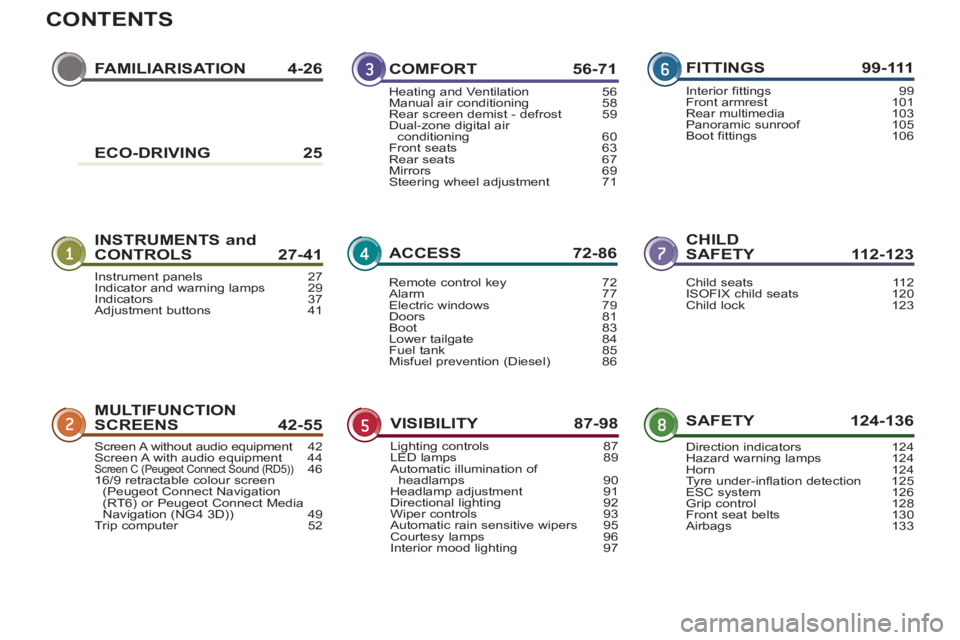
CONTENTS
FAMILIARISATION 4-26
INSTRUMENTS and
CONTROLS 27-41CHILDSAFETY 112-123
MULTIFUNCTION
SCREENS42-55SAFETY 124-136
COMFORT 56-71
ACCESS 72-86
VISIBILITY 87-98
FITTINGS 99-111
Instrument panels 27Indicator and warning lamps 29Indicators 37Adjustment buttons 41
Child seats 112ISOFIX child seats 120Child lock 123
Screen A without audio equipment4t2Screen A with audio equipment 44Screen C (Peugeot Connect Sound (RD5))4616/9 retractable colour screen(Peugeot Connect Navigation (RT6) or Peugeot Connect Media
Navigation (NG4 3D)) 49Trip computer 52
Direction indicators 124Hazard warning lamps 124Horn 124Tyre under-inflation detection 125ESC system 126Grip control 128Front seat belts 130Airbags 133
Heating and Ventilation 56Manual air conditioning 58Rear screen demist - defrost 59Dual-zone digital air conditioning 60Front seats 63Rear seats 67Mirrors 69Steering wheel adjustment 71
Remote control key 72Alarm 77Electric windows 79Doors 81Boot 83Lower tailgate 84Fuel tank 85Misfuel prevention (Diesel) 86
Lighting controls 87LED lamps 89Automatic illumination ofheadlamps 90Headlamp adjustment 91Directional lighting 92Wiper controls 93Automatic rain sensitive wipers 95Courtesy lamps 96Interior mood lighting 97
Interior fittings 99Front armrest 101Rear multimedia 103Panoramic sunroof 105Boot fittings 106
ECO-DRIVING 25
Page 51 of 352
49
M
U
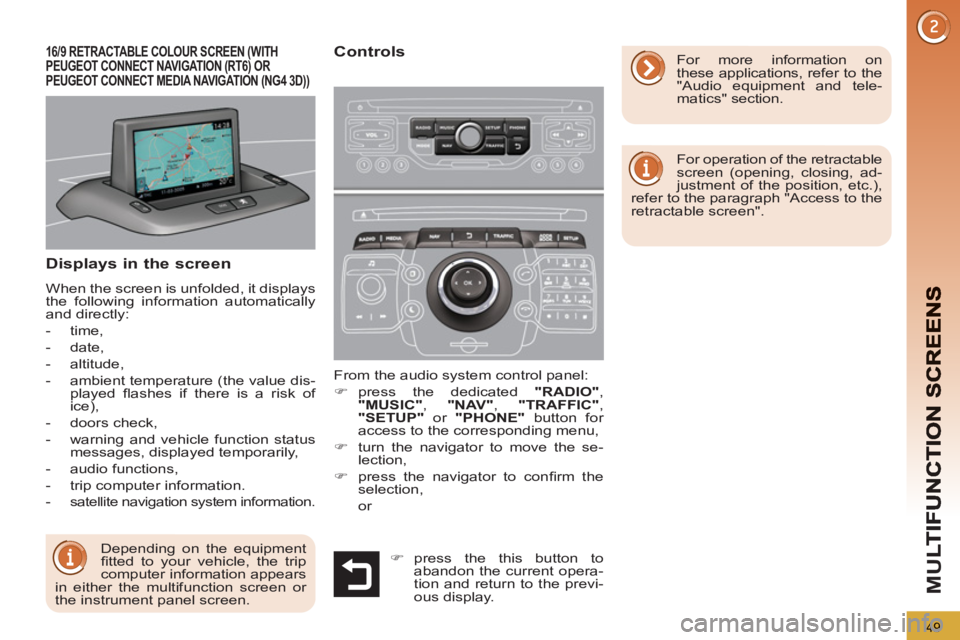
Displays in the screen
When the screen is unfolded, it displays
the following information automatically
and directly:
- time,
- date,
- altitude,
- ambient temperature (the value dis-
played fl ashes if there is a risk of
ice),
- doors check,
- warning and vehicle function status
messages, displayed temporarily,
- audio functions,
- trip computer information.
-
satellite navigation system information.
From the audio system control panel:
�)
press the dedicated "RADIO"
,
"MUSIC"
, "NAV"
, "TRAFFIC"
,
"SETUP"
or "PHONE"
button for
access to the corresponding menu,
�)
turn the navigator to move the se-
lection,
�)
press the navigator to confi rm the
selection,
or
16/9 RETRACTABLE COLOUR SCREEN (WITH PEUGEOT CONNECT NAVIGATION (RT6) ORPEUGEOT CONNECT MEDIA NAVIGATION (NG4 3D))
Controls
For operation of the retractable
screen (opening, closing, ad-
justment of the position, etc.),
refer to the paragraph "Access to the
retractable screen".
For more information on
these applications, refer to the
"Audio equipment and tele-
matics" section.
Depending on the equipment
fi tted to your vehicle, the trip
computer information appears
in either the multifunction screen or
the instrument panel screen.
�)
press the this button to
abandon the current opera-
tion and return to the previ-
ous display.
Page 117 of 352
HUSOHA ne használjon menetiránynak háttal beszerelt gyermekülést olyan ülésen, amely AKTIVÁLT ÁLLAPOTÚ (BEKAPCSOLT) FRONTLÉGZSÁKKAL
van védve. Ez a gyermek halálát vagy súlyos sérülését okozhatja.
ITNON installare MAI seggiolini per bambini posizionati in senso contrario a quello di marcia su un sedile protetto da un AIRBAG frontale ATTIVATO.
Ciò potrebbe provocare la MORTE o FERITE GRAVI al bambino.
LTNIEKADA neįrenkite vaiko prilaikymo priemonės su atgal atgręžtu vaiku ant sėdynės, kuri saugoma VEIKIANČIOS priekinės ORO PAGALVĖS.
Išsiskleidus oro pagalvei vaikas gali būti MIRTINAI arba SUNKIAI TRAUMUOTAS.
LVNAV PIEĻAUJAMS uzstādīt uz aizmuguri vērstu bērnu sēdeklīti priekšējā pasažiera vietā, kurā ir AKTIVIZĒTS priekšējais DROŠĪBAS GAISA
SPILVENS.
Tas var izraisīt BĒRNA NĀVI vai radīt NOPIETNUS IEVAINOJUMUS.
MTQatt m’ghandek thalli tifel/tifl a marbut f’siggu dahru lejn l-Airbag attiva, ghaliex tista’ tikkawza korriment serju jew anke mewt lit-tifel/tifl a
NLPlaats NOOIT een kinderzitje met de rug in de rijrichting op een zitplaats waarvan de AIRBAG is INGESCHAKELD. Bij het afgaan van de airbag
kan het KIND ERNSTIG OF DODELIJK GEWOND raken.
NOInstaller ALDRI et barnesete med ryggen mot kjøreretningen i et sete som er beskyttet med en frontal AKTIVERT KOLLISJONSPUTE, BARNET
risikerer å bli DREPT eller HARDT SKADET.
PLNIGDY nie instalować fotelika dziecięcego w pozycji «tyłem do kierunku jazdy»na siedzeniu wyposażonym w CZOŁOWĄ PODUSZKĘ
POWIETRZNĄ w stanie AKTYWNYM.W przeciwnym razie dziecko narażone będzie na ŚMIERĆ lub BARDZO POWAŻNE OBRAŻENIA CIAŁA w
momenicie wyzwolenia poduszki powietrznej
PTNUNCA instale um sistema de retenção para crianças de costas para a estrada, num banco protegido por um AIRBAG frontal ACTIVADO. Esta
instalação poderá provocar FERIMENTOS GRAVES ou a MORTE da CRIANÇA.
RONu instalati NICIODATA un sistem de retinere pentru copii, dispus cu spatele in directia de mers, pe un loc din vehicul protejat cu AIRBAG frontal
ACTIVAT. Aceasta ar putea provoca MOARTEA COPILULUI sau RANIREA lui GRAVA.
RUВО ВСЕХ СЛУЧАЯХ ЗАПРЕЩАЕТСЯ использовать обращенное назад детское удерживающее устройство на сиденье, защищенном
ФУНКЦИОНИРУЮЩЕЙ ПОДУШКОЙ БЕЗОПАСНОСТИ, установленной перед этим сиденьем.
Это может привести к ГИБЕЛИ РЕБЕНКА или НАНЕСЕНИЮ ЕМУ СЕРЬЕЗНЫХ ТЕЛЕСНЫХ ПОВРЕЖДЕНИЙ
SKNIKDY nepoužívajte na prednom sedadle chránenom AKTÍVNYM AIRBAGOM detské zadržiavacie zariadenie umiestnené v proti smere jazdy.
Môže to spôsobiť SMRŤ, alebo VÁŽNE ZRANENIE DIEŤAŤA.
SLNIKOLI ne nameščajte otroškega sedeža s hrbtom v smeri vožnje, če je VARNOSTNA BLAZINA pred sprednjim sopotnikovim sedežem AKTIVIRANA.
Takšna namestitev lahko povzroči SMRT OTROKA ali HUDE POŠKODBE.
SRNIKADA ne koristite dečje sedište koje se okreće unazad na sedištu zaštićenim AKTIVNIM VAZDUŠNIM JASTUKOM ispred njega, jer mogu nas-
tupiti SMRT ili OZBILJNA POVREDA DETETA.
SVAnvänd ALDRIG en bakåtvänd barnstol i ett säte skyddat av en AKTIV AIRBAG framför det. Det kan orsaka ALLVARLIGA eller DÖDLIGA skador
på barnet.
TRKESİNLKLE HAVA YASTIĞI AKTİF olan ön koltuğa yüzü arkaya dönük bir çocuk koltuğu yerleştirmeyiniz. Bu ÇOCUĞUN ÖLMESİNE veya ÇOK
AĞIR YARALANMASINA sebep olabilir.
11 5
CHILD SAFETY
Page 208 of 352
206
PRACTICAL INFORMATION
Installation of radio
communication
transmitters
Before installing any after-market ra-
dio communication transmitter, you
can contact a PEUGEOT dealer for
the specifi cation of transmitters which
can be fi tted (frequency, maximum
power, aerial position, specifi c instal-
lation requirements), in line with the
Vehicle Electromagnetic Compatibility
Directive (2004/104/EC).
* To avoid any risk of jamming of the
pedals:
- ensure that the mat is positioned
and secured correctly,
- never fi t one mat on top of another.
A wide range of accessories and genu-
ine parts is available from the PEUGEOT
dealer network.
These accessories and parts have been
tested and approved for reliability and
safety.
They are all adapted to your vehicle and
benefi t from PEUGEOT's recommenda-
tion and warranty.
"Transport solutions":
For leisure pursuits: roof bars, bicycle
carrier on towbar, bicycle carrier on roof
bars, ski carrier, roof box, booster seats
and child seats, side blinds, under shelf
storage.
Trailer towbar, which must be fi tted by a
PEUGEOT dealer.
You can also obtain cleaning and main-
tenance products (exterior and interior),
products for topping up (screenwash
fl uid...) and refi lls (sealant cartridge
for the temporary puncture repair kit...)
from PEUGEOT dealers.
Depending on the legislation
in force in the country, it may
be compulsory to have a high
visibility safety vest, warning triangle
and spare bulbs and fuses available
in the vehicle.
The fi tting of electrical equip-
ment or accessories which
are not recommended by
PEUGEOT may result in a failure of
your vehicle's electronic system and
excessive electrical consumption.
Please note this precaution. You are
advised to contact a PEUGEOT rep-
resentative to be shown the range
of recommended equipment and ac-
cessories.
"Style":
seat covers compatible with lateral air-
bags, leather gear lever knob, foglamps,
door defl ectors, spoiler, styling strips,
alloy wheels, trims, chrome-plated door
handle shells.
"Safety and security":
anti-theft alarm, window etching, wheel
security bolts, fi rst aid kit, breathalyzer,
warning triangle, high visibility vest, sto-
len vehicle tracking system, dog guard,
snow chains.
"Protection":
mats * , boot tray, luggage net, coat
hanger fi xed on head restraint, stainless
steel or carbon fi bre style door sills.
"Multimedia":
audio systems, amplifi ers, satellite navi-
gation systems, Bluetooth hands-free
system, CD changer, speakers, DVD
player, USB Box, front and rear parking
sensors, additional Bluetooth wireless
headphones, Bluetooth audio head-
phones mains charger.
Page 227 of 352
225
03
SETUP
TRAFFIC
MEDIA
GENERAL OPERATION
For a detailed global view of the menus available, refer to the "Screen menu map" section of this handbook.
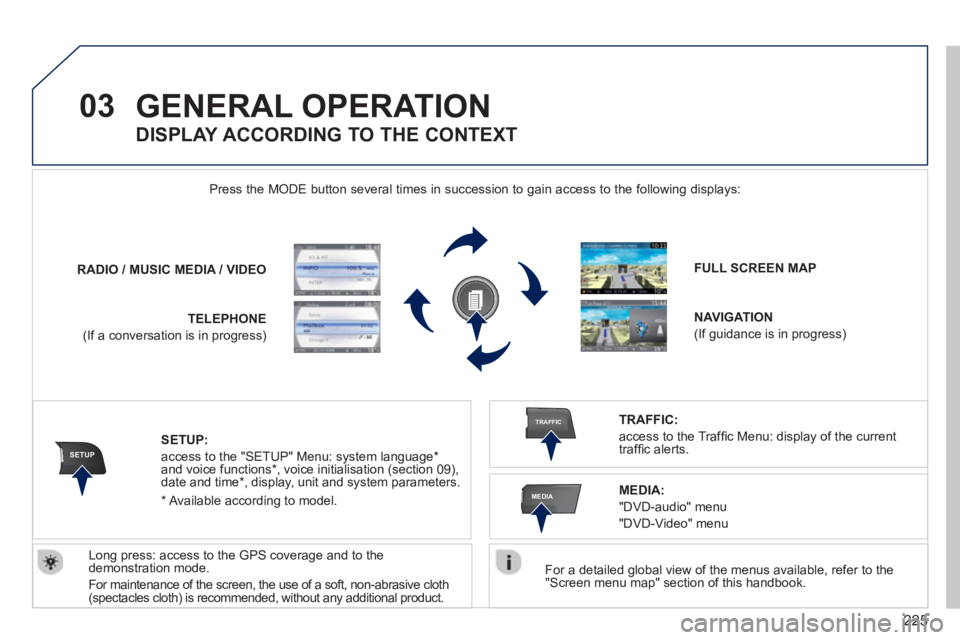
Press the M
ODE button several times in succession to gain access to the following displays:
Lon
g press: access to the GPS coverage and to the demonstration mode.
For maintenance o
f the screen, the use of a soft, non-abrasive cloth(spectacles cloth) is recommended, without any additional product. RADIO
/ /MUSIC MEDIA / VIDEO
TELEPHONE
(If a conversation is in progress)
FULL SCREEN MAP
NAVIGATION
(If guidance is in progress)
SETUP:
access to the "SETUP" Menu: system language *
and voice functions * , voice initialisation (section 09),
date and time * , display, unit and system parameters.
TRAFFIC:
access to the Traffi c Menu: display of the current
traffi c alerts.
DISPLAY ACCORDING TO THE CONTEXT
MEDIA:
"DVD-audio" menu
"DVD-Video" menu
*
Available accordin
g to model.
Page 228 of 352
226
03 GENERAL OPERATION
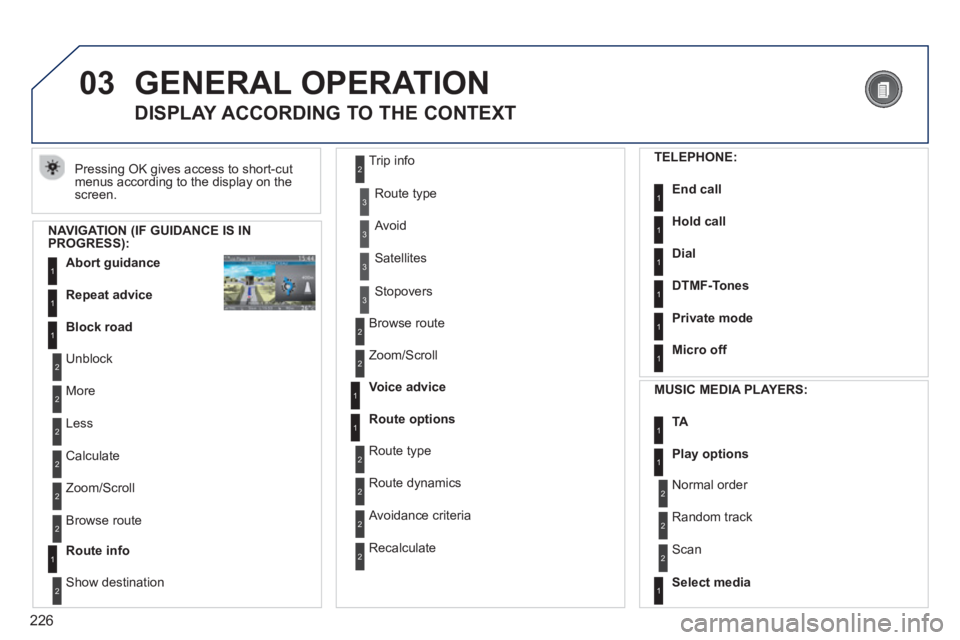
Pressing OK gives access to short-cut
menus according to the display on the screen.
DISPLAY ACCORDING TO THE CONTEXT
NAVIGATION (IF GUIDANCE IS IN PROGRESS):
Abort guidanc
e1
1
1
Repeat advice
Block road
2
2
Unblock
M
ore
2
Less
3
3
Route type
Avoid
3 Satellites
2
2
Calculate
Z
oom/Scroll
2
Browse route
1Route info
2
2
Show destination Trip in
fo
3
Stopovers
2
2
Browse route
Zoom/Scroll
1
1
Voice advice
Route options
2
2
Route type
Route dynamics
2 Avoidance criteria
2
Recalculate
TELEPHONE:
End call1
1
1
1
Hold call
Dial
DTMF-Tones
1Private mode
1Micro off
MU
SIC MEDIA PLAYERS:
TA1
1Play options
1Select media
2
2
Normal order
R
andom track
2 Scan
Page 250 of 352
248
08
2ABC3DEF5JKL4GHI6MNO8TUV7PQRS9WXYZ0*#
1RADIO MEDIANAV TRAFFIC
SETUPADDR
BOOK
2ABC3DEF5JKL4GHI6MNO8TUV7PQRS9WXYZ0*#
1RADIO MEDIANAV TRAFFIC
SETUPADDR
BOOK
2ABC3DEF5JKL4GHI6MNO8TUV7PQRS9WXYZ0*#
1RADIO MEDIANAV TRAFFIC
SETUPADDR
BOOK
2ABC3DEF5JKL4GHI6MNO8TUV7PQRS9WXYZ0*#
1RADIO MEDIANAV TRAFFIC
SETUPADDR
BOOK
2ABC3DEF5JKL4GHI6MNO8TUV7PQRS9WXYZ0*#
1RADIO MEDIANAV TRAFFIC
SETUPADDR
BOOK2ABC3DEF5JKL4GHI6MNO8TUV7PQRS9WXYZ0*#
1RADIO MEDIANAV TRAFFIC
SETUPADDR
BOOK
*
The services available via the telephone depend on the network, the SIMcard and the compatibility of the Bluetooth equipment used. Refer to your
telephone's manual and your operator to check which services you haveaccess to.
USING THE TELEPHONE
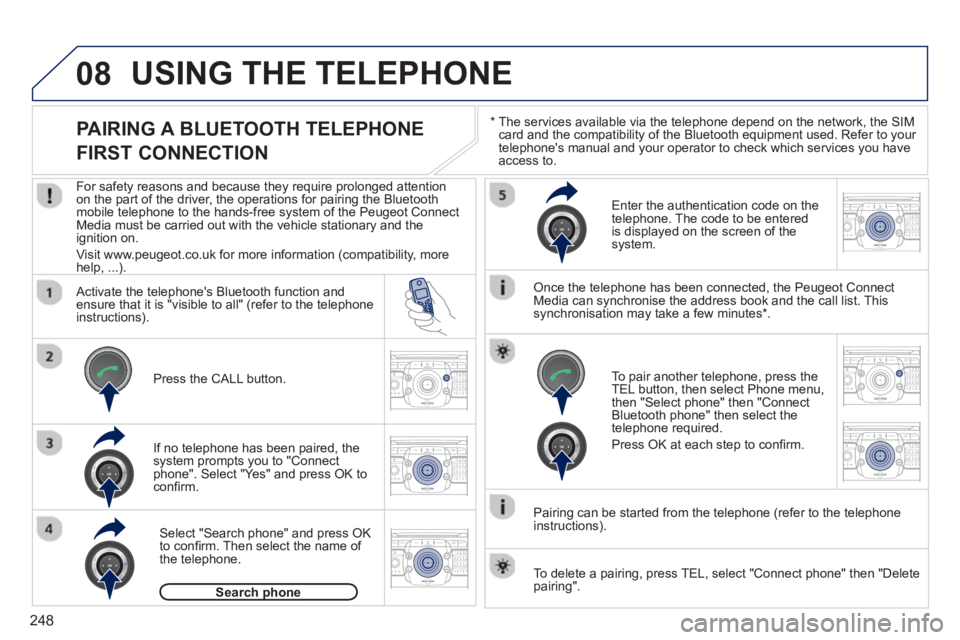
PAIRING A BLUETOOTH TELEPHONE
FIRST CONNECTION
For safety reasons and because they require prolonged attentionon the part of the driver, the operations for pairing the Bluetooth mobile telephone to the hands-free system of the Peugeot ConnectMedia must be carried out with the vehicle stationary and theignition on.
Visit www.peu
geot.co.uk for more information (compatibility, morehelp, ...). p)
Activate the telephone's Bluetooth function andensure that it is "visible to all" (refer to the telephone
instructions).
If no tele
phone has been paired, the
system prompts you to "Connect
phone". Select "Yes" and press OK to confi rm.
Ent
er the authentication code on thetelephone. The code to be entered
is displayed on the screen of the system.
To pair another telephone, press the
TEL button, then select Phone menu,then "Select phone" then "Connect Bluetooth phone" then select the
telephone required.
Press
OK at each step to confi rm.
Once the telephone has been connected, the Peugeot ConnectMedia can synchronise the address book and the call list. This
synchronisation may take a few minutes * .
Pairin
g can be started from the telephone (refer to the telephone
instructions). Press the
CALL button.
Select "Search phone" and press OK
to confi rm. Then select the name of
the telephone.
Search phonep
To delete a pairing, press TEL, select "Connect phone" then "Delete
pairing".
Page 251 of 352
249
08
2ABC3DEF5JKL4GHI6MNO8TUV7PQRS9WXYZ0*#
1RADIO MEDIANAV TRAFFIC
SETUPADDR
BOOK
*
The services available via the telephone depend on the network, the SIM card and the compatibility of the Bluetooth equipment used. Refer toyour telephone's manual and your operator to check which services you have access to. A list of mobile telephones which offer the best range of services is available from dealers.
USING THE TELEPHONE
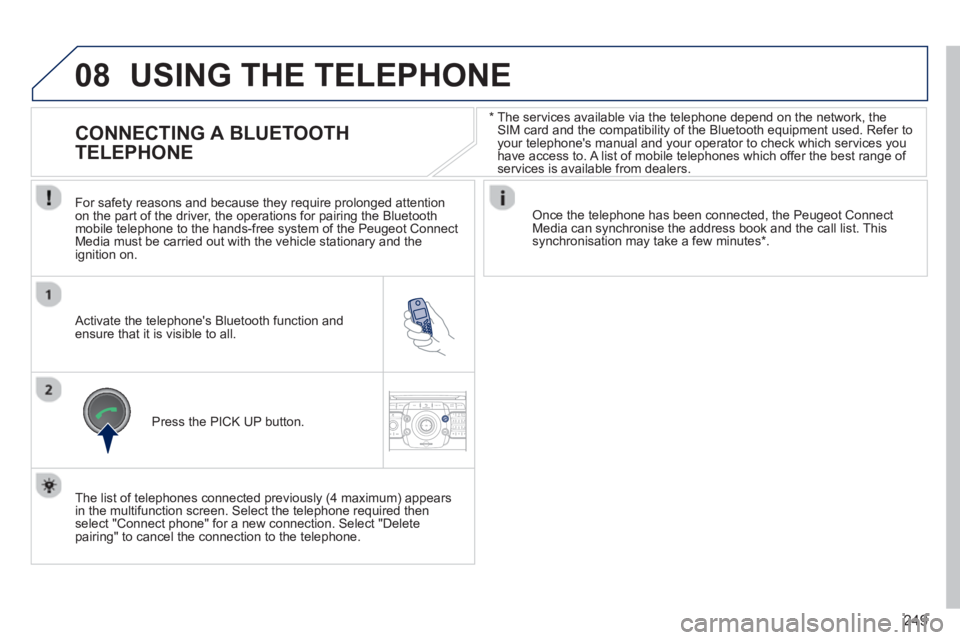
CONNECTING A BLUETOOTH
TELEPHONE
For safety reasons and because they require prolonged attention
on the part of the driver, the operations for pairing the Bluetoothmobile telephone to the hands-free system of the Peugeot ConnectMedia must be carried out with the vehicle stationary and the
ignition on.
Activate the telephone's Bluetooth function and ensure that it is visible to all.
Once the telephone has been connected, the Peugeot Connect Media can synchronise the address book and the call list. This synchronisation may take a few minutes * .
Press the PI
CK UP button.
The list of telephones connected previousl
y (4 maximum) appears
in the multifunction screen. Select the telephone required then
select "Connect phone" for a new connection. Select "Delete pairing" to cancel the connection to the telephone.
Page 252 of 352
250
08
2ABC3DEF5JKL4GHI6MNO8TUV7PQRS9WXYZ0*#
1
2ABC3DEF5JKL4GHI6MNO8TUV7PQRS9WXYZ0*#
1RADIO MEDIANAV TRAFFIC
SETUPADDR
BOOK
2ABC3DEF5JKL4GHI6MNO8TUV7PQRS9WXYZ0*#
1NAV TRAFFICADDR
BOOKSETUP2ABC3DEF5JKL4GHI6MNO8TUV7PQRS9WXYZ0*#
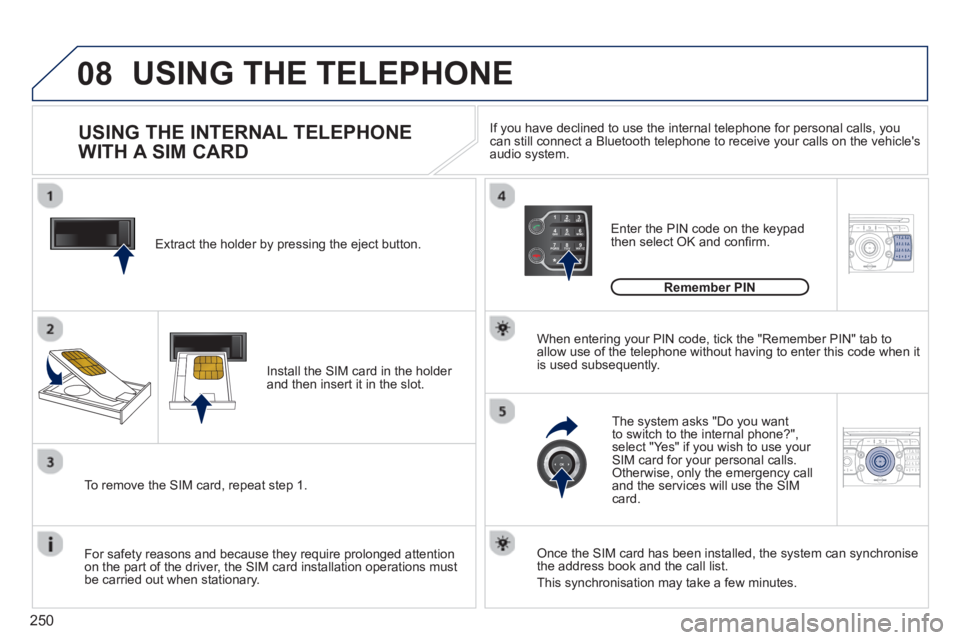
1Extract the holder by pressing the eject button.
Install the
SIM card in the holder and then insert it in the slot.
To remove the
SIM card, repeat step 1.
For safet
y reasons and because they require prolonged attention
on the part of the driver, the SIM card installation operations must
be carried out when stationary.
Enter the PIN code on the keypad
then select OK and confi rm.
The s
ystem asks "Do you want
to switch to the internal phone?", select "Yes" if you wish to use your SIM card for your personal calls. Otherwise, only the emergency call
and the services will use the SIMcard.
Remember PIN
When enterin
g your PIN code, tick the "Remember PIN" tab toallow use of the telephone without having to enter this code when itis used subsequently.
USING THE INTERNAL TELEPHONE
WITH A SIM CARD
USING THE TELEPHONE
Once the SIM card has been installed, the system can synchronise
the address book and the call list.
This synchronisation may take a
few minutes. I
f you have declined to use the internal telephone for personal calls, you can still connect a Bluetooth telephone to receive your calls on the vehicle's audio system.
Page 261 of 352
259
QUESTIONANSWERSOLUTION
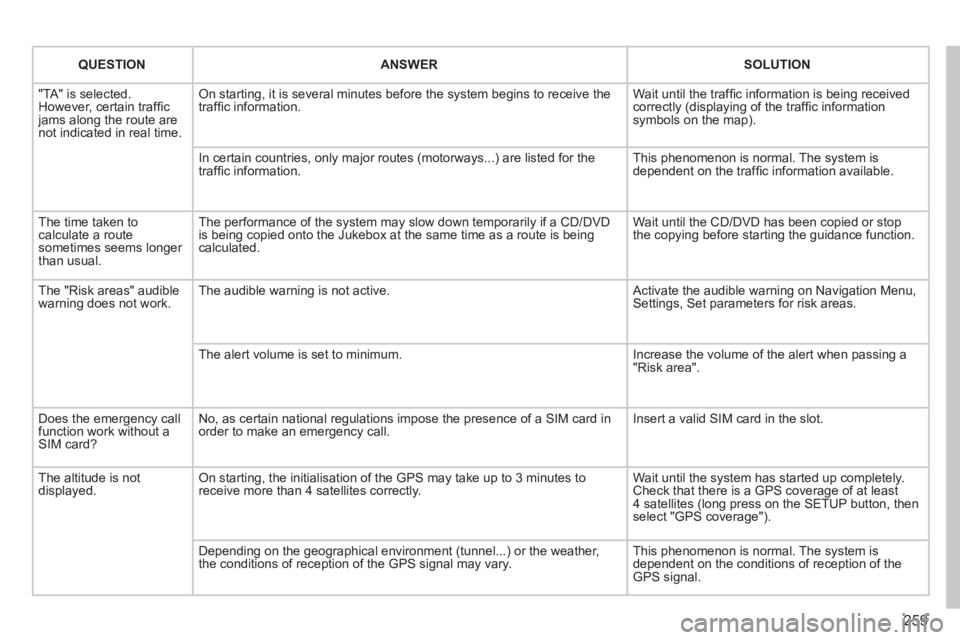
"TA" is selected. However, certain traffi c jams along the route arenot indicated in real time.
On starting, it is several minutes before the system begins to receive thetraffi c information.
Wait until the traffi c information is being received correctly (displaying of the traffi c information symbols on the map).
In certain countries, only major routes (motorways...) are listed for thetraffi c information. This phenomenon is normal. The system isdependent on the traffi c information available.
The time taken to calculate a route sometimes seems longer than usual.
The performance of the system may slow down temporarily if a CD/DVDis being copied onto the Jukebox at the same time as a route is being calculated.
Wait until the CD/DVD has been copied or stop the copying before starting the guidance function.
The "Risk areas" audiblewarning does not work. The audible warning is not active. Activate the audible warning on Navigation Menu,Settings, Set parameters for risk areas.
The alert volume is set to minimum.
Increase the volume of the alert when passing a"Risk area".
Does the emergency call function work without a SIM card?
No, as certain national regulations impose the presence of a SIM card inorder to make an emergency call.
Insert a valid SIM card in the slot.
The altitude is not displayed. On starting, the initialisation of the GPS may take up to 3 minutes toreceive more than 4 satellites correctly.
Wait until the system has started up completely. Check that there is a GPS coverage of at least4 satellites (long press on the SETUP button, then select "GPS coverage").
Depending on the geographical environment (tunnel...) or the weather, the conditions of reception of the GPS signal may vary.
This phenomenon is normal. The system isdependent on the conditions of reception of the GPS signal.