Peugeot 307 SW 2002 Owners Manual
Manufacturer: PEUGEOT, Model Year: 2002, Model line: 307 SW, Model: Peugeot 307 SW 2002Pages: 137, PDF Size: 1.43 MB
Page 91 of 137

COURTESY LIGHTS
1 - Front courtesy light
2 - Front map reading lights
3 - 2nd row rear reading lights
4 - 3rd row rear courtesy lightWith the key in the accessories position (1st notch) or with the ignition on, operate the relevant switch. The front and rear courtesy lights and the reading lights come on when the ignition key is removed, on unlocking the vehicle or on opening one of the doors.
They gradually go off after the ignition has been switched on or the vehicle is locked. �Pressing switch 1turns on the front and rear courtesy lights and the reading lights for a duration of ten minutes.
� Pressing switch 3or 4turns on the reading light concerned or the rear courtesy light for a duration of ten minutes.
Note: The courtesy lights and the reading lights can be deactivated by pressing switch 1for more than three seconds.
However, a short press on switch 1switches the front courtesy light on and off. The map reading lights are not affected by
this and may be switched on.� To re-activate the lights, press the switch for more than three seconds.
YOUR 307 SW IN DETAIL
86
Page 92 of 137

YOUR 307 SW IN DETAIL
88
Page 93 of 137

INTERIOR LAYOUT
1 - Glove boxThis is fitted with a lock.
To open the glove box, lift the handle.The glove box lights when the lid is opened.It contains a ventilation nozzle that can be closed, distributing the same conditioned air as the vents of the passenger compartment, and three sockets for connecting video equipment. The layout allows storage of a water bottle, a pen, the vehicle handbook, a pair of spectacles, tokens etc.
2 - Front ashtray Pull the lid to open the ashtray.
To empty it after opening, press the tab and extract the ashtray.
3 - Storage
4 - 12 volt accesories socket This is a lighter type socket, fitted with a cap. It is supplied with current from the accessories position (1st notch).
5 - Door tray
6 - Storage/Can holder
7 - Rubbish container To empty, open it fully (past the point of resistance) then pull on the receptacle to remove it.
To refit, lock it in place on the cover.
YOUR 307 SW IN DETAIL 89
Page 94 of 137

YOUR 307 SW IN DETAIL
90
Page 95 of 137

YOUR 307 SW IN DETAIL91
BOOT LAYOUT
1 - Grab handles and coat hooks
2 - High load retaining net fastenings The high load retaining net can be fitted in the 2nd or
3rd row. Open the covers of the corresponding upper faste- nings. Fit the ends of the metal bar in these fastenings.Secure the two opaque material strap hooks in the sto-
wing rings on the floor. The rings are located directly below the corresponding upper fastenings. Pull the two straps taut.Secure the two hooks on the elastic parts of the opaque material in these rings. Note: the net must be positioned so that the label can
be seen from the boot. This ensures that the central
seat belt is routed correctly.
3 - 12V Socket for accessories This is a 12 volt socket (lighter type), installed on thetonneau left support.
It is supplied with the ignition off.
4 - Rear armrests with grab handle
5 - Storage nets One of them contains the luggage retaining net. 6 - Tonneau
To install it:
Ð position one end of the tonneau roller in the 2nd row,
Ð compress the opposite end of the roller and position it,
Ð release it to allow it to engage,
Ð unroll the tonneau as far as the boot pillars,
Ð insert the tonneau guides in the rails in the pillars. To remove it:
Ð remove the tonneau guides from the pillar rails,
Ð return the tonneau into its roller,
Ð compress it and remove it from its support at the 2nd row,
To store it, pull it back and place it with the two storage nets, already lowered. Note: the roller has two hooks for securing the lugga-
ge retaining net depending on where it is installed.
7 - Luggage retaining net Secure the net's seven hooks in the stowing rings and
the fastenings on the floor.
8 - Luggage retaining net fastenings ("hammock" version) in the tailgate Fold the net in two. Secure the two centre hooks in the stowing rings on the
floor. Secure the net's remaining four hooks on the boot pillars.
See configuration of the nets (next page)
Page 96 of 137

YOUR 307 SW IN DETAIL
92
Example of installation of the nets:
Luggage retaining net, "folded" version Luggage retaining net, "hammock" version in the tailgate Luggage retaining net, "hammock" version at the rollerHigh load retaining net in the 2ndrow
Luggage retaining net, "L" version
Page 97 of 137

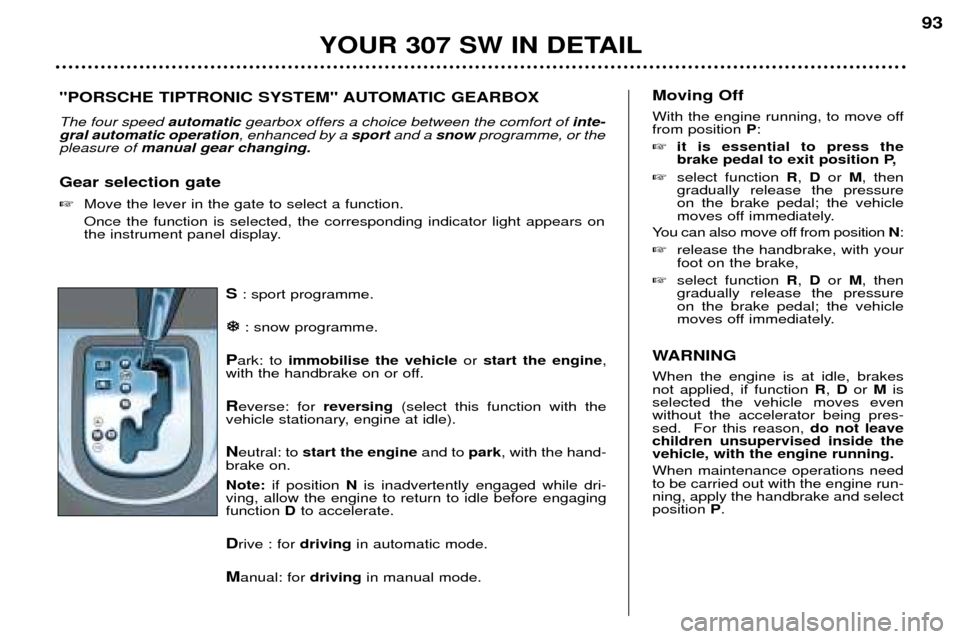
S: sport programme.
�
�: snow programme.
P ark: to immobilise the vehicle orstart the engine ,
with the handbrake on or off. R everse: for reversing(select this function with the
vehicle stationary, engine at idle).N eutral: to start the engine and to park, with the hand-
brake on. Note: if position Nis inadvertently engaged while dri-
ving, allow the engine to return to idle before engaging function Dto accelerate.
D rive : for drivingin automatic mode.
M anual: for drivingin manual mode. Moving Off
With the engine running, to move off from position
P:
� it is essential to press the
brake pedal to exit position P,
� select function R, D or M, then
gradually release the pressureon the brake pedal; the vehicle
moves off immediately.
You can also move off from position N:
� release the handbrake, with yourfoot on the brake,
� select function R, D or M, then
gradually release the pressureon the brake pedal; the vehicle
moves off immediately.
WARNING When the engine is at idle, brakes not applied, if function R, D or Mis
selected the vehicle moves evenwithout the accelerator being pres-sed. For this reason, do not leave
children unsupervised inside thevehicle, with the engine running. When maintenance operations need to be carried out with the engine run-ning, apply the handbrake and selectposition P.
"PORSCHE TIPTRONIC SYSTEM" AUTOMATIC GEARBOX The four speed
automaticgearbox offers a choice between the comfort of inte-
gral automatic operation , enhanced by a sport and a snow programme, or the
pleasure of manual gear changing.
Gear selection gate � Move the lever in the gate to select a function. Once the function is selected, the corresponding indicator light appears on
the instrument panel display.
YOUR 307 SW IN DETAIL 93
Page 98 of 137

Automatic operation Automatic changing of the four
gears: � select function Din the gate.
The gearbox always selects the most suitable gear according to the follo-wing parameters:
- the style of driving,
- the road profile,
- the vehicle load. The gearbox is then operating in auto-adaptive mode, without anyaction on your part.
WARNING Never select position Nwhen the
vehicle is moving. Never select functions Por Runless
the vehicle is stationary.Never change between functions to optimise braking on a slippery surface. Notes For immediate maximum accelera-
tion without touching the gear lever,press the accelerator pedal down as
far as it will go (kickdown). The gear-box will automatically change downor maintain the gear selected untilmaximum engine speed is reached. When the brake is applied, the gear- box will automatically change down
in order to provide efficient enginebraking. If you take your foot off the accelera-
tor suddenly, the gearbox will notchange to a higher gear for reasons
of safety. Sport and snow programmes In addition to the auto-adaptive pro- gramme, there are two special pro-grammes. The programme is displayed on the instrument panel screen. Sport programme �
PPress button Sonce the vehicle
has been started and function D
selected.
The gearbox automatically favours sporty driving and more dynamicacceleration. Snow programme This programme improves starting
and drive when traction is poor. � Press button �
�once the vehicle
has been started and function D
selected.
The gearbox adapts to driving on slippery roads. Note: you can return to the auto-
adaptive programme at any time. � Press button Sor �
�again to
switch off the programme you are in. Manual operation Manual changing of the
four gears:
� select function Mon the gate,
� push the lever to the +sign to
change to a higher gear,
� pull the lever to the -sign to
change to a lower gear.
You can change from position D(dri-
ving in automatic mode) to position M (driving in manual mode) at any
time. Note It is only possible to change from one gear to another if the vehicle speedand engine speed permit. If they donot, the vehicle will operate tempora-rily in automatic mode. When the vehicle is stationary or
moving very slowly, the gearboxautomatically selects gear M1.
Programmes S (sport) and �
�(snow)
do not operate in manual mode.
YOUR 307 SW IN DETAIL
94
Page 99 of 137

Unlocking Pull on the handle and press the but- ton to release the handbrake.Illumination of this light,accompanied by an audiblesignal and the message"handbrake on" on the
multi-function display, indi-cates that the handbrake is
still on or has not been properlyreleased.
Operating abnormality Any operating abnormality is indica- ted by an audible signal accompa-nied by the message "Automatic
gearbox faulty" on the multi-func-
tion display and flashing of the Sportand Snow warning lights on the ins-trument panel. In this situation thegearbox operates in downgrade
mode (locked in 3rd gear). You mayfeel a substantial knock when chan-ging from Pto Rand from Nto R
(this will not cause any damage tothe gearbox). Do not exceed 60 mph (100 km/h), speed restrictions permitting.
Contact a PEUGEOT dealer as soon as possible. When this warning lightcomes on, accompanied byan audible signal and themessage
"Braking fault"
on the multi-function display
it indicates that there is a malfunctionof the electronic brake force distribu-tion, which can cause a loss ofcontrol of the vehicle when braking.
Stop immediately.
Contact a PEUGEOT dealer.
HANDBRAKE Locking Pull the handbrake to immobilise your vehicle.
Warning:
when parking on a slope,
direct your wheels towards the pave- ment and pull the handbrake.
ABS ANTI-LOCK BRAKING SYSTEM
The ABS system with Electronic Brake Force Distribution (EBFD)increases the stability and manoeu-vrability of your vehicle, particularlyon poor or slippery road surfaces. Note: when changing wheels (tyres
and rims), make sure that these are approved. The anti-lock braking system comes into operation automatically whenthere is a risk of wheel lock.
YOUR 307 SW IN DETAIL 95
If the battery is flat and the lever is in position
P, it
will be impossible tochange to another posi-tion.
Normal operation of the ABS may make itself felt by slight vibrationsof the brake pedal. In emergency braking, press very firmly without releasingthe pressure.
EMERGENCY BRAKING
ASSISTANCE SYSTEM
In an emergency, this system enables the optimum braking
pressure to be reached more quickly,thus reducing the stopping distance. It is triggered according to the speed
of activation of the brake pedal. The
effect of this is a reduction in theresistance of the pedal and an
increase in braking efficiency.
Page 100 of 137

Unlocking Pull on the handle and press the but- ton to release the handbrake.Illumination of this light,accompanied by an audiblesignal and the message"handbrake on" on the
multi-function display, indi-cates that the handbrake is
still on or has not been properlyreleased.
Operating abnormality Any operating abnormality is indica- ted by an audible signal accompa-nied by the message "Automatic
gearbox faulty" on the multi-func-
tion display and flashing of the Sportand Snow warning lights on the ins-trument panel. In this situation thegearbox operates in downgrade
mode (locked in 3rd gear). You mayfeel a substantial knock when chan-ging from Pto Rand from Nto R
(this will not cause any damage tothe gearbox). Do not exceed 60 mph (100 km/h), speed restrictions permitting.
Contact a PEUGEOT dealer as soon as possible. When this warning lightcomes on, accompanied byan audible signal and themessage
"Braking fault"
on the multi-function display
it indicates that there is a malfunctionof the electronic brake force distribu-tion, which can cause a loss ofcontrol of the vehicle when braking.
Stop immediately.
Contact a PEUGEOT dealer.
HANDBRAKE Locking Pull the handbrake to immobilise your vehicle.
Warning:
when parking on a slope,
direct your wheels towards the pave- ment and pull the handbrake.
ABS ANTI-LOCK BRAKING SYSTEM
The ABS system with Electronic Brake Force Distribution (EBFD)increases the stability and manoeu-vrability of your vehicle, particularlyon poor or slippery road surfaces. Note: when changing wheels (tyres
and rims), make sure that these are approved. The anti-lock braking system comes into operation automatically whenthere is a risk of wheel lock.
YOUR 307 SW IN DETAIL 95
If the battery is flat and the lever is in position
P, it
will be impossible tochange to another posi-tion.
Normal operation of the ABS may make itself felt by slight vibrationsof the brake pedal. In emergency braking, press very firmly without releasingthe pressure.
EMERGENCY BRAKING
ASSISTANCE SYSTEM
In an emergency, this system enables the optimum braking
pressure to be reached more quickly,thus reducing the stopping distance. It is triggered according to the speed
of activation of the brake pedal. The
effect of this is a reduction in theresistance of the pedal and an
increase in braking efficiency.