ESP Peugeot 307 SW Dag 2002 Owner's Manual
[x] Cancel search | Manufacturer: PEUGEOT, Model Year: 2002, Model line: 307 SW Dag, Model: Peugeot 307 SW Dag 2002Pages: 137, PDF Size: 1.42 MB
Page 2 of 137
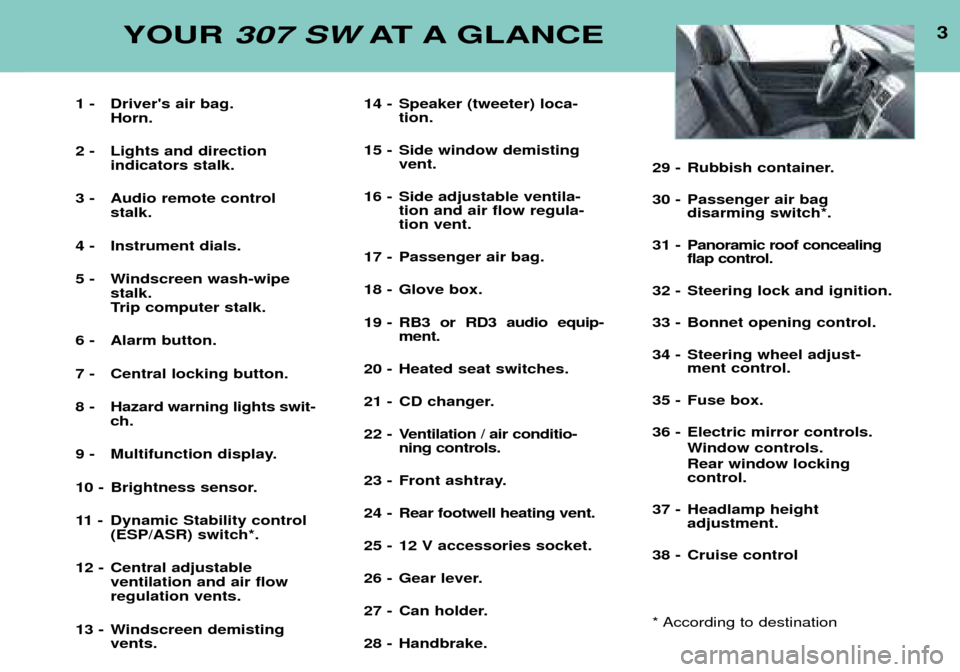
3YOUR 307 SW AT A GLANCE
1 - Driver's air bag.
Horn.
2 - Lights and direction indicators stalk.
3 - Audio remote control stalk.
4 - Instrument dials.
5 - Windscreen wash-wipe stalk.
Trip computer stalk.
6 - Alarm button.
7 - Central locking button.
8 - Hazard warning lights swit- ch.
9 - Multifunction display.
10 - Brightness sensor.
11 - Dynamic Stability control (ESP/ASR) switch*.
12 - Central adjustable ventilation and air flow regulation vents.
13 - Windscreen demisting vents. 14 - Speaker (tweeter) loca-
tion.
15 - Side window demisting vent.
16 - Side adjustable ventila- tion and air flow regula- tion vent.
17 - Passenger air bag.
18 - Glove box.
19 - RB3 or RD3 audio equip- ment.
20 - Heated seat switches.
21 - CD changer.
22 - Ventilation / air conditio- ning controls.
23 - Front ashtray.
24 - Rear footwell heating vent.
25 - 12 V accessories socket.
26 - Gear lever.
27 - Can holder.
28 - Handbrake. 29 - Rubbish container.
30 - Passenger air bag
disarming switch*.
31 - Panoramic roof concealing flap control.
32 - Steering lock and ignition.
33 - Bonnet opening control.
34 - Steering wheel adjust- ment control.
35 - Fuse box.
36 - Electric mirror controls. Window controls. Rear window locking control.
37 - Headlamp height adjustment.
38 - Cruise control
* According to destination
Page 9 of 137
Safety auto-reverse: When the window is closing and meets an obstacle, it stops and lowers again.
ELECTRIC MIRRORS
10
YOUR
307 SW AT A GLANCE
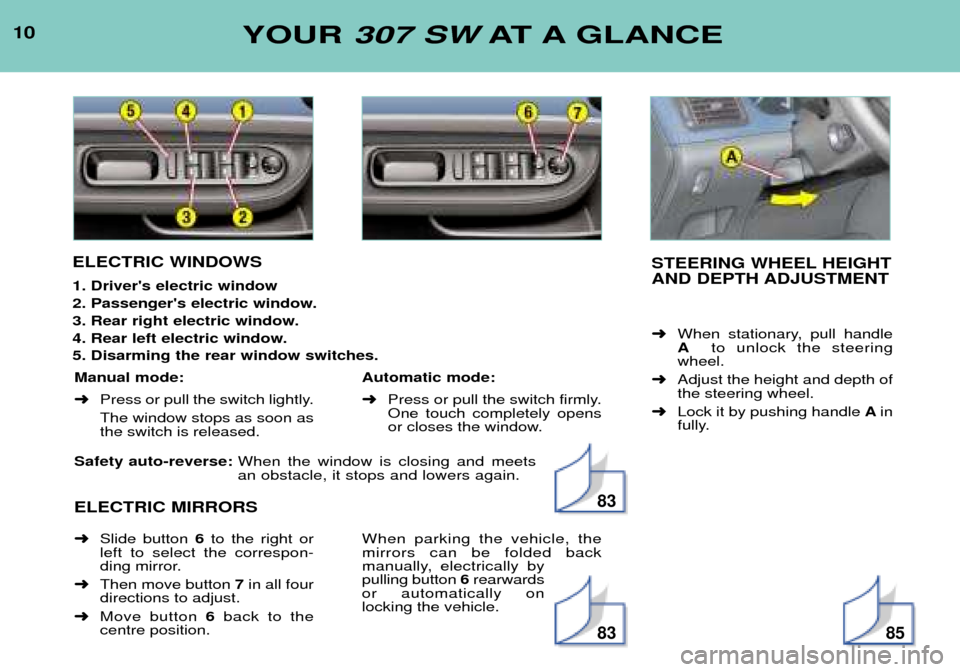
ELECTRIC WINDOWS 1. Driver's electric window
2. Passenger's electric window.
3. Rear right electric window.
4. Rear left electric window.5. Disarming the rear window switches. STEERING WHEEL HEIGHT
AND DEPTH ADJUSTMENT ➜
When stationary, pull handle A to unlock the steering
wheel.
➜ Adjust the height and depth ofthe steering wheel.
➜ Lock it by pushing handle Ain
fully.
Manual mode: ➜ Press or pull the switch lightly.
The window stops as soon as the switch is released. Automatic mode: ➜
Press or pull the switch firmly.
One touch completely opens
or closes the window.
➜ Slide button 6to the right or
left to select the correspon-
ding mirror.
➜ Then move button 7in all four
directions to adjust.
➜ Move button 6back to the
centre position. When parking the vehicle, themirrors can be folded back
manually, electrically bypulling button
6rearwards
or automatically onlocking the vehicle.
83
8385
Page 18 of 137
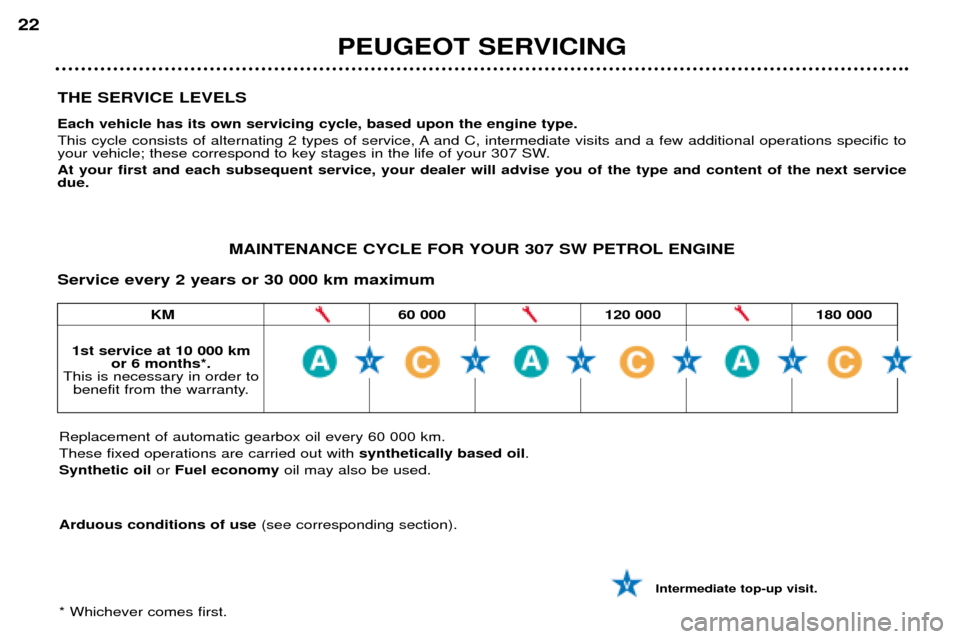
THE SERVICE LEVELS Each vehicle has its own servicing cycle, based upon the engine type.
This cycle consists of alternating 2 types of service, A and C, intermediate visits and a few additional operations specific to
your vehicle; these correspond to key stages in the life of your 307 SW. At your first and each subsequent service, your dealer will advise you of the type and content of the next service due.
PEUGEOT SERVICING
22
MAINTENANCE CYCLE FOR YOUR 307 SW PETROL ENGINE
Service every 2 years or 30 000 km maximum
1st service at 10 000 km or 6 months*.
This is necessary in order to benefit from the warranty.
Replacement of automatic gearbox oil every 60 000 km. These fixed operations are carried out with synthetically based oil.
Synthetic oil or Fuel economy oil may also be used.
Arduous conditions of use (see corresponding section).
* Whichever comes first. Intermediate top-up visit.
KM 60 000 120 000 180 000
Page 19 of 137
120 000180 000
PEUGEOT SERVICING 23
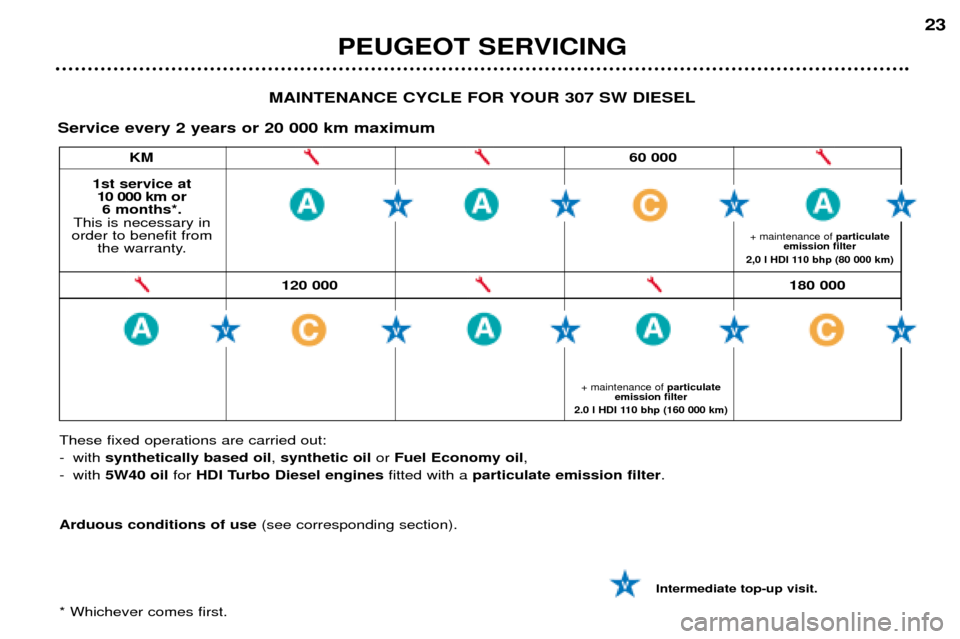
MAINTENANCE CYCLE FOR YOUR 307 SW DIESEL
Service every 2 years or 20 000 km maximum
1st service at 10 000 km or 6 months*.
This is necessary in
order to benefit from the warranty.
+ maintenance of particulate
emission filter
2.0 l HDI 110 bhp (160 000 km) + maintenance of
particulate
emission filter
2,0 l HDI 110 bhp (80 000 km)
These fixed operations are carried out:
- with synthetically based oil , synthetic oil or Fuel Economy oil ,
- with 5W40 oil for HDI Turbo Diesel engines fitted with a particulate emission filter .
Arduous conditions of use (see corresponding section).
* Whichever comes first. Intermediate top-up visit.
KM
60 000
Page 24 of 137
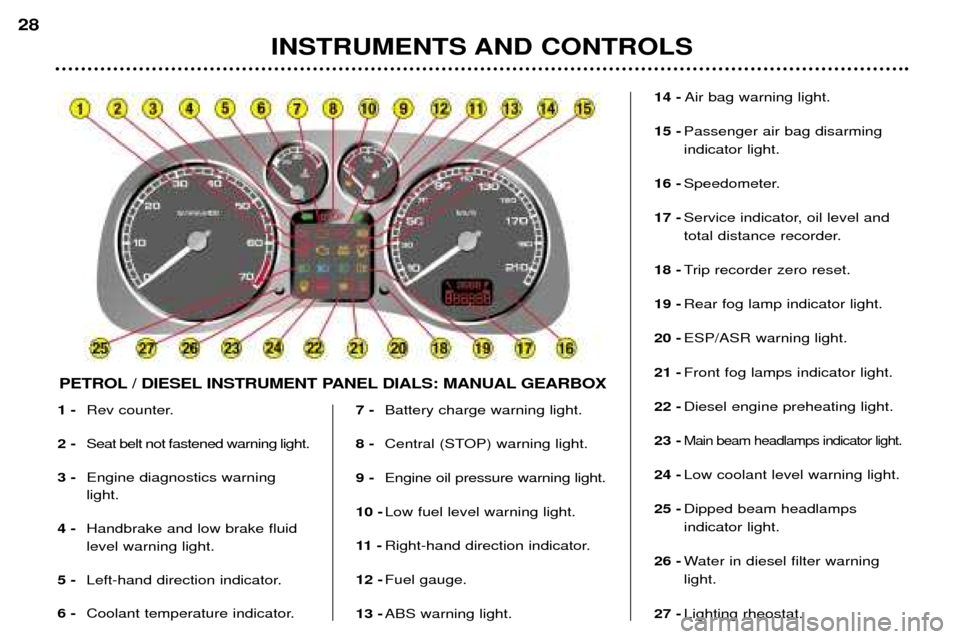
1 -Rev counter.
2 - Seat belt not fastened warning light.
3 - Engine diagnostics warning light.
4 - Handbrake and low brake fluidlevel warning light.
5 - Left-hand direction indicator.
6 - Coolant temperature indicator. 7 -
Battery charge warning light.
8 - Central (STOP) warning light.
9 - Engine oil pressure warning light.
10 - Low fuel level warning light.
11 - Right-hand direction indicator.
12 - Fuel gauge.
13 - ABS warning light. 14 -
Air bag warning light.
15 - Passenger air bag disarming indicator light.
16 - Speedometer.
17 - Service indicator, oil level and
total distance recorder.
18 - Trip recorder zero reset.
19 - Rear fog lamp indicator light.
20 - ESP/ASR warning light.
21 - Front fog lamps indicator light.
22 - Diesel engine preheating light.
23 -
Main beam headlamps indicator light.
24 - Low coolant level warning light.
25 - Dipped beam headlampsindicator light.
26 - Water in diesel filter warninglight.
27 - Lighting rheostat.
INSTRUMENTS AND CONTROLS
28
PETROL / DIESEL INSTRUMENT PANEL DIALS: MANUAL GEARBOX
Page 25 of 137
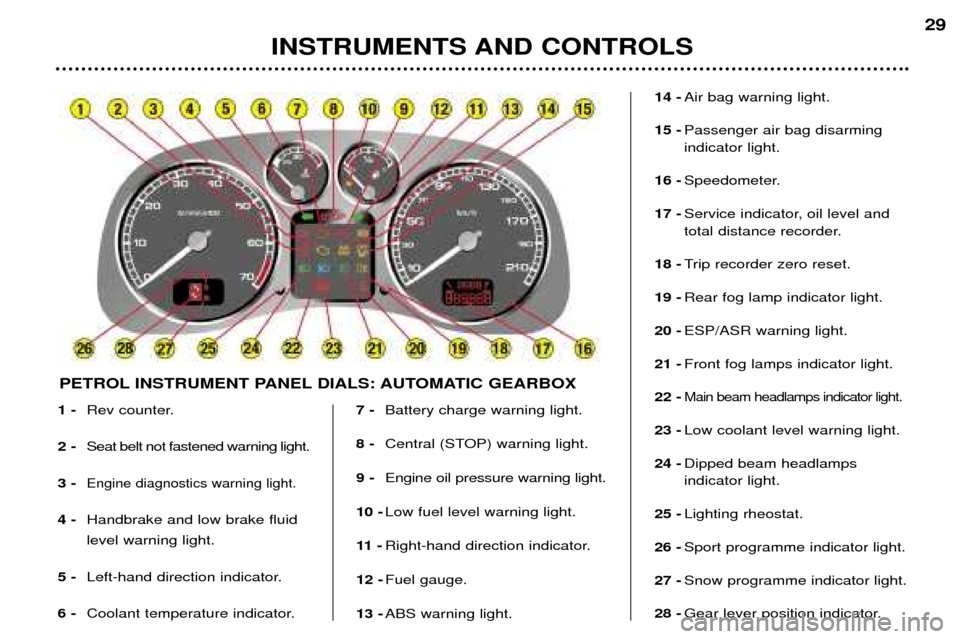
INSTRUMENTS AND CONTROLS29
1 -
Rev counter.
2 - Seat belt not fastened warning light.
3 -
Engine diagnostics warning light.
4 - Handbrake and low brake fluid level warning light.
5 - Left-hand direction indicator.
6 - Coolant temperature indicator. 7 -
Battery charge warning light.
8 - Central (STOP) warning light.
9 - Engine oil pressure warning light.
10 - Low fuel level warning light.
11 - Right-hand direction indicator.
12 - Fuel gauge.
13 - ABS warning light. 14 -
Air bag warning light.
15 - Passenger air bag disarming indicator light.
16 - Speedometer.
17 - Service indicator, oil level and
total distance recorder.
18 - Trip recorder zero reset.
19 - Rear fog lamp indicator light.
20 - ESP/ASR warning light.
21 - Front fog lamps indicator light.
22 -
Main beam headlamps indicator light.
23 - Low coolant level warning light.
24 - Dipped beam headlampsindicator light.
25 - Lighting rheostat.
26 - Sport programme indicator light.
27 - Snow programme indicator light.
28 - Gear lever position indicator.
PETROL INSTRUMENT PANEL DIALS: AUTOMATIC GEARBOX
Page 27 of 137
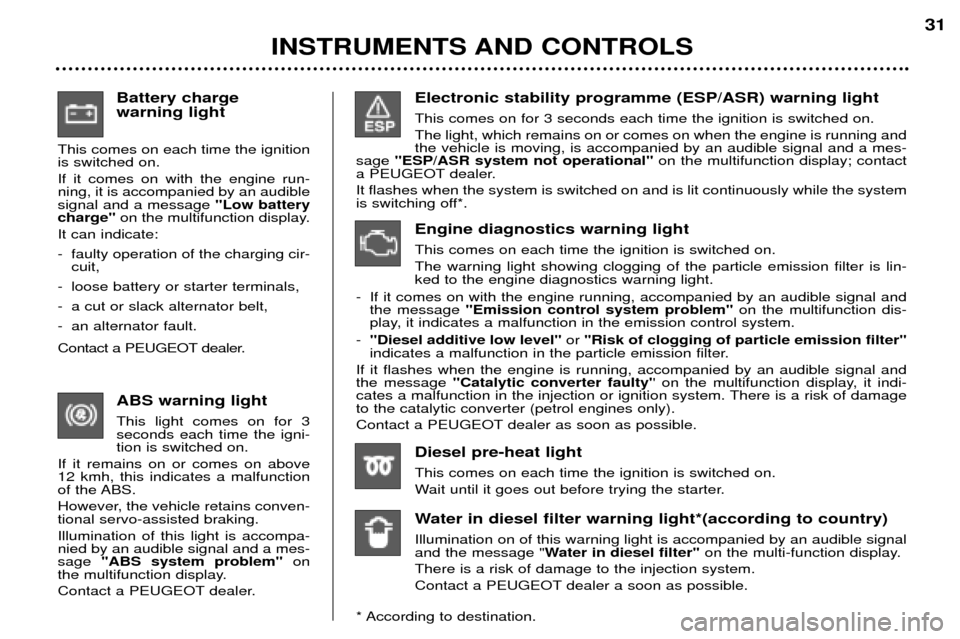
Battery charge warning light
This comes on each time the ignition is switched on. If it comes on with the engine run- ning, it is accompanied by an audiblesignal and a message "Low battery
charge" on the multifunction display.
It can indicate:
- faulty operation of the charging cir- cuit,
- loose battery or starter terminals,
- a cut or slack alternator belt,
- an alternator fault.
Contact a PEUGEOT dealer.
ABS warning light This light comes on for 3 seconds each time the igni-tion is switched on.
If it remains on or comes on above12 kmh, this indicates a malfunction
of the ABS.
However, the vehicle retains conven- tional servo-assisted braking. Illumination of this light is accompa- nied by an audible signal and a mes-sage "ABS system problem" on
the multifunction display.
Contact a PEUGEOT dealer. Electronic stability programme (ESP/ASR) warning light This comes on for 3 seconds each time the ignition is switched on. The light, which remains on or comes on when the engine is running and the vehicle is moving, is accompanied by an audible signal and a mes-
sage ''ESP/ASR system not operational'' on the multifunction display; contact
a PEUGEOT dealer. It flashes when the system is switched on and is lit continuously while the system
is switching off*.
Diesel pre-heat light This comes on each time the ignition is switched on.
Wait until it goes out before trying the starter.
Water in diesel filter warning light*(according to country) Illumination on of this warning light is accompanied by an audible signal and the message " Water in diesel filter" on the multi-function display.
There is a risk of damage to the injection system.
Contact a PEUGEOT dealer a soon as possible.
* According to destination. Engine diagnostics warning light This comes on each time the ignition is switched on. The warning light showing clogging of the particle emission filter is lin- ked to the engine diagnostics warning light.
- If it comes on with the engine running, accompanied by an audible signal and the message ''Emission control system problem'' on the multifunction dis-
play, it indicates a malfunction in the emission control system.
- ''Diesel additive low level'' or "Risk of clogging of particle emission filter"
indicates a malfunction in the particle emission filter.
If it flashes when the engine is running, accompanied by an audible signal andthe message ''Catalytic converter faulty' ' on the multifunction display, it indi-
cates a malfunction in the injection or ignition system. There is a risk of damageto the catalytic converter (petrol engines only).
Contact a PEUGEOT dealer as soon as possible.
INSTRUMENTS AND CONTROLS 31
Page 31 of 137
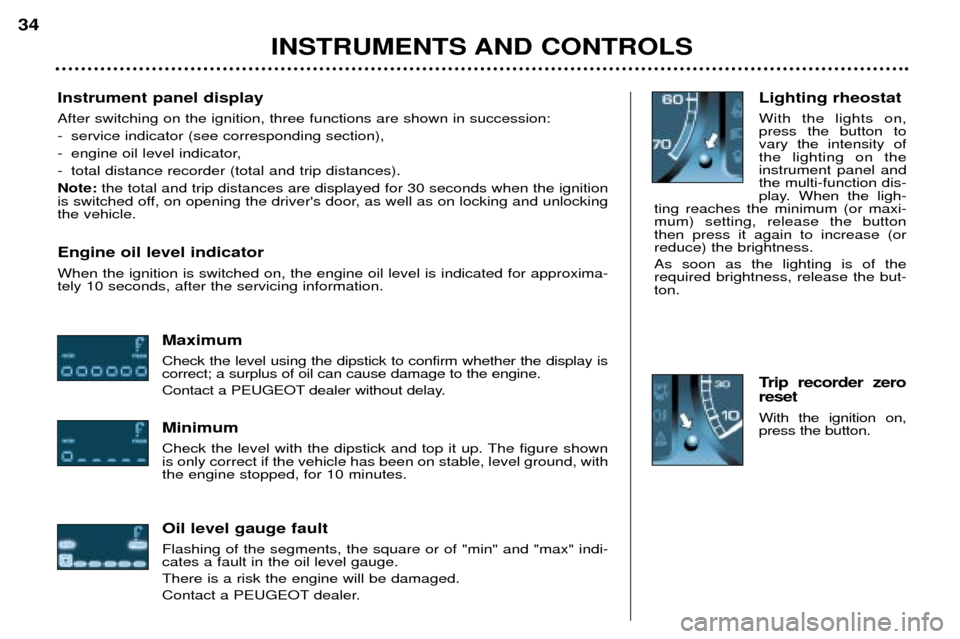
Instrument panel display After switching on the ignition, three functions are shown in succession:
- service indicator (see corresponding section),
- engine oil level indicator,
- total distance recorder (total and trip distances).Note:the total and trip distances are displayed for 30 seconds when the ignition
is switched off, on opening the driver's door, as well as on locking and unlocking the vehicle. Engine oil level indicator When the ignition is switched on, the engine oil level is indicated for approxima- tely 10 seconds, after the servicing information.
Maximum Check the level using the dipstick to confirm whether the display is correct; a surplus of oil can cause damage to the engine.
Contact a PEUGEOT dealer without delay. Minimum
Check the level with the dipstick and top it up. The figure shown is only correct if the vehicle has been on stable, level ground, withthe engine stopped, for 10 minutes. Oil level gauge fault Flashing of the segments, the square or of "min" and "max" indi- cates a fault in the oil level gauge. There is a risk the engine will be damaged.
Contact a PEUGEOT dealer. Lighting rheostat With the lights on, press the button tovary the intensity ofthe lighting on theinstrument panel andthe multi-function dis-
play. When the ligh-
ting reaches the minimum (or maxi-mum) setting, release the buttonthen press it again to increase (orreduce) the brightness. As soon as the lighting is of the required brightness, release the but-ton.
Trip recorder zero reset With the ignition on, press the button.
INSTRUMENTS AND CONTROLS
34
Page 32 of 137
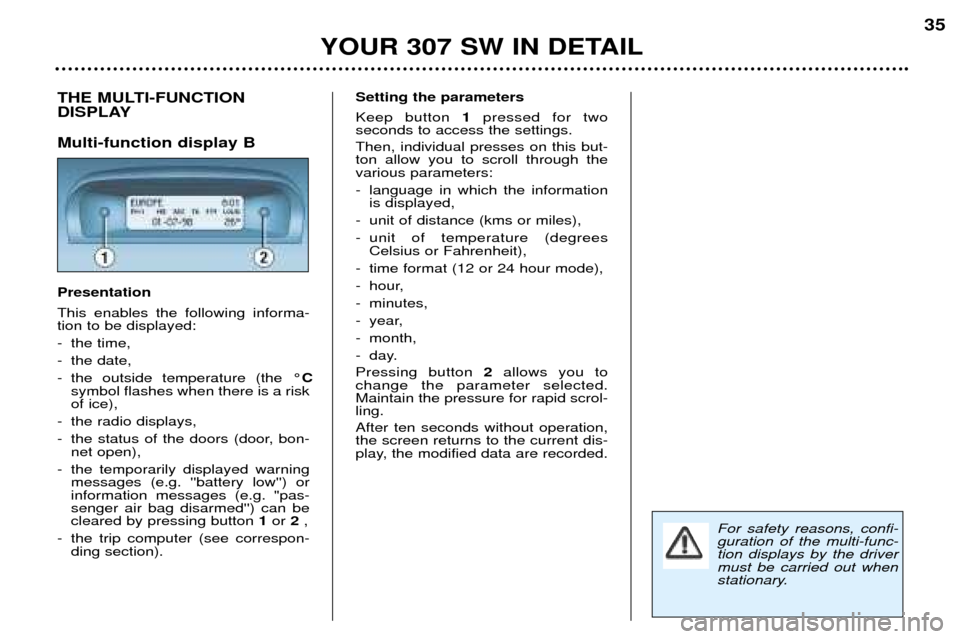
YOUR 307 SW IN DETAIL35
THE MULTI-FUNCTION
DISPLAY Multi-function display B Presentation This enables the following informa- tion to be displayed:
- the time,
- the date,
- the outside temperature (the
¡C
symbol flashes when there is a risk of ice),
- the radio displays,
- the status of the doors (door, bon- net open),
- the temporarily displayed warning messages (e.g. ''battery low'') or information messages (e.g. "pas-senger air bag disarmed'') can becleared by pressing button 1or 2,
- the trip computer (see correspon- ding section).Setting the parameters Keep button 1pressed for two
seconds to access the settings. Then, individual presses on this but- ton allow you to scroll through thevarious parameters:
- language in which the information is displayed,
- unit of distance (kms or miles),
- unit of temperature (degrees Celsius or Fahrenheit),
- time format (12 or 24 hour mode),
- hour,
- minutes,
- year,
- month,
- day. Pressing button 2allows you to
change the parameter selected. Maintain the pressure for rapid scrol-ling. After ten seconds without operation, the screen returns to the current dis-
play, the modified data are recorded.
For safety reasons, confi-guration of the multi-func-tion displays by the drivermust be carried out when
stationary.
Page 38 of 137

Manual station search Press the"MAN" button.
Briefly press button Ior Jto increase or decrease the frequency displayed.
By continuing to press the button in the direction selected, you will obtain continuous scrolling of the frequency. The scrolling stops at the first station found as soon as the button is released.Pressing the "MAN"button again returns you to automatic station search.
Manual storing of stations in the memory Select the station required. Press one of the buttons "1"to "6" for more than two seconds.
The sound stops then becomes audible again, confirming that the station has been stored in the memory.
Automatic storing of FM stations in the memory (autostore)
Audio RB3 : press and hold the "BND/AST" button for more than two seconds.
Audio RD3 : press and hold button "P" for more than two seconds.
Your radio automatically stores the 6 stations with the strongest signal in FM. These stations are stored in the FMast wave-
band.
If it is not possible to find 6 stations, the remaining memories are empty.
Recalling stations stored in the memory For each waveband, briefly press buttons "1" to "6" to recall the corresponding station.
YOUR 307 SW IN DETAIL 43