height Peugeot 308 2014 Owner's Manual
[x] Cancel search | Manufacturer: PEUGEOT, Model Year: 2014, Model line: 308, Model: Peugeot 308 2014Pages: 400, PDF Size: 10.05 MB
Page 77 of 400
75
3
Comfort
308_EN_CHAP03_CONFORT_ED02-2013
Steering wheel adjustment
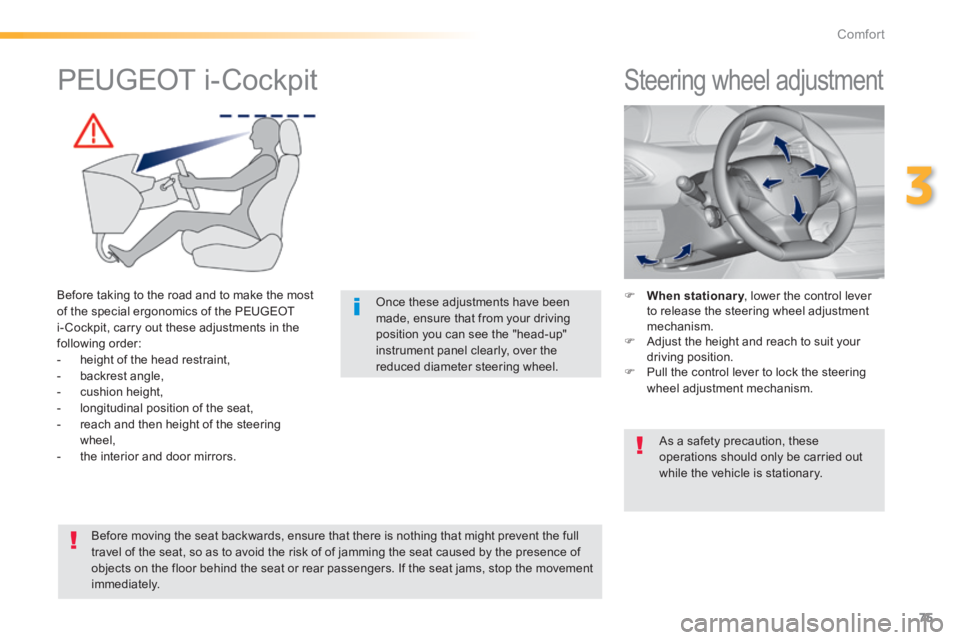
When stationary , lower the control lever hen stationary , lower the control lever hen stationaryto release the steering wheel adjustment mechanism. Adjust the height and reach to suit your driving position. Pull the control lever to lock the steering wheel adjustment mechanism.
As a safety precaution, these operations should only be carried out while the vehicle is stationary.
PEUGEOT i-Cockpit
Before taking to the road and to make the most of the special ergonomics of the PEUGEOT i- Cockpit, carry out these adjustments in the following order: - height of the head restraint, - backrest angle, - cushion height, - longitudinal position of the seat, - reach and then height of the steering wheel, - the interior and door mirrors.
Once these adjustments have been made, ensure that from your driving position you can see the "head-up" instrument panel clearly, over the reduced diameter steering wheel.
Before moving the seat backwards, ensure that there is nothing that might prevent the full travel of the seat, so as to avoid the risk of of jamming the seat caused by the presence of objects on the floor behind the seat or rear passengers. If the seat jams, stop the movement immediately.
Page 78 of 400
76
Comfort
308_EN_CHAP03_CONFORT_ED02-2013
Front seats with manual adjustments
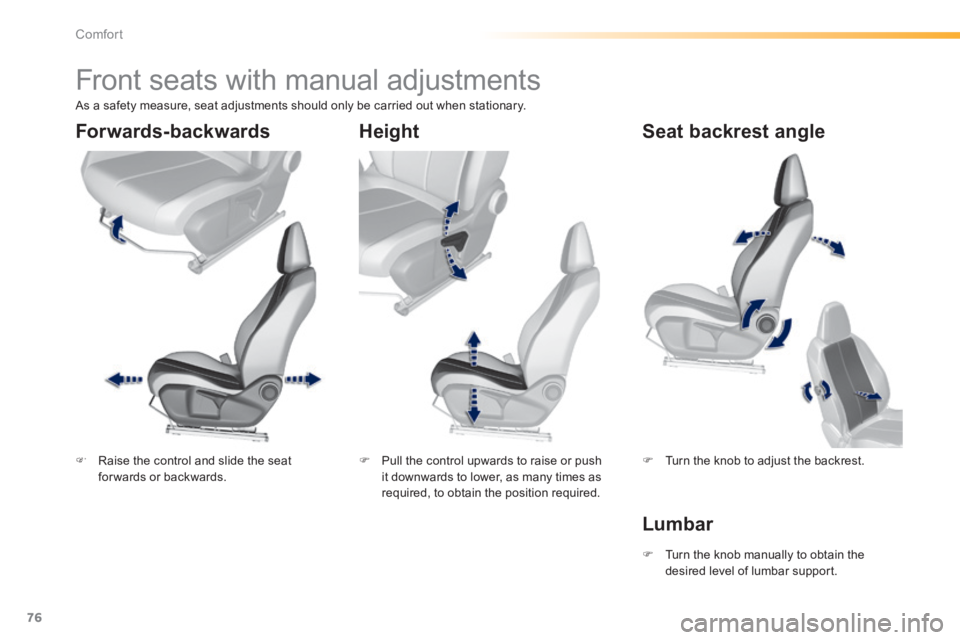
Raise the control and slide the seat for wards or backwards. Pull the control upwards to raise or push it downwards to lower, as many times as required, to obtain the position required.
Turn the knob to adjust the backrest.
Forwards-backwards Height Seat backrest angle
As a safety measure, seat adjustments should only be carried out when stationary.
Turn the knob manually to obtain the desired level of lumbar support.
Lumbar
Page 79 of 400
77
3
Comfort
308_EN_CHAP03_CONFORT_ED02-2013
Electric driver's seat
Forwards-backwards Seat backrest angle Seat cushion height and
angle
To avoid discharging the battery, carry out these adjustments with the engine running.
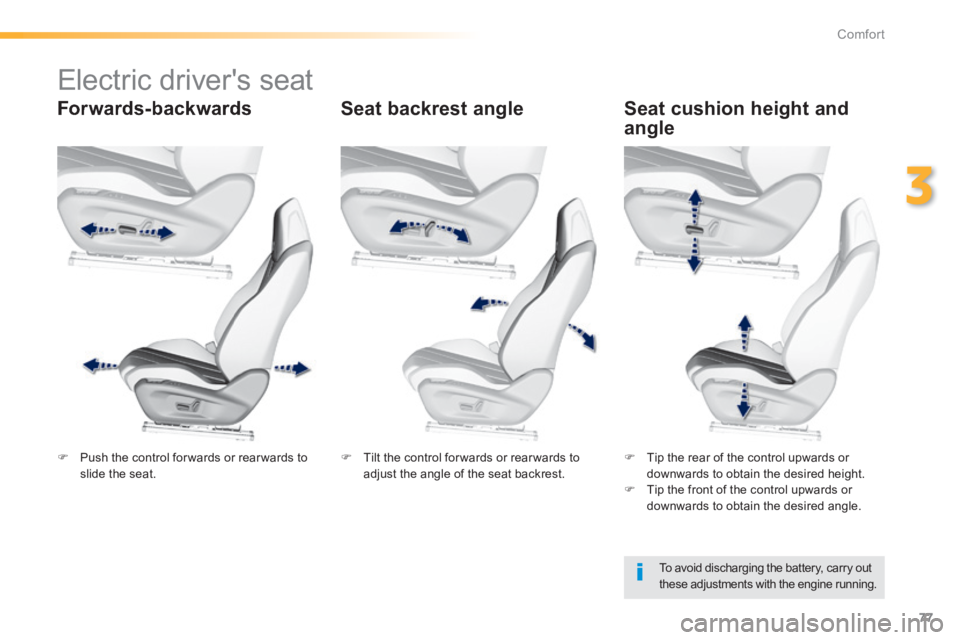
Push the control for wards or rear wards to slide the seat. Tilt the control for wards or rear wards to adjust the angle of the seat backrest. Tip the rear of the control upwards or downwards to obtain the desired height. Tip the front of the control upwards or downwards to obtain the desired angle.
Page 81 of 400
79
3
Comfort
308_EN_CHAP03_CONFORT_ED02-2013
Heated seats control
0: Of f.
1: Low. 2: Medium. 3: High.
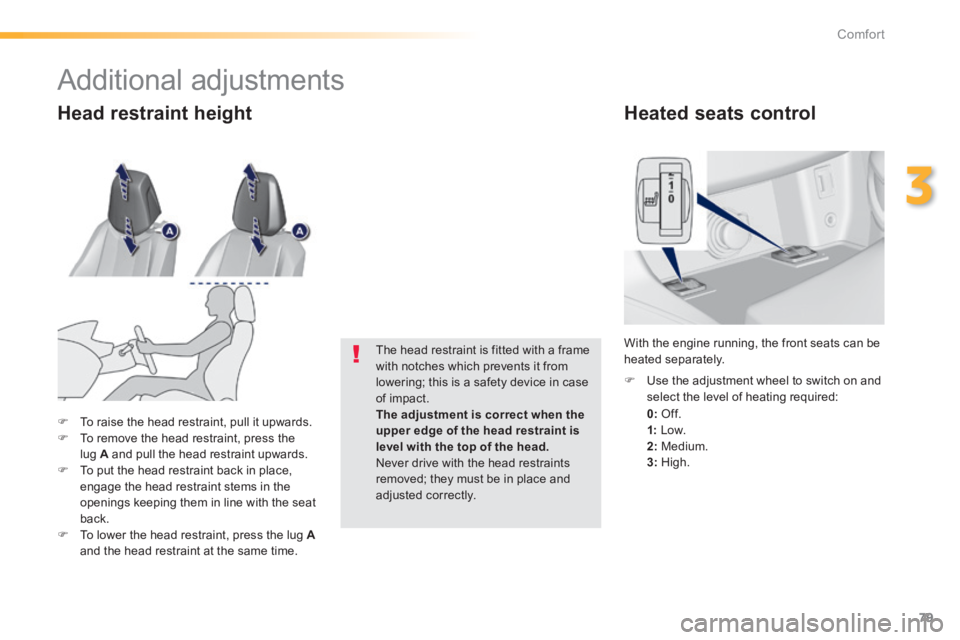
Use the adjustment wheel to switch on and select the level of heating required:
With the engine running, the front seats can be heated separately.
To raise the head restraint, pull it upwards. To remove the head restraint, press the lug A and pull the head restraint upwards. To put the head restraint back in place, engage the head restraint stems in the openings keeping them in line with the seat back. To lower the head restraint, press the lug Aand the head restraint at the same time.
The head restraint is fitted with a frame with notches which prevents it from lowering; this is a safety device in case of impact. The adjustment is correct when the
upper edge of the head restraint is level with the top of the head. Never drive with the head restraints removed; they must be in place and adjusted correctly.
Head restraint height
Additional adjustments
Page 88 of 400
86
Comfort
308_EN_CHAP03_CONFORT_ED02-2013
Front armrest
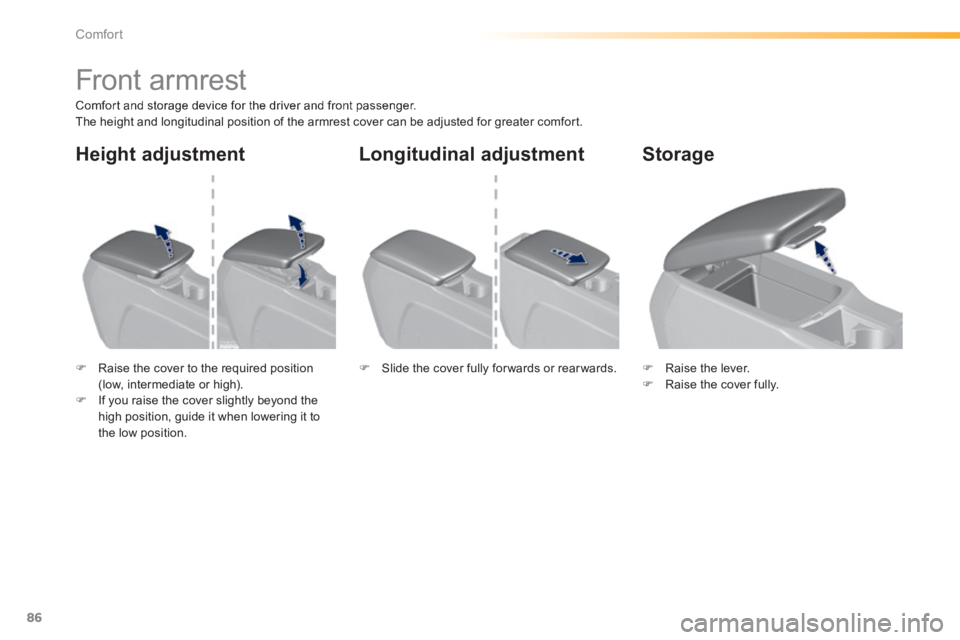
Comfort and storage device for the driver and front passenger. The height and longitudinal position of the armrest cover can be adjusted for greater comfort.
Raise the cover to the required position (low, intermediate or high). If you raise the cover slightly beyond the high position, guide it when lowering it to
the low position.
Raise the lever. Raise the cover fully. Slide the cover fully for wards or rear wards.
Storage Longitudinal adjustment Height adjustment
Page 96 of 400
94
Comfort
308_EN_CHAP03_CONFORT_ED02-2013
Warning triangle (stowing)
Before getting out of your vehicle to assemble the triangle and place it on the road, put on your high visibility vest.
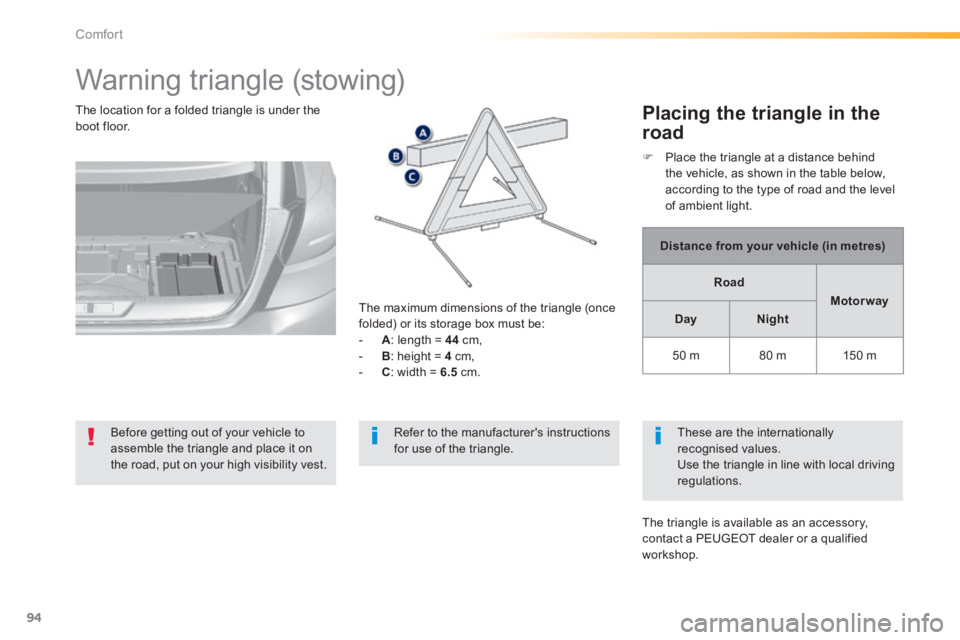
The maximum dimensions of the triangle (once folded) or its storage box must be: - A : length = 44 cm, - B : height = 4 cm, - C : width = 6.5 cm.
The location for a folded triangle is under the boot floor. Placing the triangle in the
road
Distance from your vehicle (in metres)
Road
Motor way
DayNight
50 m 80 m 150 m
These are the internationally recognised values. Use the triangle in line with local driving regulations.
The triangle is available as an accessory, contact a PEUGEOT dealer or a qualified workshop.
Place the triangle at a distance behind the vehicle, as shown in the table below, according to the type of road and the level of ambient light.
Refer to the manufacturer's instructions for use of the triangle.
Page 182 of 400
180
Visibility
308_EN_CHAP05_VISIBILITE_ED02-2013
Halogen headlamps "Full LED"
headlamps
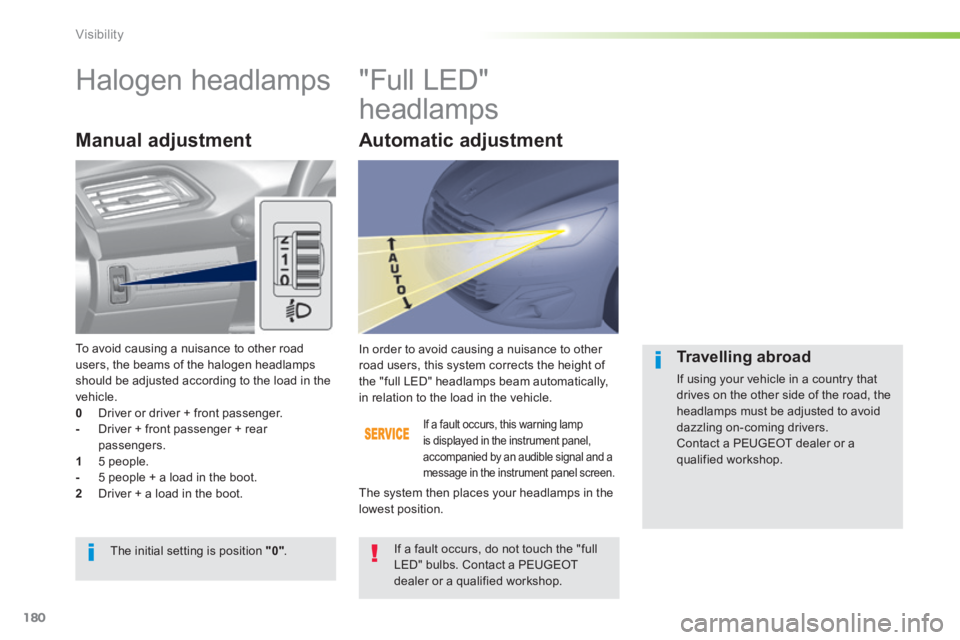
Manual adjustment
If a fault occurs, this warning lamp is displayed in the instrument panel, accompanied by an audible signal and a message in the instrument panel screen.
In order to avoid causing a nuisance to other road users, this system corrects the height of the "full LED" headlamps beam automatically, in relation to the load in the vehicle.
If a fault occurs, do not touch the "full LED" bulbs. Contact a PEUGEOT dealer or a qualified workshop.
The initial setting is position "0" .
The system then places your headlamps in the lowest position.
Travelling abroad
If using your vehicle in a country that drives on the other side of the road, the headlamps must be adjusted to avoid dazzling on-coming drivers. Contact a PEUGEOT dealer or a qualified workshop.
To avoid causing a nuisance to other road users, the beams of the halogen headlamps should be adjusted according to the load in the vehicle. 0 Driver or driver + front passenger. - Driver + front passenger + rear passengers. 1 5 people. - 5 people + a load in the boot. 2 Driver + a load in the boot.
Automatic adjustment
Page 213 of 400
211
6
Safety
308_EN_CHAP06_SECURITE_ED02-2013
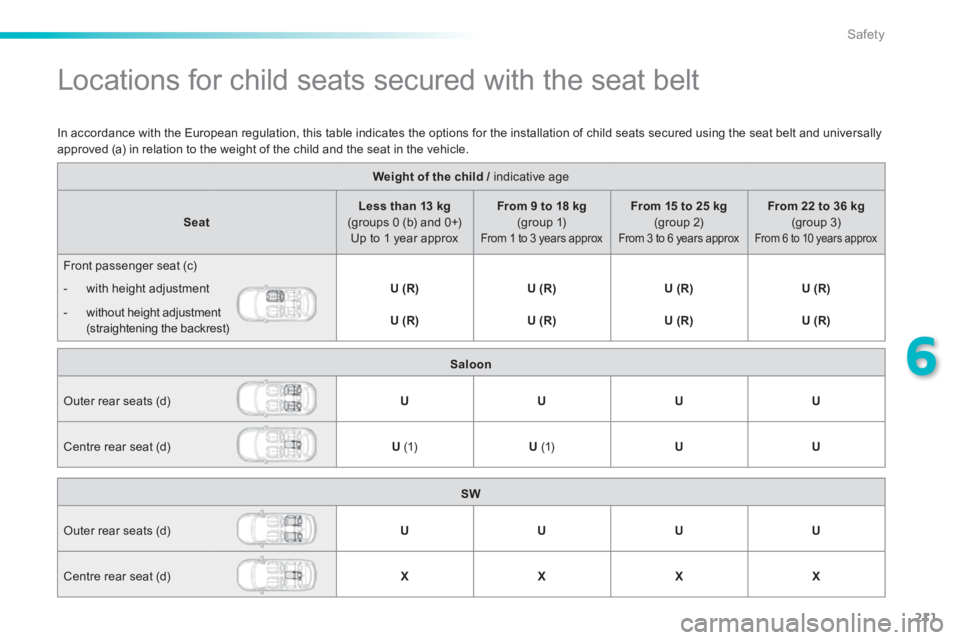
Locations for child seats secured with the seat belt
Weight of the child / indicative age Weight of the child / indicative age Weight of the child /
SeatLess than 13 kg (groups 0 (b) and 0+) Up to 1 year approx
From 9 to 18 kg (group 1) From 1 to 3 years approx
From 15 to 25 kg (group 2) From 3 to 6 years approx
From 22 to 36 kg (group 3) From 6 to 10 years approx
Front passenger seat (c)
- with height adjustment U (R)U (R)U (R)U (R)
- without height adjustment (straightening the backrest) U (R)U (R)U (R)U (R)
In accordance with the European regulation, this table indicates the options for the installation of child seats secured using the seat belt and universally approved (a) in relation to the weight of the child and the seat in the vehicle.
Saloon
Outer rear seats (d) UUUU
Centre rear seat (d) U (1) U (1) UU
SW
Outer rear seats (d) UUUU
Centre rear seat (d) XXXX
Page 214 of 400
212
Safety
308_EN_CHAP06_SECURITE_ED02-2013
U : seat suitable for the installation of a child seat secured using the seat belt and universally approved "rearward facing" and/or "for ward facing". U(R) : as for U , the vehicle seat must be adjusted to the lowest position with 11 operations of the seat height adjuster and intermediate longitudinal position. X : seat not suitable for the installation of a child seat of the weight group indicated.
Remove and stow the head restraint before fitting a child seat with a backrest to a passenger seat. Refit the head restraint when the child seat is removed.
(a) universal child seat: child seat which can be installed in all vehicles using the seat belt. (b) group 0: from birth to 10 kg. Infant car seats and "car cots" cannot be installed on the
front passenger seat. (c) consult the legislation in force in your country before installing your child on this seat. (d) to install a child seat on a rear seat, rear ward or for ward facing, move the front seat for ward, then straighten the backrest to allow enough room for the child seat and the child's legs. (1) a child seat with support leg must never be installed on the centre rear passenger seat.
Page 217 of 400
215
6
Safety
308_EN_CHAP06_SECURITE_ED02-2013
ISOFIX child seats recommended by PEUGEOT
Follow the instructions for fitting child seats contained in the seat manufacturer's installation guide.
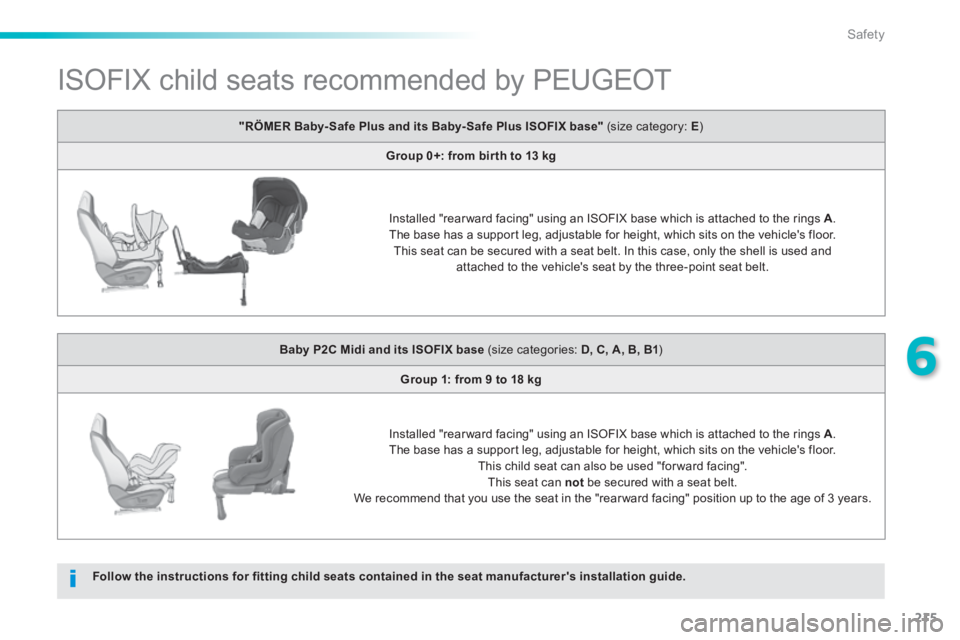
"RÖMER Baby- Safe Plus and its Baby- Safe Plus ISOFIX base" (size category: E )
Group 0+: from bir th to 13 kg
Installed "rear ward facing" using an ISOFIX base which is attached to the rings A .
The base has a support leg, adjustable for height, which sits on the vehicle's floor. This seat can be secured with a seat belt. In this case, only the shell is used and attached to the vehicle's seat by the three-point seat belt.
Baby P2C Midi and its ISOFIX base (size categories: D, C, A, B, B1 )
Group 1: from 9 to 18 kg
Installed "rear ward facing" using an ISOFIX base which is attached to the rings A .The base has a support leg, adjustable for height, which sits on the vehicle's floor. This child seat can also be used "for ward facing". This seat can not be secured with a seat belt. We recommend that you use the seat in the "rear ward facing" position up to the age of 3 years.