display Peugeot 308 2016 Owner's Manual
[x] Cancel search | Manufacturer: PEUGEOT, Model Year: 2016, Model line: 308, Model: Peugeot 308 2016Pages: 398, PDF Size: 9.38 MB
Page 5 of 398
308_en_Chap00a_sommaire_ed02-2015
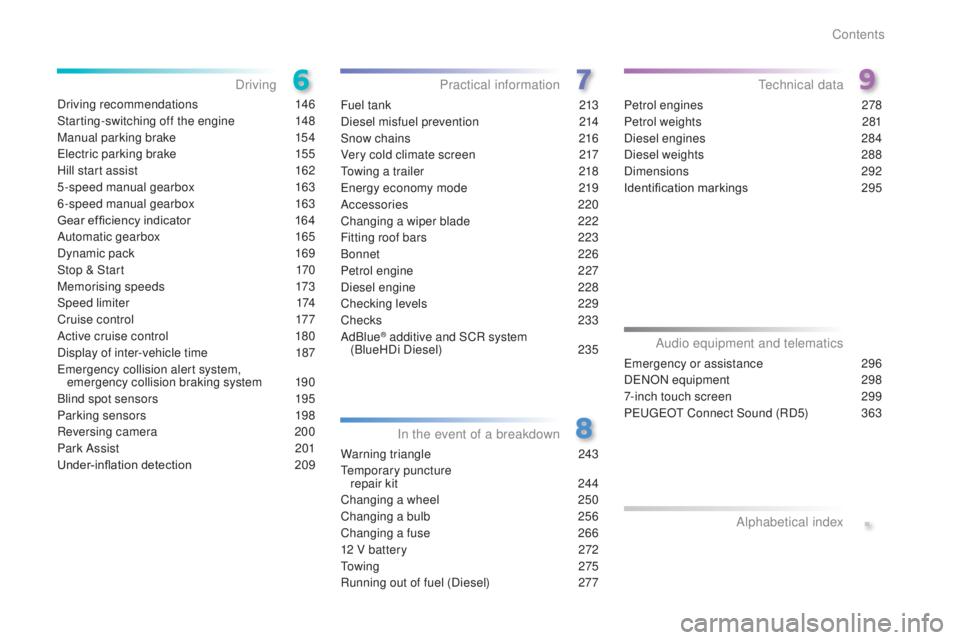
Driving recommendations 146
Starting-switching off the engine
14
8
Manual parking brake
15
4
ele
ctric parking brake
15
5
Hill start assist
16
2
5-speed manual gearbox
16
3
6-speed manual gearbox
16
3
Gear ef ficiency indicator
16
4
Automatic gearbox
16
5
Dynamic pack
16
9
Stop & Start
17
0
Memorising speeds
17
3
Speed limiter
17
4
Cruise control
17
7
Active cruise control
18
0
Display of inter-vehicle time
187
emer
gency collision alert system,
emergency collision braking system
19
0
Blind spot sensors
19
5
Parking sensors
19
8
Reversing camera
20
0
Park Assist
20
1
Under-inflation detection
209 F
uel tank 21 3
Diesel misfuel prevention
21
4
Snow chains
21
6
Very cold climate screen
21
7
tow
ing a trailer
21
8
ene
rgy economy mode
21
9
Accessories
22
0
Changing a wiper blade
22
2
Fitting roof bars
22
3
Bonnet
2
26
Petrol engine
22
7
Diesel engine
22
8
Checking levels
22
9
Checks
23
3
AdBlue
® additive and SCR system
(BlueHDi Diesel) 235
W
arning triangle
24
3
temp
orary puncture
repair kit
24
4
Changing a wheel
25
0
Changing a bulb
25
6
Changing a fuse
26
6
12 V battery
27
2
to w
i n g
2
7 5
Running out of fuel (Diesel)
27
7Petrol engines
27
8
Petrol weights
28
1
Diesel engines
28
4
Diesel weights
28
8
Dimensions
29
2
Identification markings
29
5
Driving
Practical information
In the event of a breakdowntec hnical data
.
emergency or assistance 296
D
eNO
N equipment
29
8
7-inch touch screen
29
9
P
eu
ge
Ot C
onnect Sound (RD5)
36
3
Audio equipment and telematics
Alphabetical index
Contents
Page 10 of 398
8
308_en_Chap00b_vue-ensemble_ed02-2015
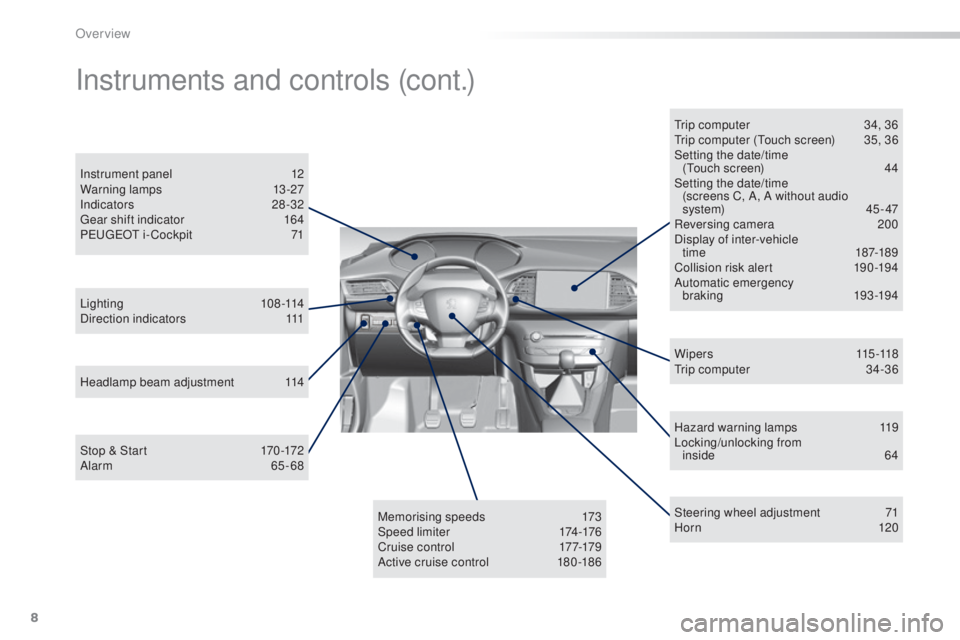
Hazard warning lamps 119
Locking/unlocking from inside
64
L
ighting
1
08-114
Direction indicators
11
1
Instrument panel
12
W
arning lamps
13
-27
Indicators
28
-32
gea
r shift indicator
16
4
P
eu
ge
Ot i
- Cockpit
71
S
teering wheel adjustment
71
H
or n
12
0
Headlamp beam adjustment
11
4
Memorising speeds
17
3
Speed limiter
17
4-176
C r u i s e c o nt r o l
17 7
-179
Active cruise control
18
0 -186 W i p e r s
11
5 -118
tri
p computer
34
-36
Instruments and controls (cont.)
trip computer 34
, 36tri
p computer (tou ch screen) 35 , 36
Setting the date/time (
tou
ch screen)
44
S
etting the date/time
(screens C, A, A without audio
system)
4
5 - 47
Reversing camera
20
0
Display of inter-vehicle time
187
-189
Collision risk alert
19
0 -194
Automatic emergency braking
19
3 -19 4
Stop & Start
17
0 -172
Alarm
6
5-68
Over view
Page 12 of 398
10
308_en_Chap00c_eco-conduite_ed02-2015
Optimise the use of your gearbox
With a manual gearbox, move off gently and change up without waiting.
During acceleration change up early.
With an automatic or electronic gearbox, give preference to automatic
mode and avoid pressing the accelerator pedal heavily or suddenly.
Control the use of your electrical
equipment
Before moving off, if the passenger compartment is too warm, ventilate it
by opening the windows and air vents before using the air conditioning.
Above 30 mph (50 km/h), close the windows and leave the air vents
open.
Remember to make use of equipment that can help keep the
temperature in the passenger compartment down (sunroof and window
blinds...).
Switch off the air conditioning, unless it has automatic regulation, as
soon as the desired temperature is attained.
Switch off the demisting and defrosting controls, if not automatic.
Switch off the heated seat as soon as possible.
Switch off the headlamps and front foglamps when the level of light
does not require their use.
Avoid running the engine before moving off, particularly in winter; your
vehicle will warm up much faster while driving.
As a passenger, if you avoid connecting your multimedia devices
(film, music, video game...), you will contribute towards limiting the
consumption of electrical energy, and so of fuel.
Disconnect your portable devices before leaving the vehicle.
eco-driving
eco-driving is a range of everyday practices that allow the motorist to optimise their fuel consumption and CO2 emissions.
Drive smoothly
Maintain a safe distance between vehicles, use engine braking rather
than the brake pedal, and press the accelerator progressively. these
practices contribute towards a reduction in fuel consumption and
CO
2 emissions and also helps reduce the background traffic noise.
If y
our vehicle has cruise control, make use of the system at speeds
above 25 mph (40 km/h) when the traffic is flowing well.
the g
ear shift indicator invites you engage the most suitable gear: as
soon as the indication is displayed in the instrument panel, follow it
straight away.
For vehicles fitted with an electronic or automatic gearbox, this
indicator appears only in manual mode.
eco-driving
Page 14 of 398
12
Instrument panel
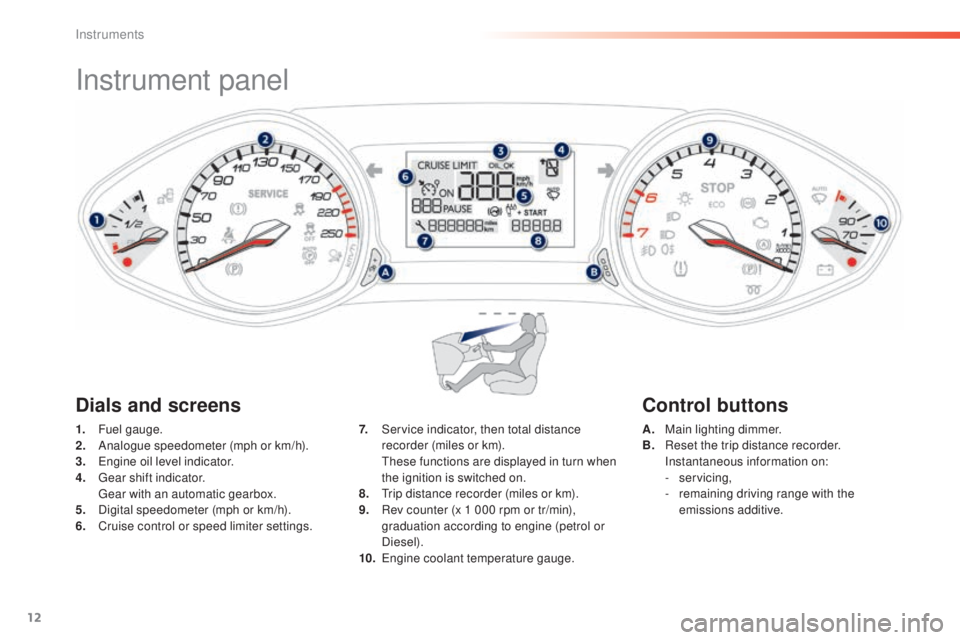
1. Fuel gauge.
2. An alogue speedometer (mph or km/h).
3.
eng
ine oil level indicator.
4.
gear
shift indicator.
gear
with an automatic gearbox.
5.
Di
gital speedometer (mph or km/h).
6.
Cr
uise control or speed limiter settings. A. Ma
in lighting dimmer.
B. Re set the trip distance recorder.
In
stantaneous information on:
-
ser
vicing,
-
rem
aining driving range with the
emissions additive.
7. Se
rvice indicator, then total distance
recorder (miles or km).
the
se functions are displayed in turn when
the ignition is switched on.
8.
tri
p distance recorder (miles or km).
9.
Re
v counter (x 1 000 rpm or tr/min),
graduation according to engine (petrol or
Diesel).
10.
engi
ne coolant temperature gauge.
Dials and screens Control buttons
Instruments
Page 19 of 398
17
308_en_Chap01_instruments-de-bord_ed02-2015
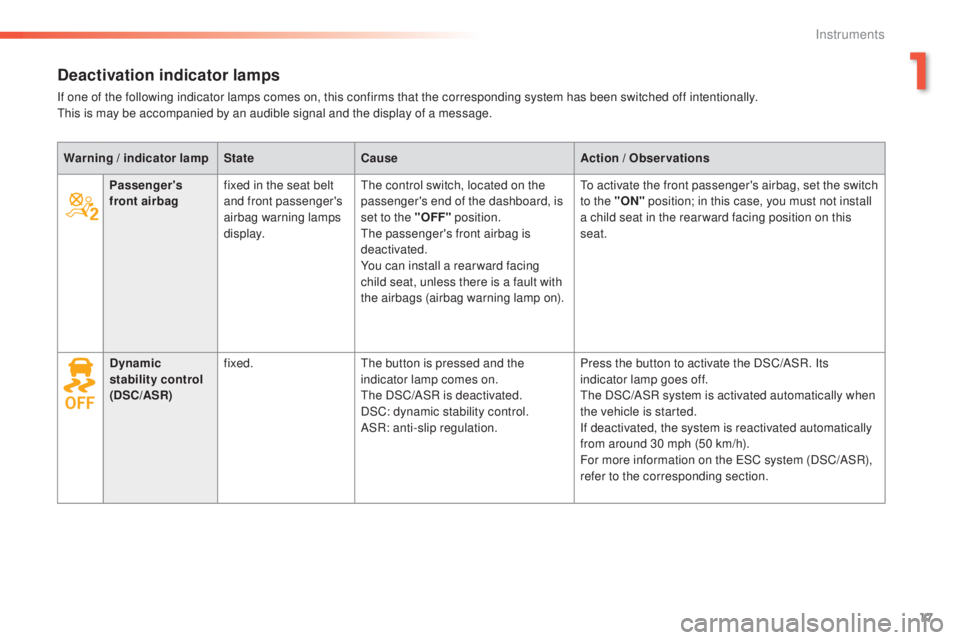
Deactivation indicator lamps
If one of the following indicator lamps comes on, this confirms that the corresponding system has been switched off intentionally.this is may be accompanied by an audible signal and the display of a message.
Warning
/
indicator lamp State Cause Action
/
Observations
Passenger's
front airbag fixed in the seat belt
and front passenger's
airbag warning lamps
display.
the c
ontrol switch, located on the
passenger's end of the dashboard, is
set to the "OFF" position.
the p
assenger's front airbag is
deactivated.
You can install a rear ward facing
child seat, unless there is a fault with
the airbags (airbag warning lamp on).
to ac
tivate the front passenger's airbag, set the switch
to the "ON" position; in this case, you must not install
a child seat in the rear ward facing position on this
seat.
Dynamic
stability control
(DSC/ASR) fixed.
the b
utton is pressed and the
indicator lamp comes on.
the DS
C/ASR is deactivated.
DSC: dynamic stability control.
ASR: anti-slip regulation. Press the button to activate the DSC/ASR. Its
indicator lamp goes off.
the D
SC/ASR system is activated automatically when
the vehicle is started.
If deactivated, the system is reactivated automatically
from around 30 mph (50 km/h).
For more information on the
eS
C system (DSC/ASR),
refer to the corresponding section.
1
Instruments
Page 21 of 398
19
308_en_Chap01_instruments-de-bord_ed02-2015
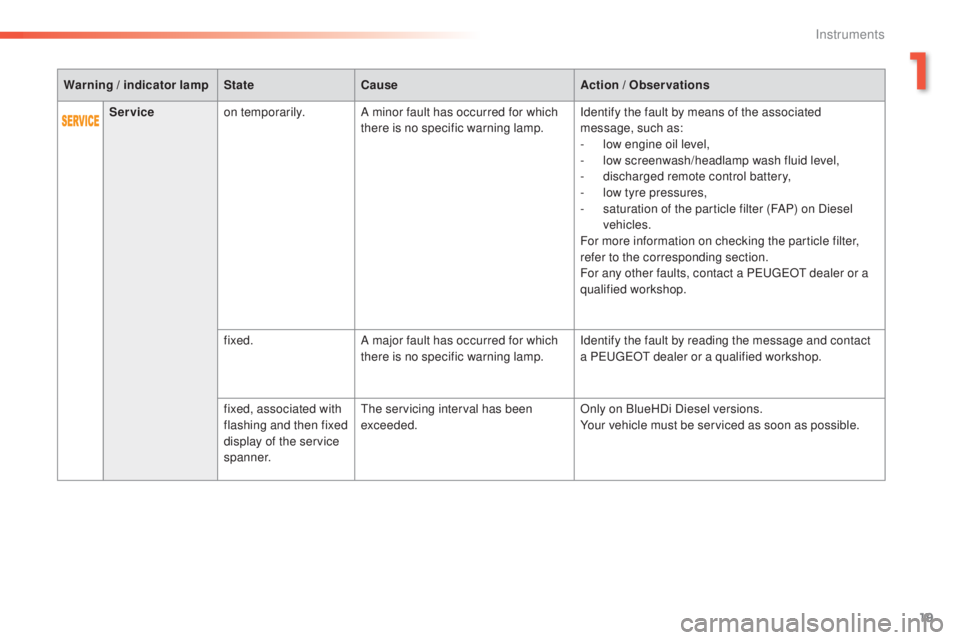
Warning / indicator lampStateCause Action / Observations
Service on temporarily. A minor fault has occurred for which
there is no specific warning lamp. Identify the fault by means of the associated
message, such as:
-
lo
w engine oil level,
-
lo
w screenwash/headlamp wash fluid level,
-
di
scharged remote control battery,
-
lo
w tyre pressures,
-
sa
turation of the particle filter (FAP) on Diesel
vehicles.
For more information on checking the particle filter,
refer to the corresponding section.
For any other faults, contact a P
eu
ge
Ot d
ealer or a
qualified workshop.
fixed. A major fault has occurred for which
there is no specific warning lamp. Identify the fault by reading the message and contact
a P
eu
ge
Ot d
ealer or a qualified workshop.
fixed, associated with
flashing and then fixed
display of the service
spanner.
the ser
vicing interval has been
exceeded. Only on BlueHDi Diesel versions.
Your vehicle must be serviced as soon as possible.
1
Instruments
Page 31 of 398
29
308_en_Chap01_instruments-de-bord_ed02-2015
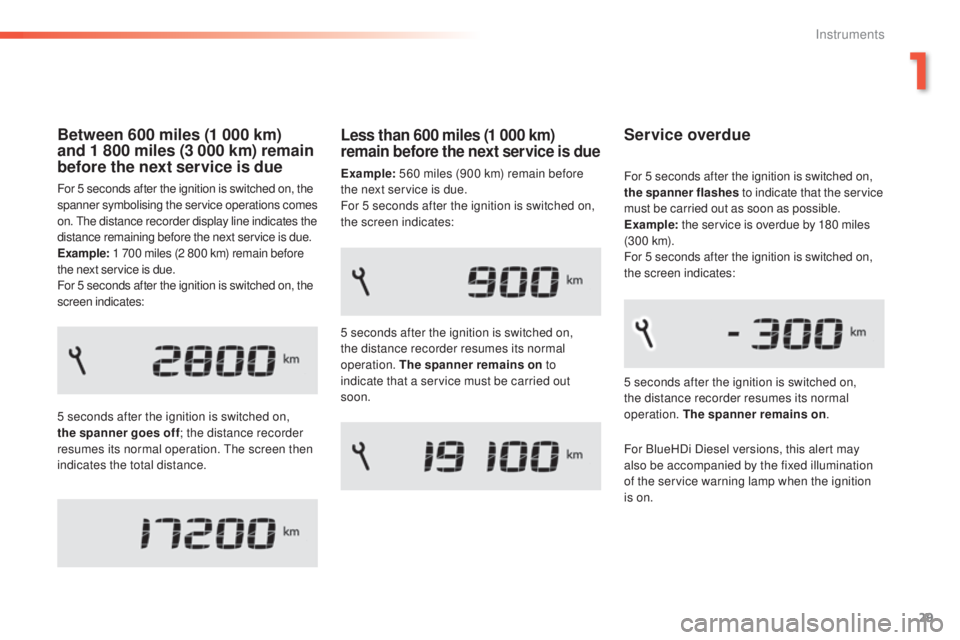
Between 600 miles (1 000 km)
and 1 800 miles (3 000 km) remain
before the next service is due
For 5 seconds after the ignition is switched on, the
spanner symbolising the service operations comes
on.
the d
istance recorder display line indicates the
distance remaining before the next service is due.
Example: 1 700 miles (2 800 km) remain before
the next service is due.
For 5 seconds after the ignition is switched on, the
screen indicates:
5 seconds after the ignition is switched on,
the spanner goes off ; the distance recorder
resumes its normal operation.
the s
creen then
indicates the total distance.
Service overdue
5 seconds after the ignition is switched on,
the distance recorder resumes its normal
operation. The spanner remains on .
For 5 seconds after the ignition is switched on,
the spanner flashes
to indicate that the service
must be carried out as soon as possible.
Example: the service is overdue by 180 miles
(3 0 0 k m).
For 5 seconds after the ignition is switched on,
the screen indicates:
Less than 600 miles (1 000 km)
remain before the next service is due
Example: 560 miles (900 km) remain before
the next service is due.
For 5 seconds after the ignition is switched on,
the screen indicates:
5 seconds after the ignition is switched on,
the distance recorder resumes its normal
operation. The spanner remains on to
indicate that a service must be carried out
soon.
For BlueHDi Diesel versions, this alert may
also be accompanied by the fixed illumination
of the service warning lamp when the ignition
is on.
1
Instruments
Page 32 of 398
30
the distance remaining may be
w eighted by the time factor, depending
on the driving conditions.
the
refore, the spanner may also come
on if you have exceeded the period
since the last service, indicated in the
manufacturer's service schedule.
For BlueHDi Diesel versions, the
spanner may also be brought on earlier
than expected, depending on the
degree of deterioration of the engine oil
(depending on the country of sale).
the r
ate of deterioration of the engine
oil depends on the driving conditions in
which the vehicle is used.
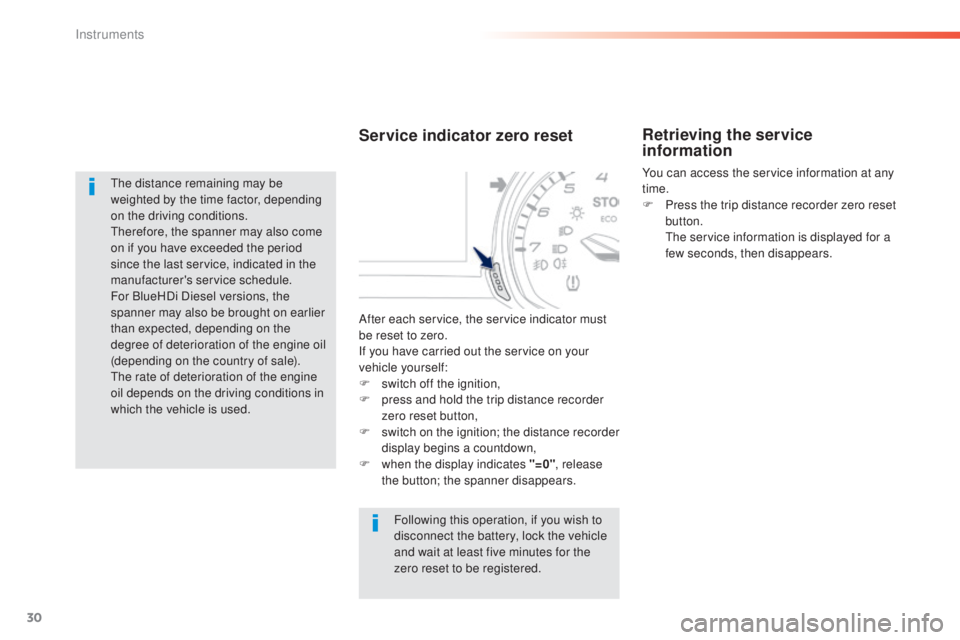
Service indicator zero reset
Following this operation, if you wish to
disconnect the battery, lock the vehicle
and wait at least five minutes for the
zero reset to be registered.
Retrieving the service
information
You can access the service information at any
time.
F
Pr
ess the trip distance recorder zero reset
button.
the s
ervice information is displayed for a
few seconds, then disappears.
After each service, the service indicator must
be reset to zero.
If you have carried out the service on your
vehicle yourself:
F
swi
tch off the ignition,
F
pr
ess and hold the trip distance recorder
zero reset button,
F
sw
itch on the ignition; the distance recorder
display begins a countdown,
F
when
the display indicates "=0" , release
the button; the spanner disappears.
Instruments
Page 33 of 398
31
308_en_Chap01_instruments-de-bord_ed02-2015
Engine oil level indicator
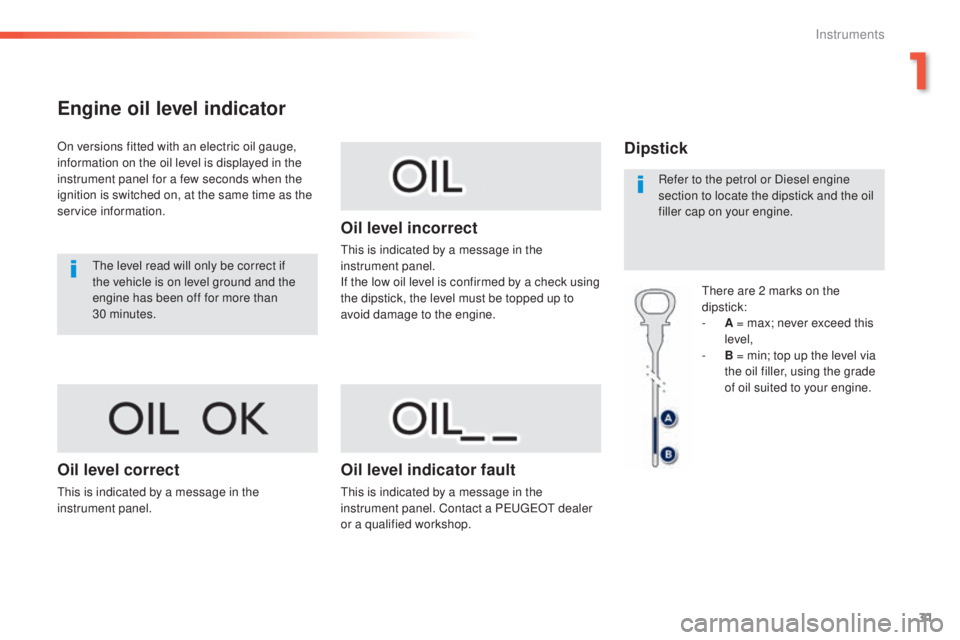
On versions fitted with an electric oil gauge,
information on the oil level is displayed in the
instrument panel for a few seconds when the
ignition is switched on, at the same time as the
service information.
the l
evel read will only be correct if
the vehicle is on level ground and the
engine has been off for more than
30
m
inutes.
Oil level correct
this is indicated by a message in the
in strument panel.
Oil level incorrect
this is indicated by a message in the
in strument panel.
If the low oil level is confirmed by a check using
the dipstick, the level must be topped up to
avoid damage to the engine.
Oil level indicator fault
this is indicated by a message in the
i nstrument panel. Contact a Peu geOt d ealer
or a qualified workshop.
Dipstick
there are 2 marks on the
di pstick:
-
A = m
ax; never exceed this
level,
-
B = m
in; top up the level via
the oil filler, using the grade
of oil suited to your engine.
Refer to the petrol or Diesel engine
section to locate the dipstick and the oil
filler cap on your engine.
1
Instruments
Page 34 of 398
32
Distance recorders
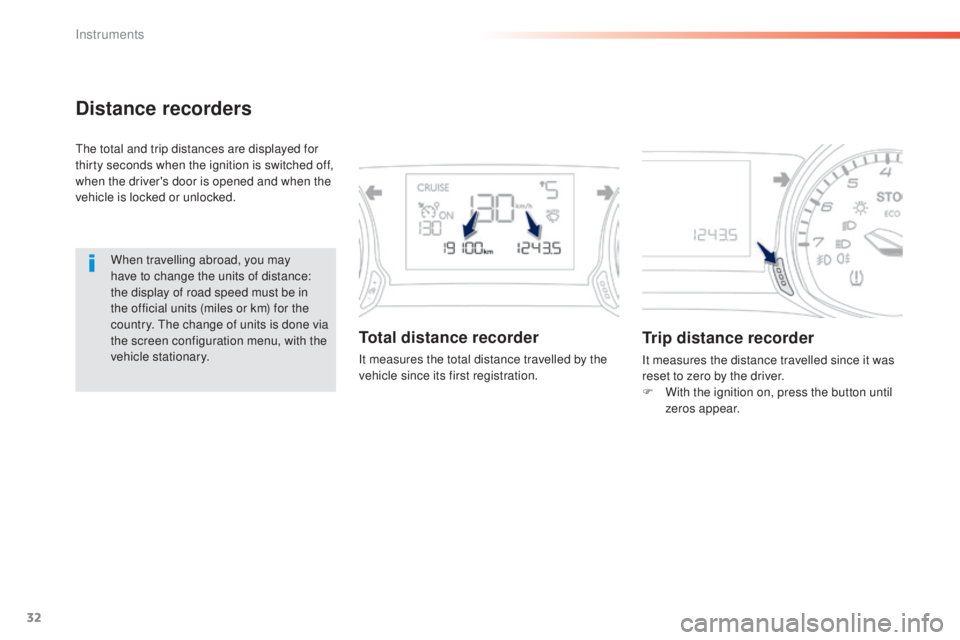
the total and trip distances are displayed for
t hirty seconds when the ignition is switched off,
when the driver's door is opened and when the
vehicle is locked or unlocked.
When travelling abroad, you may
have to change the units of distance:
the display of road speed must be in
the official units (miles or km) for the
country.
the c
hange of units is done via
the screen configuration menu, with the
vehicle stationary.
Total distance recorder
It measures the total distance travelled by the
vehicle since its first registration.
Trip distance recorder
It measures the distance travelled since it was
reset to zero by the driver.
F
Wi
th the ignition on, press the button until
zeros appear.
Instruments