PEUGEOT 308 2016 Owners Manual
308 2016
Peugeot
Peugeot
https://www.carmanualsonline.info/img/29/58300/w960_58300-0.png
PEUGEOT 308 2016 Owners Manual
Trending: wipers, air condition, power steering, mirror, ESP, oil change, ECU
Page 221 of 344
219
3008_en_Chap10_infos-pratiques_ed01-2015
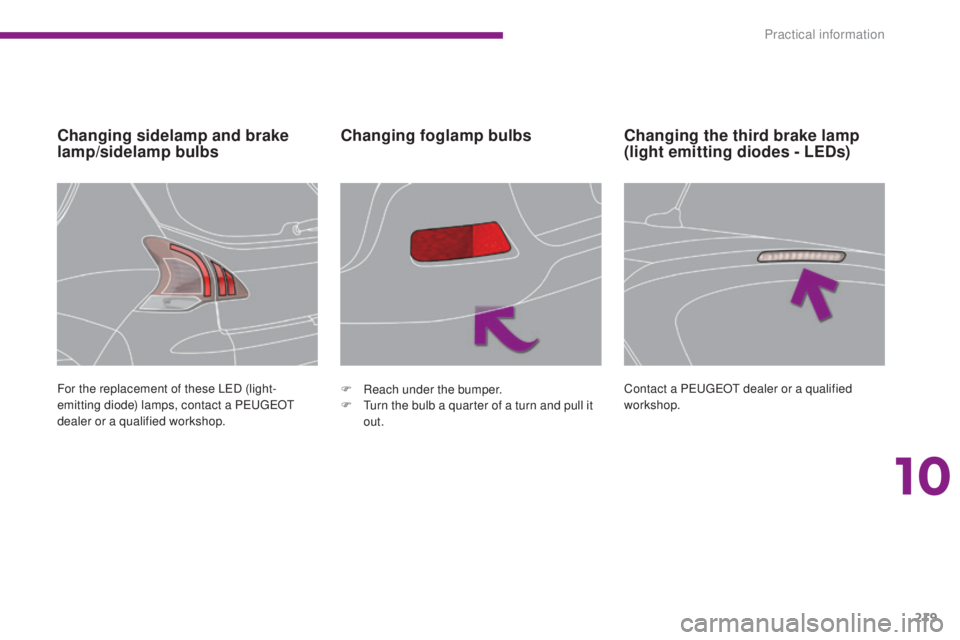
Changing sidelamp and brake
lamp/sidelamp bulbsChanging foglamp bulbs
For the replacement of these LED (light-
emitting diode) lamps, contact a PEUGEOT
dealer or a qualified workshop. F
R each under the bumper.
F
T
urn the bulb a quarter of a turn and pull it
out.
Changing the third brake lamp
(light emitting diodes - LEDs)
Contact a PEUGEOT dealer or a qualified
workshop.
10
Practical information
Page 222 of 344
220
3008_en_Chap10_infos-pratiques_ed01-2015
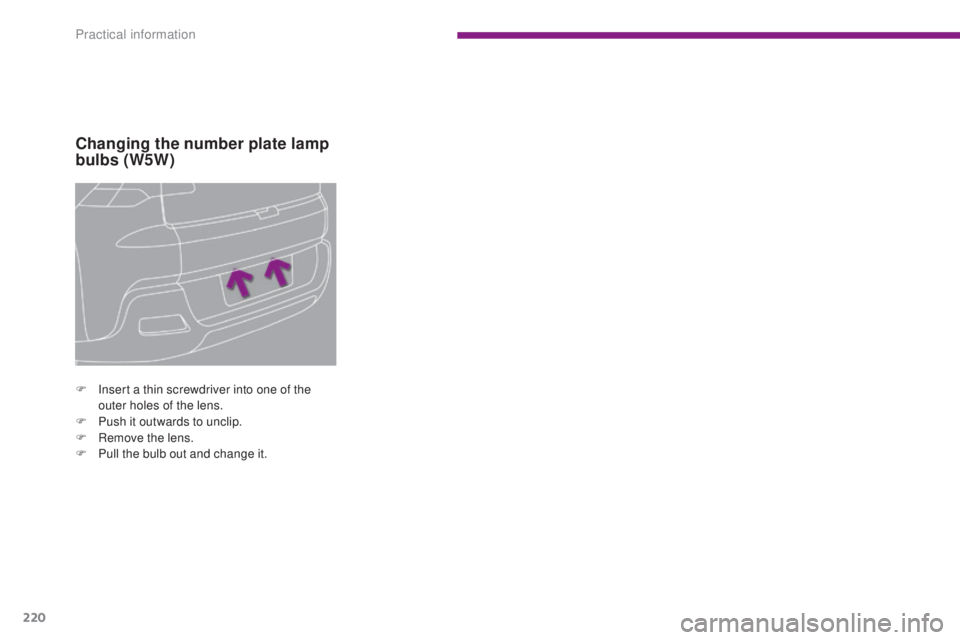
Changing the number plate lamp
bulbs (W5W)
F Insert a thin screwdriver into one of the outer holes of the lens.
F
P
ush it outwards to unclip.
F
R
emove the lens.
F
P
ull the bulb out and change it.
Practical information
Page 223 of 344
221
3008_en_Chap10_infos-pratiques_ed01-2015
Changing a fuse
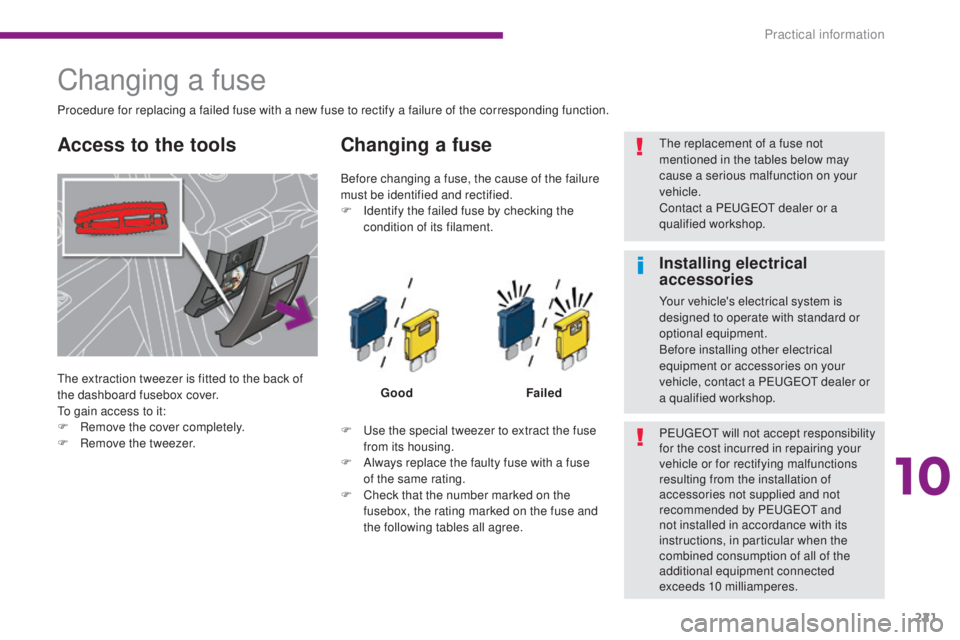
The extraction tweezer is fitted to the back of
the dashboard fusebox cover.
To gain access to it:
F
R
emove the cover completely.
F
R
emove the tweezer.
Changing a fuse
Good Failed
F
U
se the special tweezer to extract the fuse
from its housing.
F
A
lways replace the faulty fuse with a fuse
of the same rating.
F
C
heck that the number marked on the
fusebox, the rating marked on the fuse and
the following tables all agree.
Before changing a fuse, the cause of the failure
must be identified and rectified.
F
I
dentify the failed fuse by checking the
condition of its filament.
Procedure for replacing a failed fuse with a new fuse to rectify a failure of the corresponding function.
The replacement of a fuse not
mentioned in the tables below may
cause a serious malfunction on your
vehicle.
Contact a PEUGEOT dealer or a
qualified workshop.
PEUGEOT will not accept responsibility
for the cost incurred in repairing your
vehicle or for rectifying malfunctions
resulting from the installation of
accessories not supplied and not
recommended by PEUGEOT and
not installed in accordance with its
instructions, in particular when the
combined consumption of all of the
additional equipment connected
exceeds 10 milliamperes.
Access to the tools
Installing electrical
accessories
Your vehicle's electrical system is
designed to operate with standard or
optional equipment.
Before installing other electrical
equipment or accessories on your
vehicle, contact a PEUGEOT dealer or
a qualified workshop.
10
Practical information
Page 224 of 344
222
3008_en_Chap10_infos-pratiques_ed01-2015
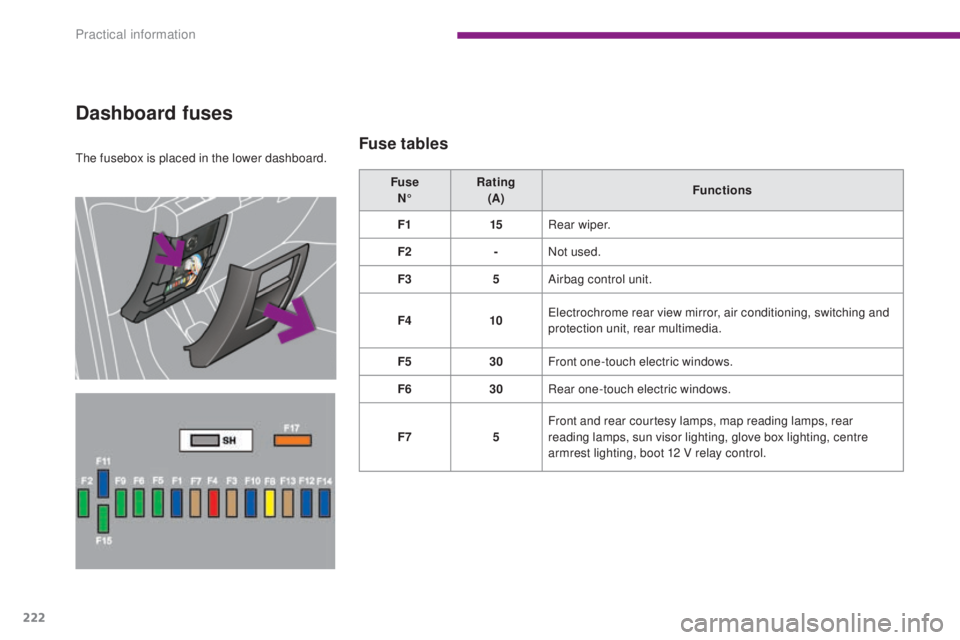
The fusebox is placed in the lower dashboard.
Dashboard fuses
Fuse tables
Fuse N° Rating
(A) Functions
F1 15Rear wiper.
F2 -Not used.
F3 5Airbag control unit.
F4 10Electrochrome rear view mirror, air conditioning, switching and
protection unit, rear multimedia.
F5 30Front one-touch electric windows.
F6 30Rear one-touch electric windows.
F7 5Front and rear courtesy lamps, map reading lamps, rear
reading lamps, sun visor lighting, glove box lighting, centre
armrest lighting, boot 12 V relay control.
Practical information
Page 225 of 344
223
3008_en_Chap10_infos-pratiques_ed01-2015
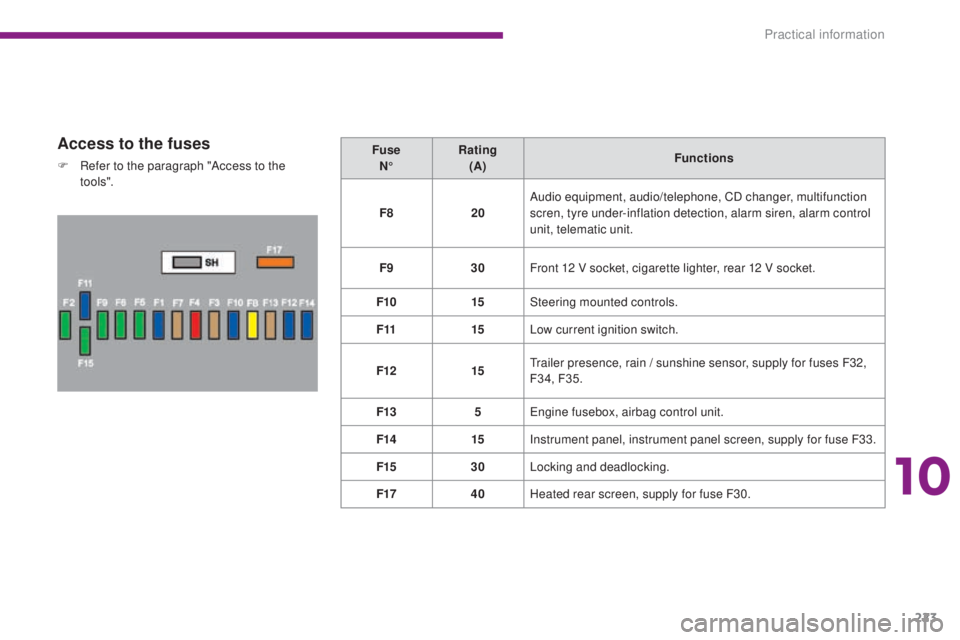
Access to the fuses
F Refer to the paragraph "Access to the to o ls". Fuse
N° Rating
(A) Functions
F8 20Audio equipment, audio/telephone, CD changer, multifunction
scren, tyre under-inflation detection, alarm siren, alarm control
unit, telematic unit.
F9 30Front 12 V socket, cigarette lighter, rear 12 V socket.
F10 15Steering mounted controls.
F11 15Low current ignition switch.
F12 15Trailer presence, rain
/ sunshine sensor, supply for fuses F32,
F34, F35.
F13 5Engine fusebox, airbag control unit.
F14 15Instrument panel, instrument panel screen, supply for fuse F33.
F15 30Locking and deadlocking.
F17 40Heated rear screen, supply for fuse F30.
10
Practical information
Page 226 of 344
224
3008_en_Chap10_infos-pratiques_ed01-2015
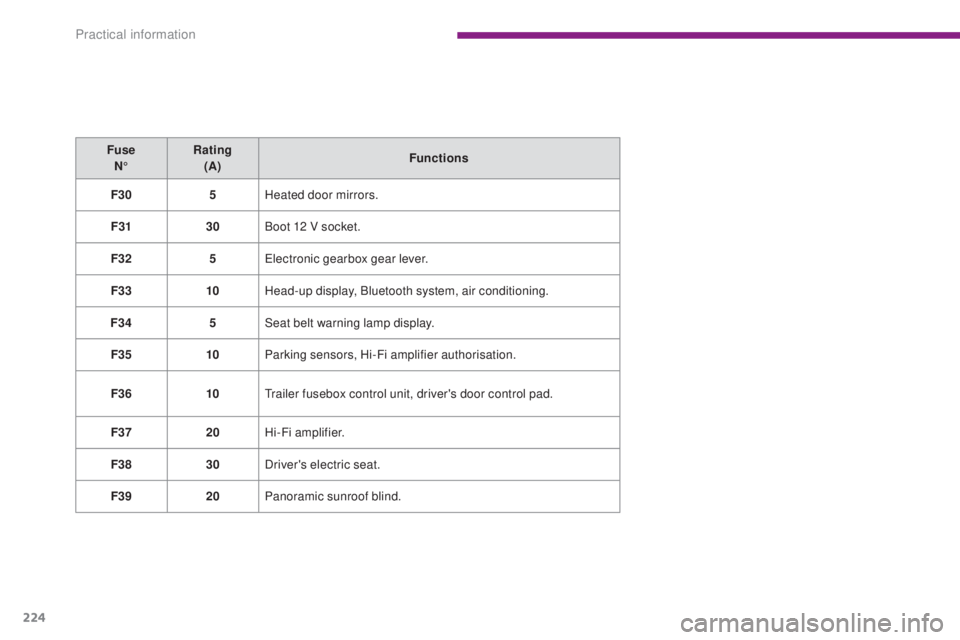
Fuse N° Rating
(A) Functions
F30 5Heated door mirrors.
F31 30Boot 12 V socket.
F32 5Electronic gearbox gear lever.
F33 10Head-up display, Bluetooth system, air conditioning.
F34 5Seat belt warning lamp display.
F35 10Parking sensors, Hi-Fi amplifier authorisation.
F36 10Trailer fusebox control unit, driver's door control pad.
F37 20Hi-Fi amplifier.
F38 30Driver's electric seat.
F39 20Panoramic sunroof blind.
Practical information
Page 227 of 344
225
3008_en_Chap10_infos-pratiques_ed01-2015
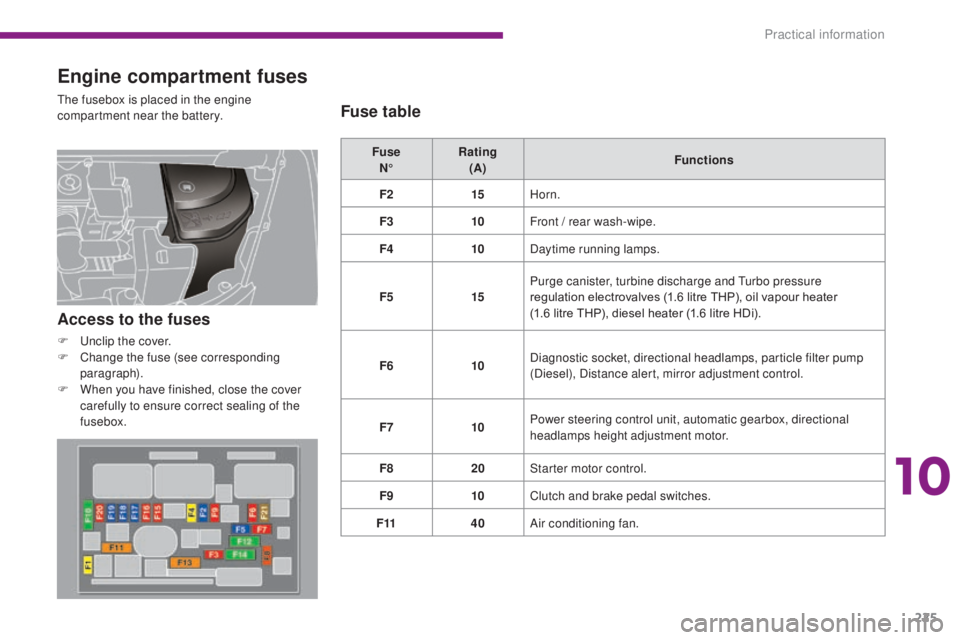
Engine compartment fuses
The fusebox is placed in the engine
compartment near the battery.Fuse N° Rating
(A) Functions
F2 15Horn.
F3 10Front
/ rear wash-wipe.
F4 10Daytime running lamps.
F5 15Purge canister, turbine discharge and Turbo pressure
regulation electrovalves (1.6 litre THP), oil vapour heater
(1.6 litre THP), diesel heater (1.6 litre HDi).
F6 10Diagnostic socket, directional headlamps, particle filter pump
(Diesel), Distance alert, mirror adjustment control.
F7 10Power steering control unit, automatic gearbox, directional
headlamps height adjustment motor.
F8 20Starter motor control.
F9 10Clutch and brake pedal switches.
F11 40Air conditioning fan.
Access to the fuses
F Unclip the cover.
F
C hange the fuse (see corresponding
paragraph).
F
W
hen you have finished, close the cover
carefully to ensure correct sealing of the
fusebox.
Fuse table
10
Practical information
Page 228 of 344
226
3008_en_Chap10_infos-pratiques_ed01-2015
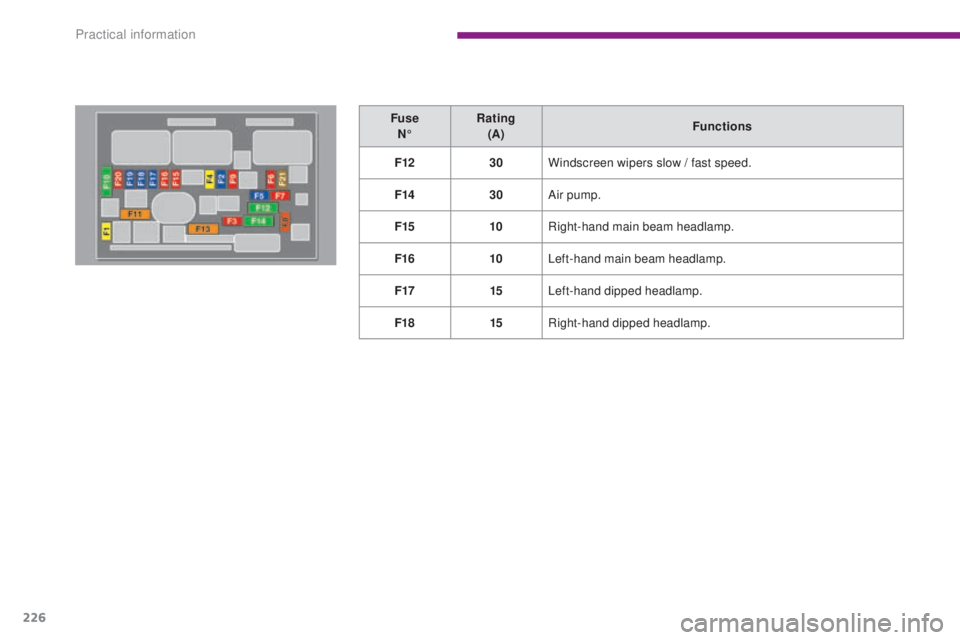
Fuse N° Rating
(A) Functions
F12 30Windscreen wipers slow
/ fast speed.
F14 30Air pump.
F15 10Right-hand main beam headlamp.
F16 10Left-hand main beam headlamp.
F17 15Left-hand dipped headlamp.
F18 15Right-hand dipped headlamp.
Practical information
Page 229 of 344
227
3008_en_Chap10_infos-pratiques_ed01-2015
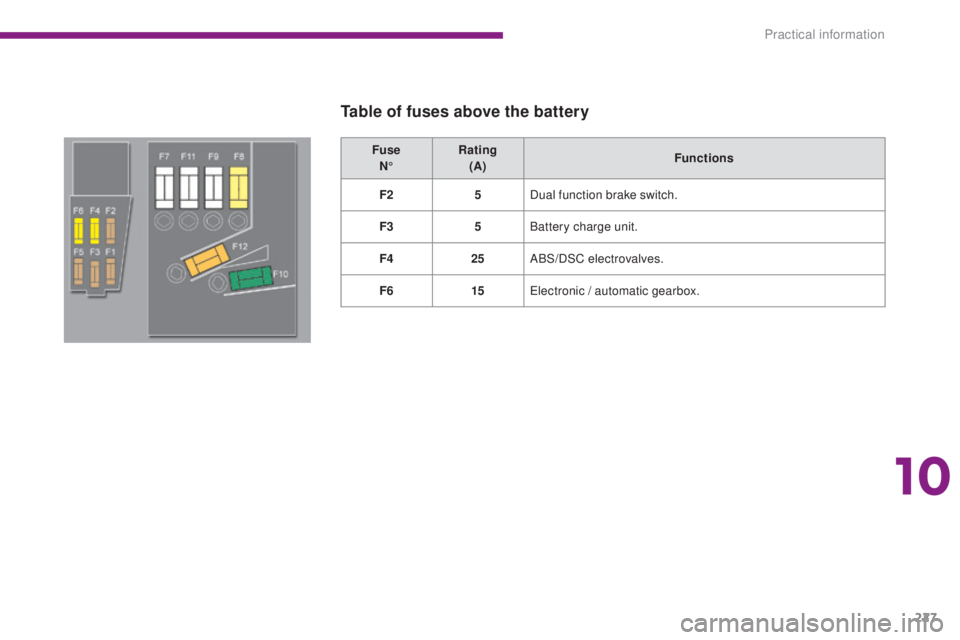
Fuse N° Rating
(A) Functions
F2 5Dual function brake switch.
F3 5Battery charge unit.
F4 25ABS/DSC electrovalves.
F6 15Electronic
/ automatic gearbox.
Table of fuses above the battery
10
Practical information
Page 230 of 344
228
3008_en_Chap10_infos-pratiques_ed01-2015
12 V battery
Access to the battery
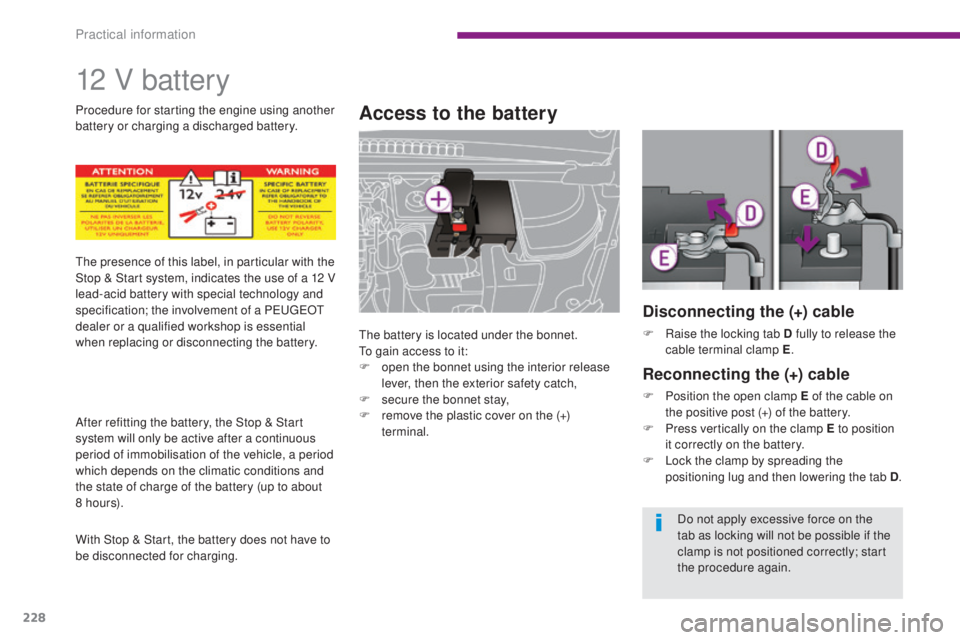
The battery is located under the bonnet.
To gain access to it:
F
o
pen the bonnet using the interior release
lever, then the exterior safety catch,
F
s
ecure the bonnet stay,
F
r
emove the plastic cover on the (+)
terminal.
The presence of this label, in particular with the
Stop & Start system, indicates the use of a 12
V
lead-acid battery with special technology and
specification; the involvement of a PEUGEOT
dealer or a qualified workshop is essential
when replacing or disconnecting the battery.
After refitting the battery, the Stop & Start
system will only be active after a continuous
period of immobilisation of the vehicle, a period
which depends on the climatic conditions and
the state of charge of the battery (up to about
8 h o u r s).
With Stop & Start, the battery does not have to
be disconnected for charging. Procedure for starting the engine using another
battery or charging a discharged battery.
Disconnecting the (+) cable
F Raise the locking tab D fully to release the cable terminal clamp E .
Reconnecting the (+) cable
F Position the open clamp E of the cable on
the positive post (+) of the battery.
F
P
ress vertically on the clamp E to position
it correctly on the battery.
F
L
ock the clamp by spreading the
positioning lug and then lowering the tab D .
Do not apply excessive force on the
tab as locking will not be possible if the
clamp is not positioned correctly; start
the procedure again.
Practical information
Trending: load capacity, climate control, refuelling, fuel cap, emergency towing, remote start, fog light
