fuel Peugeot 308 2017 - RHD (UK, Australia) User Guide
[x] Cancel search | Manufacturer: PEUGEOT, Model Year: 2017, Model line: 308, Model: Peugeot 308 2017Pages: 392, PDF Size: 10.13 MB
Page 48 of 392
46
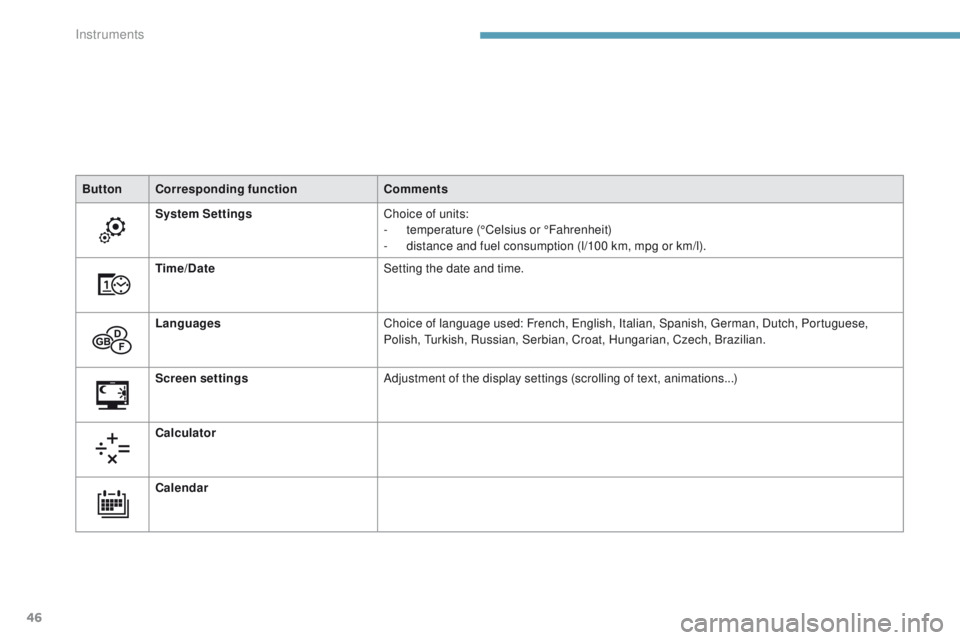
ButtonCorresponding function Comments
System Settings Choice of units:
-
t
emperature (°Celsius or °Fahrenheit)
-
d
istance and fuel consumption (l/100 km, mpg or km/l).
Time/Date Setting the date and time.
Languages Choice of language used: French,
e
n
glish, Italian, Spanish, g
e
rman, Dutch, Portuguese,
Polish,
t
u
rkish, Russian, Serbian, Croat, Hungarian, Czech, Brazilian.
Screen settings Adjustment of the display settings (scrolling of text, animations...)
Calculator
Calendar
Instruments
Page 52 of 392
50
System for the central locking or unlocking
of the vehicle using the door lock or from a
distance.
It is also used to open and close the fuel filler
cap, locate and start the vehicle, as well as
providing protection against theft.
Remote control key
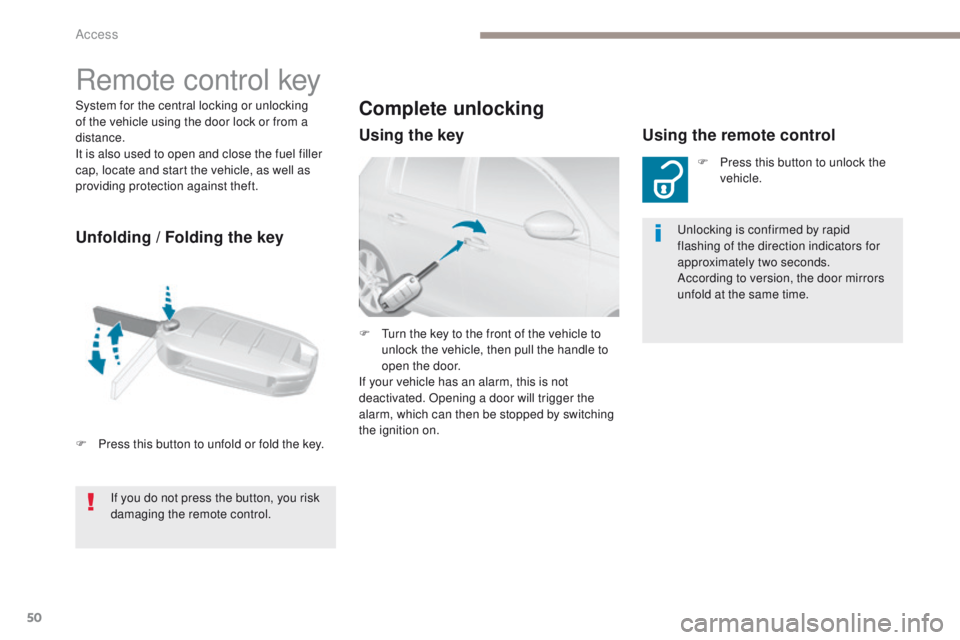
Unfolding / Folding the key
F Press this button to unfold or fold the key.
Complete unlocking
Using the keyUsing the remote control
F Press this button to unlock the
vehicle.
un
locking is confirmed by rapid
flashing of the direction indicators for
approximately two seconds.
According to version, the door mirrors
unfold at the same time.
F
t
u
rn the key to the front of the vehicle to
unlock the vehicle, then pull the handle to
open the door.
If your vehicle has an alarm, this is not
deactivated. Opening a door will trigger the
alarm, which can then be stopped by switching
the ignition on.
If you do not press the button, you risk
damaging the remote control.
Access
Page 78 of 392
76
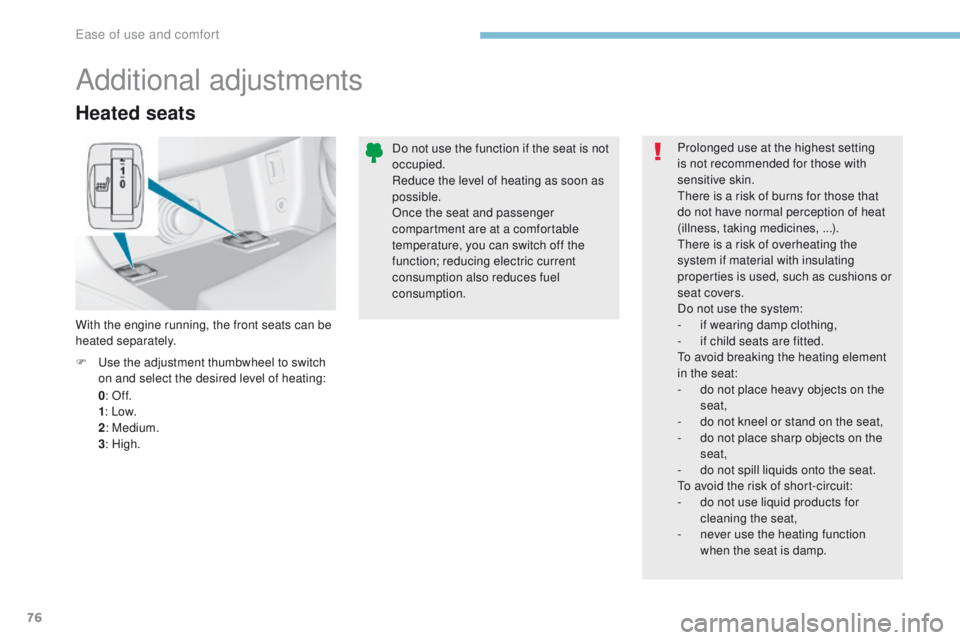
Heated seats
0: Of f.
1 : Low.
2 : Medium.
3 : High.
F
u
s
e the adjustment thumbwheel to switch
on and select the desired level of heating:
With the engine running, the front seats can be
heated separately.
Additional adjustments
Prolonged use at the highest setting
is not recommended for those with
sensitive skin.
th
ere is a risk of burns for those that
do not have normal perception of heat
(illness, taking medicines, ...).
ther
e is a risk of overheating the
system if material with insulating
properties is used, such as cushions or
seat covers.
Do not use the system:
-
i
f wearing damp clothing,
-
i
f child seats are fitted.
to
avoid breaking the heating element
in the seat:
-
d
o not place heavy objects on the
seat,
-
d
o not kneel or stand on the seat,
-
d
o not place sharp objects on the
seat,
-
d
o not spill liquids onto the seat.
to a
void the risk of short-circuit:
-
d
o not use liquid products for
cleaning the seat,
-
n
ever use the heating function
when the seat is damp.
Do not use the function if the seat is not
occupied.
Reduce the level of heating as soon as
possible.
Once the seat and passenger
compartment are at a comfortable
temperature, you can switch off the
function; reducing electric current
consumption also reduces fuel
consumption.
Ease of use and comfort
Page 103 of 392
101
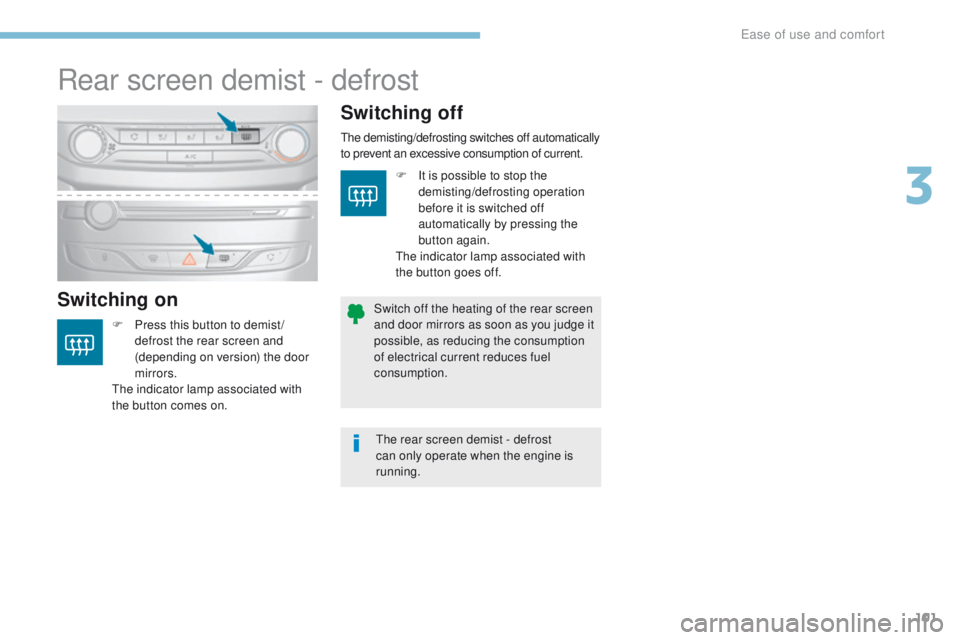
Rear screen demist - defrost
Switching onSwitching off
F Press this button to demist /
defrost the rear screen and
(depending on version) the door
mirrors.
th
e indicator lamp associated with
the button comes on.
the demisting/defrosting switches off automatically
to prevent an excessive consumption of current.
the rear screen demist - defrost
can only operate when the engine is
running.
Switch off the heating of the rear screen
and door mirrors as soon as you judge it
possible, as reducing the consumption
of electrical current reduces fuel
consumption. F
I
t is possible to stop the
demisting/defrosting operation
before it is switched off
automatically by pressing the
button again.
th
e indicator lamp associated with
the button goes off.
3
ease of use and comfort
Page 166 of 392
164
Gear efficiency indicator
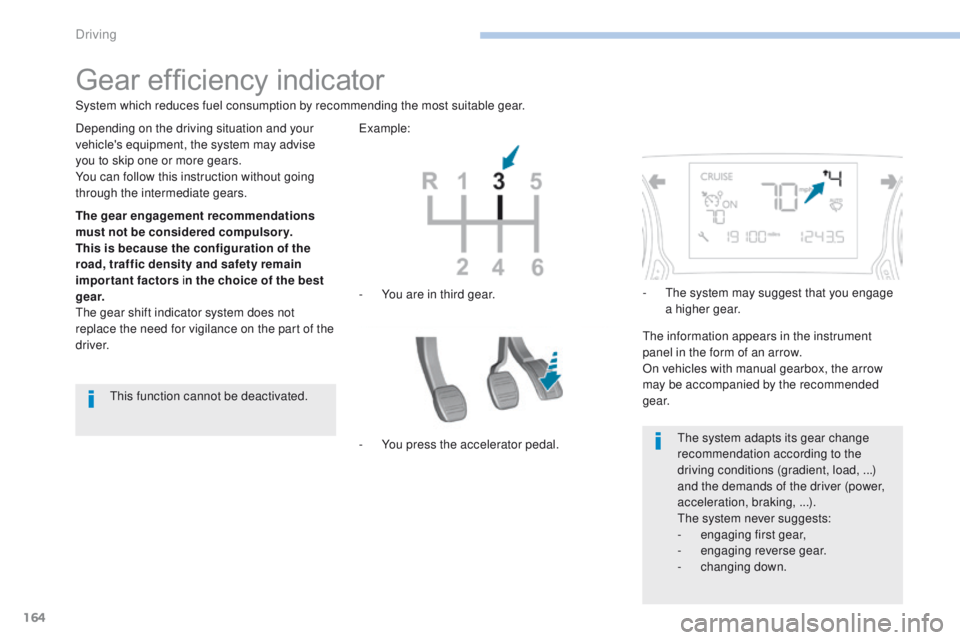
The gear engagement recommendations
must not be considered compulsory.
This is because the configuration of the
road, traffic density and safety remai n
important factors in the choice of the best
g e a r.
th
e gear shift indicator system does not
replace the need for vigilance on the part of the
driver. -
Y
ou are in third gear.
ex
ample:
-
Y
ou press the accelerator pedal.-
t
h
e system may suggest that you engage
a higher gear.
th
e information appears in the instrument
panel in the form of an arrow.
On vehicles with manual gearbox, the arrow
may be accompanied by the recommended
g e a r.
th
e system adapts its gear change
recommendation according to the
driving conditions (gradient, load,
...)
and the demands of the driver (power,
acceleration, braking,
...).
th
e system never suggests:
-
e
ngaging first gear,
-
enga
ging reverse gear.
-
c
hanging down.
System which reduces fuel consumption by recommending the most suitable gear.
Depending on the driving situation and your
vehicle's equipment, the system may advise
you to skip one or more gears.
You can follow this instruction without going
through the intermediate gears.
th
is function cannot be deactivated.
Driving
Page 170 of 392
168
F Select position M for sequential changing
of the six gears.
F
P
ull towards the + sign and release to
change up a gear.
F
P
ush towards the - sign and release to
change down a gear.
It is only possible to change from one gear to
another if the vehicle speed and engine speed
permit; otherwise, the gearbox will operate
temporarily in automatic mode.
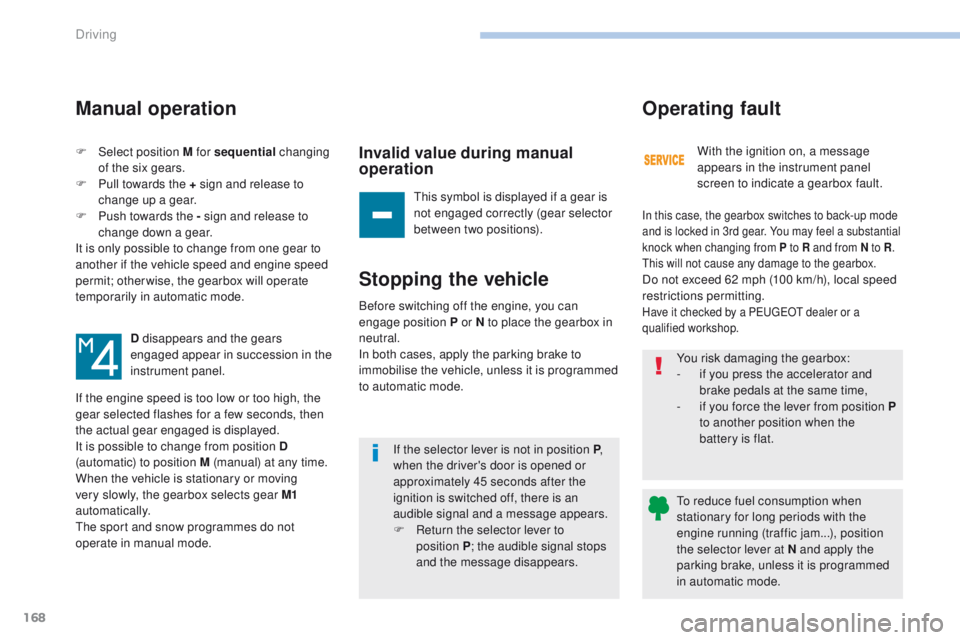
D disappears and the gears
engaged appear in succession in the
instrument panel.
If the engine speed is too low or too high, the
gear selected flashes for a few seconds, then
the actual gear engaged is displayed.
It is possible to change from position D
(automatic) to position M (manual) at any time.
When the vehicle is stationary or moving
very slowly, the gearbox selects gear M1
automatically.
th
e sport and snow programmes do not
operate in manual mode.
Manual operation
Invalid value during manual
operation
this symbol is displayed if a gear is
not engaged correctly (gear selector
between two positions).
Stopping the vehicle
If the selector lever is not in position P ,
w hen the driver's door is opened or
approximately 45 seconds after the
ignition is switched off, there is an
audible signal and a message appears.
F
R
eturn the selector lever to
position
P; the audible signal stops
and the message disappears. With the ignition on, a message
appears in the instrument panel
screen to indicate a gearbox fault.
Operating fault
In this case, the gearbox switches to back-up mode
and is locked in 3rd gear. You may feel a substantial
knock when changing from P to R and from N to R
.
th
is will not cause any damage to the gearbox.
Do not exceed 62 mph (100 km/h), local speed
restrictions permitting.
Have it checked by a Pe ugeOt dealer or a
qualified workshop.Before switching off the engine, you can
engage position P or N to place the gearbox in
neutral.
In both cases, apply the parking brake to
immobilise the vehicle, unless it is programmed
to automatic mode. You risk damaging the gearbox:
-
i
f you press the accelerator and
brake pedals at the same time,
-
i
f you force the lever from position P
to another position when the
battery is flat.
to r
educe fuel consumption when
stationary for long periods with the
engine running (traffic jam...), position
the selector lever at N and apply the
parking brake, unless it is programmed
in automatic mode.
Driving
Page 172 of 392
170
Stop & Start
Operation
Going into engine STOP mode
- With a manual gearbox, with the speed
below 12 mph (20 km/h) or with the vehicle
stationary (depending on the engine), when
you put the gear lever into neutral and
release the clutch pedal.
Never refuel with the engine in S
tO
P
mode; you must switch off the ignition. For your comfort, during parking
manoeuvres, S
tO
P mode is not
available for a few seconds after
coming out of reverse gear.
th
e Stop & Start system does not affect
the functionality of the vehicle, such as
for example, braking, power steering...
A slight delay between the vehicle
stopping and the engine cutting out may
be noticed.
A time counter calculates the
time spent in S
tO
P mode during
a j o u r n ey.
th
e Stop & Start system puts the engine
temporarily into standby - S
tO
P mode - during
stops in the traffic (red lights, traffic jams, etc.).
th
e engine restarts automatically - S
tA
R
t
mode - as soon as you want to move off.
th
e restart takes place instantly, quickly and
silently.
Per fect for urban use, the Stop & Start system
reduces fuel consumption and exhaust
emissions as well as the noise level when
stationary.
Stop & Star t time counter
(minutes / seconds or hours / minutes) -
W
ith an automatic gearbox , vehicle
stationary, when you press the brake
pedal or place the gear selector lever in
position
N.
It resets to zero every time the ignition is
switched on.
the "ECO" warning lamp comes on in
the instrument panel and the engine
goes into standby automatically:
Driving
Page 211 of 392
209
Under-inflation detection
the system monitors the pressures in the four
tyres, once the vehicle is moving.
It compares the information given by the four
wheel speed sensors with reference values,
which must be reinitialised ever y time the
tyre pressures are adjusted or a wheel
changed.
th
e system triggers an alert as soon as it
detects a drop in the inflation pressure of one
or more tyres.th e under-inflation detection system
does not replace the need for vigilance
on the part of the driver.
th
is system does not avoid the need to
check the tyre pressures (including the
spare wheel) every month as well as
before a long journey.
Driving with under-inflated tyres impairs
road holding, extends braking distances
and causes premature tyre wear,
particularly under arduous conditions
(high loading, high speed, long journey).
System which automatically checks the pressures of the tyres while driving.th
e inflation pressures defined for
your vehicle can be found on the tyre
pressure label.
For more information on the
Identification markings , refer to the
corresponding section.
ty
re pressures should be checked
when the tyres are "cold" (vehicle
stopped for 1 hour or after a journey of
less than 6 miles (10 km) at moderate
speeds).
Other wise (when hot), add 0.3 bar to
the pressures shown on the label.
Driving with under-inflated tyres
increases fuel consumption.
Snow chains
the system does not have to be
reinitialised after fitting or removing
snow chains.
6
Driving
Page 215 of 392
213
Fuel tank
Additions of fuel must be of at least 6 litres to
be registered by the fuel gauge.
Opening the filler cap may result in an inrush of
air. t
h
is vacuum is entirely normal and results
from the sealing of the fuel system.
Opening
If your vehicle is fitted with Stop & Start,
never refuel with the engine in StO P
mode; you must switch off the ignition
using the key, or the S
tA
R
t/
S
tO
P
button if your vehicle has Keyless
e
n
try
and Starting.
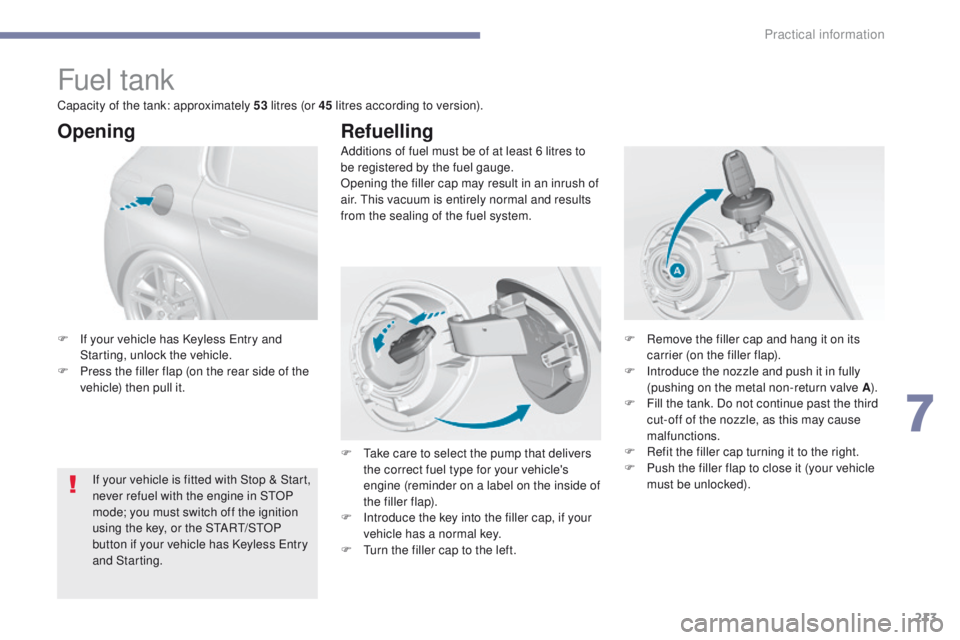
F
I
f your vehicle has Keyless e
n
try and
Starting, unlock the vehicle.
F
P
ress the filler flap (on the rear side of the
vehicle) then pull it.
Refuelling
F Remove the filler cap and hang it on its carrier (on the filler flap).
F
I
ntroduce the nozzle and push it in fully
(pushing on the metal non-return valve A ).
F
F
ill the tank. Do not continue past the third
cut-off of the nozzle, as this may cause
malfunctions.
F
R
efit the filler cap turning it to the right.
F
P
ush the filler flap to close it (your vehicle
must be unlocked).
F
t
a
ke care to select the pump that delivers
the correct fuel type for your vehicle's
engine (reminder on a label on the inside of
the filler flap).
Capacity of the tank: approximately 53
litres (or 45 litres according to version).
F
I
ntroduce the key into the filler cap, if your
vehicle has a normal key.
F
t
u
rn the filler cap to the left.
7
Practical information
Page 216 of 392
214
Low fuel level
When the low fuel level in the tank is
reached, this warning lamp comes on in
the instrument panel, accompanied by
an audible warning and a message.
Fuel supply cut-off
Your vehicle is equipped with a safety device
which cuts off the fuel supply in the event of a
collision. When it first comes on, less than 6 litres of fuel
remain in the tank.
You must refuel as soon as possible to avoid
running out.If you have put in the wrong fuel for
your vehicle, you must have have
the tank drained and refilled with
the correct fuel before you star t the
engine.
Your vehicle is fitted with a catalytic converter,
a device which helps to reduce the level of
harmful emissions in the exhaust gases.
For petrol engines, you must use unleaded
fuel only.
th
e filler neck is narrower, admitting petrol
nozzles only. It is still possible to use a fuel can to fill
the tank but this must be done slowly.
In order to ensure a good flow of fuel,
do not place the nozzle of the fuel can
in direct contact with the flap of the
misfuel prevention device.
Diesel misfuel prevention
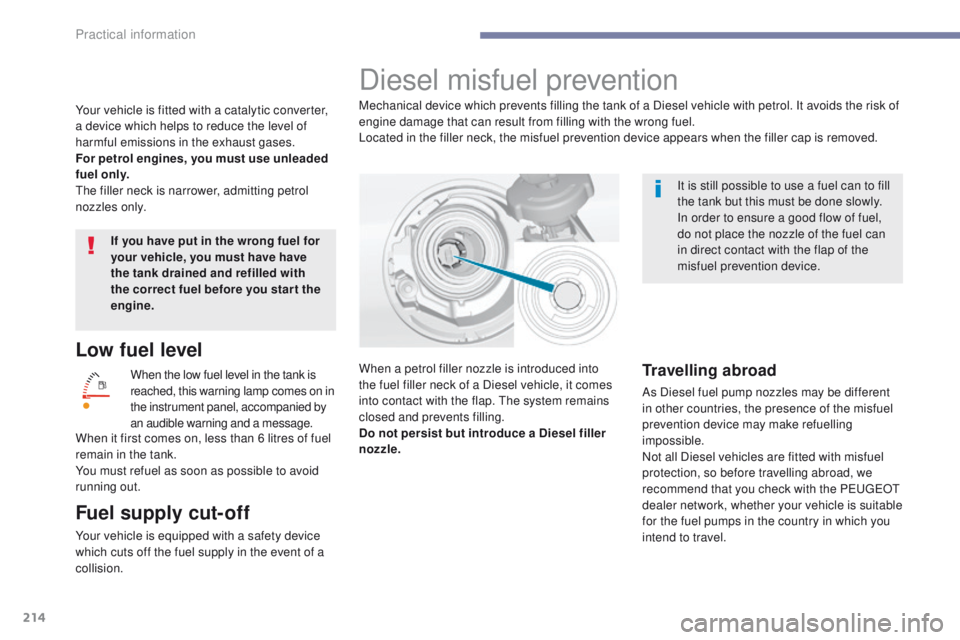
Mechanical device which prevents filling the tank of a Diesel vehicle with petrol. It avoids the risk of
engine damage that can result from filling with the wrong fuel.
Located in the filler neck, the misfuel prevention device appears when the filler cap is removed.
When a petrol filler nozzle is introduced into
the fuel filler neck of a Diesel vehicle, it comes
into contact with the flap.
t
h
e system remains
closed and prevents filling.
Do not persist but introduce a Diesel filler
nozzle.
Travelling abroad
As Diesel fuel pump nozzles may be different
in other countries, the presence of the misfuel
prevention device may make refuelling
impossible.
Not all Diesel vehicles are fitted with misfuel
protection, so before travelling abroad, we
recommend that you check with the P
e
uge
Ot
dealer network, whether your vehicle is suitable
for the fuel pumps in the country in which you
intend to travel.
Practical information