reset Peugeot 308 2017 Owner's Manual - RHD (UK, Australia)
[x] Cancel search | Manufacturer: PEUGEOT, Model Year: 2017, Model line: 308, Model: Peugeot 308 2017Pages: 392, PDF Size: 10.13 MB
Page 30 of 392
28
Coolant temperature gauge
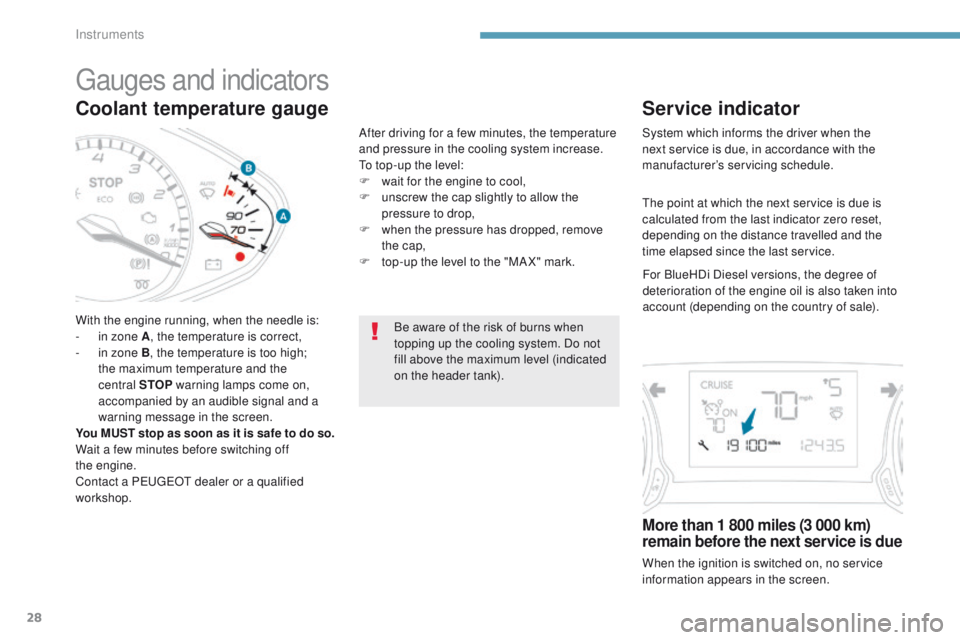
With the engine running, when the needle is:
- i n zone A , the temperature is correct,
-
i
n zone B, the temperature is too high;
the maximum temperature and the
central STOP warning lamps come on,
accompanied by an audible signal and a
warning message in the screen.
You MUST stop as soon as it is safe to do so.
Wait a few minutes before switching off
the
engine.
Contact a P
e
uge
Ot
dealer or a qualified
workshop. After driving for a few minutes, the temperature
and pressure in the cooling system increase.
to t
op-up the level:
F
w
ait for the engine to cool,
F
u
nscrew the cap slightly to allow the
pressure to drop,
F
w
hen the pressure has dropped, remove
the cap,
F
t
op-up the level to the "MA X" mark.
Be aware of the risk of burns when
topping up the cooling system. Do not
fill above the maximum level (indicated
on the header tank).
gauges and indicators
Service indicator
System which informs the driver when the
next service is due, in accordance with the
manufacturer’s servicing schedule.
More than 1 800 miles (3 000 km)
remain before the next service is due
When the ignition is switched on, no service
information appears in the screen.
th
e point at which the next service is due is
calculated from the last indicator zero reset,
depending on the distance travelled and the
time elapsed since the last service.
For BlueHDi Diesel versions, the degree of
deterioration of the engine oil is also taken into
account (depending on the country of sale).
Instruments
Page 32 of 392
30
the distance remaining may be
weighted by the time factor, depending
on the driving conditions.
th
erefore, the spanner may also come
on if you have exceeded the period
since the last service, indicated in the
manufacturer’s service schedule.
For BlueHDi Diesel versions, the
spanner may also be brought on earlier
than expected, depending on the
degree of deterioration of the engine oil
(depending on the country of sale).
th
e rate of deterioration of the engine
oil depends on the driving conditions in
which the vehicle is used.
Resetting the service indicator
If you have to disconnect the battery
following this operation, lock the vehicle
and wait at least 5 minutes for the reset
to be registered.
Retrieving the service
information
You can access the service information at any
time.
F
P
ress the trip distance recorder reset
button.
t
h
e service information is displayed for a
few seconds, then disappears.
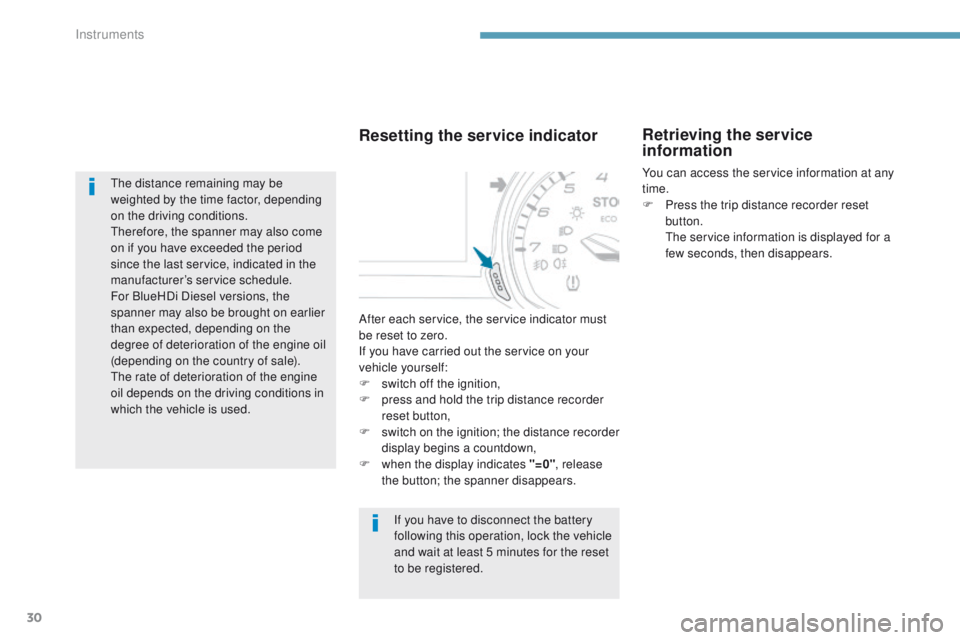
After each service, the service indicator must
be reset to zero.
If you have carried out the service on your
vehicle yourself:
F
s
witch off the ignition,
F
p
ress and hold the trip distance recorder
reset button,
F
s
witch on the ignition; the distance recorder
display begins a countdown,
F
w
hen the display indicates "=0" , release
the button; the spanner disappears.
Instruments
Page 37 of 392
35
Distance recorders
the total and trip distances are displayed for
thirty seconds when the ignition is switched off,
when the driver’s door is opened and when the
vehicle is locked or unlocked.When travelling abroad, you may
have to change the units of distance:
the display of road speed must be in
the official units (miles or km) for the
country.
t
h
e change of units is done via
the screen configuration menu, with the
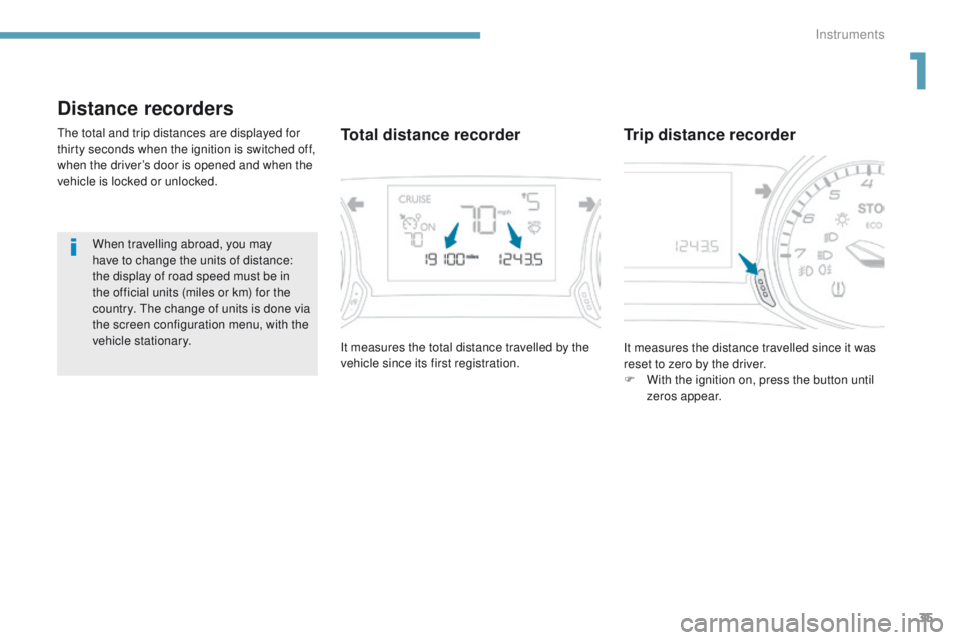
vehicle stationary. It measures the total distance travelled by the
vehicle since its first registration. It measures the distance travelled since it was
reset to zero by the driver.
F
W
ith the ignition on, press the button until
zeros appear.Total distance recorder Trip distance recorder
1
Instruments
Page 39 of 392
37
System that gives you information on the current journey (range, fuel consumption…).
tr i p c o m p u t e r
Instrument panel screen
Information display
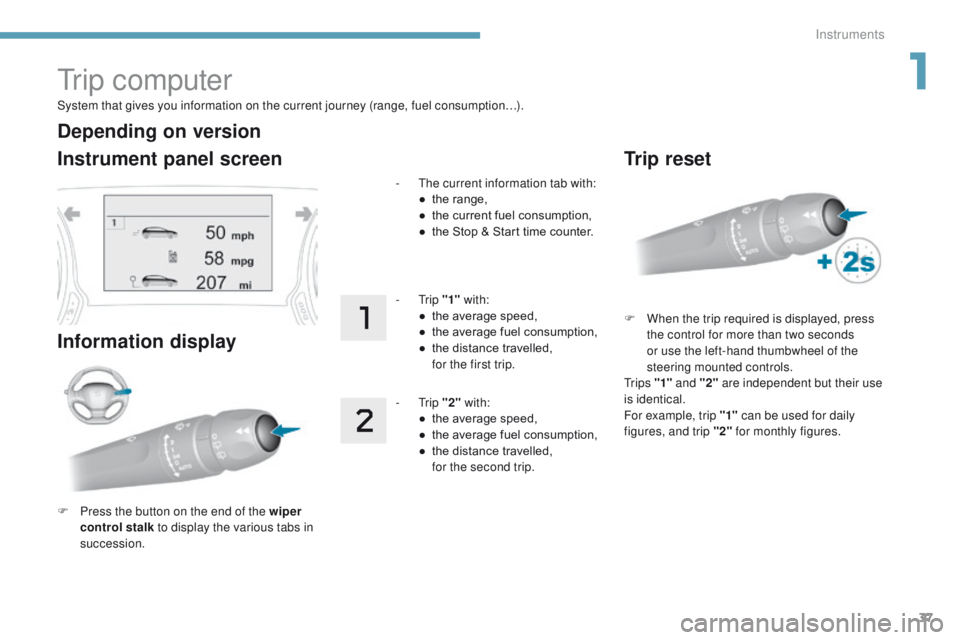
F Press the button on the end of the wiper control stalk to display the various tabs in
succession. -
t
h
e current information tab with:
●
t
he range,
●
t
he current fuel consumption,
●
t
he Stop & Start time counter.
- t
r
ip
"1" with:
●
t
he average speed,
●
t
he average fuel consumption,
●
t
he distance travelled,
f
or the first trip.
- t
r
ip
"2" with:
●
t
he average speed,
●
t
he average fuel consumption,
●
t
he distance travelled,
f
or the second trip.
Depending on version
Trip reset
F When the trip required is displayed, press the control for more than two seconds
or use the left-hand thumbwheel of the
steering mounted controls.
t
r i p s "1" and "2" are independent but their use
is identical.
For example, trip "1" can be used for daily
figures, and trip "2" for monthly figures.
1
Instruments
Page 40 of 392
38
tr i p c o m p u t e r
System that gives you information on the current journey (range, fuel consumption…).
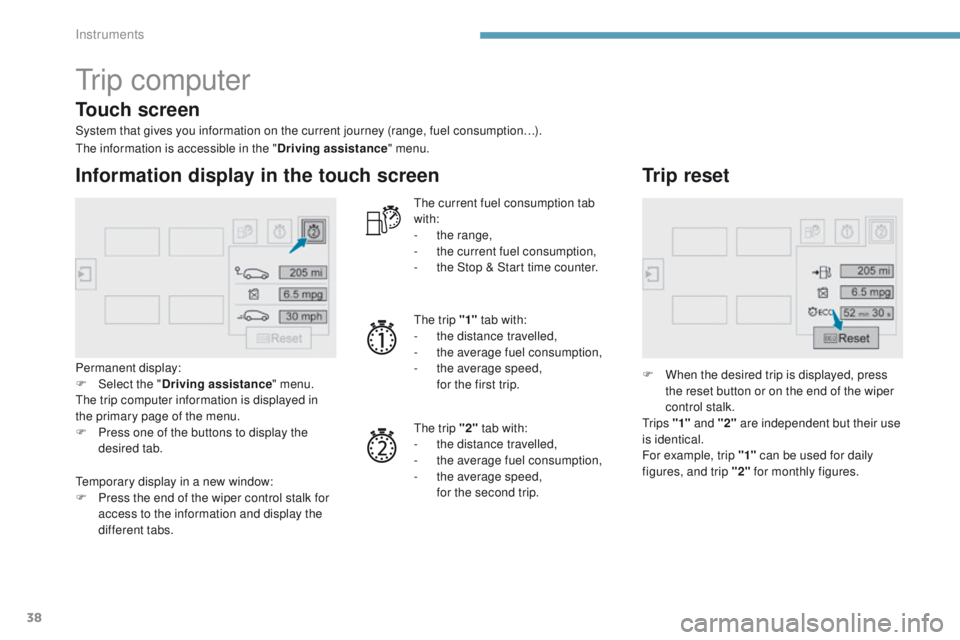
Information display in the touch screen
Permanent display:
F Sel ect the " Driving assistance " menu.
th
e trip computer information is displayed in
the primary page of the menu.
F
P
ress one of the buttons to display the
desired tab.
th
e current fuel consumption tab
with:
-
t
he range,
-
t
he current fuel consumption,
-
t
he Stop & Start time counter.
th
e trip "1"
tab with:
-
t
he distance travelled,
- t he average fuel consumption,
- t he average speed,
f
or the first trip.
th
e trip "2" tab with:
-
t
he distance travelled,
-
t
he average fuel consumption,
-
t
he average speed,
f
or the second trip.
Trip reset
F When the desired trip is displayed, press the reset button or on the end of the wiper
control stalk.
t
r i p s "1" and "2" are independent but their use
is identical.
For example, trip "1" can be used for daily
figures, and trip "2" for monthly figures.
th
e information is accessible in the "
Driving assistance" menu.
te
mporary display in a new window:
F
P
ress the end of the wiper control stalk for
access to the information and display the
different tabs.
Touch screen
Instruments
Page 41 of 392
39
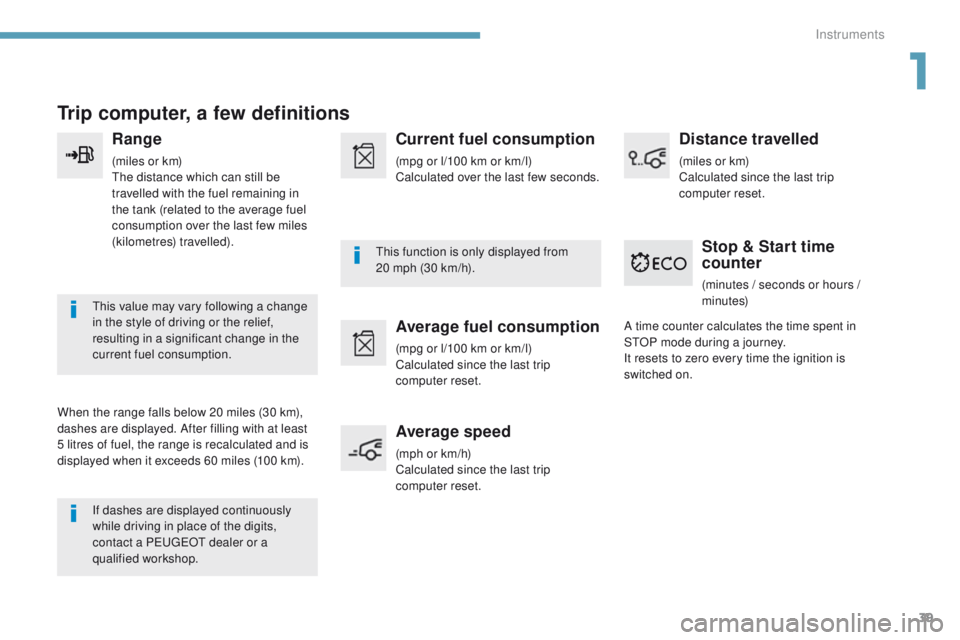
Trip computer, a few definitions
Range
(miles or km)the distance which can still be
travelled with the fuel remaining in
the tank (related to the average fuel
consumption over the last few miles
(kilometres) travelled).
th
is value may vary following a change
in the style of driving or the relief,
resulting in a significant change in the
current fuel consumption.
When the range falls below 20 miles (30 km),
dashes are displayed. After filling with at least
5 litres of fuel, the range is recalculated and is
displayed when it exceeds 60 miles (100 km). If dashes are displayed continuously
while driving in place of the digits,
contact a P
e
uge
Ot
dealer or a
qualified workshop.
th
is function is only displayed from
20
mph (30 km/h).
Current fuel consumption
(mpg or l/100 km or km/l)
Calculated over the last few seconds.
Average fuel consumption
(mpg or l/100 km or km/l)
Calculated since the last trip
computer reset.
Average speed
(mph or km/h)
Calculated since the last trip
computer reset.
Distance travelled
(miles or km)
Calculated since the last trip
computer reset.
Stop & Start time
counter
(minutes / seconds or hours /
minutes)
A time counter calculates the time spent in
S
tO
P mode during a journey.
It resets to zero every time the ignition is
switched on.
1
Instruments
Page 172 of 392
170
Stop & Start
Operation
Going into engine STOP mode
- With a manual gearbox, with the speed
below 12 mph (20 km/h) or with the vehicle
stationary (depending on the engine), when
you put the gear lever into neutral and
release the clutch pedal.
Never refuel with the engine in S
tO
P
mode; you must switch off the ignition. For your comfort, during parking
manoeuvres, S
tO
P mode is not
available for a few seconds after
coming out of reverse gear.
th
e Stop & Start system does not affect
the functionality of the vehicle, such as
for example, braking, power steering...
A slight delay between the vehicle
stopping and the engine cutting out may
be noticed.
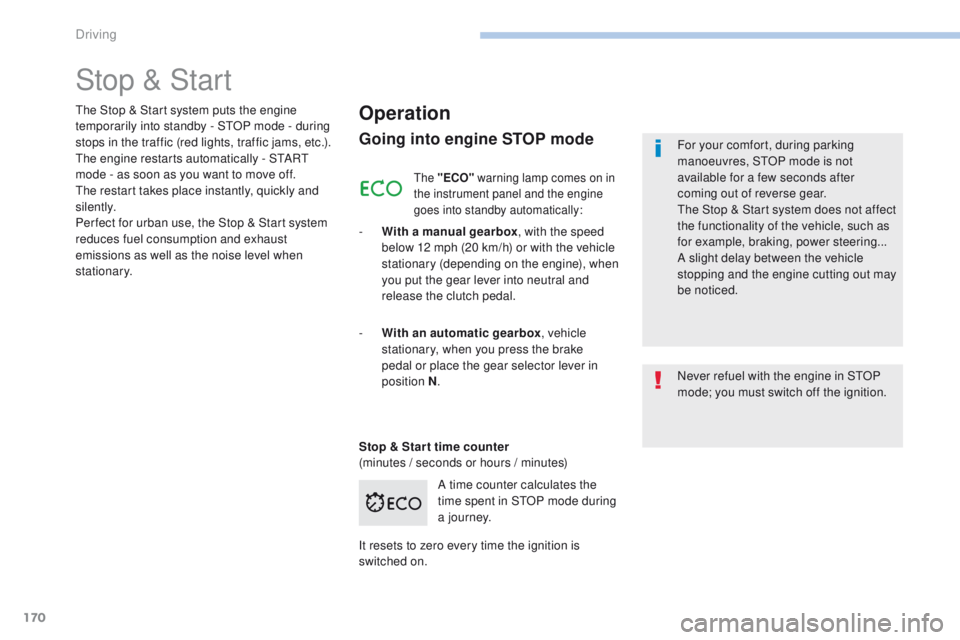
A time counter calculates the
time spent in S
tO
P mode during
a j o u r n ey.
th
e Stop & Start system puts the engine
temporarily into standby - S
tO
P mode - during
stops in the traffic (red lights, traffic jams, etc.).
th
e engine restarts automatically - S
tA
R
t
mode - as soon as you want to move off.
th
e restart takes place instantly, quickly and
silently.
Per fect for urban use, the Stop & Start system
reduces fuel consumption and exhaust
emissions as well as the noise level when
stationary.
Stop & Star t time counter
(minutes / seconds or hours / minutes) -
W
ith an automatic gearbox , vehicle
stationary, when you press the brake
pedal or place the gear selector lever in
position
N.
It resets to zero every time the ignition is
switched on.
the "ECO" warning lamp comes on in
the instrument panel and the engine
goes into standby automatically:
Driving
Page 301 of 392
299
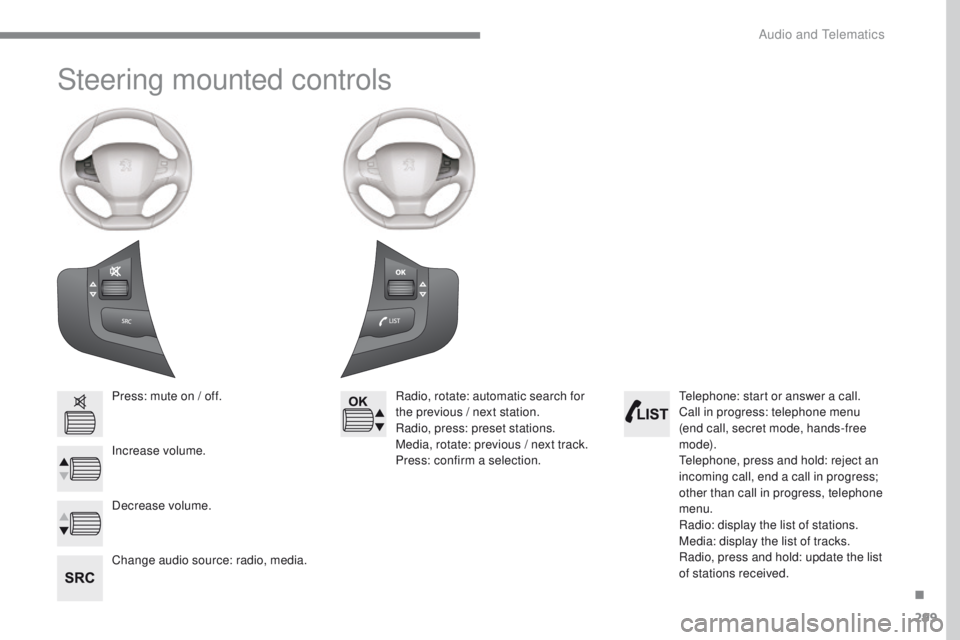
Steering mounted controls
Press: mute on / off.
Increase volume.
Change audio source: radio, media.Radio, rotate: automatic search for
the previous / next station.
Radio, press: preset stations.
Media, rotate: previous / next track.
Press: confirm a selection.
Decrease volume.te lephone: start or answer a call.
Call in progress: telephone menu
(end call, secret mode, hands-free
m o d e).
te
lephone, press and hold: reject an
incoming call, end a call in progress;
other than call in progress, telephone
menu.
Radio: display the list of stations.
Media: display the list of tracks.
Radio, press and hold: update the list
of stations received.
.
Audio and telematics
Page 310 of 392
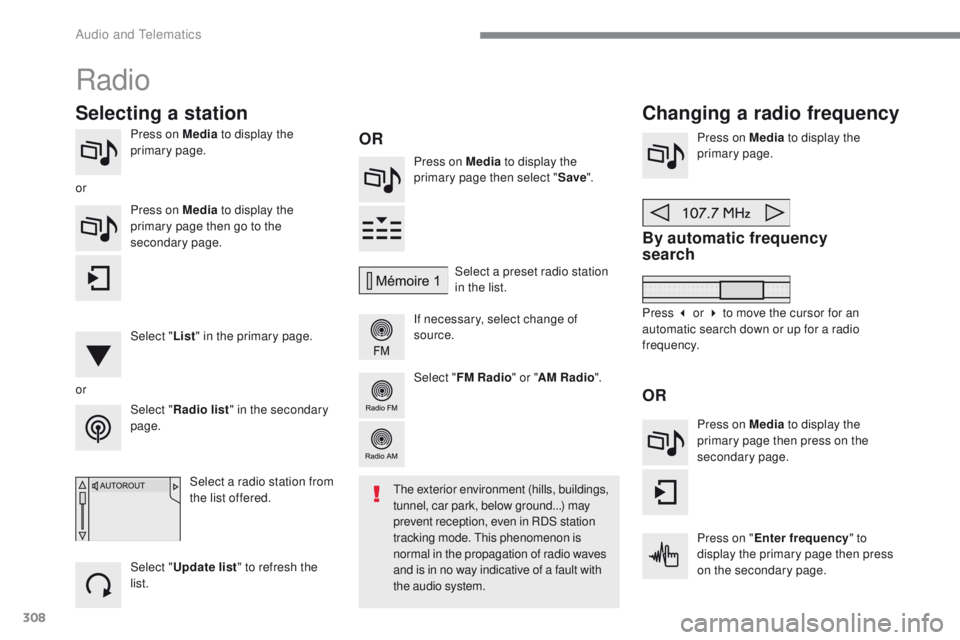
308
Press on Media to display the
primary page. Press on Media to display the
primary page then select " Save".
If necessary, select change of
source. Press on Media
to display the
primary page.
By automatic frequency
search
Select " Radio list " in the secondary
page. Select a preset radio station
in the list.
Select " FM Radio " or "AM Radio ".
Select a radio station from
the list offered.
Select " Update list " to refresh the
list. Press on Media to display the
primary page then go to the
secondary page.
Select " List" in the primary page.
Radio
Changing a radio frequency
Selecting a station
OR
orOR
the exterior environment (hills, buildings,
tunnel, car park, below ground...) may
prevent reception, even in RDS station
tracking mode.
t
h
is phenomenon is
normal in the propagation of radio waves
and is in no way indicative of a fault with
the audio system.
or
Press 3 or 4 to move the cursor for an
automatic search down or up for a radio
frequency.Press on Media to display the
primary page then press on the
secondary page.
Press on " Enter frequency " to
display the primary page then press
on the secondary page.
Audio and telematics
Page 311 of 392
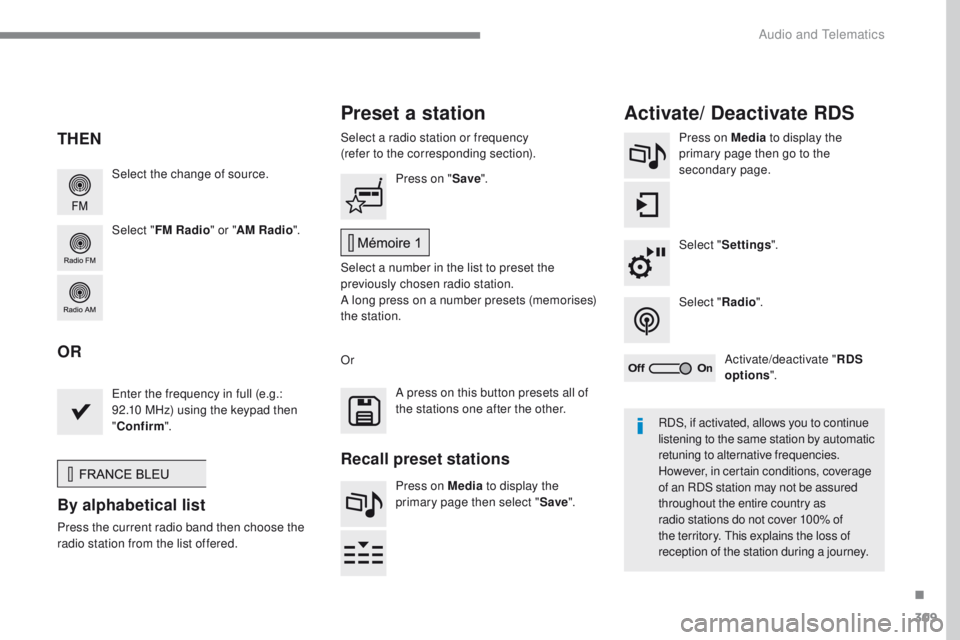
309
Select the change of source.
Select "FM Radio " or "AM Radio ".Select a radio station or frequency
(refer to the corresponding section).
Press on Media
to display the
primary page then go to the
secondary page.
Select " Settings ".
Select " Radio".
Activate/deactivate " RDS
options ".
Press on "
Save".
Select a number in the list to preset the
previously chosen radio station.
A long press on a number presets (memorises)
the station.
en
ter the frequency in full (e.g.:
92.10 MHz) using the keypad then
" Confirm ".
By alphabetical list
Press the current radio band then choose the
radio station from the list offered. Or
Press on Media to display the
primary page then select " Save".
Preset a station Activate/ Deactivate RDS
THEN
OR
A press on this button presets all of
the stations one after the other.
Recall preset stations
RDS, if activated, allows you to continue
listening to the same station by automatic
retuning to alternative frequencies.
However, in certain conditions, coverage
of an RDS station may not be assured
throughout the entire country as
radio stations do not cover 100% of
the territory.
t
h
is explains the loss of
reception of the station during a journey.
.
Audio and telematics