tow bar PEUGEOT 308 2022 Owners Manual
[x] Cancel search | Manufacturer: PEUGEOT, Model Year: 2022, Model line: 308, Model: PEUGEOT 308 2022Pages: 260, PDF Size: 7.92 MB
Page 5 of 260
3
Contents
Road signs recognition 11 5
Speed limiter 11 9
Cruise control - Specific recommendations 120
Cruise control 121
Drive Assist Plus 122
Drive Assist 2.0 123
Adaptive cruise control 123
Lane positioning assist 127
Speed adjustment during cornering 131
Semi-automatic lane changing 131
Active Safety Brake with Collision Risk Alert
and Intelligent emergency braking assistance
135
Distraction detection 138
Active lane departure warning system 139
Long-distance blind spot monitoring 142
Parking sensors 143
Visiopark 1 145
Visiopark 2 146
Rear traffic alert 148
7Practical informationCompatibility of fuels 151
Refuelling 151
Misfuel prevention (Diesel) 152
Rechargeable hybrid system 152
Charging the traction battery
(Rechargeable hybrid engine)
159
Towing device 161
Towing device with quickly detachable towball 162
Roof bars 165
Very cold climate screens 166
Snow chains 167
Energy economy mode 167
Bonnet 168
Engine compartment 169
Checking levels 169
Checks 171
AdBlue® (BlueHDi) 173
Free-wheeling 175
Advice on care and maintenance 176
8In the event of a breakdownWarning triangle 179
Running out of fuel (Diesel) 179
Tool kit 179
Temporary puncture repair kit 181
Spare wheel 184
Changing a bulb 187
Fuses 189
12
V battery/Accessory batteries 189
Towing the vehicle 194
9Technical dataEngine technical data and towed loads 197
Petrol engines 198
Diesel engines 200
Rechargeable hybrid engines 201
Dimensions 202
Identification markings 202
10 PEUGEOT i-Connect Advanced -PEUGEOT i-Connect
First steps 204
Customisation 207
Steering mounted controls 208
Applications 209
Voice commands 209
Navigation 210
Connectivity 2 11
Mirror Screen 213
Media 214
Phone 216
Settings 217
Help 218
11Event data recorders
■
Alphabetical index
bit.ly/helpPSA
Access to additional videos
Page 46 of 260
44
Ease of use and comfort
When driving
Maintain a good driving position and hold the
steering wheel with both hands at the 'quarter to
three' position, so that you can easily and quickly
reach the controls behind and near the steering
wheel.
Never adjust the seats or steering wheel
when driving.
Always keep your feet on the floor.
Front seats
Before moving the seat backwards,
ensure that there is no person or object
that might prevent the full travel of the seat.
There is a risk of trapping or pinching
passengers if present in the rear seats or of
jamming the seat if large objects are placed
on the floor behind the seat.
Front head restraints
Adjusting the height
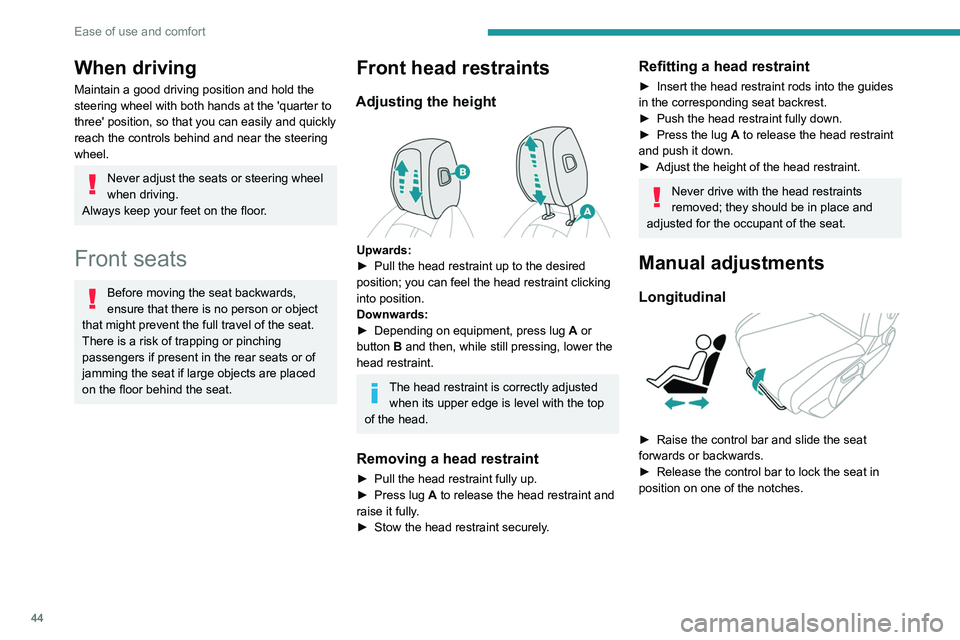
Upwards:
► Pull the head restraint up to the desired
position; you can feel the head restraint clicking
into position.
Downwards:
►
Depending on equipment, press lug A
or
button B and then, while still pressing, lower the
head restraint.
The head restraint is correctly adjusted when its upper edge is level with the top
of the head.
Removing a head restraint
► Pull the head restraint fully up.
► Press lug A to release the head restraint and
raise it fully.
►
Stow the head restraint securely
.
Refitting a head restraint
► Insert the head restraint rods into the guides
in the corresponding seat backrest.
►
Push the head restraint fully down.
►
Press the lug
A to release the head restraint
and push it down.
►
Adjust the height of the head restraint.
Never drive with the head restraints
removed; they should be in place and
adjusted for the occupant of the seat.
Manual adjustments
Longitudinal
► Raise the control bar and slide the seat
forwards or backwards.
►
Release the control bar to lock the seat in
position on one of the notches.
Page 67 of 260
65
Ease of use and comfort
3Behind the front seats
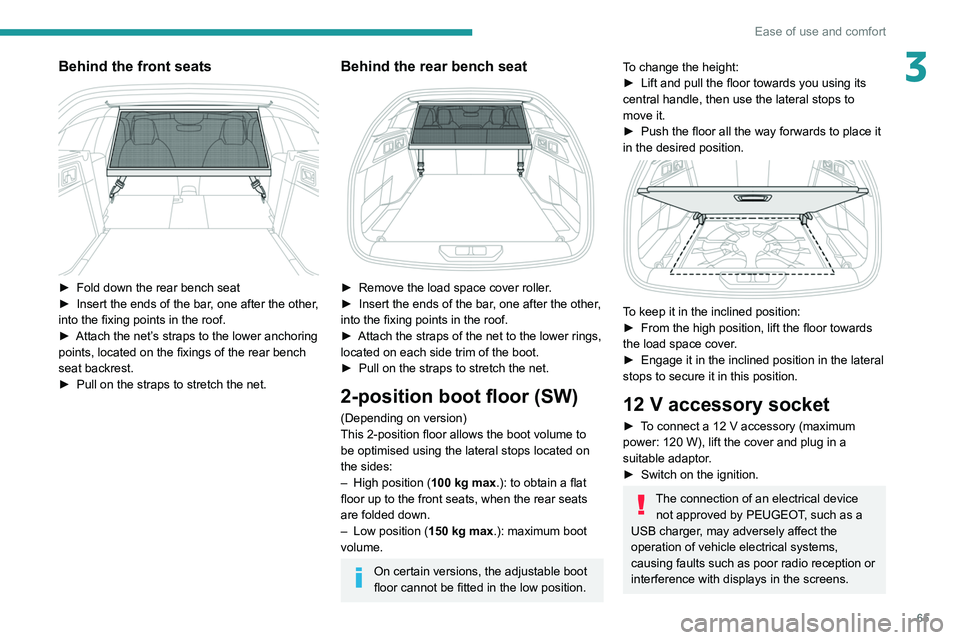
► Fold down the rear bench seat
► Insert the ends of the bar , one after the other,
into the fixing points in the roof.
►
Attach the net’
s straps to the lower anchoring
points, located on the fixings of the rear bench
seat backrest.
►
Pull on the straps to stretch the net.
Behind the rear bench seat
► Remove the load space cover roller .
► Insert the ends of the bar , one after the other,
into the fixing points in the roof.
►
Attach the straps of the net to the lower rings,
located on each side trim of the boot.
►
Pull on the straps to stretch the net.
2-position boot floor (SW)
(Depending on version)
This 2-position floor allows the boot volume to
be optimised using the lateral stops located on
the sides:
–
High position ( 100
kg max.): to obtain a flat
floor up to the front seats, when the rear seats
are folded down.
–
Low position ( 150
kg max.): maximum boot
volume.
On certain versions, the adjustable boot
floor cannot be fitted in the low position.
To change the height:
► Lift and pull the floor towards you using its
central handle, then use the lateral stops to
move it.
►
Push the floor all the way forwards to place it
in the desired position.
To keep it in the inclined position:
► From the high position, lift the floor towards
the load space cover
.
►
Engage it in the inclined position in the lateral
stops to secure it in this position.
12 V accessory socket
► To connect a 12 V accessory (maximum
power: 120 W), lift the cover and plug in a
suitable adaptor.
►
Switch on the ignition.
The connection of an electrical device not approved by PEUGEOT, such as a
USB charger, may adversely affect the
operation of vehicle electrical systems,
causing faults such as poor radio reception or
interference with displays in the screens.
Page 72 of 260
70
Lighting and visibility
► With the ignition off, pull the lighting control
stalk toward you ("headlamp flash") to activate/
deactivate the function.
Manual guide-me-home lighting goes off
automatically after a period of time.
Welcome lighting
When the vehicle is unlocked in low light
conditions and the "Automatic illumination of
headlamps" function is activated, this system
automatically switches on:
–
On the outside, sidelamps, dipped beam
headlamps and door mirror spotlamps.
–
Inside, courtesy lamps and footwell lighting.
Door mirror spotlamps
These spotlamps facilitate access to the vehicle
by lighting the ground near the front doors.
The spotlamps come on automatically:
–
when the vehicle is unlocked.
–
when a door is opened.
–
when a request to locate the vehicle is
received from the remote control.
They also come on with the welcome lighting
and guide-me-home lighting functions.
They go off automatically after 30 seconds.
Automatic lighting systems - General
recommendations
The automatic lighting systems use a detection
camera, located at the top of the windscreen.
Operating limits
The system may be disrupted or not work
correctly:
–
When visibility conditions are poor
(e.g.
snowfall, heavy rain).
–
If the windscreen is dirty
, misted-up or
masked (e.g.
sticker) in front of the camera.
–
If the vehicle is facing highly reflective signs
or safety barrier reflectors.
The system is not able to detect:
–
Road users that do not have their own
lighting, such as pedestrians.
–
V
ehicles with hidden lighting (e.g. travelling
behind a safety barrier on the motorway).
–
V
ehicles at the top or bottom of a steep
slope, on winding roads, on crossroads.
Maintenance
Clean the windscreen regularly,
particularly the area in front of the camera.
The internal surface of the windscreen can
also become misted around the camera.
In humid and cold weather, demist the
windscreen regularly.
Do not allow snow to accumulate on the
bonnet or roof of the vehicle as this could
obstruct the camera.
Automatic headlamp dipping
For more information, refer to the
General recommendations for
automatic lighting systems.
With the ring of the lighting control stalk
in the
"AUTO" position and the function activated on
the touch screen, this system automatically
switches between dipped and main beam
headlamps, according to lighting and traffic
conditions, using a camera located at the top of
the windscreen.
Page 129 of 260
127
Driving
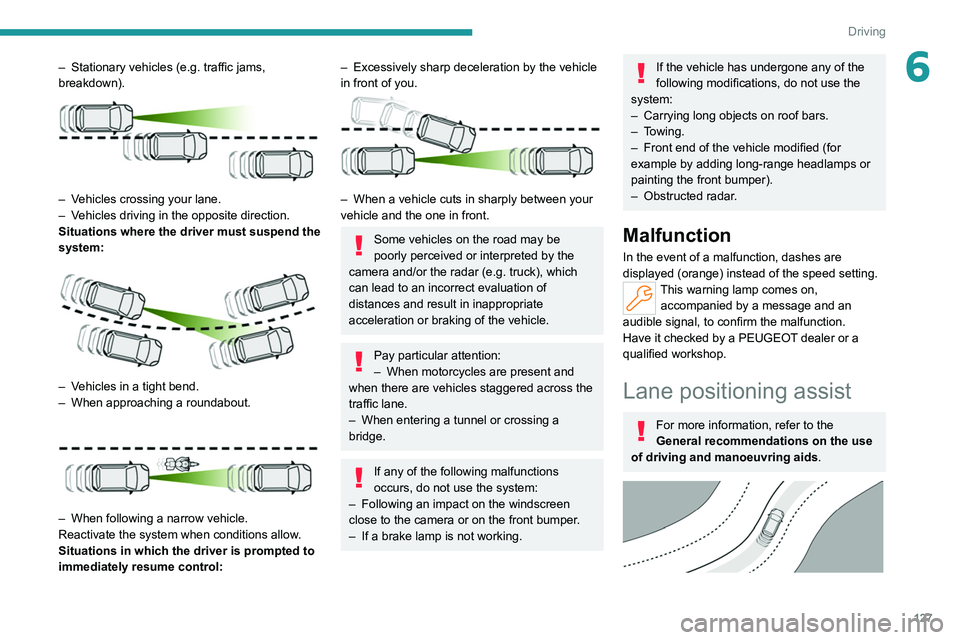
6– Stationary vehicles (e.g. traffic jams,
breakdown).
– Vehicles crossing your lane.
– V ehicles driving in the opposite direction.
Situations where the driver must suspend the
system:
– Vehicles in a tight bend.
– When approaching a roundabout.
– When following a narrow vehicle.
Reactivate the system when conditions allow .
Situations in which the driver is prompted to
immediately resume control:
– Excessively sharp deceleration by the vehicle
in front of you.
– When a vehicle cuts in sharply between your
vehicle and the one in front.
Some vehicles on the road may be
poorly perceived or interpreted by the
camera and/or the radar (e.g.
truck), which
can lead to an incorrect evaluation of
distances and result in inappropriate
acceleration or braking of the vehicle.
Pay particular attention:
– When motorcycles are present and
when there are vehicles staggered across the
traffic lane.
–
When entering a tunnel or crossing a
bridge.
If any of the following malfunctions
occurs, do not use the system:
–
Following an impact on the windscreen
close to the camera or on the front bumper
.
–
If a brake lamp is not working.
If the vehicle has undergone any of the
following modifications, do not use the
system:
–
Carrying long objects on roof bars.
–
Towing.
–
Front end of the vehicle modified (for
example by adding long-range headlamps or
painting the front bumper).
–
Obstructed radar
.
Malfunction
In the event of a malfunction, dashes are
displayed (orange) instead of the speed setting.
This warning lamp comes on, accompanied by a message and an
audible signal, to confirm the malfunction.
Have it checked by a PEUGEOT dealer or a
qualified workshop.
Lane positioning assist
For more information, refer to the
General recommendations on the use
of driving and manoeuvring aids .
Page 146 of 260
144
Driving
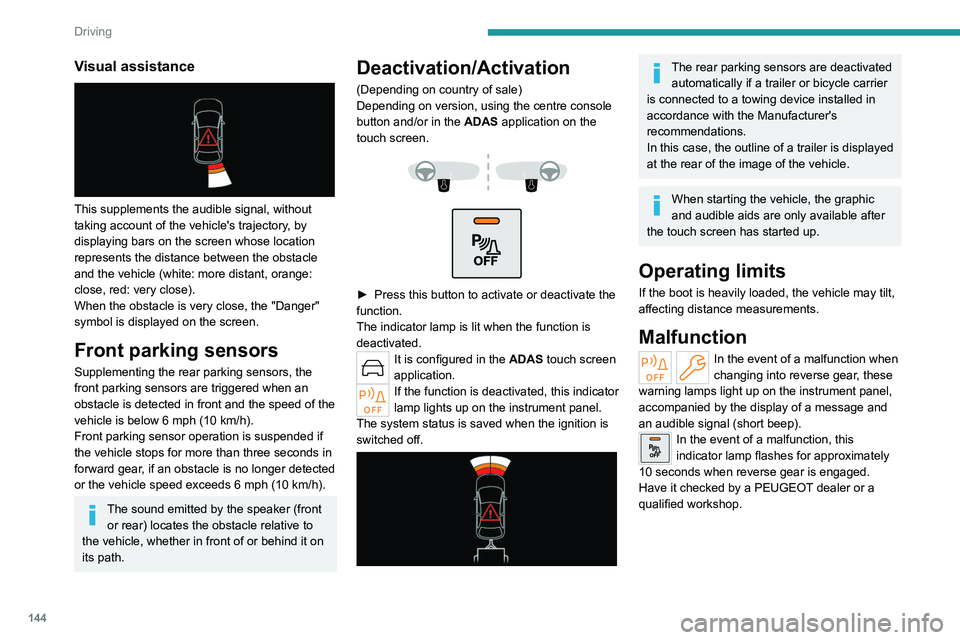
Visual assistance
This supplements the audible signal, without
taking account of the vehicle's trajectory, by
displaying bars on the screen whose location
represents the distance between the obstacle
and the vehicle (white: more distant, orange:
close, red: very close).
When the obstacle is very close, the "Danger"
symbol is displayed on the screen.
Front parking sensors
Supplementing the rear parking sensors, the
front parking sensors are triggered when an
obstacle is detected in front and the speed of the
vehicle is below 6 mph (10 km/h).
Front parking sensor operation is suspended if
the vehicle stops for more than three seconds in
forward gear, if an obstacle is no longer detected
or the vehicle speed exceeds 6
mph (10 km/h).
The sound emitted by the speaker (front or rear) locates the obstacle relative to
the vehicle, whether in front of or behind it on
its path.
Deactivation/Activation
(Depending on country of sale)
Depending on version, using the centre console
button and/or in the ADAS application on the
touch screen.
► Press this button to activate or deactivate the
function.
The indicator lamp is lit when the function is
deactivated.
It is configured in the ADAS touch screen
application.
If the function is deactivated, this indicator
lamp lights up on the instrument panel.
The system status is saved when the ignition is
switched off.
The rear parking sensors are deactivated automatically if a trailer or bicycle carrier
is connected to a towing device installed in
accordance with the Manufacturer's
recommendations.
In this case, the outline of a trailer is displayed
at the rear of the image of the vehicle.
When starting the vehicle, the graphic
and audible aids are only available after
the touch screen has started up.
Operating limits
If the boot is heavily loaded, the vehicle may tilt,
affecting distance measurements.
Malfunction
In the event of a malfunction when
changing into reverse gear, these
warning lamps light up on the instrument panel,
accompanied by the display of a message and
an audible signal (short beep).
In the event of a malfunction, this
indicator lamp flashes for approximately
10 seconds when reverse gear is engaged.
Have it checked by a PEUGEOT dealer or a
qualified workshop.
Page 167 of 260
165
Practical information
7► Replace the protective plug 2 into the
carrier 1.
►
Stow the towball in its bag to protect it from
knocks and dirt.
Maintenance
Correct operation is only possible if the towball
and its carrier are kept clean.
Before cleaning the vehicle with a high-pressure
jet wash, the towball must be removed and the
protective plug fitted to the carrier.
Work on the towing device
Contact a PEUGEOT dealer or a
qualified workshop.
Roof bars
As a safety measure and to avoid damaging the roof, it is essential to use
transverse roof bars approved for your
vehicle.
Observe the instructions on fitting and use
contained in the guide supplied with the roof
bars.
Maximum load distributed over the
transverse roof bars, for a loading height
not exceeding 40 cm (except bicycle carrier):
80 kg.
As this value may change, please verify the
maximum load quoted in the guide supplied
with the roof bars.
If the height exceeds 40 cm, adapt the speed
of the vehicle to the profile of the road to
avoid damaging the roof bars and the fixings
on the vehicle.
Be sure to refer to national legislation in order
to comply with the regulations for transporting
objects that are longer than the vehicle.
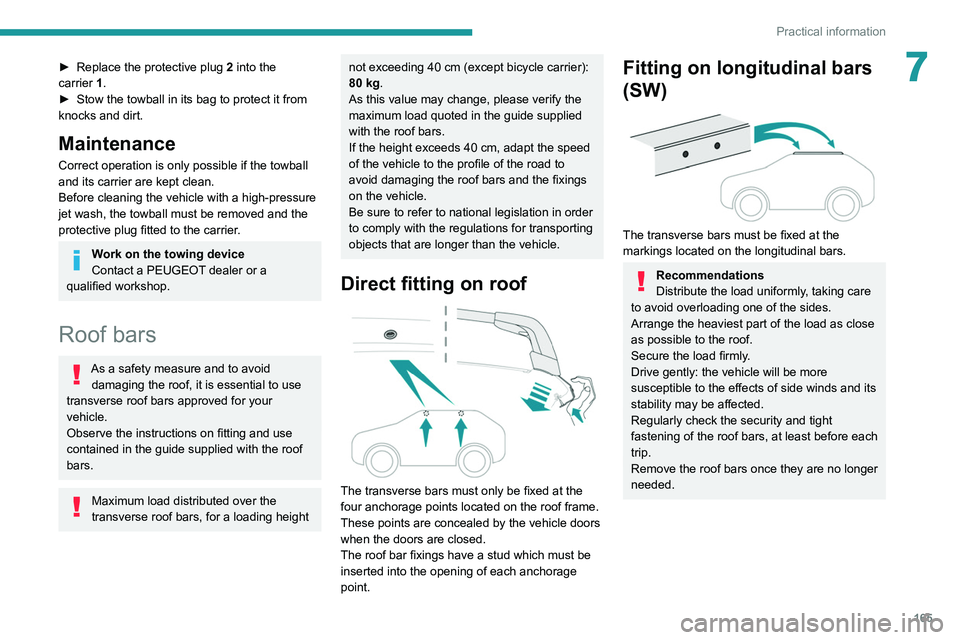
Direct fitting on roof
The transverse bars must only be fixed at the
four anchorage points located on the roof frame.
These points are concealed by the vehicle doors
when the doors are closed.
The roof bar fixings have a stud which must be
inserted into the opening of each anchorage
point.
Fitting on longitudinal bars
(SW)
The transverse bars must be fixed at the
markings located on the longitudinal bars.
Recommendations
Distribute the load uniformly, taking care
to avoid overloading one of the sides.
Arrange the heaviest part of the load as close
as possible to the roof.
Secure the load firmly.
Drive gently: the vehicle will be more
susceptible to the effects of side winds and its
stability may be affected.
Regularly check the security and tight
fastening of the roof bars, at least before each
trip.
Remove the roof bars once they are no longer
needed.
Page 185 of 260
183
In the event of a breakdown
8
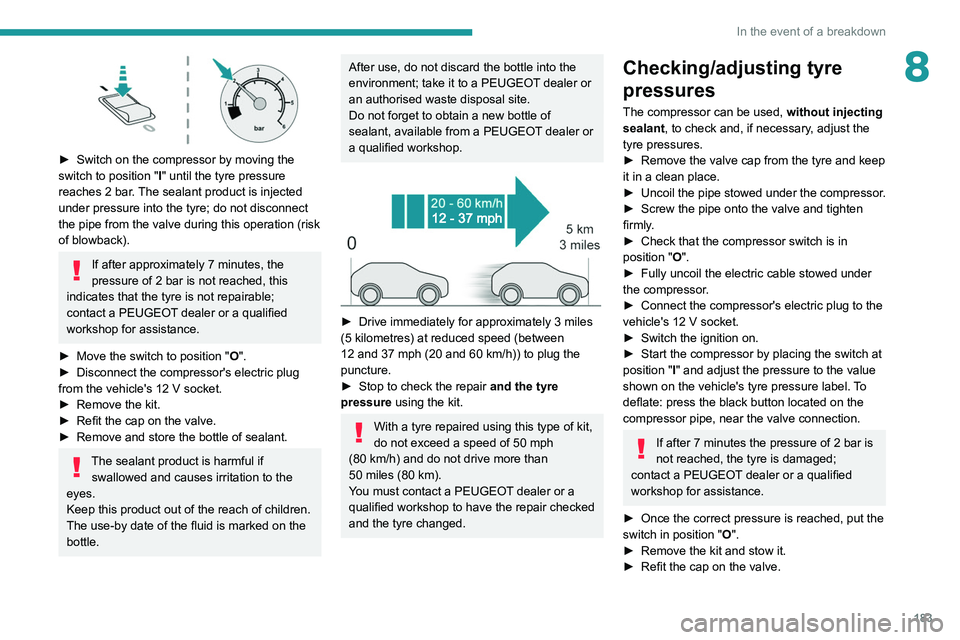
► Switch on the compressor by moving the
switch to position " I
" until the tyre pressure
reaches 2 bar. The sealant product is injected
under pressure into the tyre; do not disconnect
the pipe from the valve during this operation (risk
of blowback).
If after approximately 7 minutes, the
pressure of 2 bar is not reached, this
indicates that the tyre is not repairable;
contact a PEUGEOT dealer or a qualified
workshop for assistance.
►
Move the switch to position " O
".
►
Disconnect the compressor's electric plug
from the vehicle's 12
V socket.
►
Remove the kit.
►
Refit the cap on the valve.
►
Remove and store the bottle of sealant.
The sealant product is harmful if swallowed and causes irritation to the
eyes.
Keep this product out of the reach of children.
The use-by date of the fluid is marked on the
bottle.
After use, do not discard the bottle into the
environment; take it to a PEUGEOT dealer or
an authorised waste disposal site.
Do not forget to obtain a new bottle of
sealant, available from a PEUGEOT dealer or
a qualified workshop.
► Drive immediately for approximately 3 miles
(5 kilometres) at reduced speed (between
12 and 37 mph (20 and 60
km/h)) to plug the
puncture.
►
Stop to check the repair
and the tyre
pressure using the kit.
With a tyre repaired using this type of kit,
do not exceed a speed of 50
mph
(80
km/h) and do not drive more than
50
miles (80 km).
You must contact a PEUGEOT dealer or a
qualified workshop to have the repair checked
and the tyre changed.
Checking/adjusting tyre
pressures
The compressor can be used, without injecting
sealant, to check and, if necessary, adjust the
tyre pressures.
►
Remove the valve cap from the tyre and keep
it in a clean place.
►
Uncoil
the pipe stowed under the compressor.
►
Screw the pipe onto the valve and tighten
firmly
.
►
Check that the compressor switch is in
position " O
".
►
Fully uncoil the electric cable stowed under
the compressor
.
►
Connect the compressor's electric plug to the
vehicle's 12
V socket.
►
Switch the ignition on.
►
Start the compressor by placing the switch at
position " I
" and adjust the pressure to the value
shown on the vehicle's tyre pressure label. To
deflate: press the black button located on the
compressor pipe, near the valve connection.
If after 7 minutes the pressure of 2 bar is
not reached, the tyre is damaged;
contact a PEUGEOT dealer or a qualified
workshop for assistance.
►
Once the correct pressure is reached, put the
switch in position " O
".
►
Remove the kit and stow it.
►
Refit the cap on the valve.
Page 197 of 260
195
In the event of a breakdown
8A professional towing service must be
called if:
–
Broken down on a motorway or main road.
–
Not possible to put
the gearbox into neutral,
unlock the steering, or release the parking
brake.
–
Not possible to tow a vehicle with an
automatic gearbox, with the engine running.
– Towing with only two wheels on the ground.
– Four-wheel drive vehicle.
–
No approved towbar available.
Rechargeable hybrid vehicles
Before any intervention, with the ignition
on, depress the brake pedal and select mode
N, then switch off the hybrid system (READY
indicator lamp off).
Always call on professionals for recovery of
the vehicle on a flatbed lorry or trailer.
Use the towing eye only
to free the vehicle
if it is stuck, or to secure it for recovery on a
flatbed lorry or trailer.
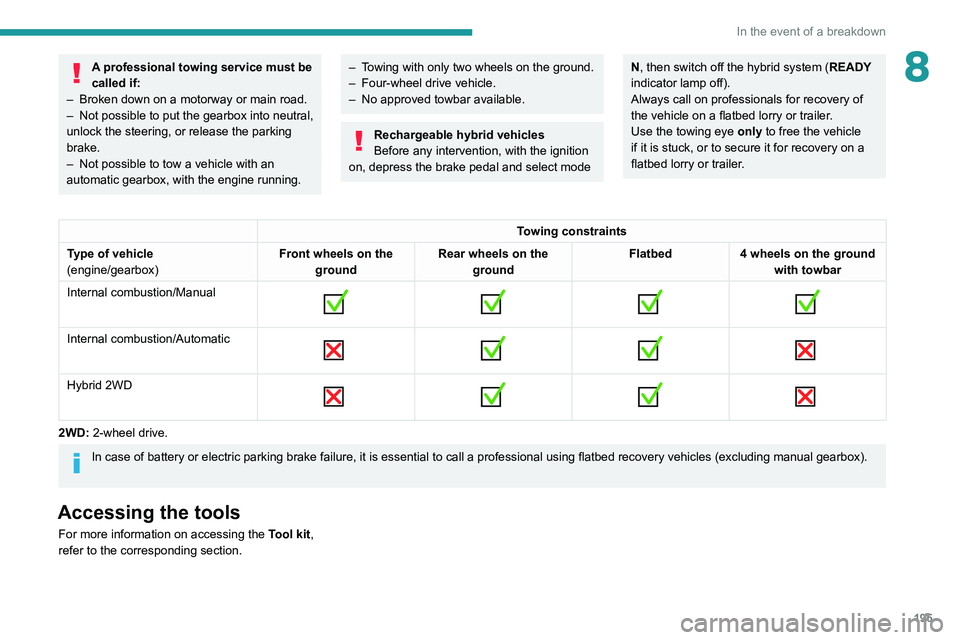
Towing constraints
Type of vehicle
(engine/gearbox) Front wheels on the
ground Rear wheels on the
ground Flatbed
4 wheels on the ground
with towbar
Internal combustion/Manual
Internal combustion/Automatic
Hybrid 2WD
2WD: 2-wheel drive.
In case of battery or electric parking brake failure, it is essential to call a p
rofessional using flatbed recovery vehicles (excluding manual gearbox).
Accessing the tools
For more information on accessing the Tool kit,
refer to the corresponding section.
Page 198 of 260

196
In the event of a breakdown
Towing your vehicle
To access the front screw thread:
► Unclip the cover by pressing at its top left-
hand corner .
►
Release the cover downwards.
T
o be towed:
►
Screw the towing eye in fully
.
►
Install the towbar
.
►
Put the gearbox into neutral.
Failure to observe this instruction could
result in damage to certain components
(braking, transmission, etc.) and to the
absence of braking assistance the next time
the engine is started.
Automatic gearbox
Never tow the vehicle with the driving
wheels on the ground and the engine off.
►
Unlock the steering and release the parking
brake. ►
Switch on the hazard warning lamps on both
vehicles.
►
Move off gently
, drive slowly and only for a
short distance.
Towing another vehicle
To access the rear screw thread:
► Unclip the cover by pressing at its top left-
hand corner .
►
Pull the cover downwards.
T
o tow:
►
Screw the towing eye in fully
.
►
Install the towbar
. ►
Switch on the hazard warning lamps on both
vehicles.
►
Move off gently
, drive slowly and only for a
short distance.