spare wheel PEUGEOT 4008 2017 Owners Manual
[x] Cancel search | Manufacturer: PEUGEOT, Model Year: 2017, Model line: 4008, Model: PEUGEOT 4008 2017Pages: 368, PDF Size: 12.22 MB
Page 13 of 368
11
4008_en_Chap00c_eco-conduite_ed01-2016
Limit the causes of excess consumption
Spread loads throughout the vehicle; place the heaviest items in the
bottom of the boot, as close as possible to the rear seats.
Limit the loads carried in the vehicle and reduce wind resistance
(roof bars, roof rack, bicycle carrier, trailer, etc.). u
s
e a roof box in
preference.
Remove roof bars and roof racks after use.
At the end of winter, remove snow tyres and refit your summer tyres.
Observe the recommendations on
maintenance
Check the tyre pressures regularly, when cold, referring to the label in
the door aperture, on the driver's side.
Carry out this check in particular:
-
b
efore a long journey,
-
a
t each change of season,
-
a
fter a long period out of use.
Do not forget the spare wheel and the tyres on any trailer or caravan.
Have your vehicle serviced regularly (engine oil, oil filter, air filter,
passenger compartment filter, etc.) and observe the schedule of
operations recommended in the manufacturer's service schedule.
When refuelling, do not continue after the third cut-off of the nozzle to
avoid any over flow.
At the wheel of your new vehicle, it is only after the first 1 800 miles
(3
000 kilometres) that you will see the fuel consumption settle down to
a consistent average.
.
eco-driving
Page 116 of 368
114
4008_en_Chap04_conduite_ed01-2016
the tyre under-inflation detection
system is an aid to driving which does
not replace the need for vigilance on
the part of the driver.
Under-inflation detection
System which continuously and automatically checks the pressures of the four tyres after switching on the ignition.
A pressure sensor is located in the valve of each tyre (except the spare wheel).
th
e system triggers an alert if a drop in pressure is detected in one or more tyres, compared to the reference pressure registered in the system. t
h
is
reference pressure must be reinitialised every time the tyre pressures are adjusted or a wheel changed.
th
e system operates on condition that the sensor identifiers have first been memorised in the system by a P
e
uge
Ot
dealer or a qualified workshop.
You can memorise two sets of tyres (e.g. wheels with "standard" tyres and wheels with "winter" tyres).
Driving with under-inflated tyres
increases fuel consumption.
th
is system does not avoid the need
to check the tyre pressures regularly
(including the spare wheel) and before
a long journey.
Driving with under-inflated tyres
adversely affects road holding,
extends braking distances and causes
premature tyre wear, particularly under
arduous conditions (vehicle loaded,
high speed, long journey).
th
e tyre pressures for your vehicle can
be found on the tyre pressure label.
For more information on Identification
markings , refer to the corresponding
section.
th
e tyre pressures must be checked
when the tyres are cold (vehicle
stopped for 1 hour or after driving for
less then 6 miles (10 km) at moderate
speed). Other wise, add 0.3 bar to the
values indicated on the label.
Driving
Page 117 of 368
115
4008_en_Chap04_conduite_ed01-2016
Under-inflation alert
the alert is given by the fixed
illumination of this warning lamp and
the display of a message.
F
R
educe speed immediately, avoid sudden
steering movements or harsh brake
applications.
F
S
top as soon as it is safe to do so.
th
e loss of pressure detected does not
always lead to visible deformation of the
tyre. Do not rely on just a visual check.
th
e alert is maintained until the
reference pressure is reinitialised after
the inflation, repair or replacement of
the tyres concerned. In the event of
the repair or replacement of tyres, the
sensor identifiers must be registered in
the system by a P
e
uge
Ot
dealer or a
qualified workshop.
th
e spare wheel does not have
a sensor, so there is no need to
reinitialise the system for driving with
the spare wheel fitted.
F
I f you have a compressor (the one in the
temporary puncture repair kit, for example),
check the four tyre pressures when cold.
I
f it is not possible to check the tyre
pressures immediately, drive carefully at
reduced speed.
or
F
I
n the event of a puncture, use the
temporary puncture repair kit or the spare
wheel (depending on equipment).
Reinitialising the reference
pressure
Before reinitialising the system, ensure
that the pressures in the four tyres are
suitable for the conditions of use of the
vehicle and are as specified on the tyre
pressure label.
th
e under-inflation detection system
cannot warn of an incorrect pressure at
the time of reinitialisation.
th
e system must be reinitialised after any
adjustment of tyre pressures and after
changing one or more wheels.
4
Driving
Page 118 of 368
116
4008_en_Chap04_conduite_ed01-2016
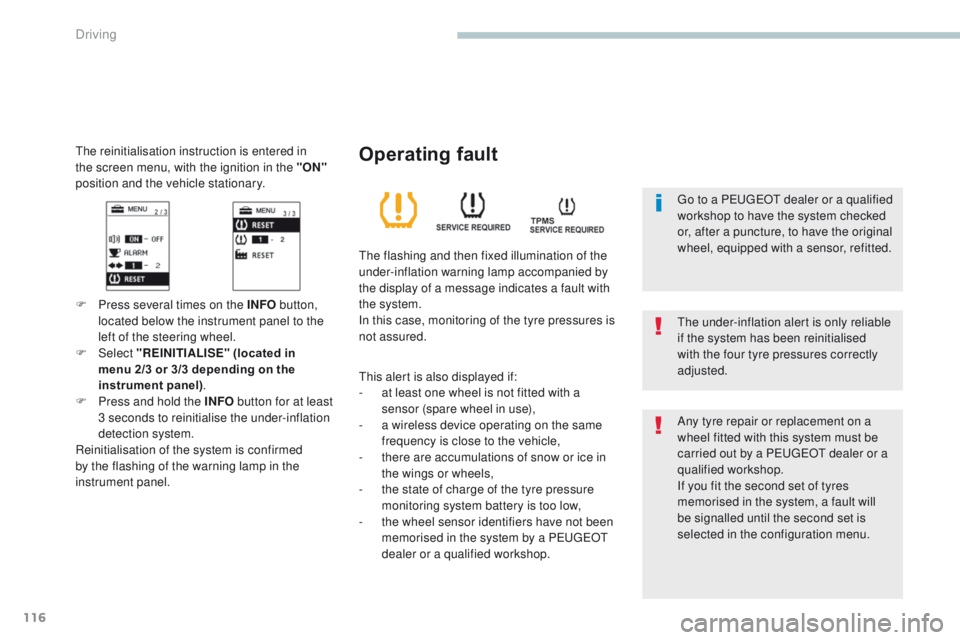
the reinitialisation instruction is entered in
the screen menu, with the ignition in the "ON"
position and the vehicle stationary.
F Press several times on the INFO button,
located below the instrument panel to the
left of the steering wheel.
F
Select "REINITIALISE" (located in
menu
2/3 or 3/3 depending on the
instrument panel) .
F
P
ress and hold the INFO button for at least
3 seconds to reinitialise the under-inflation
detection system.
Reinitialisation of the system is confirmed
by the flashing of the warning lamp in the
instrument panel.
th
e under-inflation alert is only reliable
if the system has been reinitialised
with the four tyre pressures correctly
adjusted.
Operating fault
the flashing and then fixed illumination of the
under-inflation warning lamp accompanied by
the display of a message indicates a fault with
the system.
In this case, monitoring of the tyre pressures is
not assured.
th
is alert is also displayed if:
-
a
t least one wheel is not fitted with a
sensor (spare wheel in use),
-
a w
ireless device operating on the same
frequency is close to the vehicle,
-
t
here are accumulations of snow or ice in
the wings or wheels,
-
t
he state of charge of the tyre pressure
monitoring system battery is too low,
-
t
he wheel sensor identifiers have not been
memorised in the system by a P
e
uge
Ot
dealer or a qualified workshop. Any tyre repair or replacement on a
wheel fitted with this system must be
carried out by a P
e
uge
Ot
dealer or a
qualified workshop.
If you fit the second set of tyres
memorised in the system, a fault will
be signalled until the second set is
selected in the configuration menu.
go t
o a P
e
uge
Ot
dealer or a qualified
workshop to have the system checked
or, after a puncture, to have the original
wheel, equipped with a sensor, refitted.
Driving
Page 177 of 368
175
4008_en_Chap07_info-pratiques_ed01-2016
For more information on snow chains,
contact a PeugeOt dealer or a
qualified workshop.
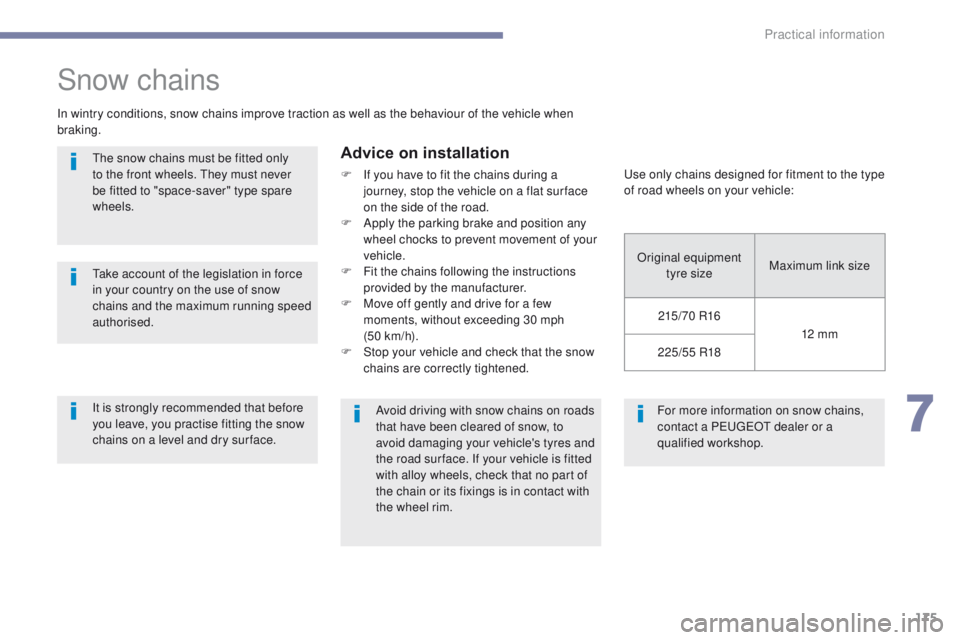
Snow chains
In wintry conditions, snow chains improve traction as well as the behaviour of the vehicle when
braking.
Advice on installation
F If you have to fit the chains during a journey, stop the vehicle on a flat sur face
on the side of the road.
F
A
pply the parking brake and position any
wheel chocks to prevent movement of your
vehicle.
F
F
it the chains following the instructions
provided by the manufacturer.
F
M
ove off gently and drive for a few
moments, without exceeding 30 mph
(50 km/h).
F
S
top your vehicle and check that the snow
chains are correctly tightened.
th
e snow chains must be fitted only
to the front wheels.
th
ey must never
be fitted to "space-saver" type spare
wheels.
ta
ke account of the legislation in force
in your country on the use of snow
chains and the maximum running speed
authorised.
Avoid driving with snow chains on roads
that have been cleared of snow, to
avoid damaging your vehicle's tyres and
the road sur face. If your vehicle is fitted
with alloy wheels, check that no part of
the chain or its fixings is in contact with
the wheel rim.us e only chains designed for fitment to the type
of road wheels on your vehicle:
Original equipment tyre size Maximum link size
215/ 70 R16 12 mm
225/55 R18
It is strongly recommended that before
you leave, you practise fitting the snow
chains on a level and dry sur face.
7
Practical information
Page 195 of 368
193
4008_en_Chap08_en-cas-de panne_ed01-2016
Changing a wheel
the tools are stowed in the boot under the
f l o o r.
to g
ain access to them:
F
O
pen the boot.
F
L
ift and remove the boot floor.
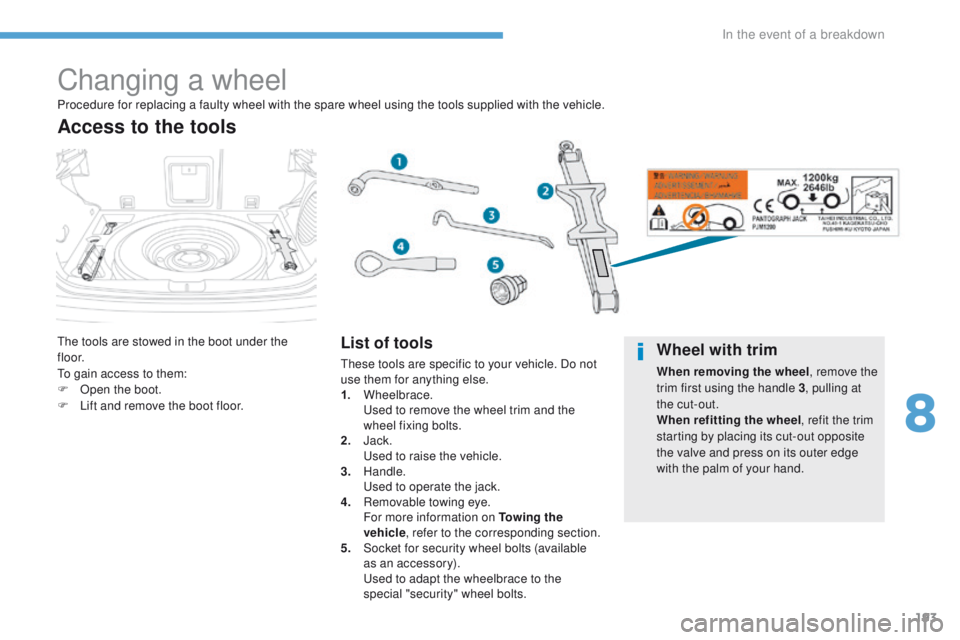
Access to the tools
List of tools
these tools are specific to your vehicle. Do not
use them for anything else.
1.
Wheelbrace.
u
s
ed to remove the wheel trim and the
wheel fixing bolts.
2.
J
ack.
u
se
d to raise the vehicle.
3.
Handle.
u
s
ed to operate the jack.
4.
R
emovable towing eye.
F
or more information on To w i n g the
vehicle , refer to the corresponding section.
5.
S
ocket for security wheel bolts (available
as an accessory).
u
s
ed to adapt the wheelbrace to the
special "security" wheel bolts.
Procedure for replacing a faulty wheel with the spare wheel using the tools supplied with the vehicle.Wheel with trim
When removing the wheel
, remove the
trim first using the handle 3 , pulling at
the cut-out.
When refitting the wheel , refit the trim
starting by placing its cut-out opposite
the valve and press on its outer edge
with the palm of your hand.
8
In the event of a breakdown
Page 196 of 368
194
4008_en_Chap08_en-cas-de panne_ed01-2016
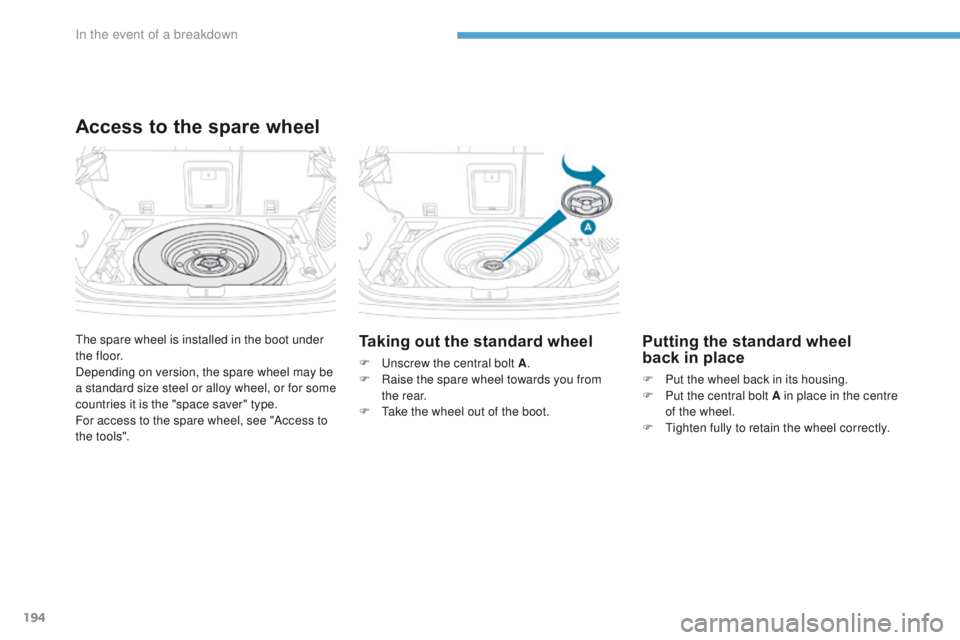
the spare wheel is installed in the boot under
t h e f l o o r.
Depending on version, the spare wheel may be
a standard size steel or alloy wheel, or for some
countries it is the "space saver" type.
For access to the spare wheel, see "Access to
t he to o ls".
Access to the spare wheel
Taking out the standard wheel
F unscrew the central bolt A .
F R aise the spare wheel towards you from
the rear.
F
t
a
ke the wheel out of the boot.
Putting the standard wheel
back in place
F Put the wheel back in its housing.
F P ut the central bolt A in place in the centre
of the wheel.
F
t
i
ghten fully to retain the wheel correctly.
In the event of a breakdown
Page 198 of 368
196
4008_en_Chap08_en-cas-de panne_ed01-2016
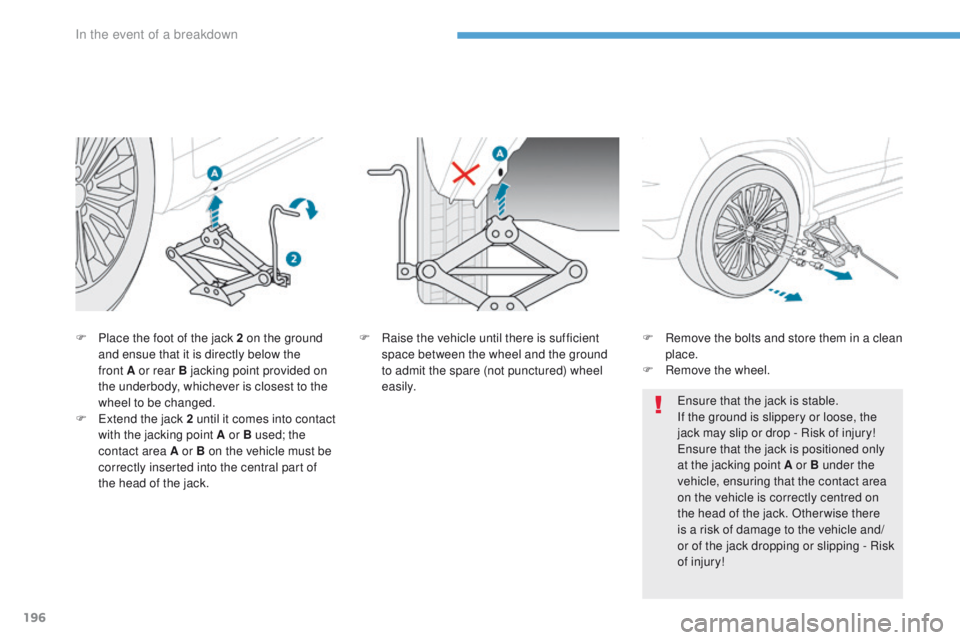
F Place the foot of the jack 2 on the ground
and ensue that it is directly below the
front
A or rear B jacking point provided on
the underbody, whichever is closest to the
wheel to be changed.
F
e
x
tend the jack 2 until it comes into contact
with the jacking point A or B used; the
contact area A or B on the vehicle must be
correctly inserted into the central part of
the head of the jack. F
Ra ise the vehicle until there is sufficient
space between the wheel and the ground
to admit the spare (not punctured) wheel
easily.
en
sure that the jack is stable.
If the ground is slippery or loose, the
jack may slip or drop - Risk of injury!
en
sure that the jack is positioned only
at the jacking point A or B under the
vehicle, ensuring that the contact area
on the vehicle is correctly centred on
the head of the jack. Otherwise there
is a risk of damage to the vehicle and/
or of the jack dropping or slipping - Risk
of injury!
F
R emove the bolts and store them in a clean
place.
F
R
emove the wheel.
In the event of a breakdown
Page 199 of 368
197
4008_en_Chap08_en-cas-de panne_ed01-2016
Fitting the wheel
After changing a wheel
When using the "space-saving" spare
wheel, do not exceed 50 mph (80 km/h).
Have the tightening of the bolts and the
pressure of the spare wheel checked
by a P
e
uge
Ot
dealer or a qualified
workshop without delay.
Have the punctured wheel repaired
and refitted on the vehicle as soon as
possible.
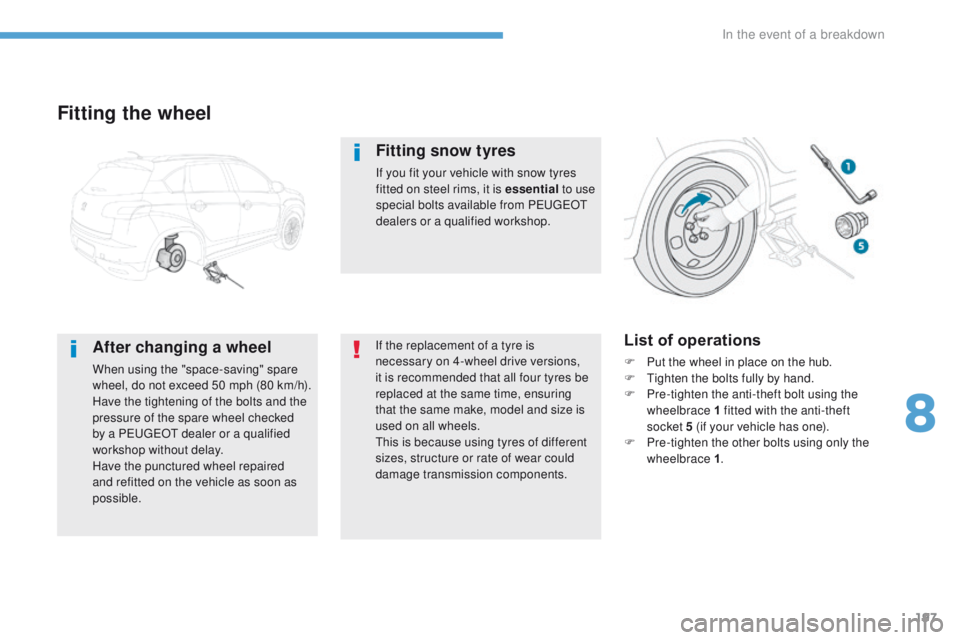
List of operations
F Put the wheel in place on the hub.
F ti ghten the bolts fully by hand.
F
P
re-tighten the anti-theft bolt using the
wheelbrace 1 fitted with the anti-theft
socket 5 (if your vehicle has one).
F
P
re-tighten the other bolts using only the
wheelbrace 1 .
Fitting snow tyres
If you fit your vehicle with snow tyres
fitted on steel rims, it is essential to use
special bolts available from P
e
uge
Ot
dealers or a qualified workshop.
If the replacement of a tyre is
necessary on 4-wheel drive versions,
it is recommended that all four tyres be
replaced at the same time, ensuring
that the same make, model and size is
used on all wheels.
th
is is because using tyres of different
sizes, structure or rate of wear could
damage transmission components.
8
In the event of a breakdown
Page 342 of 368
340
4008_en_Chap11_index-alpha_ed01-2016
Regeneration of the particle emissions filter ............................................................. 187
Reminder, key in ignition
.................................98
Reminder, lighting on
.................................... 129
Remote control
........................ 5
2, 54, 56, 57, 61
Removing the mat
........................................... 90
Repair kit, puncture
....................................... 189
Replacing bulbs
........................... 199, 203, 204
Replacing fuses
..............................
..............205
Replacing the air filter
...................................18 6
Replacing the oil filter
................................... 18
6
Replacing the passenger compartment filter
............................................................. 18 6
Rev counter
..................................................... 12
Reversing camera
......................................... 126
Reversing lamps
.................................. 203, 204
Roof bars
....................................................... 17
9
Routine checks
..................................... 18 6, 188
Running out of fuel (Diesel)
..........................2
18Screenwash, front
.........................................
13 5
Screen-wash reservoir .................................185
Seat belts
.............................................. 14
9, 15 0
Seat, rear bench
.............................................74
Seats, electric
.................................................72
Seats, front
...............................
..................71-73
Seats, heated
..................................................73
Seats, rear
.......................................................74
Serial number, vehicle
.................................. 23
3
Service indicator
.............................................33
Servicing
...............................
....................10, 33
Sidelamps
.....................................199, 201, 203
Side repeater
..............................
..................202
Ski flap
..............................
..............................75
Snow chains
.................................................. 17
5
Socket, 12 V accessory
......................8
9, 91, 92
Sockets, audio
............93, 278, 281, 306, 307, 330, 331
Sockets, auxiliary
....................93, 281, 307, 330
Spare wheel
...............................
...........193, 19 4
Speedometer
..................................................12
Spotlamps, side
............................................202
Starting the engine
...................................98, 99
Station, radio
................................. 3
00, 302-304
Steering mounted controls, audio
...........................................249, 291, 316
Steering wheel, adjustment
............................78
Stop & Start system (Auto Stop &
g
o
).........................................111
Storage
................................................75, 90, 95
Stowing rings
............................................95, 96
Sun visor
.........................................................90
Switching off the engine
........................... 9
8, 99
System, ABS
.................................................143
Radio
............ 268, 272, 300, 301, 303, 319, 321
Range
........................................................ 32, 35
RDS
...................................................... 302, 304
Reader, SD card
.......................... 263, 279, 280
Rear foglamp ........................................ 203, 204
Rear screen, demisting
................................... 88
Recharging the battery
......................... 21
1, 214
Recirculation / exterior air intake
.......................................... 83
R
P
Pairing a telephone ...............................2 8 8, 310
Panoramic glass sunroof ................................70
Parcel shelf, rear
............................................. 96
P
arking brake
........................................ 102, 188
Parking sensors, front
...................................125
Parking sensors, rear ............................123, 124
Particle filter
.......................... 180, 18 4, 185, 187
Passenger compartment filter
......................18 6
Plates, identification ...................................... 233
Player, Apple
® .............................. ........280, 308
Player, MP3 CD ............................................. 305
Player,
u
S
B
.......... 278, 280, 306, 308, 309, 331
Pockets, seat back
.......................................... 94
Port,
u
S
B
............................... 9
3, 278, 306, 331
Pressures, tyres
.................................... 114 , 2 3 3
Pre-tensioning seat belts
.............................. 150
Priming the fuel system
................................ 218
Protecting children
................ 156, 157, 161, 163,
165, 167, 169 -171
Puncture
................................................ 189, 193
Safety, children
..................... 15
6 -15 8, 161, 163,
165, 167, 169, 170
Screen (audio system)
.......................4
4, 46, 48
Screen, colour
.......................248, 251, 290, 293
Screen, instrument panel
..........................19, 32
Screen menu
................................294, 296, 298
Screen menu map
........................294, 296, 298
Screenwash fluid level
..................................185
S
Alphabetical index