service indicator PEUGEOT 408 2023 User Guide
[x] Cancel search | Manufacturer: PEUGEOT, Model Year: 2023, Model line: 408, Model: PEUGEOT 408 2023Pages: 244, PDF Size: 7.37 MB
Page 148 of 244

146
Practical information
► Stop the vehicle as soon as possible in the
best conditions of safety .
►
Switch off the ignition.
►
Evacuate the vehicle as quickly as possible
and move to a safe distance.
►
Call the fire department and/or the
emergency services and tell them that the
vehicle is an electric one.
Danger of death / Risk of serious
injury
A chain reaction can occur up to a traction
battery fire.
Disposal of the traction battery
The traction battery is designed for the life of the
vehicle if the recommendations of PEUGEOT
are followed.
If it becomes necessary to replace the battery,
contact the PEUGEOT dealer for instructions on
its disposal. Improper disposal carries the risk of
severe burns, electric shock, and damage to the
environment.
In accordance with regulations, PEUGEOT
ensures a second life or recycling of this
component in collaboration with qualified
operators.
Charging flap
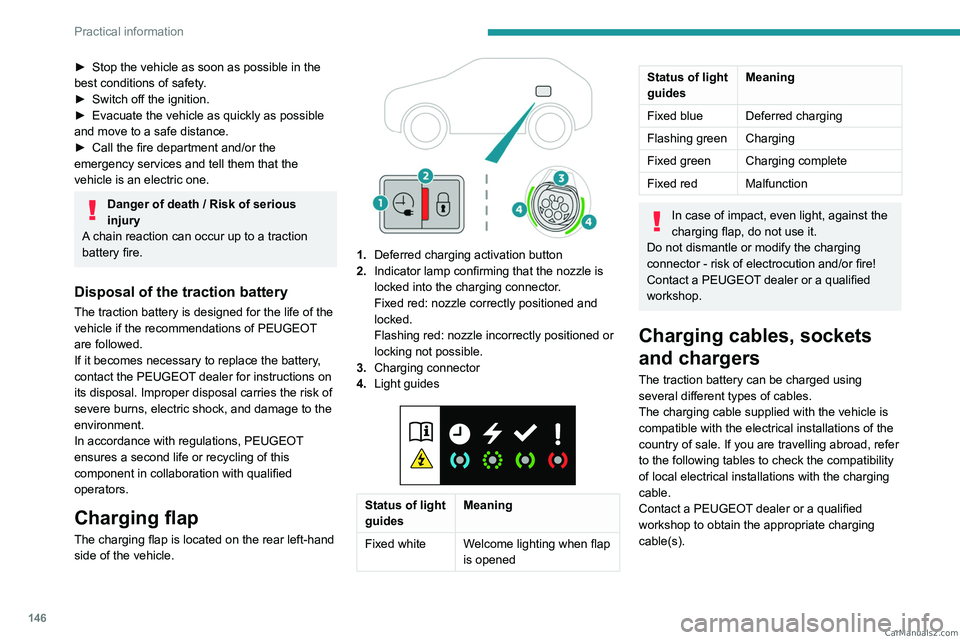
The charging flap is located on the rear left-hand
side of the vehicle.
1. Deferred charging activation button
2. Indicator lamp confirming that the nozzle is
locked into the charging connector.
Fixed red: nozzle correctly positioned and
locked.
Flashing red: nozzle incorrectly positioned or
locking not possible.
3. Charging connector
4. Light guides
Status of light
guides Meaning
Fixed white Welcome lighting when flap
is opened
Status of light
guidesMeaning
Fixed blue Deferred charging
Flashing green Charging
Fixed green Charging complete
Fixed red Malfunction
In case of impact, even light, against the
charging flap, do not use it.
Do not dismantle or modify the charging
connector - risk of electrocution and/or fire!
Contact a PEUGEOT dealer or a qualified
workshop.
Charging cables, sockets
and chargers
The traction battery can be charged using
several different types of cables.
The charging cable supplied with the vehicle is
compatible with the electrical installations of the
country of sale. If you are travelling abroad, refer
to the following tables to check the compatibility
of local electrical installations with the charging
cable.
Contact a PEUGEOT dealer or a qualified
workshop to obtain the appropriate charging
cable(s). CarM an uals 2 .c o m
Page 163 of 244

161
Practical information
7► Lift the exterior safety catch and raise the
bonnet.
►
Unclip the stay from its housing and place it
in the support slot to hold the bonnet open.
Closing
► Lower the bonnet and release it near the end
of its travel.
►
Check the locking.
Because of the presence of electrical
equipment under the bonnet, it is strongly
recommended that exposure to water (rain,
washing, etc.) be limited.
Engine compartment
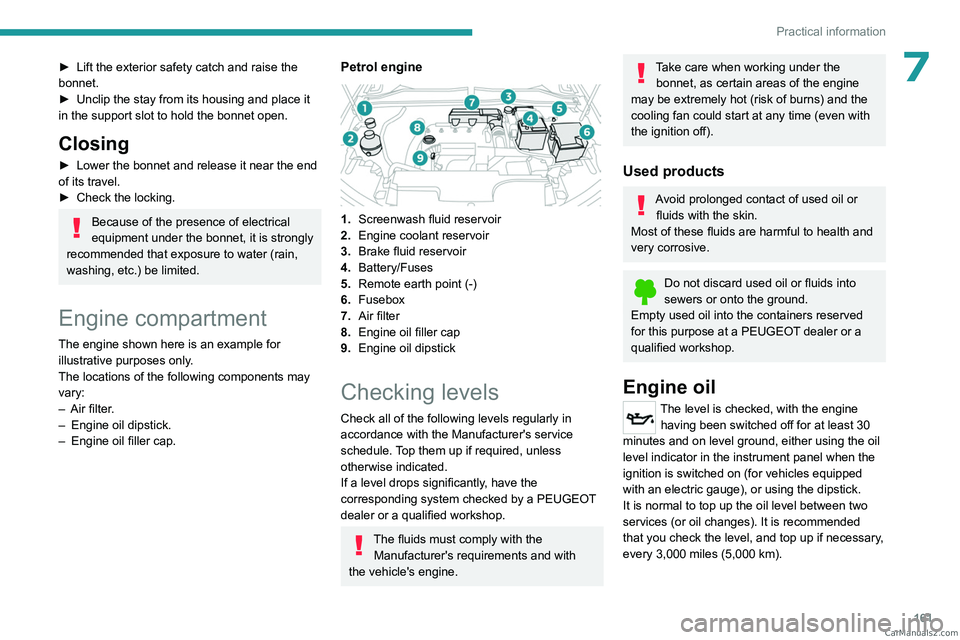
The engine shown here is an example for
illustrative purposes only.
The locations of the following components may
vary:
–
Air filter
.
–
Engine oil dipstick.
–
Engine oil filler cap.
Petrol engine
1. Screenwash fluid reservoir
2. Engine coolant reservoir
3. Brake fluid reservoir
4. Battery/Fuses
5. Remote earth point (-)
6. Fusebox
7. Air filter
8. Engine oil filler cap
9. Engine oil dipstick
Checking levels
Check all of the following levels regularly in
accordance with the Manufacturer's service
schedule. Top them up if required, unless
otherwise indicated.
If a level drops significantly, have the
corresponding system checked by a PEUGEOT
dealer or a qualified workshop.
The fluids must comply with the
Manufacturer's requirements and with
the vehicle's engine.
Take care when working under the bonnet, as certain areas of the engine
may be extremely hot (risk of burns) and the
cooling fan could start at any time (even with
the ignition off).
Used products
Avoid prolonged contact of used oil or fluids with the skin.
Most of these fluids are harmful to health and
very corrosive.
Do not discard used oil or fluids into
sewers or onto the ground.
Empty used oil into the containers reserved
for this purpose at a PEUGEOT dealer or a
qualified workshop.
Engine oil
The level is checked, with the engine having been switched off for at least 30
minutes and on level ground, either using the oil
level indicator in the instrument panel when the
ignition is switched on (for vehicles equipped
with an electric gauge), or using the dipstick.
It is normal to top up the oil level between two
services (or oil changes). It is recommended
that you check the level, and top up if necessary,
every 3,000 miles (5,000 km). CarM an uals 2 .c o m
Page 183 of 244

181
In the event of a breakdown
8Charging the front battery using a
battery charger
For optimum service life of the front battery, it
is essential to maintain an adequate state of
charge.
In some circumstances, it may be necessary to
charge the front battery:
–
When using the vehicle mainly for short
journeys.
–
If the vehicle is to be taken off the road for
several weeks.
Consult a PEUGEOT
dealer or a qualified
workshop.
To charge the vehicle's front battery yourself, use only a charger compatible
with lead-acid batteries with a nominal voltage
of 12
V.
Follow the instructions provided by the
manufacturer of the charger.
Never reverse polarities.
It is not necessary to disconnect the
battery.
►
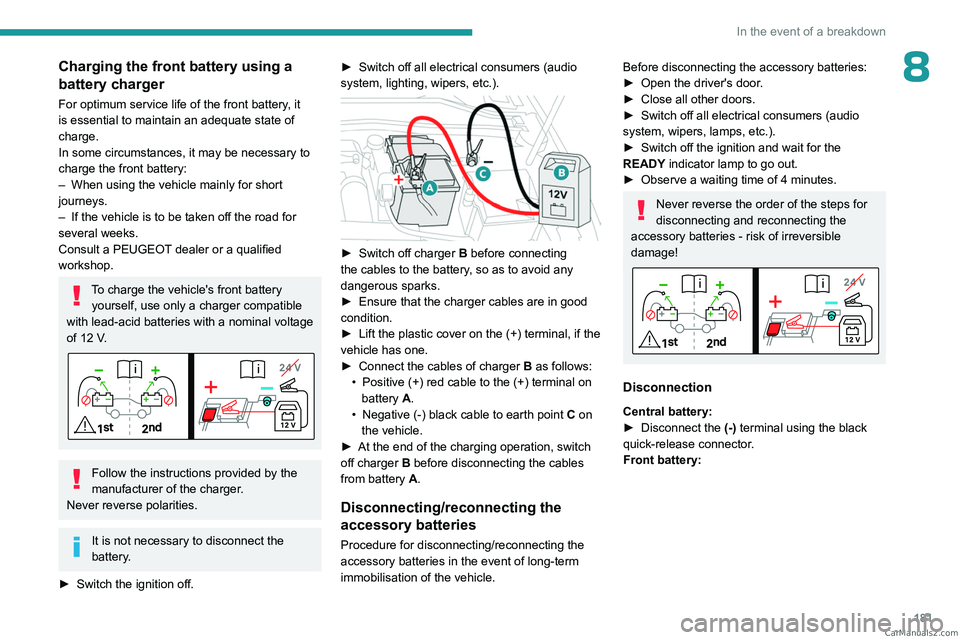
Switch the ignition off. ►
Switch off all electrical consumers (audio
system, lighting, wipers, etc.).
► Switch off charger B before connecting
the cables to the battery, so as to avoid any
dangerous sparks.
►
Ensure that the charger cables are in good
condition.
►
Lift the plastic cover on the (+) terminal, if the
vehicle has one.
►
Connect the cables of charger B
as follows:
•
Positive (+) red cable to the (+) terminal on
battery
A.
•
Negative (-) black cable to earth point C
on
the vehicle.
►
At the end of the charging operation, switch
off charger B
before disconnecting the cables
from battery A.
Disconnecting/reconnecting the
accessory batteries
Procedure for disconnecting/reconnecting the
accessory batteries in the event of long-term
immobilisation of the vehicle.
Before disconnecting the accessory batteries:
► Open the driver's door .
►
Close all other doors.
►
Switch off all electrical consumers (audio
system, wipers, lamps, etc.).
►
Switch off the ignition and wait for the
READY
indicator lamp to go out.
►
Observe a waiting time of 4 minutes.
Never reverse the order of the steps for
disconnecting and reconnecting the
accessory batteries - risk of irreversible
damage!
Disconnection
Central battery:
► Disconnect the (-)
terminal using the black
quick-release connector.
Front battery:
CarM an uals 2 .c o m
Page 212 of 244

210
Alphabetical index
Filter, oil 163
Filter, passenger compartment
49, 163
Fitting a wheel
172, 174
Fitting roof bars
157–158
Fittings, boot
59
Fittings, interior
54
Fittings, rear
58
Flap, charging
153
Flap, fuel filler
143
Flap, ski
59
Flashing indicators
62
Flat bed (towing)
183
Fluid, brake
162
Fluid, engine coolant
162
Foglamps, rear
61, 176
Folding the rear seats
47–48
Frequency (radio)
200
Fuel
8, 143
Fuel consumption
8, 18
Fuel level, low
143
Fuel (tank)
143
Fuses
177
G
Gauge, fuel 143
Gearbox, automatic
96–99, 101, 163, 177
Gearbox, manual
101
Gear shift indicator
101
Glove box
54
H
Hands-free access 33–34
Hands-free tailgate
33–34
Hazard warning lamps
72, 168
Headlamps (adjustment)
62
Headlamps, automatic dipping
64–65
Headlamps, automatic operation
63
Headlamps, halogen
62
Headlamps, main beam
64
Head restraints, front
41
Head restraints, rear
47–48
Head-up display
67
Heated steering wheel
45
Heating
48
Heating, programmable
22, 53
Hi-Fi system
57
High voltage
144
Hill start assist
100–101
Histogramme, fuel consumption
22
Horn
73
I
Ignition 93, 202
Ignition on
93
Immobiliser, electronic
92
Indicator, coolant temperature
18
Indicator, engine oil level
17
Indicators, direction
62
Indicator, service
17
Inflating tyres
164, 188
Inflating tyres and accessories
(using the kit)
169, 171
Information, vehicle
10, 205
Infrared camera
67, 105
Instrument panel
10, 19, 19–20, 106
Instrument panels
10
ISOFIX mountings
85, 88–89
J
Jack 168–169, 172
Jump starting
178
K
Key 24–25, 29
Key, electronic
26–27
Keyless Entry and Starting
24, 26–27, 92–93
Key not recognised
94
Key with remote control
24, 92
Kit, hands-free
197
Kit, puncture repair
168–169
Kit, temporary puncture repair
168–171
Klaxon
73
L
Labels, identification 188
Lamps, parking
62
Lamps, rear
176 CarM an uals 2 .c o m