open bonnet PEUGEOT 408 2023 Owners Manual
[x] Cancel search | Manufacturer: PEUGEOT, Model Year: 2023, Model line: 408, Model: PEUGEOT 408 2023Pages: 244, PDF Size: 7.37 MB
Page 20 of 244
18
Dashboard instruments
For more information on Checking levels, refer
to the corresponding section.
Oil gauge malfunction
This is indicated by the message " Oil level
measurement invalid" on the instrument panel.
Consult a PEUGEOT dealer or a qualified
workshop.
In the event of a malfunction of the
electric gauge, the oil level is no longer
monitored.
If the system is faulty, you must check the
engine oil level using the manual dipstick
located in the engine compartment.
For more information on Checking levels,
refer to the corresponding section.
Coolant temperature
indicator
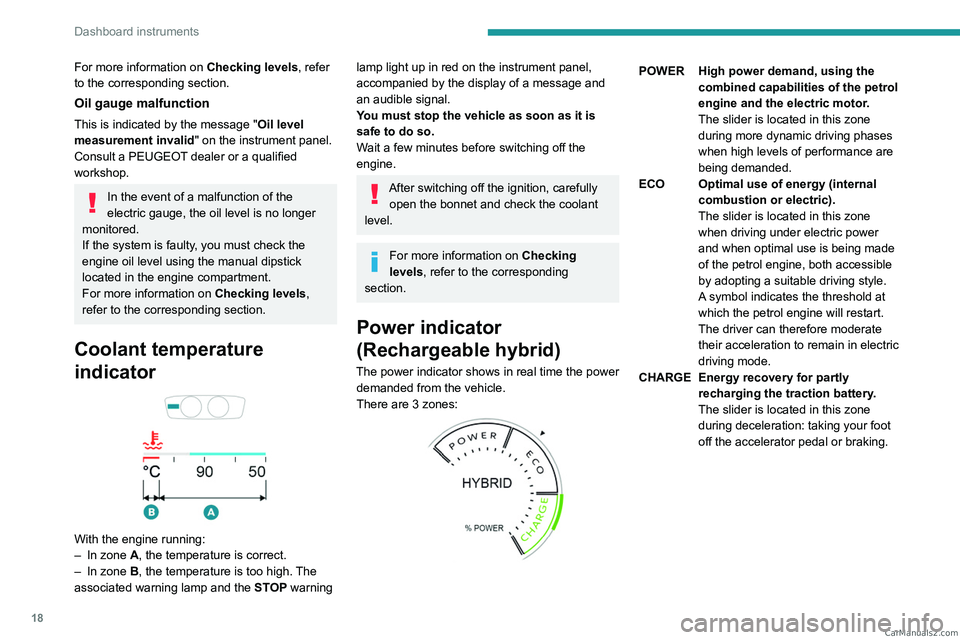
With the engine running:
– In zone A, the temperature is correct.
–
In zone
B, the temperature is too high. The
associated warning lamp and the STOP
warning
lamp light up in red on the instrument panel,
accompanied by the display of a message and
an audible signal.
You must stop the vehicle as soon as it is
safe to do so.
Wait a few minutes before switching off the
engine.
After switching off the ignition, carefully open the bonnet and check the coolant
level.
For more information on Checking
levels, refer to the corresponding
section.
Power indicator
(Rechargeable hybrid)
The power indicator shows in real time the power demanded from the vehicle.
There are 3 zones:
POWER High power demand, using the combined capabilities of the petrol
engine and the electric motor.
The slider is located in this zone
during more dynamic driving phases
when high levels of performance are
being demanded.
ECO Optimal use of energy (internal combustion or electric).
The slider is located in this zone
when driving under electric power
and when optimal use is being made
of the petrol engine, both accessible
by adopting a suitable driving style.
A symbol indicates the threshold at
which the petrol engine will restart.
The driver can therefore moderate
their acceleration to remain in electric
driving mode.
CHARGE Energy recovery for partly recharging the traction battery.
The slider is located in this zone
during deceleration: taking your foot
off the accelerator pedal or braking. CarM an uals 2 .c o m
Page 37 of 244

35
Access
2Alarm
(Depending on version)
System which protects and provides a deterrent
against theft and break-ins.
Exterior perimeter monitoring
The system checks for opening of the vehicle.
The alarm is triggered if anyone tries to open a
door, the boot or the bonnet, for example.
Interior volumetric monitoring
The system checks for any variation in volume in
the passenger compartment.
The alarm is triggered if anyone breaks a
window, enters the passenger compartment or
moves inside the vehicle.
Anti-tilt monitoring
The system checks for any change in the attitude
of the vehicle.
The alarm goes off if the vehicle is lifted or
moved.
When the vehicle is parked, the alarm
will not be triggered if the vehicle is
knocked.
Rechargeable hybrid vehicles
Depending on version, interior volumetric
and anti-tilt monitoring may be reduced or
even suspended during temperature pre-
conditioning sequences.
Self-protection function
The system checks whether any of its
components are out of service.
The alarm is triggered if the battery, the central
control or the siren wiring is put out of service or
damaged.
Work on the alarm system
Consult a PEUGEOT dealer or a
qualified workshop.
Locking the vehicle with full
alarm system
Activation
► Switch off the ignition and exit the vehicle.
► Lock or deadlock the vehicle using the
remote control or by pressing on the driver's
door handle.
When the monitoring system is active, the red
indicator lamp in the button flashes once per
second and the direction indicators come on for
about 2 seconds.
The exterior perimeter monitoring is activated
after 5 seconds and the interior volumetric
monitoring after 45 seconds.
The alarm does not activate when locking automatically from a distance.
Door, boot or bonnet
If an opening is not properly closed,
the vehicle is not locked, but the exterior
perimeter monitoring will be activated after
45 seconds, at the same time as the interior
volumetric monitoring.
Sunroof
If the sunroof remains open, the vehicle
is locked with exterior perimeter monitoring
activated but without interior volumetric or
anti-tilt monitoring.
Deactivation
► Press one of the remote control unlocking
buttons:
Short press.
Long press.
or
►
Unlock the vehicle by pressing the driver
’s
door handle. CarM an uals 2 .c o m
Page 66 of 244

64
Lighting and visibility
► With the ignition off, pull the lighting control
stalk toward you ("headlamp flash") to activate/
deactivate the function.
Manual guide-me-home lighting goes off
automatically after a period of time.
Welcome lighting
When the vehicle is unlocked in low light
conditions and the "Automatic illumination of
headlamps" function is activated, this system
automatically switches on:
–
On the outside, sidelamps, dipped beam
headlamps and door mirror spotlamps.
–
Inside, courtesy lamps and footwell lighting.
Door mirror spotlamps
These spotlamps facilitate access to the vehicle
by lighting the ground near the front doors.
The spotlamps come on automatically:
–
when the vehicle is unlocked.
–
when a door is opened.
–
when a request to locate the vehicle is
received from the remote control.
They also come on with the welcome lighting
and guide-me-home lighting functions.
They go off automatically after 30 seconds.
Automatic lighting systems - General
recommendations
The automatic lighting systems use a detection
camera, located at the top of the windscreen.
Operating limits
The system may be disrupted or not work
correctly:
–
When visibility conditions are poor
(e.g.
snowfall, heavy rain).
–
If the windscreen is dirty
, misted-up or
masked (e.g.
sticker) in front of the camera.
–
If the vehicle is facing highly reflective signs
or safety barrier reflectors.
The system is not able to detect:
–
Road users that do not have their own
lighting, such as pedestrians.
–
V
ehicles with hidden lighting (e.g. travelling
behind a safety barrier on the motorway).
–
V
ehicles at the top or bottom of a steep
slope, on winding roads, on crossroads.
Maintenance
Clean the windscreen regularly,
particularly the area in front of the camera.
The internal surface of the windscreen can
also become misted around the camera.
In humid and cold weather, demist the
windscreen regularly.
Do not allow snow to accumulate on the
bonnet or roof of the vehicle as this could
obstruct the camera.
Automatic headlamp dipping
For more information, refer to the
General recommendations for
automatic lighting systems.
With the ring of the lighting control stalk in the
"AUTO" position and the function activated on
the touch screen, this system automatically
switches between dipped and main beam
headlamps, according to lighting and traffic
conditions, using a camera located at the top of
the windscreen.
CarM an uals 2 .c o m
Page 84 of 244

82
Safety
Passengers must not place their feet on the
dashboard.
Do not smoke as deployment of the airbags
can cause burns or the risk of injury from a
cigarette or pipe.
Never remove or pierce the steering wheel or
hit it violently.
Do not fix or attach anything to the steering
wheel or dashboard, as this could cause
injuries when the airbags are deployed.
Lateral airbags
Use only approved seat covers
compatible with the deployment of these
airbags. For information on the range of seat
covers suitable for your vehicle, contact a
PEUGEOT dealer.
Do not fix or attach anything to the seat
backrests (e.g.
clothing) as this could cause
injuries to the chest or arm when the airbag is
deployed.
Do not sit with the upper part of the body any
nearer to the door than necessary.
The vehicle's front door panels include side
impact sensors.
A damaged door or any unauthorised or
incorrectly executed work (modification or
repair) on the front doors or their interior trim
could compromise the operation of these
sensors - risk of malfunction of the lateral
airbags!
All work must be carried out only by a
PEUGEOT dealer or a qualified workshop
Curtain airbags
Do not fix or attach anything to the roof,
as this could cause head injuries when the
curtain airbag is deployed.
Do not remove the grab handles installed on
the roof.
Active bonnet
The active bonnet has been designed to
optimise the safety of pedestrians in the event of
collision with the front of the vehicle.
The pyrotechnic system is triggered at the
hinges of the bonnet to lift it, when the sensors
located at the front of the vehicle detect a
collision.
Deployment of the active bonnet is
accompanied by a slight discharge of
harmless smoke and a noise, due to the
activation of the pyrotechnic cartridge
incorporated in the system. The airbag
warning lamp comes on.
After triggering, do not try to open or close
the bonnet. Call a towing company or go to
the nearest PEUGEOT dealer or qualified
workshop, driving at a speed below 19 mph
(30
km/h).
Make sure that you adjust the height of the
driver's seat - risk of hindrance to visibility!
This equipment will only trigger once. If a second impact occurs (during the same
or a subsequent accident), the active bonnet
will not trigger.
After an accident or if the vehicle has been
stolen, have the system checked.
Do not tamper with the pyrotechnic systems
under the bonnet, close to the struts - risk of
explosion!
All work must be carried out only by a
PEUGEOT dealer or a qualified workshop
Malfunction
In the event of a malfunction, this warning
lamp lights up on the instrument panel,
accompanied by the display of a message and
an audible signal. You must contact a PEUGEOT
dealer or a qualified workshop to have the
system checked.
The active bonnet may not deploy in the event of
an impact. CarM an uals 2 .c o m
Page 104 of 244
102
Driving
The function does not affect the functionalities of
the vehicle, in particular the braking.
Deactivation/Reactivation
By default, the function is activated when the
ignition is switched on.
It is configured in the ADAS touch screen
application.
or
Direct access to the Shortcuts for driving aids .
The display of a message on the instrument
panel confirms the change of state.
If the function is deactivated while the engine is
in STOP mode, it will restart immediately.
Associated indicator lamps
Function activated: engine on standby
(STOP mode)
Function deactivated or malfunction
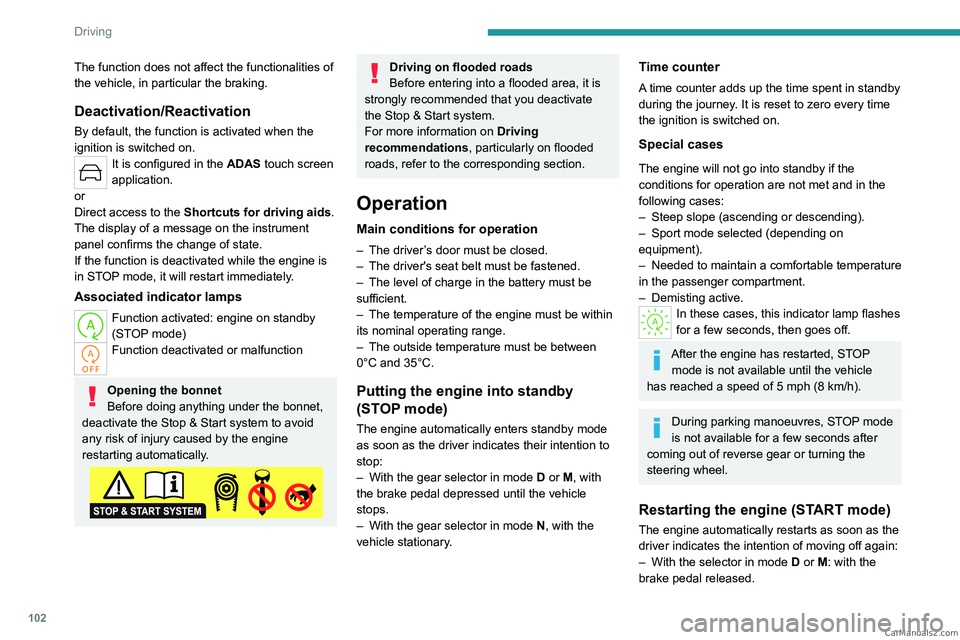
Opening the bonnet
Before doing anything under the bonnet,
deactivate the Stop & Start system to avoid
any risk of injury caused by the engine
restarting automatically.
Driving on flooded roads
Before entering into a flooded area, it is
strongly recommended that you deactivate
the Stop & Start system.
For more information on Driving
recommendations, particularly on flooded
roads, refer to the corresponding section.
Operation
Main conditions for operation
– The driver ’s door must be closed.
– The driver's seat belt must be fastened.
–
The level of charge in the battery must be
sufficient.
–
The temperature of the engine must be within
its nominal operating range.
–
The outside temperature must be between
0°C and 35°C.
Putting the engine into standby
(STOP mode)
The engine automatically enters standby mode
as soon as the driver indicates their intention to
stop:
–
With the gear selector in mode D
or M, with
the brake pedal depressed until the vehicle
stops.
–
With the gear selector in mode N
, with the
vehicle stationary.
Time counter
A time counter adds up the time spent in standby
during the journey. It is reset to zero every time
the ignition is switched on.
Special cases
The engine will not go into standby if the
conditions for operation are not met and in the
following cases:
–
Steep slope (ascending or descending).
–
Sport mode selected (depending on
equipment).
–
Needed
to maintain a comfortable temperature
in the passenger compartment.
–
Demisting active.
In these cases, this indicator lamp flashes
for a few seconds, then goes off.
After the engine has restarted, STOP mode is not available until the vehicle
has reached a speed of 5 mph (8
km/h).
During parking manoeuvres, STOP mode
is not available for a few seconds after
coming out of reverse gear or turning the
steering wheel.
Restarting the engine (START mode)
The engine automatically restarts as soon as the
driver indicates the intention of moving off again:
–
With the selector in mode
D or M: with the
brake pedal released. CarM an uals 2 .c o m
Page 154 of 244
152
Practical information
Wearers of pacemakers or equivalent
devices should consult a doctor to
enquire about any applicable precautionary
measures, or contact the manufacturer of their
implanted electronic medical device to check that
it is guaranteed to operate in an environment
compliant with the ICNIRP guidelines.
If in doubt , during charging, do not remain
inside or near the vehicle, near the charging
cable or the charging unit, even for a short time.
Before charging
Depending on the context:
►
Have a professional check that the
electrical system to be used complies with
applicable standards and is compatible with
the vehicle.
►
Have a professional electrician install
a dedicated domestic power socket or
accelerated charging unit (W
allbox)
compatible with the vehicle.
Use the charging cable supplied with the
vehicle.
For more information, contact a PEUGEOT
dealer or a qualified workshop.
During charging
As a safety measure, the engine will
not start if the charging cable is plugged into
the connector on the vehicle. A warning is
displayed on the instrument panel.
While charging is in progress, unlocking the
vehicle will cause the charging to stop.
If no action is taken on one of the openings
(door or boot) or on the charging nozzle, the
vehicle will lock again after 30 seconds and
charging will resume automatically.
Never work under the bonnet:
–
Some areas remain very hot, even an hour
after charging ends - risk of burns!
–
The fan may start at any time - risk of cuts
or strangulation!
After charging
Check that the charging flap is closed.
Do not leave the cable connected to the
domestic power socket - risk of short-circuit
or electrocution in the event of contact with or
immersion in water!
Charging procedure
Connection
► Before charging, check that the gear selector
is in mode P and the ignition is off, otherwise
charging is impossible.
►
Press on the rear of the charging flap to open
it and check that there are no foreign bodies on
the vehicle's charging connector
.
The light guides in the flap come on white.
Domestic charging (mode 2)
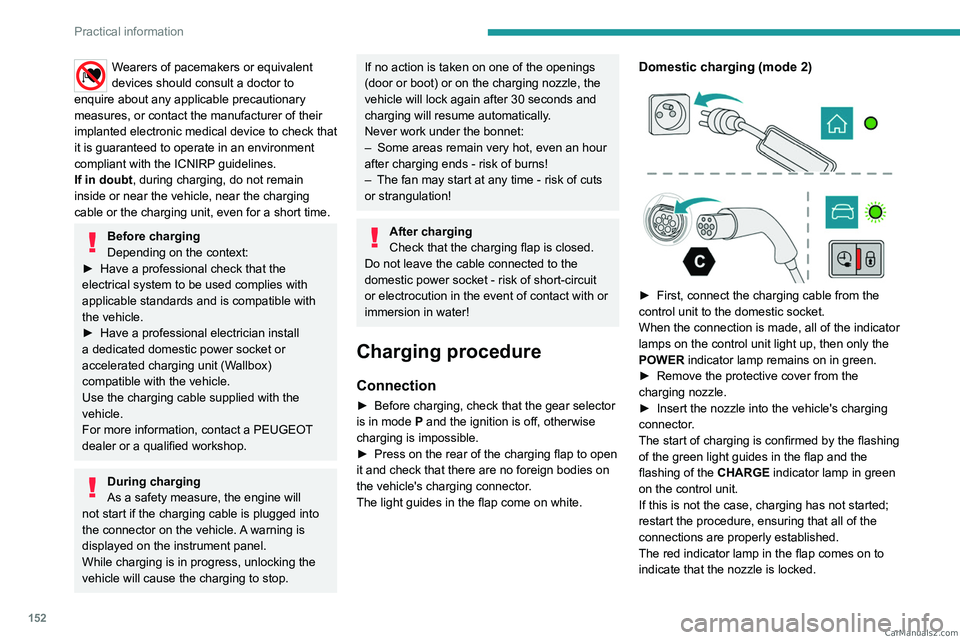
► First, connect the charging cable from the
control unit to the domestic socket.
When the connection is made, all of the indicator
lamps on the control unit light up, then only the
POWER
indicator lamp remains on in green.
►
Remove the protective cover from the
charging nozzle.
►
Insert the nozzle into the vehicle's charging
connector
.
The start of charging is confirmed by the flashing
of the green light guides in the flap and the
flashing of the
CHARGE indicator lamp in green
on the control unit.
If this is not the case, charging has not started;
restart the procedure, ensuring that all of the
connections are properly established.
The red indicator lamp in the flap comes on to
indicate that the nozzle is locked. CarM an uals 2 .c o m
Page 162 of 244

160
Practical information
To recharge the battery, avoid repeatedly or
continuously restarting the engine.
A flat battery prevents the engine from starting.
For more information on the 12
V battery,
refer to the corresponding section.
Load reduction mode
This system manages the use of certain
functions according to the level of charge
remaining in the battery.
When the vehicle is being driven, the load
reduction function temporarily deactivates certain
functions, such as the air conditioning and the
heated rear screen.
The deactivated functions are reactivated
automatically as soon as conditions permit.
Bonnet
For more information on the Active bonnet,
refer to the corresponding section.
Stop & Start
Before doing anything under the bonnet,
you must switch off the ignition to avoid any
risk of the engine restarting automatically.
Take care with objects or clothing that could
be caught in the blades of the cooling fan
or in certain moving components - risk of
strangulation and serious injury!
Rechargeable hybrid vehicles
Before any work is carried out under the
bonnet, it is essential to switch off the ignition
and disconnect the charging connector nozzle
if it is connected, check that the READY
indicator lamp is off on the instrument panel
and wait 4 minutes - risk of serious injury!
The location of the interior bonnet release lever prevents the bonnet being
opened when the left-hand front door is
closed.
When the engine is hot, handle the
exterior safety catch and the bonnet stay
with care (risk of burns), using the protected
area.
When the bonnet is open, take care not to
damage the safety catch.
Do not open the bonnet under very windy
conditions.
Cooling of the engine when stopped
The engine cooling fan may start after
the engine has been switched off.
Take care with objects or clothing that
could be caught in the blades of the fan!
Opening
► Open the left- hand front door.
► Pull the interior release lever , located at the
bottom of the door frame, towards you.
CarM an uals 2 .c o m
Page 163 of 244
161
Practical information
7► Lift the exterior safety catch and raise the
bonnet.
►
Unclip the stay from its housing and place it
in the support slot to hold the bonnet open.
Closing
► Lower the bonnet and release it near the end
of its travel.
►
Check the locking.
Because of the presence of electrical
equipment under the bonnet, it is strongly
recommended that exposure to water (rain,
washing, etc.) be limited.
Engine compartment
The engine shown here is an example for
illustrative purposes only.
The locations of the following components may
vary:
–
Air filter
.
–
Engine oil dipstick.
–
Engine oil filler cap.
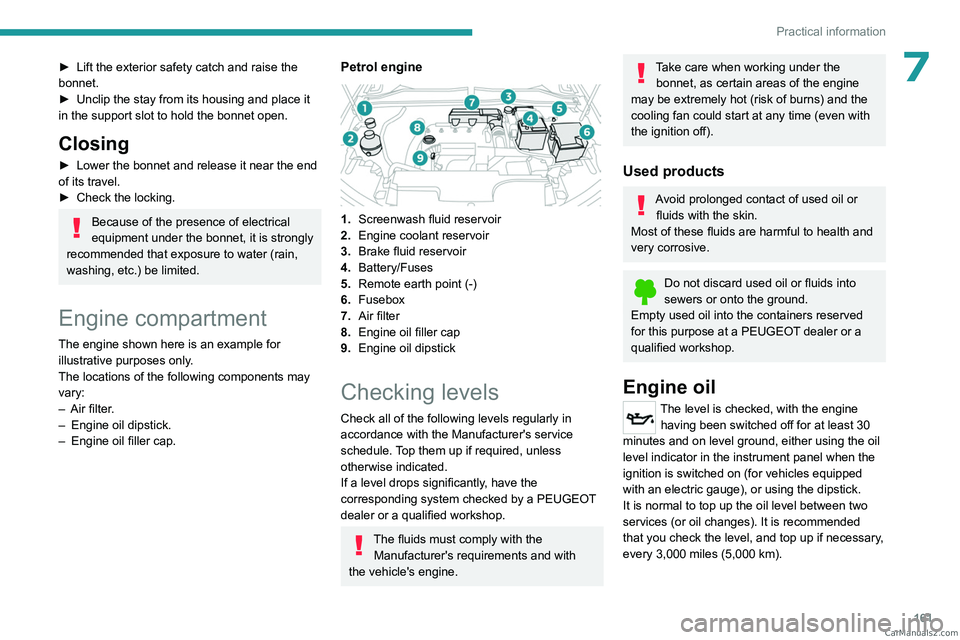
Petrol engine
1. Screenwash fluid reservoir
2. Engine coolant reservoir
3. Brake fluid reservoir
4. Battery/Fuses
5. Remote earth point (-)
6. Fusebox
7. Air filter
8. Engine oil filler cap
9. Engine oil dipstick
Checking levels
Check all of the following levels regularly in
accordance with the Manufacturer's service
schedule. Top them up if required, unless
otherwise indicated.
If a level drops significantly, have the
corresponding system checked by a PEUGEOT
dealer or a qualified workshop.
The fluids must comply with the
Manufacturer's requirements and with
the vehicle's engine.
Take care when working under the bonnet, as certain areas of the engine
may be extremely hot (risk of burns) and the
cooling fan could start at any time (even with
the ignition off).
Used products
Avoid prolonged contact of used oil or fluids with the skin.
Most of these fluids are harmful to health and
very corrosive.
Do not discard used oil or fluids into
sewers or onto the ground.
Empty used oil into the containers reserved
for this purpose at a PEUGEOT dealer or a
qualified workshop.
Engine oil
The level is checked, with the engine having been switched off for at least 30
minutes and on level ground, either using the oil
level indicator in the instrument panel when the
ignition is switched on (for vehicles equipped
with an electric gauge), or using the dipstick.
It is normal to top up the oil level between two
services (or oil changes). It is recommended
that you check the level, and top up if necessary,
every 3,000 miles (5,000 km). CarM an uals 2 .c o m
Page 182 of 244
180
In the event of a breakdown
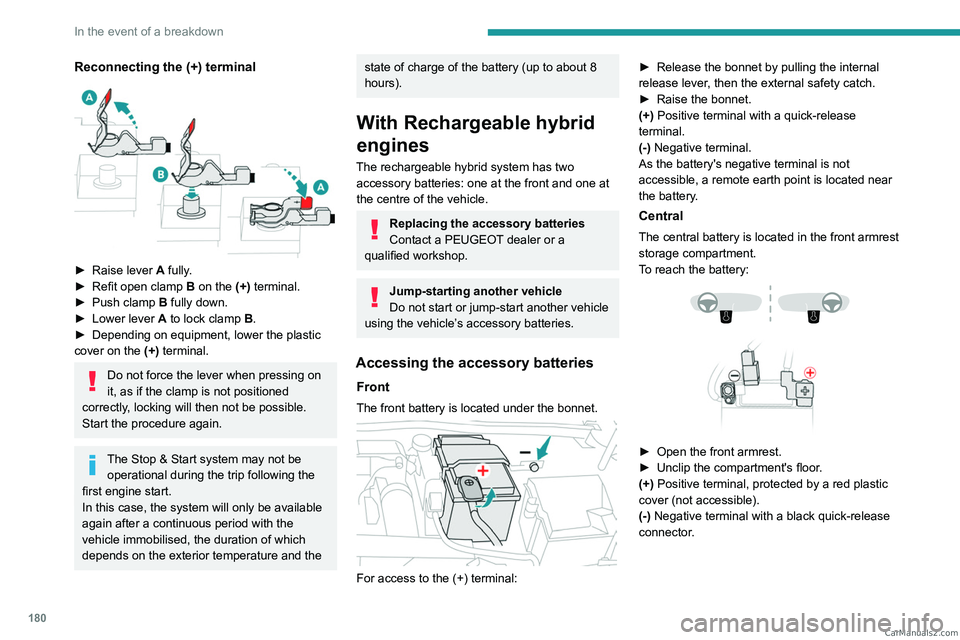
Reconnecting the (+) terminal
► Raise lever A fully.
► Refit open clamp B on the (+) terminal.
►
Push clamp
B fully down.
►
Lower lever
A
to lock clamp B.
►
Depending on equipment, lower the plastic
cover on the
(+) terminal.
Do not force the lever when pressing on
it, as if the clamp is not positioned
correctly, locking will then not be possible.
Start the procedure again.
The Stop & Start system may not be operational during the trip following the
first engine start.
In this case, the system will only be available
again after a continuous period with the
vehicle immobilised, the duration of which
depends on the exterior temperature and the
state of charge of the battery (up to about 8
hours).
With Rechargeable hybrid
engines
The rechargeable hybrid system has two accessory batteries: one at the front and one at
the centre of the vehicle.
Replacing the accessory batteries
Contact a PEUGEOT dealer or a
qualified workshop.
Jump-starting another vehicle
Do not start or jump-start another vehicle
using the vehicle’s accessory batteries.
Accessing the accessory batteries
Front
The front battery is located under the bonnet.
For access to the (+) terminal: ►
Release the bonnet by pulling the internal
release lever
, then the external safety catch.
►
Raise the bonnet.
(+)
Positive terminal with a quick-release
terminal.
(-) Negative terminal.
As the battery's negative terminal is not
accessible, a remote earth point is located near
the battery.
Central
The central battery is located in the front armrest
storage compartment.
To reach the battery:
► Open the front armrest.
► Unclip the compartment's floor .
(+) Positive terminal, protected by a red plastic
cover (not accessible).
(-) Negative terminal with a black quick-release
connector. CarM an uals 2 .c o m
Page 213 of 244
2 11
Alphabetical index
Lamps with Full LED technology 63, 65
Lane assist
114–115, 119–121
Lane keeping assist
131
Leather (care)
167
LEDs - Light-emitting diodes
62, 176
Level, brake fluid
162
Level, engine coolant
18, 162
Level, engine oil
17, 161
Levels and checks
161–162
Level, screenwash fluid
69, 162
Light-emitting diodes - LEDs
62, 176
Lighting, boot
60
Lighting dimmer
19
Lighting, exterior
61, 64
Lighting, guide-me home
63
Lighting, interior
57–58
Lighting, mood
58
Lighting, welcome
63–64
Loading
157–158
Load reduction mode
160
Load space cover
59
Locating your vehicle
25
Locking
25, 27
Locking from the inside
28
Locking the doors
28
Log, alerts
19
Long-distance blind spot monitoring
134
Long objects, transporting
59
Lumbar
42M
Mains socket (domestic network) 146–147
Maintenance (advice)
145, 165
Maintenance, routine
105, 163–164
Manoeuvring aids (recommendations)
104
Map reading lamps
57
Markings, identification
188
Massage function
44
Massage, multi-point
44
Mat
57, 106
Menu, shortcuts
21
Mirror, rear view
46
Mirrors, door
45–46, 52, 134
Mirror, vanity
54
Mobile application
22, 53, 151, 153
Motor, electric
100, 144, 187
Motorised tailgate
31–32, 34
Mountings, ISOFIX
85, 88–89
N
Net, luggage retaining 59
Night vision
67
Night Vision
67
O
Obstacle detection 135
Oil change
161
Oil consumption
161
Oil, engine 161
On-board tools
60, 168–169
Opening the bonnet
160
Opening the boot
26, 31
Opening the doors
26, 31
P
Pads, brake 163
Paint
165, 188
Paint colour code
188
Parcel shelf, rear
59
Parking brake, electric
94–96, 164
Parking (sensors)
135
Parking sensors, audible and visual
135
Parking sensors, front
136
Parking sensors, rear
135
Passenger compartment temperature pre-
conditioning (Rechargeable hybrid)
22, 53
Pedestrian horn (Rechargeable hybrid)
73
Personalisation
10, 22
Plates, identification
188
Port, USB
55, 58
Post Collision Safety Brake
76
Power
18
Power indicator (Rechargeable hybrid)
9, 18
Pressures, tyres
164, 170, 188
Pre-tensioning (seat belts)
79
Profiles
190
Protecting children
80, 83–87
Proximity Keyless Entry and Start
26
Puncture
169–170, 172 CarM an uals 2 .c o m