lock PEUGEOT 5008 2017 Service Manual
[x] Cancel search | Manufacturer: PEUGEOT, Model Year: 2017, Model line: 5008, Model: PEUGEOT 5008 2017Pages: 404, PDF Size: 15.31 MB
Page 119 of 404

117
Front and rear courtesy lamps
In this position, the courtesy
lamp comes on gradually:
-
w
hen the vehicle is unlocked,
-
w
hen the key is removed from the ignition,
-
w
hen opening a door,
-
w
hen the remote control locking button is
activated, in order to locate your vehicle.
It switches off gradually:
-
w
hen the vehicle is locked,
-
w
hen the ignition is switched on,
-
3
0
seconds after the last door is closed. Permanently off.
Permanent lighting.
In "permanent lighting" mode, the lighting time
varies according to the circumstances:
-
w
hen the ignition is off, approximately ten
minutes,
-
i
n energy saving mode, approximately thirty
seconds,
-
w
ith the engine running, unlimited. When the front courtesy lamp is in the
"permanent lighting" position, the rear
courtesy lamp also comes on, except if it
is in the "permanently off " position.
To switch off the rear courtesy lamp, put it
in the "permanently off " position.
Front and rear map reading
lamps
Take care not to put anything in contact
with the courtesy lamps.
F
W
ith the ignition on, press the
corresponding switch.
Interior ambient lighting
The dimmed passenger compartment lighting
improves visibility in the vehicle when the light
i s p o o r.
At night, the interior ambient lighting comes on
automatically when the sidelamps are switched
on.
3
Ease of use and comfort
Page 121 of 404
119
12 V accessory socket
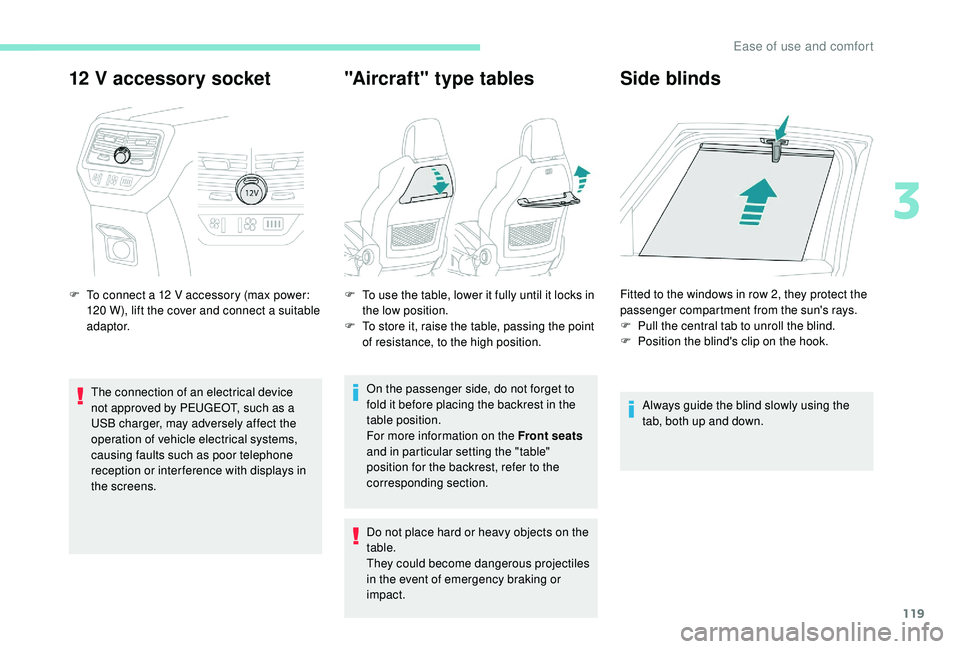
F To connect a 12 V accessory (max power:
120 W), lift the cover and connect a suitable
adaptor.
The connection of an electrical device
not approved by PEUGEOT, such as a
USB charger, may adversely affect the
operation of vehicle electrical systems,
causing faults such as poor telephone
reception or inter ference with displays in
the screens.
"Aircraft" type tables Side blinds
Always guide the blind slowly using the
tab, both up and down.
F
T
o use the table, lower it fully until it locks in
the low position.
F
T
o store it, raise the table, passing the point
of resistance, to the high position.
On the passenger side, do not forget to
fold it before placing the backrest in the
table position.
For more information on the Front seats
and in particular setting the "table"
position for the backrest, refer to the
corresponding section.
Do not place hard or heavy objects on the
table.
They could become dangerous projectiles
in the event of emergency braking or
impact. Fitted to the windows in row 2, they protect the
passenger compartment from the sun's rays.
F
P
ull the central tab to unroll the blind.
F
P
osition the blind's clip on the hook.
3
Ease of use and comfort
Page 123 of 404

121
Load space cover
In 5 -seat configuration, it is installed behind
the second row seats, with the third row seats
stored folded away.
In 7-seat configuration, it is stored behind the
third row seats.
InstallationRemoval
F Remove the guides of the roller from the
rails in pillars B .
F
G
uide the roller as it reels in.
F
U
nlock the roller by pressing one of the
handles located at the ends of the roller
bracket.
F
P
osition the left and right ends of the roller
in cut-outs A , with the mobile flap at the
front.
F
P
ull out the roller until it reaches the boot
pillars.
F
I
nsert the guides of the roller into the rails in
pillars B .
Storage behind the 3rd row seats
F Make sure that the 3rd row seats are folded
away.
F
F
old the first two concertina boards.
F
P
osition the roller in the space located
above the armrest, side by side, tilting it
s l i g ht l y.
F
S
lide the roller to the stop position, until it
reaches the notches arranged at the back of
the boot, with the two hinges facing down.
F
U
nfold the third row seats.
The folded concertina boards can be placed in
the horizontal or upright position.
To fold the 3
rd row seats with the roller stored at
the back, it is necessary to raise the concertina
boards in order to give access to the seat
unlocking controls (red straps).
When sharp deceleration occurs, objects
placed on the load space cover can turn
into projectiles.
3
Ease of use and comfort
Page 132 of 404
130
Automatic exterior welcome
lighting
With the "Automatic illumination of headlamps"
function activated, under low ambient light, the
sidelamps, dipped beam headlamps and door
mirror spotlamps come on automatically when
the vehicle is unlocked.
Activation, deactivation and the duration of the
exterior welcome lighting are set in the vehicle
parameters menu in the screen.
Welcome lighting
Availability of this function depends on version.
Door mirror spotlampsSwitching on
When the front courtesy lamp
switch is in this position,
the spotlamps come on
automatically:
Whatever the position of the front courtesy
lamp switch, they also come on with the
exterior welcome lighting and the guide-me-
home lighting.
Switching off
They go off automatically after 30 seconds.
F
M
ake a short press on this
remote control button.
The sidelamps, dipped beam headlamps,
number plate lamps and door mirror spotlamps
come on for 30
seconds. Pressing again before
the end of the timed period switches off the
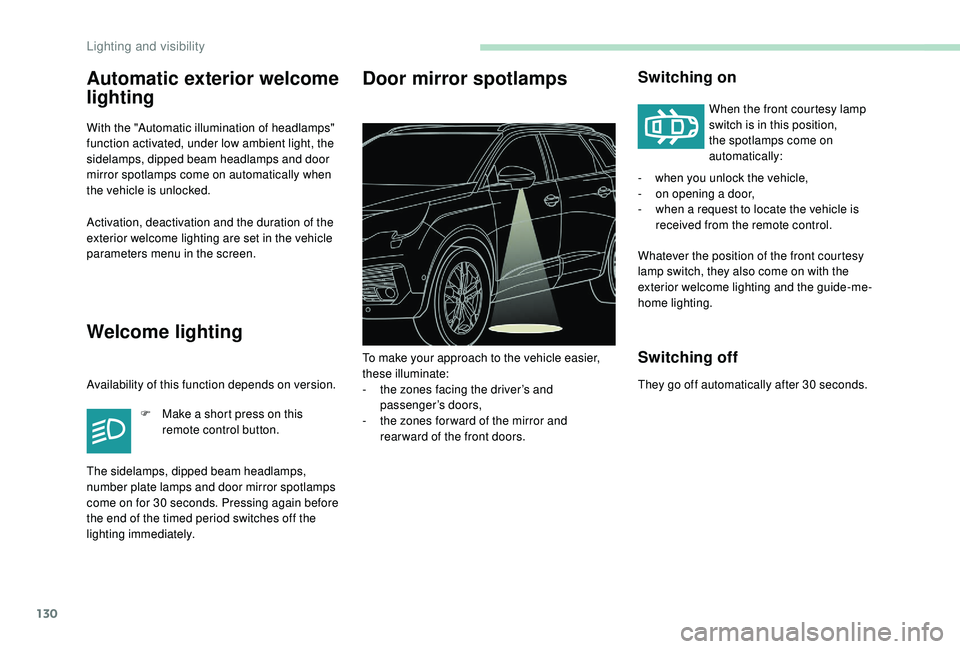
lighting immediately. To make your approach to the vehicle easier,
these illuminate:
-
t
he zones facing the driver’s and
passenger’s doors,
-
t
he zones for ward of the mirror and
rear ward of the front doors. -
w
hen you unlock the vehicle,
-
o
n opening a door,
-
w
hen a request to locate the vehicle is
received from the remote control.
Lighting and visibility
Page 144 of 404
142
Electronic stability control
(ESC)
A set of the following Electronic Stability
systems:
-
a
nti-lock braking system (ABS) and
electronic brake force distribution (EBFD),
-
em
ergency braking assistance (EBA),
-
w
heel anti-slip regulation (ASR) or traction
control,
-
d
ynamic stability control (DSC).
-
t
railer stability assist (TSA).
Definitions
Anti-lock braking system (ABS)
and electronic brake force
distribution (EBFD)
These systems improve the stability and
manoeuvrability of your vehicle when braking
and contribute towards improved control in
corners, in particular on poor or slippery road
surfaces.
The ABS prevents wheel lock in the event of
emergency braking.
The electronic brake force distribution system
manages the braking pressure wheel by wheel.
Emergency braking assistance
In an emergency, this system enables you to
reach the optimum braking pressure more
quickly and therefore reduce the stopping
distance.
It is triggered in relation to the speed at which
the brake pedal is pressed. This is felt by a
reduction in the resistance of the pedal and an
increase in braking efficiency.
Anti-slip regulation (ASR)
This system optimises traction in order to
avoid wheel slip by acting on the brakes of
the driving wheels and on the engine. It also
improves the directional stability of the vehicle
on acceleration.
Dynamic stability control (DSC)
If there is a difference between the path
followed by the vehicle and that required by the
driver, this system monitors each wheel and
automatically acts on the brake of one or more
wheels and on the engine to return the vehicle
to the required path, within the limits of the laws
of physics.
Trailer stability assist (TSA)
This system allows control of the vehicle to be
retained when towing a trailer, so as to avoid
the risk of snaking.
Anti-lock braking system
(ABS) and electronic brake
force distribution (EBFD)
The fixed illumination of this warning
lamp signals that there is a fault with
the ABS.
The vehicle retains conventional braking. Drive
carefully at moderate speed.
Contact a PEUGEOT dealer or a qualified
workshop as soon as possible.
Illumination of this warning lamp,
linked with the STOP and ABS
warning lamps, accompanied by
the display of a message and an
audible signal, signals that there is a
fault with the electronic brake force
distribution (EBFD).
You must stop as soon as it is safe to do so.
Call on a PEUGEOT dealer or a qualified
workshop.
Safety
Page 151 of 404
149
Locking
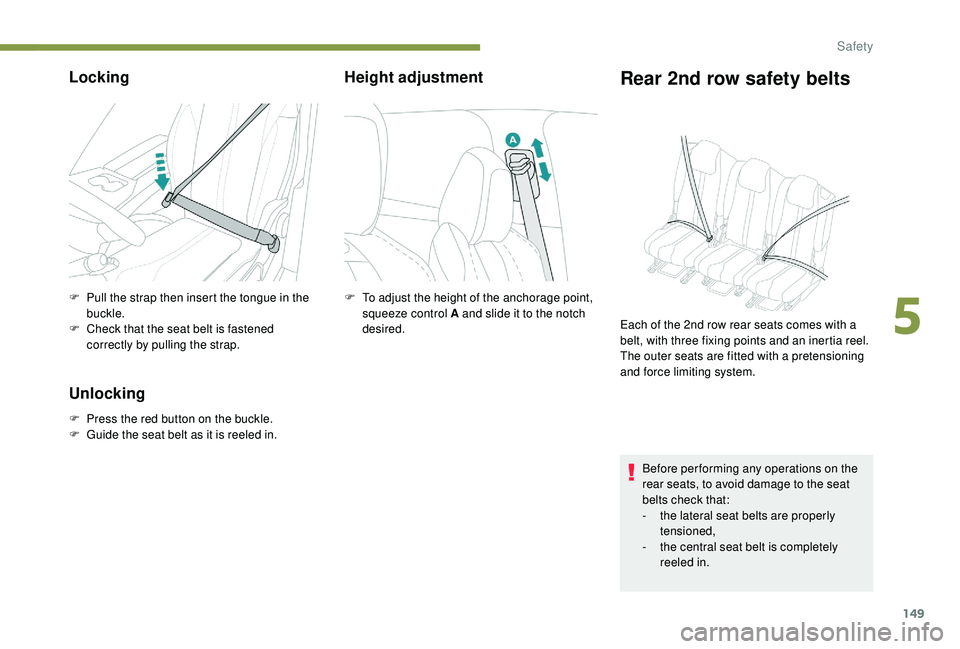
F Pull the strap then insert the tongue in the buckle.
F
C
heck that the seat belt is fastened
correctly by pulling the strap.
Unlocking
F Press the red button on the buckle.
F G uide the seat belt as it is reeled in.
Height adjustmentRear 2nd row safety belts
F To adjust the height of the anchorage point, squeeze control A and slide it to the notch
desired.
Before per forming any operations on the
rear seats, to avoid damage to the seat
belts check that:
-
t
he lateral seat belts are properly
tensioned,
-
t
he central seat belt is completely
reeled in.
Each of the 2nd row rear seats comes with a
belt, with three fixing points and an inertia reel.
The outer seats are fitted with a pretensioning
and force limiting system.
5
Safety
Page 152 of 404
150
Locking
F Pull the strap then insert the tongue in the buckle.
F
C
heck that the seat belt is fastened
correctly by pulling the strap.
Unlocking
F Press the red button on the buckle.
F G uide the seat belt as it is reeled in.
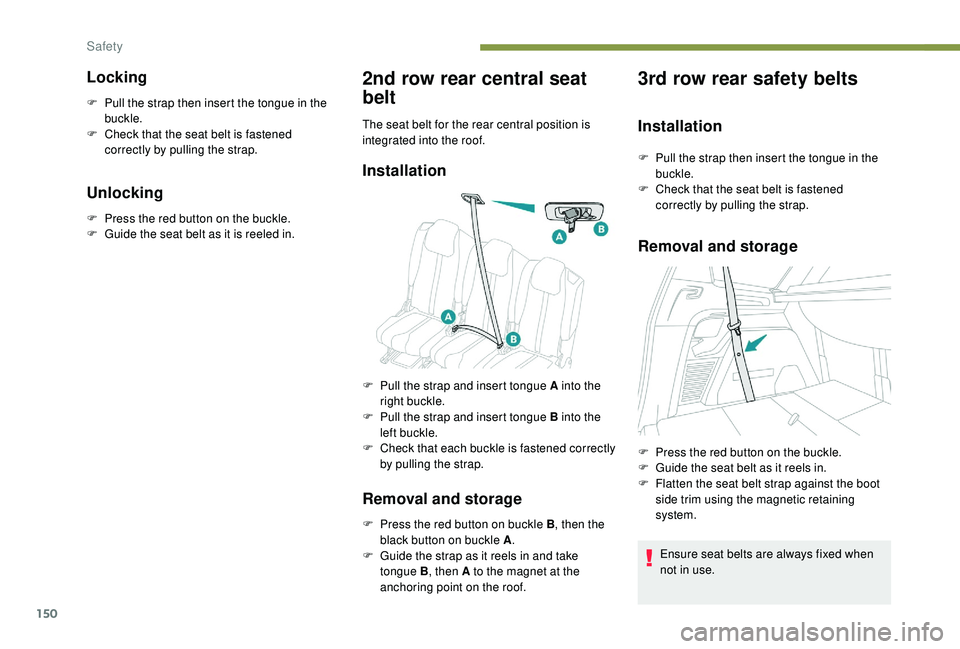
2nd row rear central seat
belt
The seat belt for the rear central position is
integrated into the roof.
Installation
Removal and storage
F Press the red button on buckle B , then the
black button on buckle A .
F
G
uide the strap as it reels in and take
tongue B , then A to the magnet at the
anchoring point on the roof.
3rd row rear safety belts
Installation
F Pull the strap then insert the tongue in the buckle.
F
C
heck that the seat belt is fastened
correctly by pulling the strap.
Removal and storage
Ensure seat belts are always fixed when
not in use.
F
P
ull the strap and insert tongue A into the
right buckle.
F
P
ull the strap and insert tongue B into the
left buckle.
F
C
heck that each buckle is fastened correctly
by pulling the strap. F
P
ress the red button on the buckle.
F
G
uide the seat belt as it reels in.
F
F
latten the seat belt strap against the boot
side trim using the magnetic retaining
system.
Safety
Page 154 of 404
152
Advice
The driver must ensure that passengers use
the seat belts correctly and that they are all
fastened before setting off.
Wherever you are seated in the vehicle,
always fasten your seat belt, even for short
journeys.
Do not interchange the seat belt buckles as
they will not fulfil their role fully.
The seat belts are fitted with an inertia reel
permitting automatic adjustment of the length
of the strap to your size. The seat belt is
stowed automatically when not in use.
Before and after use, ensure that the seat belt
is reeled in correctly.
The lower part of the strap must be positioned
as low as possible on the pelvis.
The upper part must be positioned in the
hollow of the shoulder.
The inertia reels have an automatic blocking
device at the time of a collision, during
sudden braking or if the vehicle turns over.
You can release the device by pulling the
strap firmly and then releasing it so that it
reels in slightly.In order to be effective, a seat belt must:
-
b e tightened as close to the body as
possible,
-
b
e pulled in front of you with a smooth
movement, checking that it does not twist,
-
b
e used to restrain only one person,
-
n
ot show any signs of cuts or fraying,
-
n
ot be converted or modified to avoid
affecting its performance.
In accordance with current safety regulations,
for all repairs on your vehicle's seat belts, go
to a qualified workshop with the skills and
equipment needed, which a PEUGEOT dealer
is able to provide.
Have your seat belts checked regularly by a
PEUGEOT dealer or a qualified workshop,
particularly if the straps show signs of
damage.
Clean the seat belt straps with soapy water or
a textile cleaning product, sold by PEUGEOT
dealers.
After folding or moving a seat or rear bench
seat, ensure that the seat belt is positioned
and reeled in correctly. Recommendations for children
Use a suitable child seat if the passenger is
less than 12
years old or shorter than one and
a half metres.
Never use the same seat belt to secure more
than one person.
Never allow a child to travel on your lap.
For more information on Child seats , refer to
the corresponding section.
In the event of an impact
Depending on the nature and seriousness
of the impact , the pyrotechnic device may
be deployed before and independently of the
airbags. Deployment of the pretensioners
is accompanied by a slight discharge of
harmless smoke and a noise, due to the
activation of the pyrotechnic cartridge
incorporated in the system.
In all cases, the airbag warning lamp comes
on.
Following an impact, have the seat belts
system checked, and, if necessary, replaced,
by a PEUGEOT dealer or a qualified
workshop.
Safety
Page 174 of 404
172
The incorrect installation of a child seat in a
vehicle compromises the child's protection in
the event of an accident.
Check that there is no seat belt or seat belt
buckle under the child seat as this could
make it unstable.
Remember to fasten the seat belts or the
child seat harnesses keeping the slack
relative to the child's body to a minimum,
even for short journeys.
When installing a child seat using the seat
belt, ensure that the seat belt is tightened
correctly on the child seat and that it secures
the child seat firmly on the seat of your
vehicle. If your passenger seat is adjustable,
move it for wards if necessary.
At rear seating positions, always leave
sufficient space between the front seat and:
-
a "
rear ward facing" child seat,
-
t
he feet of a child seated in a "for ward
facing" child seat.
For this, move the seat for ward and, if
necessary, straighten its backrest too.
For optimal installation of the "forward facing"
child seat, verify that its backrest is as close
as possible to the backrest of the vehicle
seat, if possible in contact with it.
Advice
The head restraint must be removed before
installing a child seat with a backrest on a
passenger seat.
Ensure that the head restraint is stored or
attached securely to prevent it from being
thrown around the vehicle in the event of
sharp braking. Refit the head restraint once
the child seat has been removed. PEUGEOT recommends using a booster seat
with a backrest, equipped with a belt guide at
shoulder level.
As a safety precaution, do not leave:
-
a c
hild or children alone and unattended in
a vehicle,
-
a c
hild or an animal in a vehicle under the
sun, with the windows closed,
-
t
he keys within the reach of children inside
the vehicle.
To prevent accidental opening of the doors
and rear windows, use the child lock.
Take care not to open the rear windows by
more than one third.
To protect young children from the rays of the
sun, fit side blinds on the rear windows.
Children in front
The legislation on carrying children on the
front passenger seat is specific to each
country. Refer to the legislation in force in
your country.
Deactivate the passenger's front airbag when
a rear ward facing child seat is installed on the
front passenger seat.
Otherwise, the child risks being seriously
injured or killed if the airbag is deployed.
Installing a booster seat
The chest part of the seat belt must be
positioned on the child's shoulder without
touching the neck.
Ensure that the lap part of the seat belt
passes correctly over the child's thighs.
Safety
Page 175 of 404
173
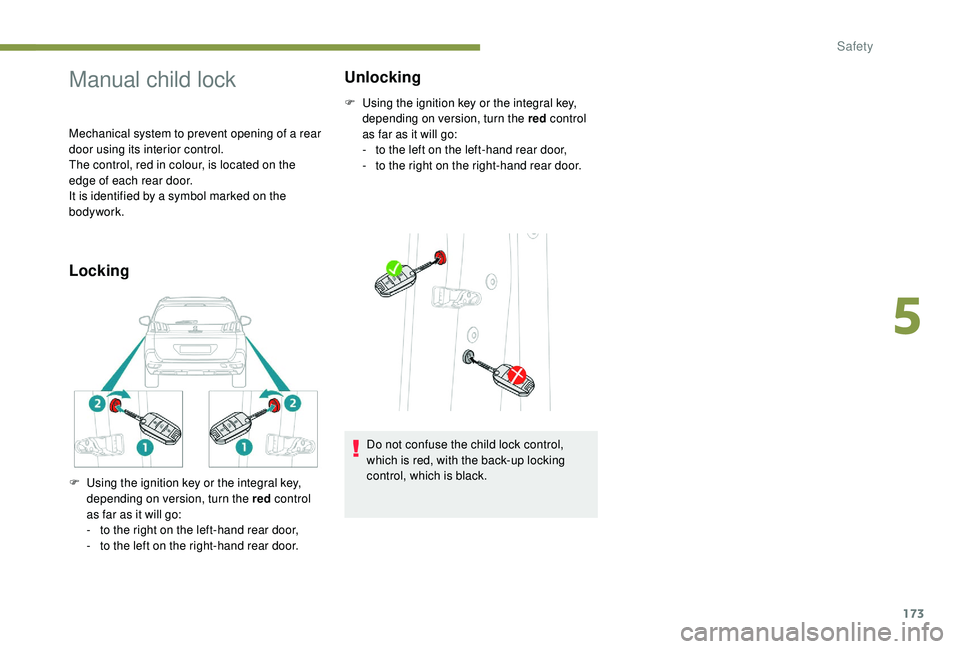
Manual child lock
Mechanical system to prevent opening of a rear
door using its interior control.
The control, red in colour, is located on the
edge of each rear door.
It is identified by a symbol marked on the
bodywork.
LockingUnlocking
F Using the ignition key or the integral key,
depending on version, turn the red control
as far as it will go:
-
t
o the left on the left-hand rear door,
-
t
o the right on the right-hand rear door.
F
U
sing the ignition key or the integral key,
depending on version, turn the red control
as far as it will go:
-
t
o the right on the left-hand rear door,
-
t
o the left on the right-hand rear door. Do not confuse the child lock control,
which is red, with the back-up locking
control, which is black.
5
Safety