driver seat adjustment PEUGEOT 5008 2018 Owners Manual
[x] Cancel search | Manufacturer: PEUGEOT, Model Year: 2018, Model line: 5008, Model: PEUGEOT 5008 2018Pages: 364, PDF Size: 13.03 MB
Page 70 of 364
68
Driving position
Adopting a good driving position helps improve
y our comfort and protection.
It also optimises interior and exterior visibility
as well as access to controls.
Sitting comfortably
Whether or not your vehicle has certain seat
adjustments described in this section depends
on the trim level and country of sale.
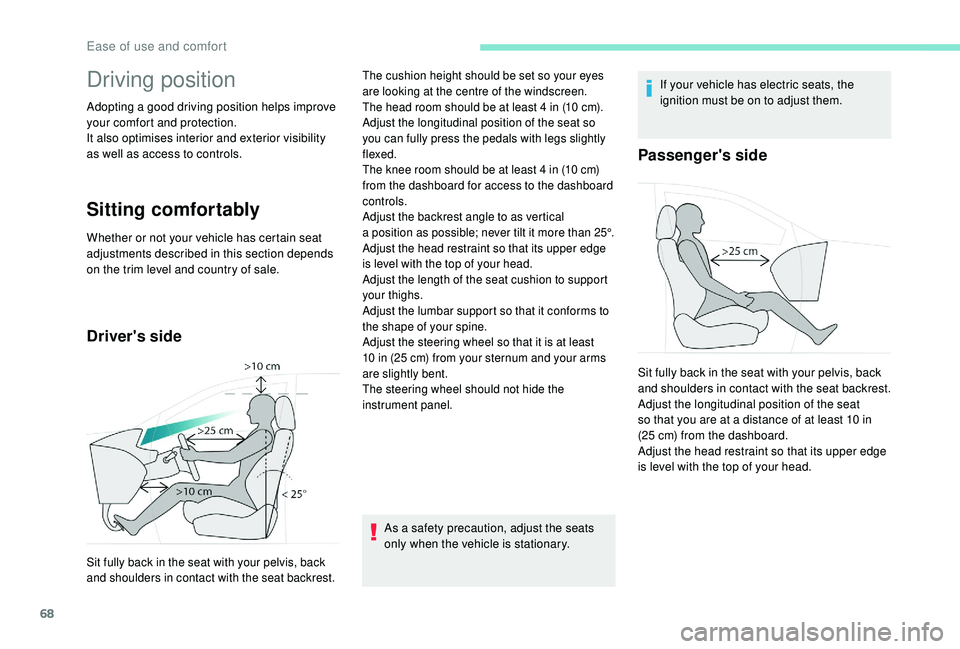
Driver's side
As a safety precaution, adjust the seats
o nly when the vehicle is stationary. If your vehicle has electric seats, the
ignition must be on to adjust them.
Passenger's side
Sit fully back in the seat with your pelvis, back
and shoulders in contact with the seat backrest. The cushion height should be set so your eyes
are looking at the centre of the windscreen.
The head room should be at least 4
in (10 cm).
Adjust the longitudinal position of the seat so
you can fully press the pedals with legs slightly
flexed.
The knee room should be at least 4 in (10 cm)
from the dashboard for access to the dashboard
controls.
Adjust the backrest angle to as vertical
a position as possible; never tilt it more than 25°.
Adjust the head restraint so that its upper edge
is level with the top of your head.
Adjust the length of the seat cushion to support
your thighs.
Adjust the lumbar support so that it conforms to
the shape of your spine.
Adjust the steering wheel so that it is at least
10 in (25 cm) from your sternum and your arms
are slightly bent.
The steering wheel should not hide the
instrument panel.
Sit fully back in the seat with your pelvis, back
and shoulders in contact with the seat backrest.
Adjust the longitudinal position of the seat
so that you are at a
distance of at least 10 in
(25
cm) from the dashboard.
Adjust the head restraint so that its upper edge
is level with the top of your head.
Ease of use and comfort
Page 72 of 364
70
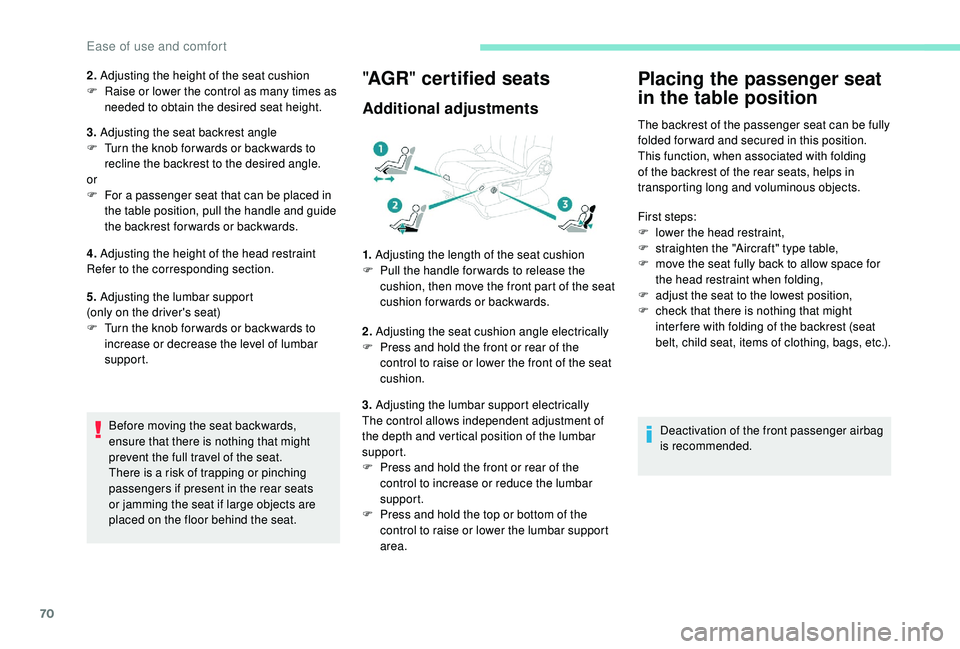
2. Adjusting the height of the seat cushion
F R aise or lower the control as many times as
needed to obtain the desired seat height.
3. Adjusting the seat backrest angle
F
T
urn the knob for wards or backwards to
recline the backrest to the desired angle.
or
F
F
or a passenger seat that can be placed in
the table position, pull the handle and guide
the backrest for wards or backwards.
4. Adjusting the height of the head restraint
Refer to the corresponding section.
5. Adjusting the lumbar support
(only on the driver's seat)
F
T
urn the knob for wards or backwards to
increase or decrease the level of lumbar
support.
Before moving the seat backwards,
ensure that there is nothing that might
prevent the full travel of the seat.
There is a
risk of trapping or pinching
passengers if present in the rear seats
or jamming the seat if large objects are
placed on the floor behind the seat." AGR " certified seats
Additional adjustments
1. Adjusting the length of the seat cushion
F P ull the handle for wards to release the
cushion, then move the front part of the seat
cushion forwards or backwards.
2. Adjusting the seat cushion angle electrically
F
P
ress and hold the front or rear of the
control to raise or lower the front of the seat
cushion.
3. Adjusting the lumbar support electrically
The control allows independent adjustment of
the depth and vertical position of the lumbar
support.
F
P
ress and hold the front or rear of the
control to increase or reduce the lumbar
support.
F
P
ress and hold the top or bottom of the
control to raise or lower the lumbar support
area.
Placing the passenger seat
in the table position
The backrest of the passenger seat can be fully
folded for ward and secured in this position.
This function, when associated with folding
of the backrest of the rear seats, helps in
transporting long and voluminous objects.
First steps:
F
l
ower the head restraint,
F
s
traighten the "Aircraft" type table,
F
m
ove the seat fully back to allow space for
the head restraint when folding,
F
a
djust the seat to the lowest position,
F
c
heck that there is nothing that might
inter fere with folding of the backrest (seat
belt, child seat, items of clothing, bags, etc.).
Deactivation of the front passenger airbag
is recommended.
Ease of use and comfort
Page 73 of 364
71
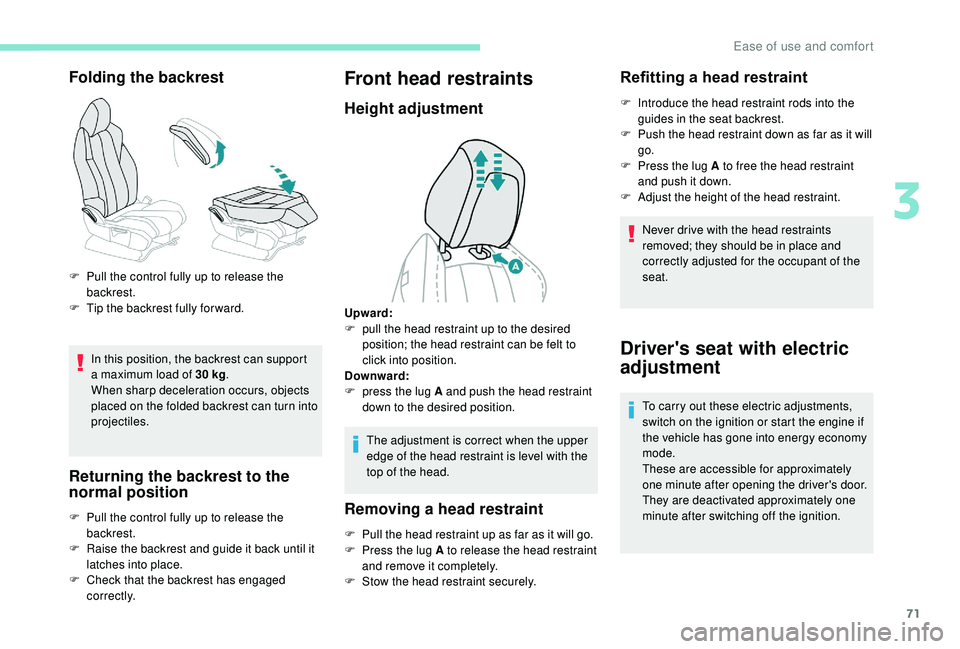
Folding the backrest
In this position, the backrest can support
a maximum load of 30 kg.
When sharp deceleration occurs, objects
placed on the folded backrest can turn into
projectiles.
Returning the backrest to the
normal position
F Pull the control fully up to release the backrest.
F
T
ip the backrest fully for ward.
F
P
ull the control fully up to release the
backrest.
F
R
aise the backrest and guide it back until it
latches into place.
F
C
heck that the backrest has engaged
c o r r e c t l y.
Front head restraints
Height adjustment
The adjustment is correct when the upper
edge of the head restraint is level with the
top of the head.
Removing a head restraint
F Pull the head restraint up as far as it will go.
F P ress the lug A to release the head restraint
and remove it completely.
F
S
tow the head restraint securely.
Refitting a head restraint
F Introduce the head restraint rods into the guides in the seat backrest.
F
P
ush the head restraint down as far as it will
go.
F
P
ress the lug A to free the head restraint
and push it down.
F
A
djust the height of the head restraint.
Never drive with the head restraints
removed; they should be in place and
correctly adjusted for the occupant of the
seat.
Driver's seat with electric
adjustment
To carry out these electric adjustments,
switch on the ignition or start the engine if
the vehicle has gone into energy economy
mode.
These are accessible for approximately
one minute after opening the driver's door.
They are deactivated approximately one
minute after switching off the ignition.
Upward:
F
p
ull the head restraint up to the desired
position; the head restraint can be felt to
click into position.
Downward:
F
p
ress the lug A and push the head restraint
down to the desired position.
3
Ease of use and comfort
Page 74 of 364
72
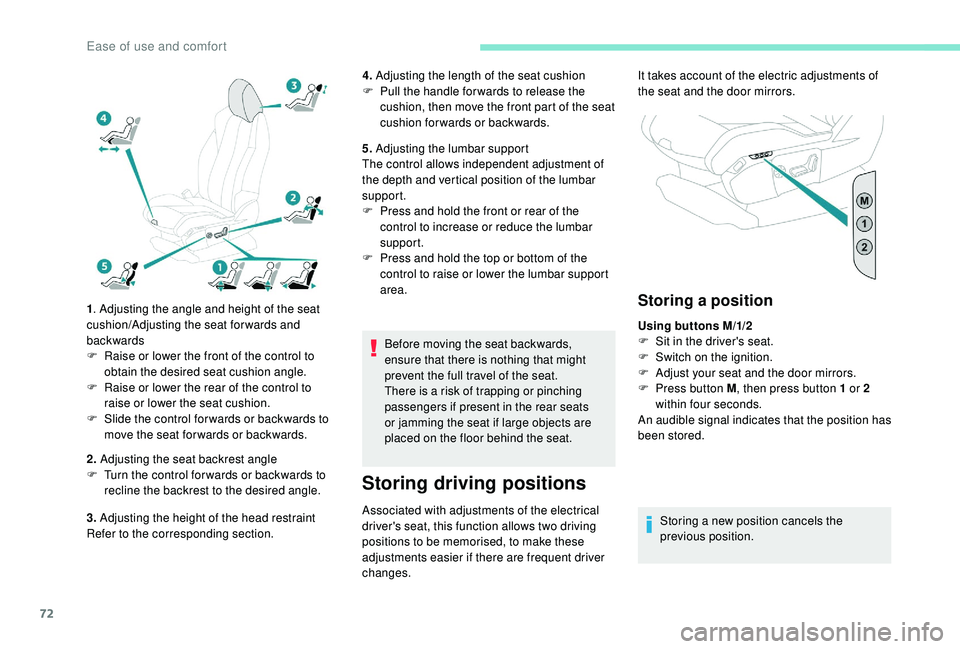
1. Adjusting the angle and height of the seat
cushion/Adjusting the seat forwards and
backwards
F
R
aise or lower the front of the control to
obtain the desired seat cushion angle.
F
R
aise or lower the rear of the control to
raise or lower the seat cushion.
F
S
lide the control for wards or backwards to
move the seat for wards or backwards.
2. Adjusting the seat backrest angle
F
T
urn the control for wards or backwards to
recline the backrest to the desired angle.
3. Adjusting the height of the head restraint
Refer to the corresponding section. 4.
Adjusting the length of the seat cushion
F
P
ull the handle for wards to release the
cushion, then move the front part of the seat
cushion forwards or backwards.
5. Adjusting the lumbar support
The control allows independent adjustment of
the depth and vertical position of the lumbar
support.
F
P
ress and hold the front or rear of the
control to increase or reduce the lumbar
support.
F
P
ress and hold the top or bottom of the
control to raise or lower the lumbar support
area.
Before moving the seat backwards,
ensure that there is nothing that might
prevent the full travel of the seat.
There is a
risk of trapping or pinching
passengers if present in the rear seats
or jamming the seat if large objects are
placed on the floor behind the seat.
Storing driving positions
Associated with adjustments of the electrical
driver's seat, this function allows two driving
positions to be memorised, to make these
adjustments easier if there are frequent driver
changes.
Storing a position
Using buttons M/1/2
F
S it in the driver's seat.
F
S
witch on the ignition.
F
A
djust your seat and the door mirrors.
F
P
ress button M , then press button 1
or 2
within four seconds.
An audible signal indicates that the position has
been stored.
Storing a
new position cancels the
previous position.
It takes account of the electric adjustments of
the seat and the door mirrors.
Ease of use and comfort
Page 135 of 364
133
Advice
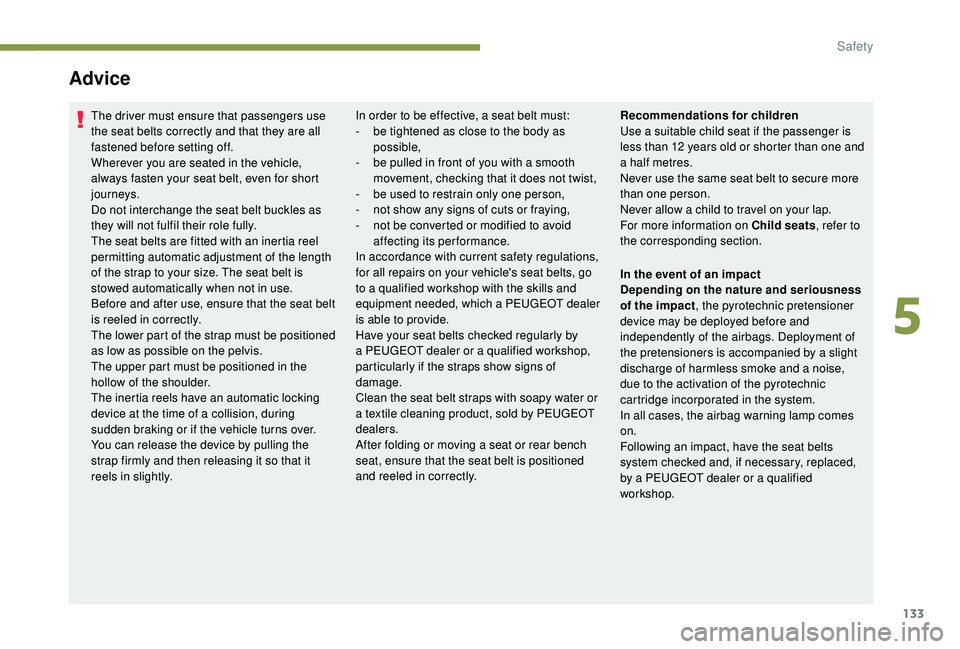
The driver must ensure that passengers use
the seat belts correctly and that they are all
fastened before setting off.
Wherever you are seated in the vehicle,
always fasten your seat belt, even for short
journeys.
Do not interchange the seat belt buckles as
they will not fulfil their role fully.
The seat belts are fitted with an inertia reel
permitting automatic adjustment of the length
of the strap to your size. The seat belt is
stowed automatically when not in use.
Before and after use, ensure that the seat belt
is reeled in correctly.
The lower part of the strap must be positioned
as low as possible on the pelvis.
The upper part must be positioned in the
hollow of the shoulder.
The inertia reels have an automatic locking
device at the time of a collision, during
sudden braking or if the vehicle turns over.
You can release the device by pulling the
strap firmly and then releasing it so that it
reels in slightly. In order to be effective, a seat belt must:
-
b e tightened as close to the body as
possible,
-
b
e pulled in front of you with a smooth
movement, checking that it does not twist,
-
b
e used to restrain only one person,
-
n
ot show any signs of cuts or fraying,
-
n
ot be converted or modified to avoid
affecting its performance.
In accordance with current safety regulations,
for all repairs on your vehicle's seat belts, go
to a
qualified workshop with the skills and
equipment needed, which a
PEUGEOT dealer
is able to provide.
Have your seat belts checked regularly by
a
PEUGEOT dealer or a qualified workshop,
particularly if the straps show signs of
damage.
Clean the seat belt straps with soapy water or
a
textile cleaning product, sold by PEUGEOT
dealers.
After folding or moving a
seat or rear bench
seat, ensure that the seat belt is positioned
and reeled in correctly. Recommendations for children
Use a
suitable child seat if the passenger is
less than 12
years old or shorter than one and
a
half metres.
Never use the same seat belt to secure more
than one person.
Never allow a
child to travel on your lap.
For more information on Child seats , refer to
the corresponding section.
In the event of an impact
Depending on the nature and seriousness
of the impact , the pyrotechnic pretensioner
device may be deployed before and
independently of the airbags. Deployment of
the pretensioners is accompanied by a
slight
discharge of harmless smoke and a
noise,
due to the activation of the pyrotechnic
cartridge incorporated in the system.
In all cases, the airbag warning lamp comes
on.
Following an impact, have the seat belts
system checked and, if necessary, replaced,
by a
PEUGEOT dealer or a qualified
workshop.
5
Safety
Page 146 of 364
144
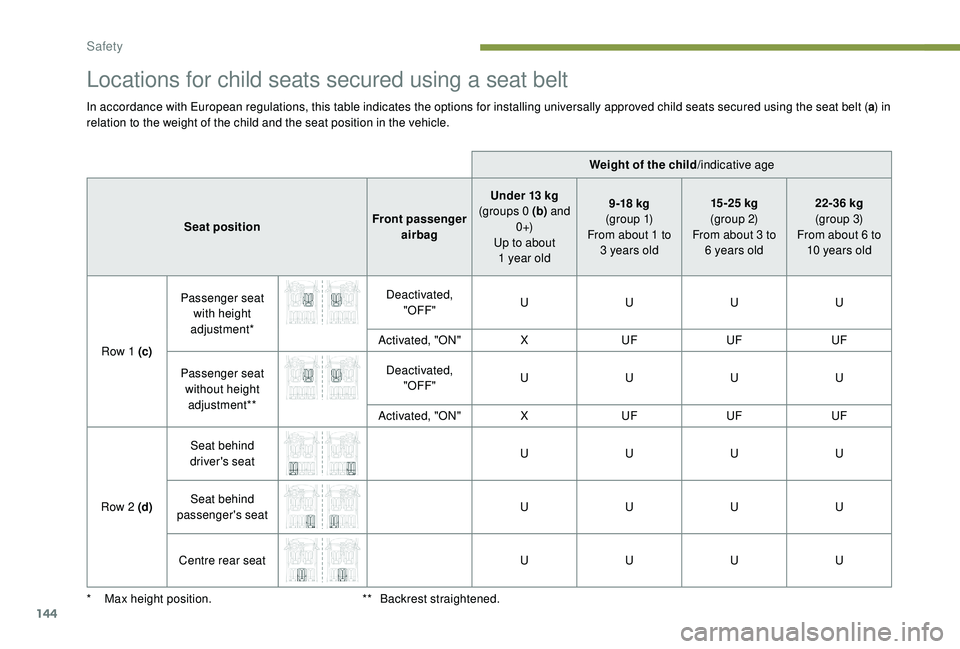
Locations for child seats secured using a seat belt
In accordance with European regulations, this table indicates the options for installing universally approved child seats secured using the seat belt (a) in
relation to the weight of the child and the seat position in the vehicle.
Weight of the child/indicative age
Seat position Front passenger
airbag Under 13
kg
(groups 0 (b) and
0 +)
Up to about 1
year old9 -18
kg
(g r o u p 1)
From about 1
to
3
years old15 -25
kg
(group 2)
From about 3
to
6
years old22-36
kg
(group 3)
From about 6
to
10
years old
Row 1 (c) Passenger seat
with height
adjustment* Deactivated,
"OFF" U
UUU
Activated, "ON" XUF UFUF
Passenger seat without height adjustment** Deactivated,
"OFF" U
UUU
Activated, "ON" XUF UFUF
Row 2 (d) Seat behind
driver's seat U
UUU
Seat behind
passenger's seat U
UUU
Centre rear seat UUUU
*
M
ax height position. **
B
ackrest straightened.
Safety
Page 150 of 364
148
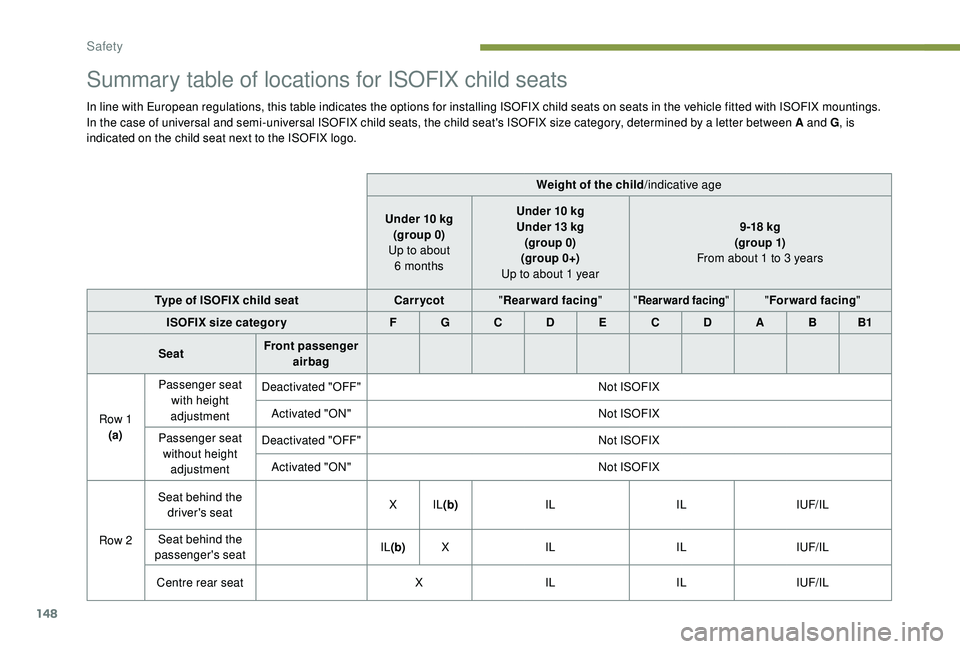
Summary table of locations for ISOFIX child seats
In line with European regulations, this table indicates the options for installing ISOFIX child seats on seats in the vehicle fitted with ISOFIX mountings.
In the case of universal and semi-universal ISOFIX child seats, the child seat's ISOFIX size category, determined by a letter between A and G, is
indicated on the child seat next to the ISOFIX logo.
Weight of the child/indicative age
Under 10
kg
(group 0)
Up to about 6
monthsUnder 10
kg
Under 13
kg
(group 0)
(group 0+)
Up to about 1
year9 -18
kg
(g ro up 1)
From about 1
to 3 years
Type of ISOFIX child seat Carr ycot"Rearward facing "
"Rearward facing ""Forward facing "
ISOFIX size categor y F G C D E C D A B B1
Seat Front passenger
airbag
Row 1 (a) Passenger seat
with height
adjustment Deactivated "OFF"
Not ISOFIX
Activated "ON" Not ISOFIX
Passenger seat without height adjustment Deactivated "OFF"
Not ISOFIX
Activated "ON" Not ISOFIX
Row 2 Seat behind the
driver's seat X
IL(b) IL ILIUF/IL
Seat behind the
passenger's seat IL
(b) X IL ILIUF/IL
Centre rear seat XIL ILIUF/IL
Safety
Page 356 of 364
276
HHands-free access .......................................... 61
Hands-free tailgate ................................... 60-62
Hazard warning lamps
..........................123, 24 0
Headlamp adjustment
...................................114
Headlamps, automatic dipping
........2 6 , 11 6 -11 8
Headlamps, automatic illumination
...................111, 114 -115
Headlamps, dipped beam
..........25 -26, 252-254
Headlamps, halogen
......................114, 252-253
Headlamps, main beam
..................26, 252-254
Head restraints, front
...................................... 71
Head restraints, rear
.................................76, 81
Heating
.......................................... 8
4, 86 - 88, 92
Heating, additional
.......................................... 94
Heating, programmable
..................................94
Hi-Fi system
.................................................. 10
1
Hill Assist Descent Control (H A DC)
.......................................... 24, 12 9 -13 0
Hill start assist
........................................ 16 9 -170
Horn ............................................................... 123
Fusebox, engine compartment
.....................
261
Fuses
............................................. 25
7-258, 261
Cruise control, adaptive with
Stop function
.................
178, 184-187, 191-192
Cup holder
.......................................................
99
Customisation
...................................................
9Economy mode
.............................................
2
27
Electronic brake force distribution (EBFD)
...
125
Electronic stability control (ESC)
..................
12
5
Emergency braking assistance (EBA)
..........
125
Emergency call
......................................
123 -124
Emergency switching off
........................
160 -161
Emissions control system, SCR
...................
237
Energy economy mode
................................. 2
27
Engine compartment
............................. 23
1-232
Engine, Diesel
.......
222, 231-232, 240, 269, 271
Engine oil pressure
.........................................
12
Engine, petrol
............................... 2
22, 232, 268
Engines
..........................................
267-269, 271
Environment
....................................................
52
E
D
DAB (Digital Audio
Broadcasting) – Digital radio ............22, 8, 6 -7
Date (setting)
................................. 38 - 40, 31, 18
Daytime running lamps
..................112, 252-253
Deactivating the passenger airbag ...134 -13 5, 13 9
Deadlocking
.............................................. 4 7, 5 0
Defrosting
........................................................ 93
Defrosting, front
.............................................. 93
Demisting
........................................................ 93
Demisting, front
............................................... 93
D
emisting, rear
................................................ 94
Dials and gauges
...............................
............... 8
Dimensions
..............................
..................... 272
Dipstick
................
............................ 31, 233-234
Direction indicators
................................ 2 5 , 113 ,
25
2-253, 255-256
Display screen, instrument panel
.......... 170 -171
Distance Alert ~ Collision Risk Alert
.....19
2-193
Door pockets
...............................
.................... 99
Doors
............................................................... 58
Doors, rear
............................................. 15 3 -15 4
Driver's attention warning
............................. 19
7
Driving
....................................................... 68-69
Driving abroad ............................................... 112
Driving positions (storing)
.......................... 72-73
Driving time warning
..................................... 19 6
Dynamic pack
............................................... 17
0
Dynamic stability control (DSC)
............. 125 -12 9
F
G
Fatigue detection ................................... 19 6 -197
Filling the AdBlue® tank ................................ 238
Filling the fuel tank ................................ 220-222
Filter, air
........................................................ 235
Filter, oil
................
......................................... 235
Filter, particle
........................................ 234-235
Filter, passenger compartment
..................... 235
Fitting a
wheel
....................................... 24 9 - 2 51
Fitting roof bars
..................................... 229-230
Fittings, boot
................................................. 108
Fittings, interior
....................................... 9
9 -10 0
Fittings, rear
.................................................. 10 6
Flap, fuel filler
........................................ 220-221
Floor, concertina
............................................. 80
Foglamps
...................................................... 111
Foglamps, front
................ 25, 112, 118, 252-254
Foglamps, rear
...................................... 11
2 , 2 5 6
Folding the rear seats
............................... 76 -78
Frequency (radio)
....................................... 21-22
Fuel ................................................................ 222
Fuel tank ................................................ 220-221Gauge, fuel
.................................................... 220
Gearbox, automatic
..............
165 -173, 236, 263
Gearbox, manual
...........
16 4 -165, 169 -173, 236
Gear lever, automatic gearbox
.............
165 -169
Gear lever, manual gearbox
.................
16 4 -165
Gear shift indicator ~ Gear efficiency indicator
..............................
170 -171
Glove box ......................................................
10 0
GPS.
................
................................................
12
Grab handles
..................................................
99
Alphabetical index