towing PEUGEOT 5008 2023 Owner's Manual
[x] Cancel search | Manufacturer: PEUGEOT, Model Year: 2023, Model line: 5008, Model: PEUGEOT 5008 2023Pages: 292, PDF Size: 9.43 MB
Page 165 of 292
163
Driving
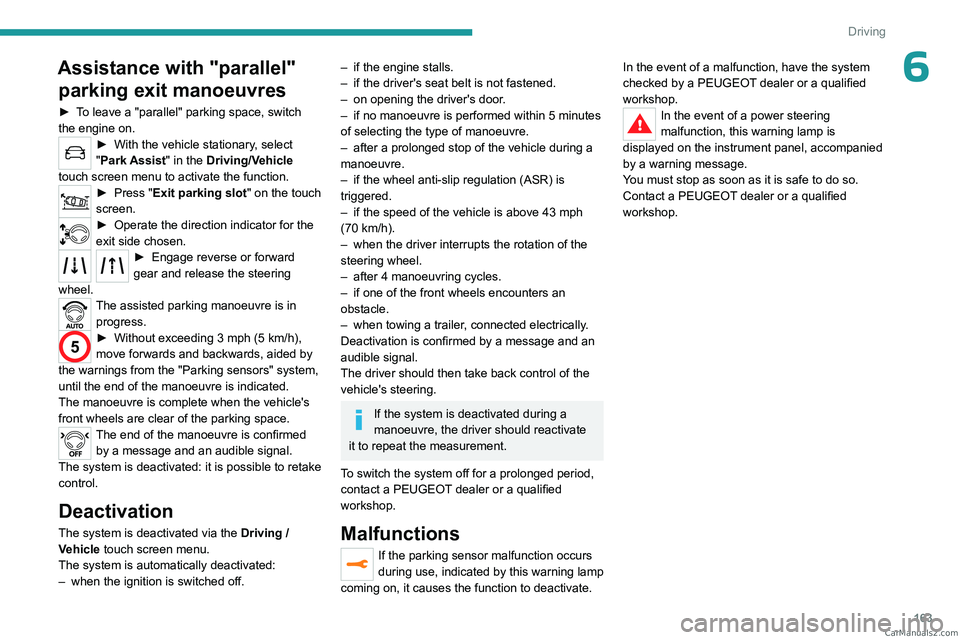
6Assistance with "parallel" parking exit manoeuvres
► To leave a "parallel" parking space, switch
the engine on.
► With the vehicle stationary, select
"Park Assist" in the Driving/Vehicle
touch screen menu to activate the function.
► Press " Exit parking slot " on the touch
screen.
► Operate the dire ction indicator for the
exit side chosen.
► Engage reverse or for ward
gear and release the steering
wheel.
The assisted parking manoeuvre is in progress.
5► Without exceedi ng 3 mph (5 km/h),
move forwards and backwards, aided by
the warnings from the "Parking sensors" system,
until the end of the manoeuvre is indicated.
The manoeuvre is complete when the vehicle's
front wheels are clear of the parking space.
The end of the manoeuvre is confirmed by a message and an audible signal.
The system is deactivated: it is possible to retake
control.
Deactivation
The system is deactivated via the Driving /
V ehicle touch screen menu.
The system is automatically deactivated:
–
when the ignition is switched off.
– if the engine stalls.
– if the driver's seat belt is not fastened.
–
on opening the driver's door
.
–
if no manoeuvre is performed within 5 minutes
of selecting the type of manoeuvre.
–
after a prolonged stop of the vehicle during a
manoeuvre.
–
if the wheel anti-slip regulation (ASR) is
triggered.
–
if the speed of the vehicle is above 43 mph
(70 km/h).
–
when the driver interrupts the rotation of the
steering wheel.
–
after 4 manoeuvring cycles.
–
if one of the front wheels encounters an
obstacle.
–
when towing a trailer
, connected electrically.
Deactivation is confirmed by a message and an
audible signal.
The driver should then take back control of the
vehicle's steering.
If the system is deactivated during a
manoeuvre, the driver should reactivate
it to repeat the measurement.
To switch the system off for a prolonged period,
contact a PEUGEOT dealer or a qualified
workshop.
Malfunctions
If the parking sensor malfunction occurs
during use, indicated by this warning lamp
coming on, it causes the function to deactivate. In the event of a malfunction, have the system
checked by a PEUGEOT dealer or a qualified
workshop.
In the event of a power steering
malfunction, this warning lamp is
displayed on the instrument panel, accompanied
by a warning message.
You must stop as soon as it is safe to do so.
Contact a PEUGEOT dealer or a qualified
workshop. CarM an uals 2 .c o m
Page 179 of 292
177
Practical information
7Settings
With PEUGEOT Connect Nav► In the Energy touch screen menu,
select the Charge page.
►
Set the charging start time.
►
Press
OK.
The setting is saved in the system.
With PEUGEOT Connect Radio or PEUGEOT
Connect Nav
You can also programme the deferred charging function at any time from a
smartphone via the MYPEUGEOT APP
application.
For more information on Remotely operable
additional functions , refer to the corresponding
section.
Activation
► After programming the deferred charging,
connect the vehicle to the desired charging
equipment.
► Press this button in the flap within one
minute to activate the deferred charging
(confirmed by the light guides coming on in
blue).
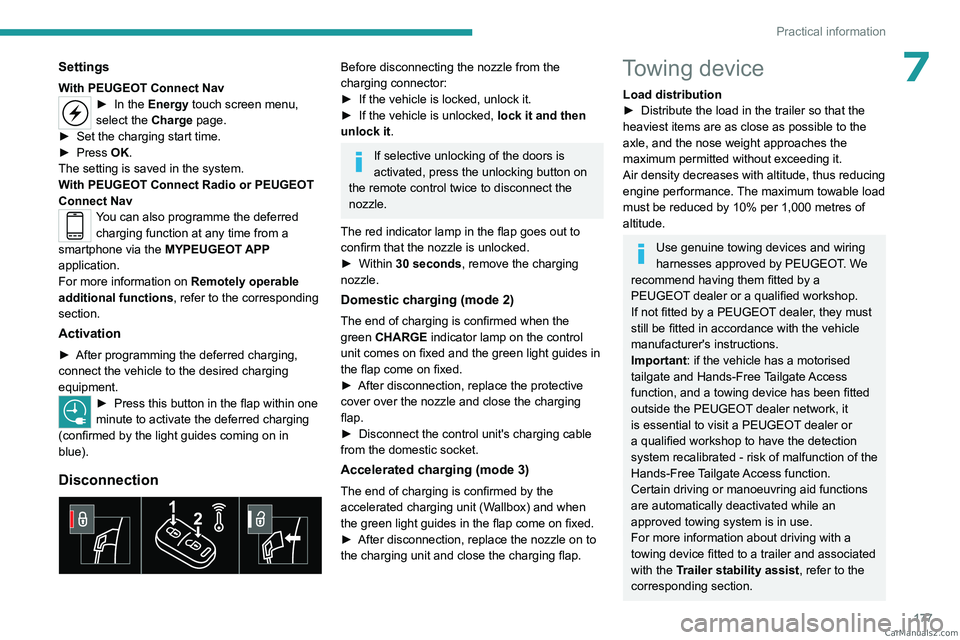
Disconnection
Before disconnecting the nozzle from the
charging connector:
►
If the vehicle is locked, unlock it.
►
If the vehicle is unlocked, lock it and then
unlock it .
If selective unlocking of the doors is
activated, press the unlocking button on
the remote control twice to disconnect the
nozzle.
The red indicator lamp in the flap goes out to
confirm that the nozzle is unlocked.
►
Within
30 seconds, remove the charging
nozzle.
Domestic charging (mode 2)
The end of charging is confirmed when the
green CHARGE indicator lamp on the control
unit comes on fixed and the green light guides in
the flap come on fixed.
►
After disconnection, replace the protective
cover over the nozzle and close the charging
flap.
►
Disconnect the control unit's charging cable
from the domestic socket.
Accelerated charging (mode 3)
The end of charging is confirmed by the
accelerated charging unit (Wallbox) and when
the green light guides in the flap come on fixed.
►
After disconnection, replace the nozzle on to
the charging unit and close the charging flap.
Towing device
Load distribution
► Distribute the load in the trailer so that the
heaviest items are as close as possible to the
axle, and the nose weight approaches the
maximum permitted without exceeding it.
Air density decreases with altitude, thus reducing
engine performance.
The maximum towable load
must be reduced by 10% per 1,000
metres of
altitude.
Use genuine towing devices and wiring
harnesses approved by PEUGEOT. We
recommend having them fitted by a
PEUGEOT dealer or a qualified workshop.
If not fitted by a PEUGEOT dealer, they must
still be fitted in accordance with the vehicle
manufacturer's instructions.
Important: if the vehicle has a motorised
tailgate and Hands-Free Tailgate Access
function, and a towing device has been fitted
outside the PEUGEOT dealer network, it
is essential to visit a PEUGEOT dealer or
a qualified workshop to have the detection
system recalibrated
- risk of malfunction of the
Hands-Free Tailgate Access function.
Certain driving or manoeuvring aid functions
are automatically deactivated while an
approved towing system is in use.
For more information about driving with a
towing device fitted to a trailer and associated
with the Trailer stability assist, refer to the
corresponding section. CarM an uals 2 .c o m
Page 180 of 292
178
Practical information
Comply with the maximum authorised
towable weight, as indicated on your
vehicle's registration certificate, on the
manufacturer's label and in the Technical
data section of this guide.
If using accessories attached to the
towing device (e.g. bicycle carriers, tow
boxes):
–
Comply with the maximum authorised nose
weight.
–
Do not transport more than 4 conventional
bicycles or 2 electric bicycles.
When loading bicycles onto a bicycle carrier
on a towball, be sure to place the heaviest
bicycles as close as possible to the vehicle.
Observe the legislation in force in the
country where you are driving.
Vehicle equipped with motorised
tailgate with hands-free function
(Hands-Free Tailgate Access)
To avoid unintentionally opening the
motorised tailgate when operating the towing
device:
–
Deactivate this function in advance in the
vehicle's configuration menu.
–
Or remove the electronic key from the
recognition zone, with the tailgate closed.
Towing device with quickly detachable towball
Presentation
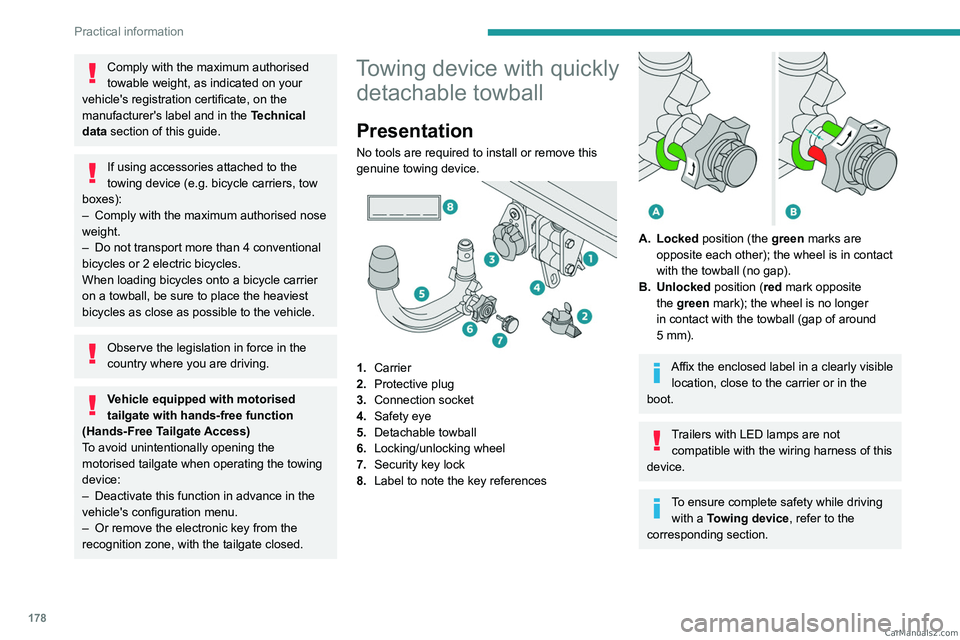
No tools are required to install or remove this
genuine towing device.
1. Carrier
2. Protective plug
3. Connection socket
4. Safety eye
5. Detachable towball
6. Locking/unlocking wheel
7. Security key lock
8. Label to note the key references
A. Locked position (the green marks are
opposite each other); the wheel is in contact
with the towball (no gap).
B. Unlocked position (red mark opposite the green mark); the wheel is no longer
in contact with the towball (gap of around
5
mm).
Affix the enclosed label in a clearly visible location, close to the carrier or in the
boot.
Trailers with LED lamps are not compatible with the wiring harness of this
device.
To ensure complete safety while driving with a Towing device , refer to the
corresponding section. CarM an uals 2 .c o m
Page 181 of 292
179
Practical information
7Before each use
Verify that the towball is correctly fitted,
checking the follow points:
–
The green mark on the wheel is in line with
the green mark on the towball.
–
The wheel is in contact with the towball
(position A
).
–
The security key lock is closed and the
key removed; the wheel can no longer be
operated.
–
The towball must not be able to move in
its carrier; test by attempting to shake it with
your hand.
If the towball is not locked, the trailer can
become detached - risk of an accident!
During use
Never release the locking system with a
trailer or load carrier on the towball.
Never exceed the maximum authorised
weight for the vehicle - the Gross Train
Weight or GTW.
Always comply with the maximum authorised
load on the towing device: if it is exceeded,
this device may become detached from the
vehicle - risk of an accident!
Before driving, check the headlamp height
adjustment and check that the lamps on the
trailer operate correctly.
For more information on Headlamp height
adjustment, refer to the corresponding
section.
After use
When travelling without a trailer or
load carrier, remove the towball and fit the
protective plug into the carrier, to provide
clear visibility of the number plate and/or its
lighting.
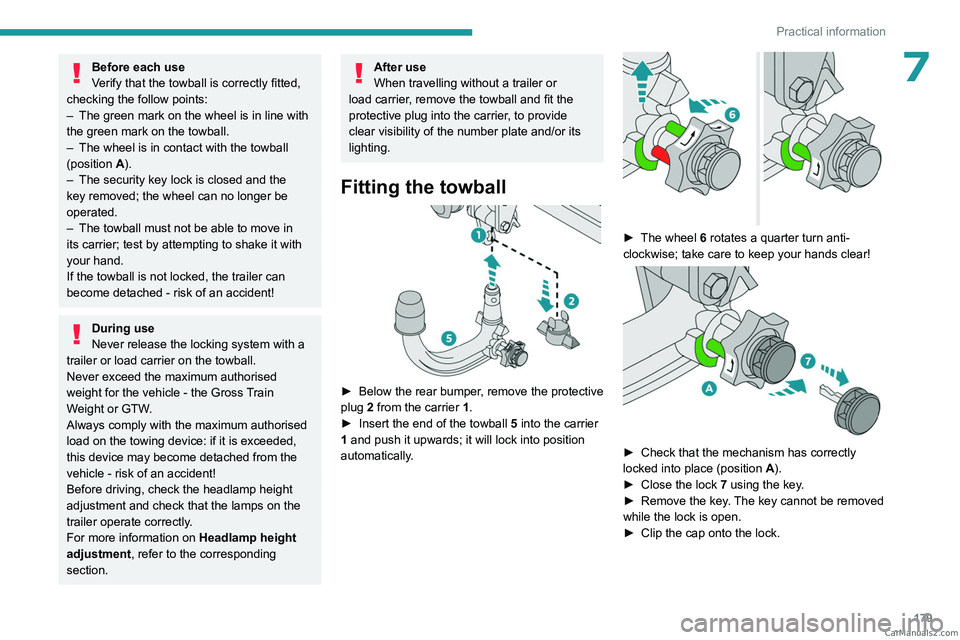
Fitting the towball
► Below the rear bumper , remove the protective
plug 2 from the carrier 1.
►
Insert the end of the towball
5 into the carrier
1 and push it upwards; it will lock into position
automatically.
► The wheel 6 rotates a quarter turn anti-
clockwise; take care to keep your hands clear!
► Check that the mechanism has correctly
locked into place (position A
).
►
Close the lock 7
using the key.
►
Remove the key
. The key cannot be removed
while the lock is open.
►
Clip the cap onto the lock. CarM an uals 2 .c o m
Page 182 of 292

180
Practical information
► Remove the protective cover from the
towball.
►
Attach the trailer to the towball.
►
Attach the cable on the trailer to the safety
eye
4 on the carrier.
►
Insert the trailer plug and rotate it by a
quarter turn to connect it to the connection
socket
3 on the carrier.
Removing the towball
► Grasp the trailer's plug, perform a quarter
turn and pull to disconnect it from the connection
socket
3 on the carrier.
►
Detach the trailer's safety cable from the
safety eye
4 on the carrier.
►
Unhitch the trailer from the towball.
►
Replace the protective cover over the towball.
►
Remove the cap from the lock and press it
onto the head of the key
.
► Insert the key into the lock 7.
► Open the lock using the key .
► Hold the towball 5 firmly in one hand; using
the other hand, pull and turn the wheel 6 fully in
a clockwise direction until it stops; do not release
the wheel.
►
Extract the towball from the base of its
carrier
1.
►
Release the wheel; it automatically locks in
the unlocked position (position B
).
► Replace the protective plug 2 into the
carrier 1.
►
Stow the towball in its bag to protect it from
knocks and dirt.
Maintenance
Correct operation is only possible if the towball
and its carrier are kept clean.
Before cleaning the vehicle with a high-pressure
jet wash, the towball must be removed and the
protective plug fitted to the carrier.
Work on the towing device
Contact a PEUGEOT dealer or a
qualified workshop.
Roof bars
As a safety measure and to avoid damaging the roof, it is essential to use CarM an uals 2 .c o m
Page 193 of 292
191
Practical information
7In order not to overfill the AdBlue® tank:
–
Add between 10 and 13 litres using
AdBlue® containers.
–
Stop after the nozzle’ s first automatic cut-
out, if you are refilling at a service station.
The system only registers AdBlue
®
intermediate top-ups of 5
litres or more.
If the AdBlue® tank is completely empty
– which is confirmed by the message
“Top up AdBlue: Starting impossible ” – it is
essential to add at least 10
litres.
Top-up detection may not be instantaneous
after addition. It may take a few minutes of
driving before the top-up detection is effective.
Free-wheeling
In certain situations, it is necessary to put the
vehicle into free-wheeling mode (e.g. towing, on
a rolling road, automatic car wash (Wash mode),
rail or sea transport).
The procedure varies according to the type of
gearbox and parking brake.
Never leave the vehicle unattended with
the vehicle into free-wheeling mode.
With a manual gearbox and
electric parking brake
/
To release them
► With the engine running and while depressing
the brake pedal, move the gear selector to the
neutral position.
►
While depressing the brake pedal, switch off
the engine.
►
Release the brake pedal, then switch on the
ignition.
►
While depressing the brake pedal, press the
control to release the parking brake.
►
Release the brake pedal, then switch off the
ignition.
Reverting to normal operation
► While depressing the brake pedal, restart the
engine and apply the parking brake.
With an automatic gearbox
(type 1) and electric parking
brake
/
Release procedure
► With the vehicle stationary and the engine
running, depress the brake pedal and select
mode
N.
Within 5 seconds:
► Depress and hold the brake pedal, then
observe this order: switch off the engine and
move the push selector forwards or backwards.
►
Release the brake pedal, then switch on the
ignition.
►
Place your foot on the brake and press the
electric parking brake control to release it.
►
Release the brake pedal, then switch off the
ignition.
A message is displayed on the instrument panel to confirm the unlocking
of the wheels for 15
minutes.
When the vehicle is free-wheeling, the
audio system cannot be updated (message
displayed on the instrument panel).
After 15 minutes or reverting to normal
operation
► While depressing the brake pedal, restart the
engine and select mode P .
With an automatic gearbox
(type 2) and electric parking
brake
/ CarM an uals 2 .c o m
Page 198 of 292
196
In the event of a breakdown
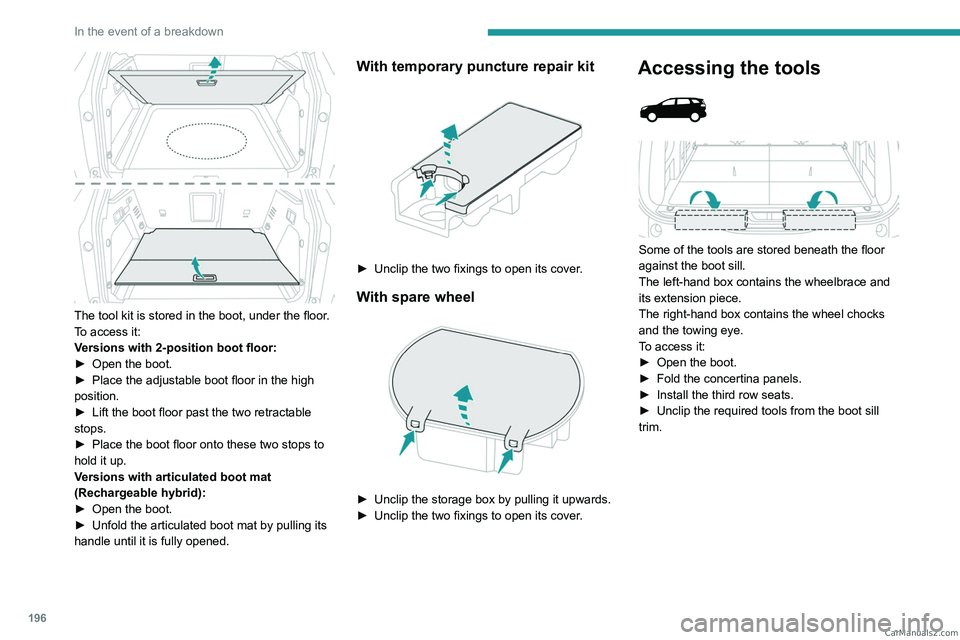
The tool kit is stored in the boot, under the floor.
To access it:
Versions with 2-position boot floor:
►
Open the boot.
►
Place the adjustable boot floor in the high
position.
►
Lift the boot floor past the two retractable
stops.
►
Place the boot floor onto these two stops to
hold it up.
V
ersions with articulated boot mat
(Rechargeable hybrid):
►
Open the boot.
►
Unfold the articulated boot mat by pulling its
handle until it is fully opened.
With temporary puncture repair kit
► Unclip the two fixings to open its cover .
With spare wheel
► Unclip the storage box by pulling it upwards.
► Unclip the two fixings to open its cover .
Accessing the tools
Some of the tools are stored beneath the floor
against the boot sill.
The left-hand box contains the wheelbrace and
its extension piece.
The right-hand box contains the wheel chocks
and the towing eye.
To access it:
►
Open the boot.
►
Fold the concertina panels.
►
Install the third row seats.
►
Unclip the required tools from the boot sill
trim. CarM an uals 2 .c o m
Page 199 of 292
197
In the event of a breakdown
8With temporary puncture repair kit
Model without storage box
This kit, stored in a bag, is installed behind the
second row left-hand seat.
►
Fold the seat backrest onto the cushion to
access the bag.
Model with storage box
This kit is installed in the storage box, located in
front of the second row left-hand seat.
►
Open the storage box cover to access the kit.
With spare wheel
The tool box is installed at the centre of the
spare wheel beneath the vehicle.
It contains the jack and the wheel bolt cover
removal tool.
►
First, access the spare wheel.
For further information on the
Spare wheel,
please refer to the corresponding section.
►
Press the tab to unlock the cover
.
►
While keeping the tab pressed in, slide the
cover to the middle and remove it.
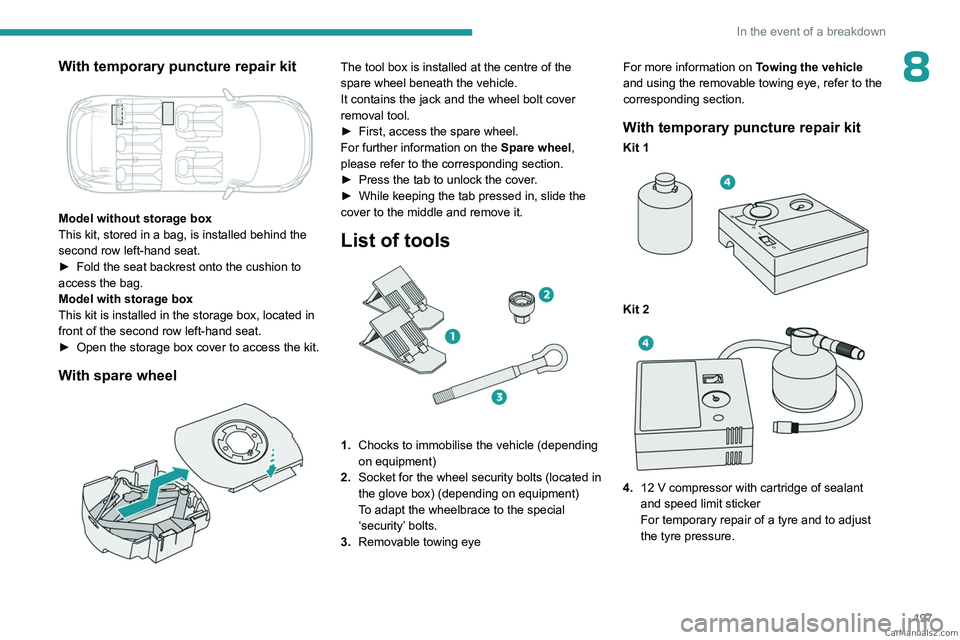
List of tools
1. Chocks to immobilise the vehicle (depending
on equipment)
2. Socket for the wheel security bolts (located in
the glove box) (depending on equipment)
To adapt the wheelbrace to the special
‘security’ bolts.
3. Removable towing eye For more information on
Towing the vehicle
and using the removable towing eye, refer to the
corresponding section.
With temporary puncture repair kit
Kit 1
Kit 2
4. 12 V compressor with cartridge of sealant
and speed limit sticker
For temporary repair of a tyre and to adjust
the tyre pressure. CarM an uals 2 .c o m
Page 215 of 292

213
In the event of a breakdown
8
► Disconnect the (+) terminal by disconnecting
the red quick-release clamp: •
Raise lever
A
fully to release clamp
B
.
•
Remove clamp
B
by lifting it off.
Reconnection
Front battery:
► Connect the (+) terminal by connecting the
red quick-release clamp: •
Raise lever
A
fully.
•
Refit open clamp
B
on the (+) terminal.
• Push clamp B fully down.
• Lower lever A to lock clamp B.
Rear battery:
►
Connect the
(-) terminal using the black
quick-release connector.
Following reconnection
After reconnecting the battery, turn on the
ignition and wait 1 minute before starting the
engine, to enable the electronic systems to
initialise.
For right-hand drive versions, when the
total distance recorder has reached
62
miles (100 km), you must wait
approximately 15
minutes before starting the
engine.
If minor problems nevertheless persist following
this operation, contact a PEUGEOT dealer or a
qualified workshop.
Referring to the relevant section, reinitialise
certain equipment:
–
Remote control key or electronic key
(depending on version).
–
Sunroof and electric blind.
–
Electric windows.
–
Date and time.
–
Preset radio stations.
After reconnecting the battery, the message "Collision risk detection
system fault" is displayed on the instrument
panel when the ignition is switched on. This
operation is perfectly normal. The message
will disappear while driving.
Towing the vehicle
Procedure for having your vehicle towed or
for towing another vehicle using a removable
mechanical device. CarM an uals 2 .c o m
Page 216 of 292
214
In the event of a breakdown
General recommendations
Observe the legislation in force in the country where you are driving.
Check that the towing vehicle is heavier than the towed vehicle.
The driver must remain at the wheel of the towed vehicle and must have a\
valid driving licence.
When towing a vehicle with all four wheels on the ground, always use an \
approved towbar; ropes and straps are prohibited.
The towing vehicle must move off gently.
When the vehicle is towed with its engine off, there is no longer braking and steering assistance.
A professional recovery service must be called in the following cases:
– broken down on a motorway or main road;
–
not possible to put the gearbox into neutral, unlock the steering, or re\
lease the parking brake;
–
not possible to tow a vehicle with an automatic gearbox, with the engine\
running;
–
towing with only two wheels on the ground;
–
four-wheel drive vehicle;
–
no approved towbar available.
Rechargeable hybrid vehicles
Before any intervention, with the ignition
on, depress the brake pedal and select mode N, then switch off the hybrid system (READY
indicator lamp off).
Always call on professionals for recovery of
the vehicle on a flatbed lorry or trailer.Use the towing eye only to free the vehicle
if it is stuck, or to secure it for recovery on a
flatbed lorry or trailer.
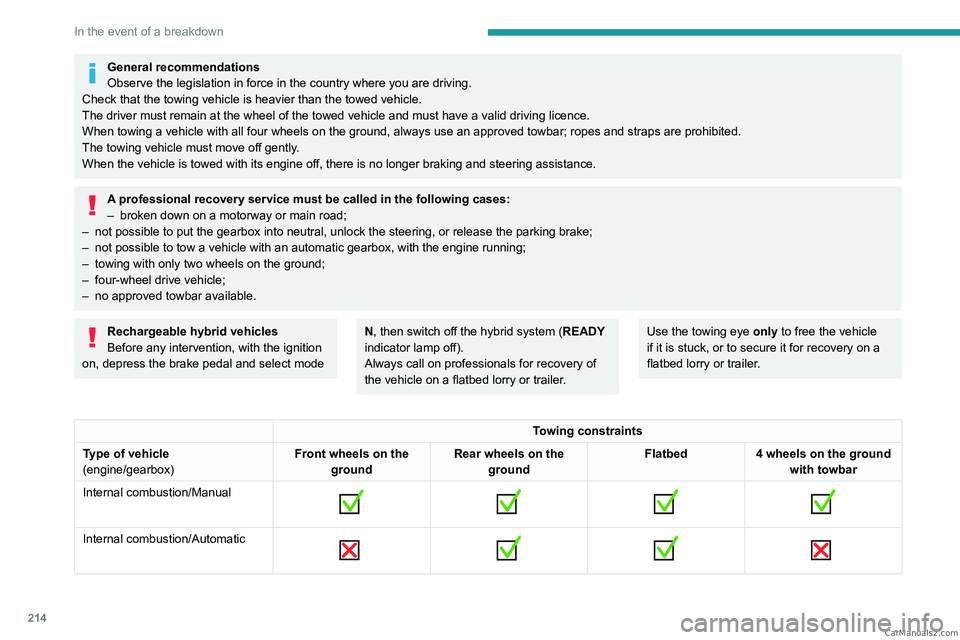
Towing constraints
Type of vehicle
(engine/gearbox) Front wheels on the
ground Rear wheels on the
ground Flatbed
4 wheels on the ground
with towbar
Internal combustion/Manual
Internal combustion/Automatic
CarM an uals 2 .c o m