tow Peugeot 508 2014 - RHD (UK, Australia) Owner's Guide
[x] Cancel search | Manufacturer: PEUGEOT, Model Year: 2014, Model line: 508, Model: Peugeot 508 2014Pages: 352, PDF Size: 13.51 MB
Page 150 of 352
148
Visibility
Rear wiper
If a significant accumulation of snow or ice is present, or when using a bicycle carrier on the boot, deactivate the automatic rear wiper via the instrument panel screen configuration menu.
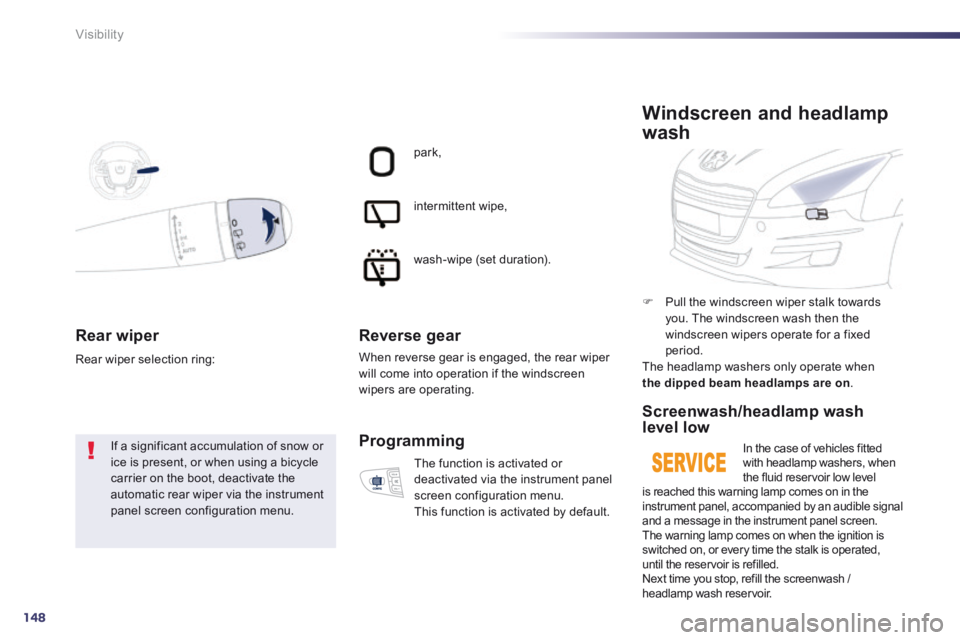
Rear wiper selection ring:
park,
intermittent wipe,
wash-wipe (set duration).
Reverse gear
When reverse gear is engaged, the rear wiper will come into operation if the windscreen wipers are operating.
The function is activated or deactivated via the instrument panel screen configuration menu. This function is activated by default.
Programming
Pull the windscreen wiper stalk towards you. The windscreen wash then the windscreen wipers operate for a fixed period. The headlamp washers only operate when the dipped beam headlamps are on .
Windscreen and headlamp
wash
Screenwash/headlamp wash level low
In the case of vehicles fitted with headlamp washers, when the fluid reservoir low level is reached this warning lamp comes on in the instrument panel, accompanied by an audible signal and a message in the instrument panel screen. The warning lamp comes on when the ignition is switched on, or every time the stalk is operated, until the reservoir is refilled. Next time you stop, refill the screenwash / headlamp wash reservoir.
Page 176 of 352
174
Safety
The driver must ensure that passengers use the seat belts correctly and that they are all restrained securely before setting off. Wherever you are seated in the vehicle, always fasten your seat belt, even for short journeys. Do not interchange the seat belt buckles as they will not fulfil their role fully. The seat belts are fitted with an inertia reel permitting automatic adjustment of the length of the strap to your size. The seat belt is stowed automatically when not in use. Before and after use, ensure that the seat belt is reeled in correctly. The lower part of the strap must be positioned as low as possible on the pelvis. The upper part must be positioned in the hollow of the shoulder. The inertia reels are fitted with an automatic locking device which comes into operation in the event of a collision, emergency braking or if the vehicle rolls over. You can release the device by pulling firmly on the strap and releasing it so that it reels in slightly.
Recommendations for children
Use a suitable child seat if the passenger is less than 12 years old or shorter than one and a half metres. Never use the same seat belt to secure more than one person. Never allow a child to travel on your lap.
In order to be effective, a seat belt must: - be tightened as close to the body as possible, - be pulled in front of you with a smooth movement, checking that it does not twist, - be used to restrain only one person, - not bear any trace of cuts or fraying, - not be converted or modified to avoid affecting its performance. In accordance with current safety regulations, for all repairs on your vehicle, go to a qualified workshop with the skills and equipment needed, which a PEUGEOT dealer is able to provide. Have your seat belts checked regularly by a PEUGEOT dealer or a qualified workshop, particularly if the straps show signs of damage. Clean the seat belt straps with soapy water or a textile cleaning product, sold by PEUGEOT dealers. After folding or moving a seat or rear bench seat, ensure that the seat belt is positioned and reeled in correctly.
In the event of an impact
Depending on the nature and seriousness of the impact , the pretensioning device may be deployed before and independently of the airbags. Deployment of the pretensioners is accompanied by a slight discharge of harmless smoke and a noise, due to the activation of the pyrotechnic cartridge incorporated in the system. In all cases, the airbag warning lamp comes on. Following an impact, have the seat belts system checked, and if necessary replaced,
by a PEUGEOT dealer or a qualified
workshop.
Page 179 of 352
7
177
Safety
Lateral airbags
Deployment
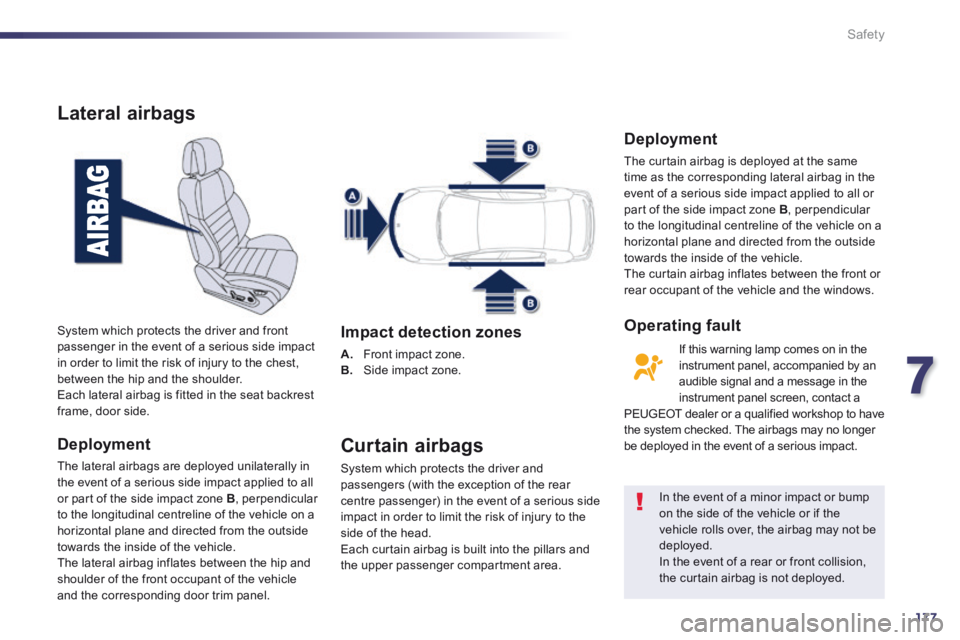
The lateral airbags are deployed unilaterally in the event of a serious side impact applied to all or part of the side impact zone B , perpendicular to the longitudinal centreline of the vehicle on a horizontal plane and directed from the outside towards the inside of the vehicle. The lateral airbag inflates between the hip and shoulder of the front occupant of the vehicle and the corresponding door trim panel.
System which protects the driver and front passenger in the event of a serious side impact in order to limit the risk of injury to the chest, between the hip and the shoulder. Each lateral airbag is fitted in the seat backrest frame, door side.
Impact detection zones
A. Front impact zone. B. Side impact zone.
Curtain airbags
System which protects the driver and passengers (with the exception of the rear centre passenger) in the event of a serious side impact in order to limit the risk of injury to the side of the head. Each curtain airbag is built into the pillars and the upper passenger compartment area.
In the event of a minor impact or bump on the side of the vehicle or if the vehicle rolls over, the airbag may not be deployed. In the event of a rear or front collision, the curtain airbag is not deployed.
Deployment
The curtain airbag is deployed at the same time as the corresponding lateral airbag in the event of a serious side impact applied to all or part of the side impact zone B , perpendicular to the longitudinal centreline of the vehicle on a horizontal plane and directed from the outside towards the inside of the vehicle. The curtain airbag inflates between the front or rear occupant of the vehicle and the windows.
If this warning lamp comes on in the instrument panel, accompanied by an audible signal and a message in the instrument panel screen, contact a PEUGEOT dealer or a qualified workshop to have the system checked. The airbags may no longer be deployed in the event of a serious impact.
Operating fault
Page 181 of 352
8
179
Practical information
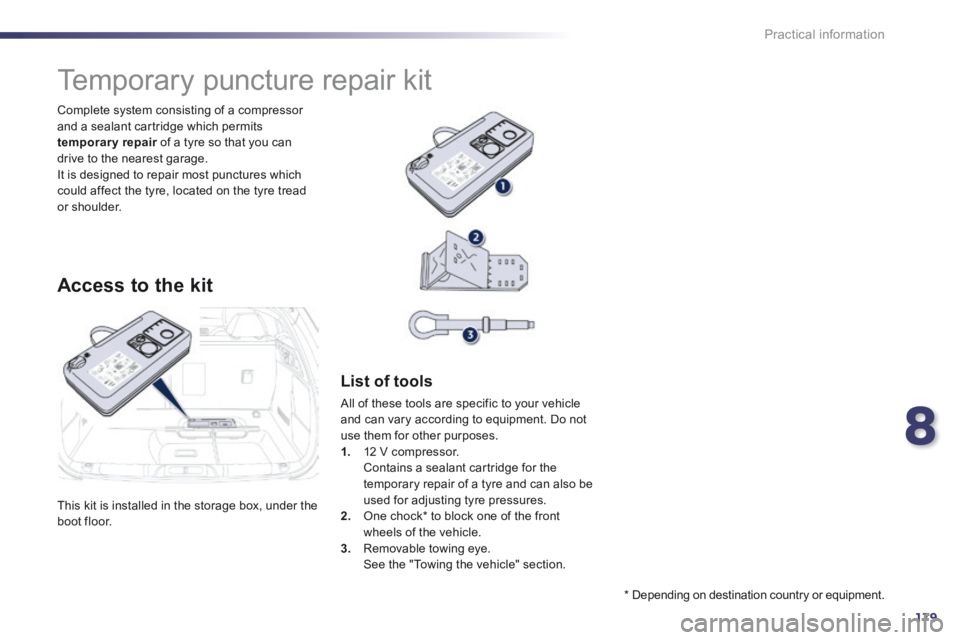
This kit is installed in the storage box, under the boot floor.
Complete system consisting of a compressor and a sealant cartridge which permits temporary repair of a tyre so that you can temporary repair of a tyre so that you can temporary repairdrive to the nearest garage. It is designed to repair most punctures which could affect the tyre, located on the tyre tread or shoulder.
Temporary puncture repair kit
Access to the kit
List of tools
All of these tools are specific to your vehicle and can vary according to equipment. Do not use them for other purposes. 1. 12 V compressor. Contains a sealant cartridge for the temporary repair of a tyre and can also be used for adjusting tyre pressures. 2. One chock * to block one of the front wheels of the vehicle. 3. Removable towing eye. See the "Towing the vehicle" section.
* Depending on destination country or equipment.
Page 185 of 352
8
183
Practical information
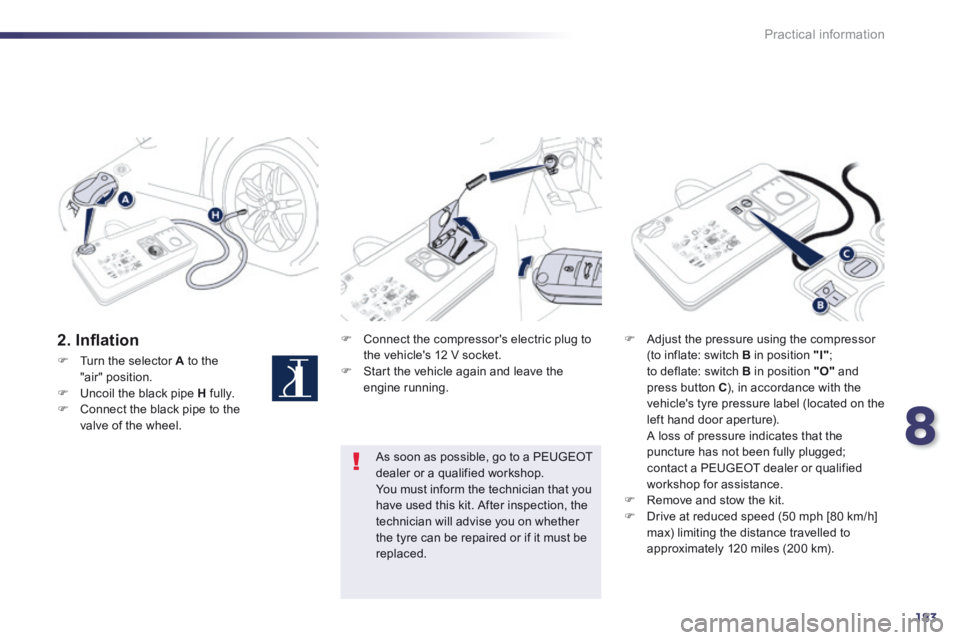
2 . I n fl a t i o n Connect the compressor's electric plug to the vehicle's 12 V socket. Start the vehicle again and leave the engine running.
Adjust the pressure using the compressor (to inflate: switch B in position "I" ; to deflate: switch B in position "O" and press button C ), in accordance with the vehicle's tyre pressure label (located on the left hand door aperture). A loss of pressure indicates that the puncture has not been fully plugged; contact a PEUGEOT dealer or qualified workshop for assistance. Remove and stow the kit. Drive at reduced speed (50 mph [80 km/h] max) limiting the distance travelled to approximately 120 miles (200 km).
As soon as possible, go to a PEUGEOT dealer or a qualified workshop. You must inform the technician that you have used this kit. After inspection, the technician will advise you on whether the tyre can be repaired or if it must be replaced.
Turn the selector A to the "air" position. Uncoil the black pipe H fully. Connect the black pipe to the valve of the wheel.
Page 186 of 352
184
Practical information
Removing the cartridge
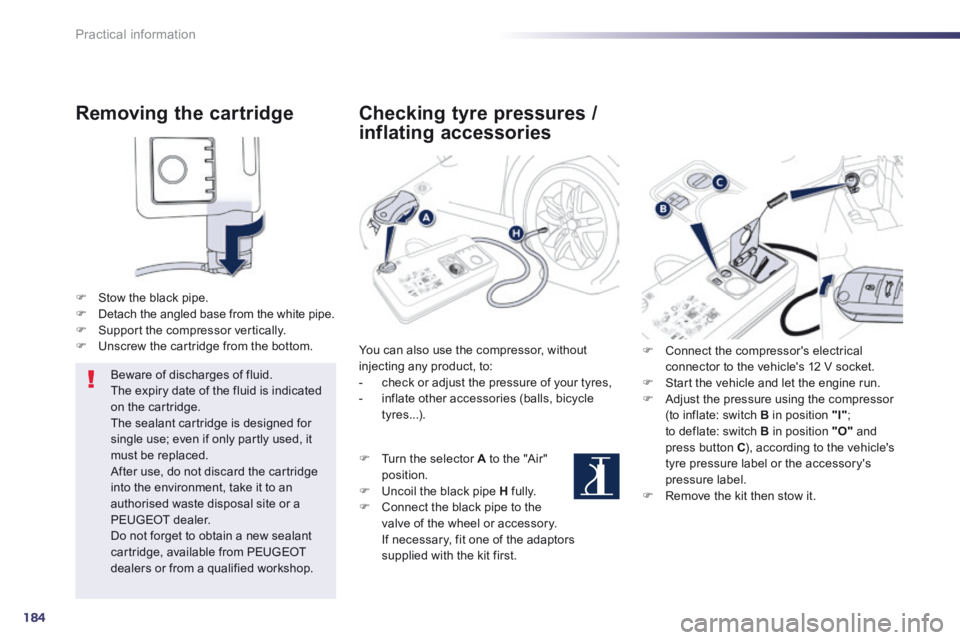
Stow the black pipe. Detach the angled base from the white pipe. Support the compressor vertically. Unscrew the cartridge from the bottom.
Beware of discharges of fluid. The expiry date of the fluid is indicated on the cartridge. The sealant cartridge is designed for single use; even if only partly used, it must be replaced. After use, do not discard the cartridge into the environment, take it to an authorised waste disposal site or a PEUGEOT dealer.
Do not forget to obtain a new sealant cartridge, available from PEUGEOT dealers or from a qualified workshop.
Checking tyre pressures /
inflating accessories
You can also use the compressor, without injecting any product, to: - check or adjust the pressure of your tyres, - inflate other accessories (balls, bicycle tyres...).
Turn the selector A to the "Air" position. Uncoil the black pipe H fully. Connect the black pipe to the valve of the wheel or accessory. If necessary, fit one of the adaptors supplied with the kit first.
Connect the compressor's electrical connector to the vehicle's 12 V socket. Start the vehicle and let the engine run. Adjust the pressure using the compressor (to inflate: switch B in position "I" ; to deflate: switch B in position "O" and press button C ), according to the vehicle's tyre pressure label or the accessory's pressure label. Remove the kit then stow it.
Page 187 of 352
8
185
Practical information
Changing a wheel Procedure for changing a faulty wheel for the spare wheel using the tools provided with the vehicle.
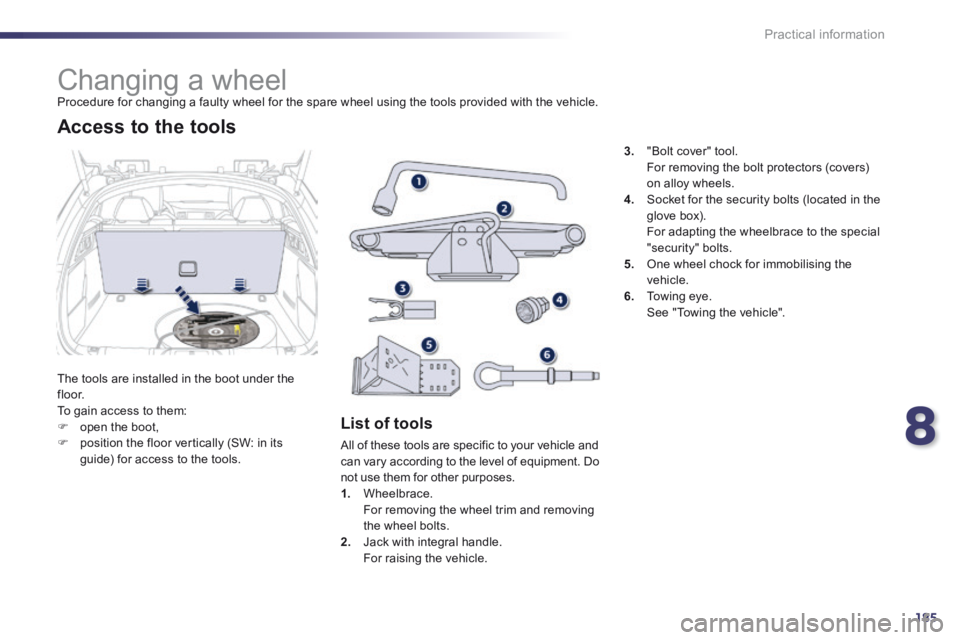
The tools are installed in the boot under the f l o o r. To gain access to them: open the boot, position the floor vertically (SW: in its guide) for access to the tools.
Access to the tools
List of tools
All of these tools are specific to your vehicle and can vary according to the level of equipment. Do not use them for other purposes. 1. Wheelbrace. For removing the wheel trim and removing the wheel bolts. 2. Jack with integral handle. For raising the vehicle.
3. "Bolt cover" tool. For removing the bolt protectors (covers) on alloy wheels. 4. Socket for the security bolts (located in the glove box).
For adapting the wheelbrace to the special "security" bolts. 5. One wheel chock for immobilising the vehicle. 6. Towing eye. See "Towing the vehicle".
Page 188 of 352
186
Practical information
Wheel with trim
When refitting the wheel , refit the trim starting by placing its notch facing the valve and press around its edge with the palm of your hand.
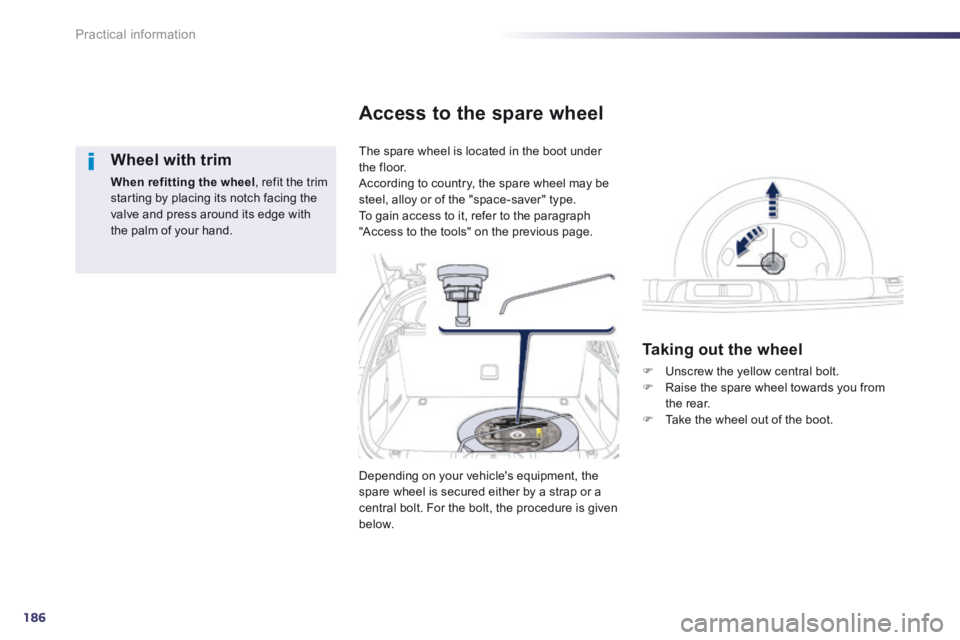
The spare wheel is located in the boot under the floor. According to country, the spare wheel may be steel, alloy or of the "space-saver" type. To gain access to it, refer to the paragraph
"Access to the tools" on the previous page.
Access to the spare wheel
Taking out the wheel
Unscrew the yellow central bolt. Raise the spare wheel towards you from the rear. Take the wheel out of the boot.
Depending on your vehicle's equipment, the spare wheel is secured either by a strap or a central bolt. For the bolt, the procedure is given below.
Page 195 of 352
8
193
Practical information
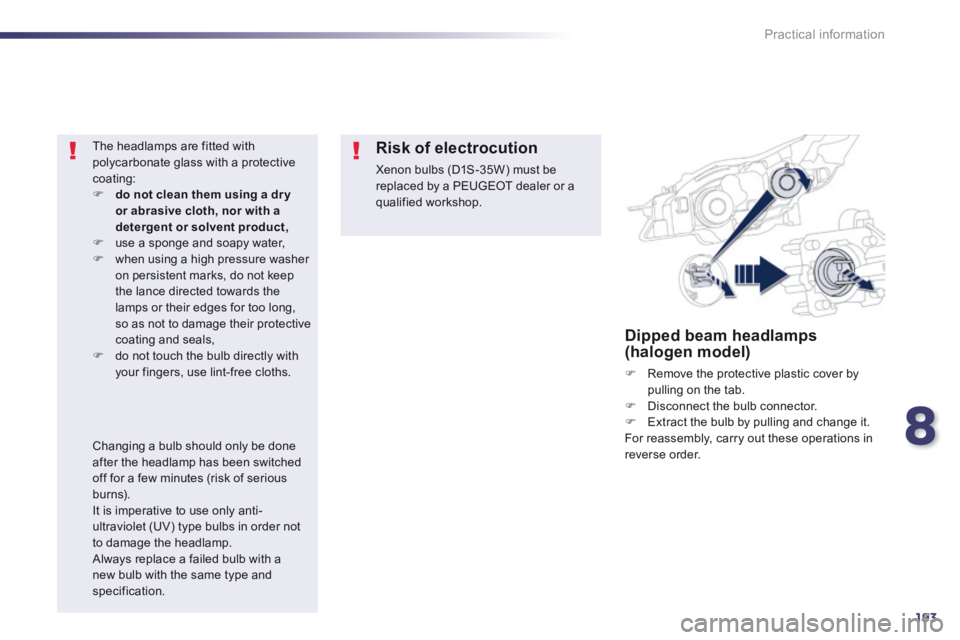
Dipped beam headlamps (halogen model)
Remove the protective plastic cover by pulling on the tab. Disconnect the bulb connector. Extract the bulb by pulling and change it. For reassembly, carry out these operations in reverse order.
The headlamps are fitted with polycarbonate glass with a protective coating: do not clean them using a dr y or abrasive cloth, nor with a detergent or solvent product, use a sponge and soapy water, when using a high pressure washer on persistent marks, do not keep the lance directed towards the lamps or their edges for too long, so as not to damage their protective coating and seals, do not touch the bulb directly with your fingers, use lint-free cloths.
Risk of electrocution
Xenon bulbs (D1S-35W) must be replaced by a PEUGEOT dealer or a qualified workshop.
Changing a bulb should only be done after the headlamp has been switched off for a few minutes (risk of serious burns). It is imperative to use only anti-ultraviolet (UV) type bulbs in order not
to damage the headlamp. Always replace a failed bulb with a new bulb with the same type and specification.
Page 212 of 352
210
Practical information
Towing the vehicle Procedure for having your vehicle towed or for towing another vehicle using a removable towing eye.
Towing from the front Access to the tools
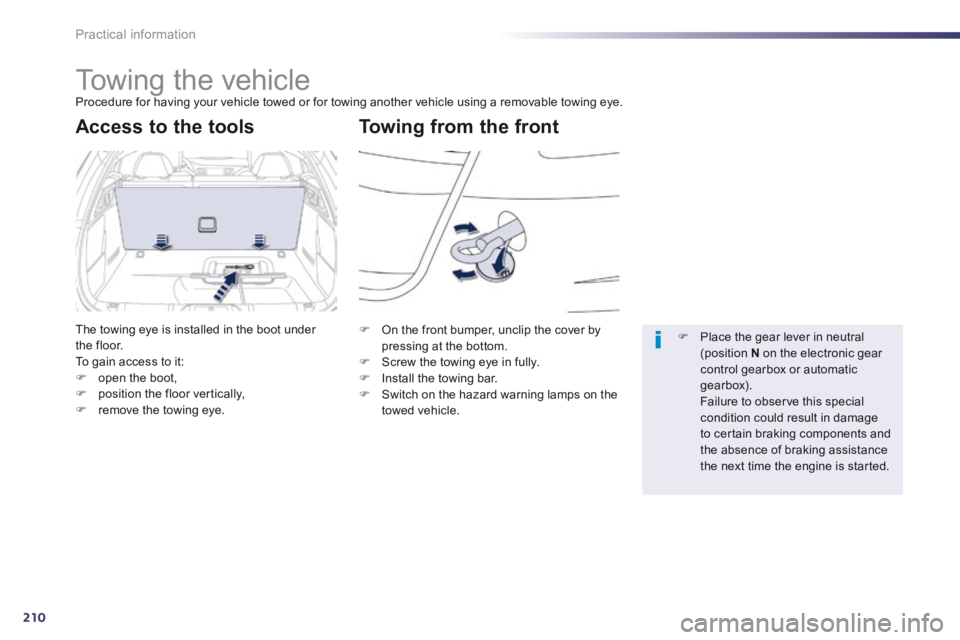
The towing eye is installed in the boot under the floor. To gain access to it: open the boot, position the floor vertically, remove the towing eye.
On the front bumper, unclip the cover by pressing at the bottom. Screw the towing eye in fully. Install the towing bar. Switch on the hazard warning lamps on the towed vehicle.
Place the gear lever in neutral (position N on the electronic gear control gearbox or automatic gearbox). Failure to observe this special condition could result in damage to certain braking components and the absence of braking assistance the next time the engine is started.