tow Peugeot 508 2020 Service Manual
[x] Cancel search | Manufacturer: PEUGEOT, Model Year: 2020, Model line: 508, Model: Peugeot 508 2020Pages: 276, PDF Size: 8.43 MB
Page 150 of 276
148
Driving
Resuming the manoeuvre after resolving the
conditions for suspending it:
►
Release all controls (brake pedal, function
control button, steering wheel, etc.).
►
Press the function control button again.
Permanent interruption after suspending the
manoeuvre:
►
Depress the brake pedal and engage a gear
.
Abandoning the manoeuvre
The manoeuvre is abandoned in the following
situations:
–
No action by the driver within 30 seconds of
the manoeuvre being suspended.
–
Intentional application of the parking brake.
–
Gearbox mode P
engaged by the driver.
–
Driver's seat belt unfastened.
–
Opening of a door or the boot.
–
Activation of the direction indicator lamps on
the opposite side to that of the manoeuvre.
–
In certain cases, when a wheel of the vehicle
hits a pavement or a low obstacle.
–
T
riggering of anti-slip regulation on a slippery
road.
–
Engine stalling.
–
Sudden appearance in the field of the
manoeuvre of an obstacle not detected by the
system before the manoeuvre was started,
with the obstacle remaining for more than 30
seconds.
–
After 10 manoeuvres to enter or exit a
"parallel" parking space and after 7 manoeuvres
to enter a "bay" parking space, –
System malfunction during the manoeuvre.
Abandoning the manoeuvre immediately
triggers the vehicle’
s brakes and automatically
deactivates the function.
This symbol is displayed, accompanied by the message "Manoeuvre abandoned"
on the touch screen.
A message prompts the driver to take back
control of the vehicle.
The function is deactivated after a few seconds; this indicator lamp goes off and
the initial display is resumed.
The system automatically engages gearbox
mode P after 4 seconds.
End of manoeuvre
The vehicle stops as soon as the manoeuvre is
completed.
This symbol is displayed, accompanied by the message "Manoeuvre completed" on
the touch screen.
When the function is deactivated, this
indicator lamp goes off and the original
display is restored.
–
If entering a parking space, the driver may
be required to complete the manoeuvre.
The gearbox changes to
P
4 seconds after
completion of the manoeuvre.
–
When exiting a parking space, the gearbox
changes to
N when the manoeuvre is complete.
A message and symbols prompt the driver to
take back control of the vehicle. The gearbox automatically changes to mode
P if no action is taken by the driver within 30
secondss.
Operating limits
– The system may suggest an inappropriate
parking space (parking prohibited, work in
progress with damaged road surface, location
alongside a ditch, etc.).
–
The system may indicate that a space has
been found but will not offer it because of a fixed
obstacle on the opposite side of the manoeuvre,
which does not allow the vehicle to follow the
trajectory required for parking.
–
The system may indicate that a space has
been found but the manoeuvre will not be
triggered because the width of the lane is
insufficient.
–
The system is not designed to perform parking
manoeuvres on a steep slope or on a sharp
curve.
–
The system does not detect spaces that
are much larger than the vehicle itself or that
are delimited by obstacles that are too low
(pavements, studs, etc.) or too thin (trees, posts,
wire fences, etc.).
–
The system may be impaired by incorrect
inflation of the vehicle’
s tyres.
–
The tilting of the vehicle if the boot is heavily
loaded can affect the distance measurements.
Do not use the function under the
following exterior conditions:
– Alongside a soft shoulder (ditch) or quay or
on the edge of a drop.
– When the road surface is slippery (ice).
Do not use the function in the presence
of one of the following malfunctions:
– If a tyre is under-inflated.
– If one of the bumpers is damaged.
– If one of the cameras is faulty.
– If the brake lamps are not working.
Do not use the function if the vehicle has
been subject to one of the following
modifications:
– When carrying an object extending beyond
the dimensions of the vehicle (ladder on the
roof bars, bicycle carrier on the tailgate, etc.).
– With a non-approved towball in place.
– With snow chains fitted.
– When driving on a small-diameter or
"space-saver" type spare wheel.
– When the wheels fitted are a different size
from the original ones.
– After modifying one or both bumpers
(added protection).
– If the sensors have been repainted outside
the PEUGEOT dealer network.
– With sensors not approved for the vehicle.
Page 151 of 276
149
Driving
6Do not use the function under the
following exterior conditions:
–
Alongside a soft shoulder (ditch) or quay or
on the edge of a drop.
–
When the road surface is slippery (ice).
Do not use the function in the presence
of one of the following malfunctions:
–
If a tyre is under-inflated.
–
If one of the bumpers is damaged.
–
If one of the cameras is faulty
.
–
If the brake lamps are not working.
Do not use the function if the vehicle has
been subject to one of the following
modifications:
–
When carrying an object extending beyond
the dimensions of the vehicle (ladder on the
roof bars, bicycle carrier on the tailgate, etc.).
–
With a non-approved towball in place.
–
With snow chains fitted.
–
When driving on a small-diameter or
"space-saver" type spare wheel.
–
When the wheels fitted are a different size
from the original ones.
–
After modifying one or both bumpers
(added protection).
–
If the sensors have been repainted outside
the PEUGEOT
dealer network.
–
With sensors not approved for the vehicle.
Malfunctions
When the function is not activated, the
temporary flashing of this warning lamp
and an audible signal indicate a Full Park Assist
malfunction.
If the malfunction occurs while the system is in
use, the warning lamp goes off.
If a parking sensor malfunction, indicated
by this warning lamp coming on, occurs
during Full Park Assist use, the function is
deactivated.
Contact a PEUGEOT dealer or a qualified
workshop.
In the event of a power steering
malfunction, this warning lamp is
displayed on the instrument panel, accompanied
by a message.
You must stop as soon as it is safe to do so.
Contact a PEUGEOT dealer or a qualified
workshop.
Page 153 of 276
151
Practical information
7Compatibility of fuels
Petrol fuels conforming to the EN228 standard
containing up to 5% and 10% ethanol
respectively.
Diesel fuels conforming to the EN590, EN16734
and EN16709 standards and containing up to
7%, 10%, 20% and 30% fatty acid methyl ester
respectively. The use of B20 or B30 fuels, even
occasionally, imposes special maintenance
conditions referred to as "Arduous conditions".
Paraffinic Diesel fuel conforming to the EN15940
standard.
The use of any other type of (bio) fuel (vegetable or animal oils, pure or diluted,
domestic fuel, etc.) is strictly prohibited (risk
of damage to the engine and fuel system).
The only fuel additives authorised for use are those that meet the B715001 (petrol)
or B715000 (Diesel) standards.
Diesel at low temperature
At temperatures below 0 °C (+32 °F), the
formation of paraffins in summer-type Diesel fuels could prevent the engine from operating
correctly. In these temperature conditions, use
winter-type Diesel fuel and keep the fuel tank
more than 50
% full.
At temperatures below -15 °C (+5 °F) to avoid
problems starting, it is best to park the vehicle
under shelter (heated garage).
Travelling abroad
Certain fuels could damage your vehicle’s
engine.
In certain countries, the use of a particular
fuel may be required (specific octane rating,
specific trade name, etc.) to ensure correct
operation of the engine.
For all additional information, consult a dealer.
Refuelling
Fuel tank capacity: approximately 62 litres
(petrol), 55 litres (Diesel) or 42 litres (Hybrid).
Reserve level: approximately 6 litres.
Low fuel level
When the low fuel level is reached, this
warning lamp comes on on the instrument
panel, accompanied by an onscreen message
and an audible signal. When it first comes on,
about 6 litres of fuel remain in the tank.
Until sufficient fuel is added, this warning lamp
appears every time the ignition is switched on,
accompanied by an onscreen message and
an audible signal. When driving, this message
and audible signal are repeated with increasing
frequency as the fuel level drops towards 0.
You must refuel as soon as possible to avoid
running out of fuel.
For more information on Running out of fuel
(Diesel), refer to the corresponding section.
Stop & Start
Never refuel with the engine in STOP
mode; you must switch off the ignition.
Refuelling
Additions of fuel must be of at least 10 litres, in
order to be registered by the fuel gauge.
Opening the filler flap may create a noise caused
by an inrush of air. This vacuum is entirely
normal, resulting from the sealing of the fuel
system.
To refuel in complete safety:
►
You must switch off the engine.
Page 160 of 276
158
Practical information
Before disconnecting the nozzle from the
charging connector:
►
If the vehicle is unlocked, lock it and then
unlock it .
►
If the vehicle is locked, unlock it.
The red indicator lamp in the flap goes out to
confirm that the charging nozzle is unlocked.
►
Within
30 seconds, remove the charging
nozzle.
Domestic charging (mode 2)
The end of charging is confirmed by the fixed
lighting of the green CHARGE indicator lamp on
the control unit and by the fixed lighting of the
green light guides in the flap.
►
After disconnection, remove the protective
cover from the nozzle and close the charging
flap.
►
Disconnect the control unit's charging cable
from the domestic socket.
Accelerated charging (mode 3)
The end of charging is confirmed by the
accelerated charging unit (Wallbox) and by the
fixed lighting of the green light guides in the flap.
►
After disconnection, replace the nozzle on the
charging unit and close the charging flap.
Deferred charging
By default, charging begins when the nozzle
is connected. Deferred charging can be
programmed.
Settings
► In the Hybrid touch screen menu,
select the Charge tab.
►
Set the charging start time.
►
Press
OK.
The setting is saved in the system.
You can also programme the deferred charging function using a smartphone, via
the MyPeugeot
application.
For more information on Remotely operable
features , refer to the corresponding section.
Activation
► Connect the vehicle to the desired charging
equipment.
► Press this button in the flap within one
minute to activate the system (confirmed
by the light guides coming on in blue).
Towing device
Load distribution
► Distribute the load in the trailer so that the
heaviest items are as close as possible to the
axle, and the nose weight approaches the
maximum permitted without exceeding it.
Air density decreases with altitude, thus reducing
engine performance.
The maximum towable load
must be reduced by 10% per 1,000
metres of
altitude.
Use genuine towing devices and their
wiring harnesses approved by
PEUGEOT. We recommend having them
fitted by a PEUGEOT dealer or a qualified
workshop.
If not fitted by a PEUGEOT dealer, they must
still be fitted in accordance with the vehicle
manufacturer's instructions.
Important: with a hands-free tailgate, if a
towing device is fitted outside the PEUGEOT
dealer network, it is essential to visit a
PEUGEOT dealer or a qualified workshop
to recalibrate the detection system. Risk of
malfunction of the hands-free function!
Certain driving or manoeuvring aid functions
are automatically deactivated while an
approved towing system is in use.
Comply with the maximum authorised
towable weight, as indicated on your
vehicle's registration certificate, on the
manufacturer's label and in the Technical
data section of this guide.
Complying with the maximum authorised
nose weight (towball weight) also includes
the use of accessories (bicycle carriers,
tow boxes, etc.).
Observe the legislation in force in the
country where you are driving.
Vehicle equipped with motorised
tailgate with hands-free function
To avoid unintentionally opening the tailgate
while operating the towing device:
– Deactivate this function in advance in your
vehicle's configuration menu.
– Or remove the electronic key from the
recognition zone, with the tailgate closed.
Towing device with retractable ball joint
When this towing device is not in use, it is folded
away underneath the rear bumper.
No tools are required to install or stow it.
Before any operation, the vehicle must
be stationary with the parking brake
applied.
The area close to the exhaust pipe may reach
a high temperature: risk of burns!
Vehicle equipped with motorised
tailgate with hands-free function
To avoid unintentional opening of the tailgate,
follow the recommendations on the Towing
device by referring to the corresponding
section.
Unlocking handle
The towball is locked in either the storage
position or the usage position.
The unlocking handle is behind the rear bumper,
protected by a storage case.
To reach the handle:
Page 161 of 276
159
Practical information
7– Deactivate this function in advance in your
vehicle's configuration menu.
–
Or remove the electronic key from the
recognition zone, with the tailgate closed.
Towing device with retractable ball joint
When this towing device is not in use, it is folded
away underneath the rear bumper.
No tools are required to install or stow it.
Before any operation, the vehicle must
be stationary with the parking brake
applied.
The area close to the exhaust pipe may reach
a high temperature: risk of burns!
Vehicle equipped with motorised
tailgate with hands-free function
To avoid unintentional opening of the tailgate,
follow the recommendations on the Towing
device by referring to the corresponding
section.
Unlocking handle
The towball is locked in either the storage
position or the usage position.
The unlocking handle is behind the rear bumper,
protected by a storage case.
To reach the handle:
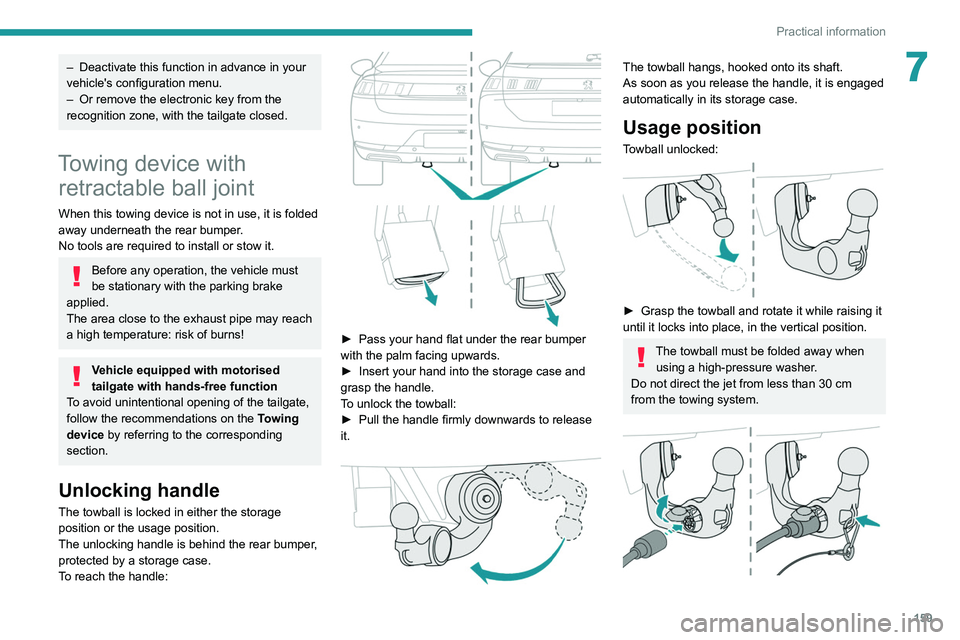
► Pass your hand flat under the rear bumper
with the palm facing upwards.
►
Insert your hand into the storage case and
grasp the handle.
T
o unlock the towball:
►
Pull the handle firmly downwards to release
it.
The towball hangs, hooked onto its shaft.
As soon as you release the handle, it is engaged
automatically in its storage case.
Usage position
Towball unlocked:
► Grasp the towball and rotate it while raising it
until it locks into place, in the vertical position.
The towball must be folded away when using a high-pressure washer.
Do not direct the jet from less than 30
cm
from the towing system.
Page 162 of 276
160
Practical information
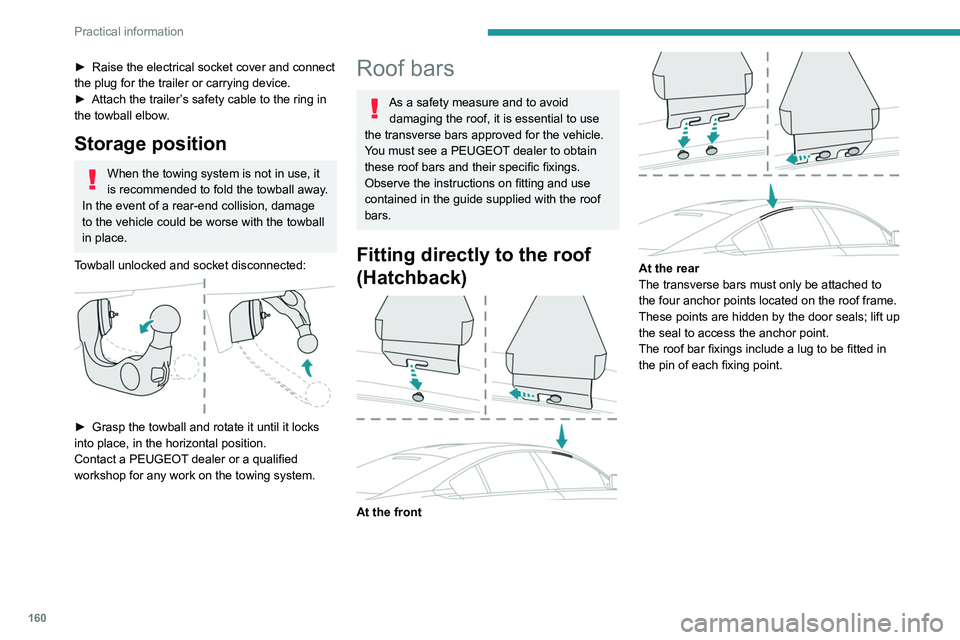
► Raise the electrical socket cover and connect
the plug for the trailer or carrying device.
►
Attach the trailer
’s safety cable to the ring in
the towball elbow.
Storage position
When the towing system is not in use, it
is recommended to fold the towball away.
In the event of a rear-end collision, damage
to the vehicle could be worse with the towball
in place.
Towball unlocked and socket disconnected:
► Grasp the towball and rotate it until it locks
into place, in the horizontal position.
Contact a PEUGEOT
dealer or a qualified
workshop for any work on the towing system.
Roof bars
As a safety measure and to avoid damaging the roof, it is essential to use
the transverse bars approved for the vehicle.
You must see a PEUGEOT dealer to obtain
these roof bars and their specific fixings.
Observe the instructions on fitting and use
contained in the guide supplied with the roof
bars.
Fitting directly to the roof
(Hatchback)
At the front
At the rear
The transverse bars must only be attached to
the four anchor points located on the roof frame.
These points are hidden by the door seals; lift up
the seal to access the anchor point.
The roof bar fixings include a lug to be fitted in
the pin of each fixing point.
Fitting on longitudinal bars
(SW)
The transverse bars must be fixed at the
engraved markings on the longitudinal bars.
Maximum load distributed over the
transverse roof bars, for a loading height
not exceeding 40 cm (except bicycle carrier):
80 kg.
As this value may change, please verify the
maximum load quoted in the guide supplied
with the roof bars.
If the height exceeds 40 cm, adapt the speed
of the vehicle to the profile of the road to
avoid damaging the roof bars and the fixings
on the vehicle.
Be sure to refer to national legislation in order
to comply with the regulations for transporting
objects that are longer than the vehicle.
Page 165 of 276
163
Practical information
7risk of injury resulting from an automatic
change to START mode.
Hybrid vehicles
Before any work is carried out under the
bonnet, it is essential to switch off the ignition
and check that the READY indicator lamp is
off in the instrument panel - risk of serious
injury!
The location of the interior bonnet release lever prevents the bonnet being
opened when the left-hand front door is
closed.
When the engine is hot, handle the
exterior safety catch with care (risk of
burns), using the protected area.
When the bonnet is open, take care not to
damage the safety catch.
Do not open the bonnet under very windy
conditions.
Cooling of the engine when stopped
The engine cooling fan may start after
the engine has been switched off.
Take care with objects or clothing that
could be caught in the blades of the fan!
Opening
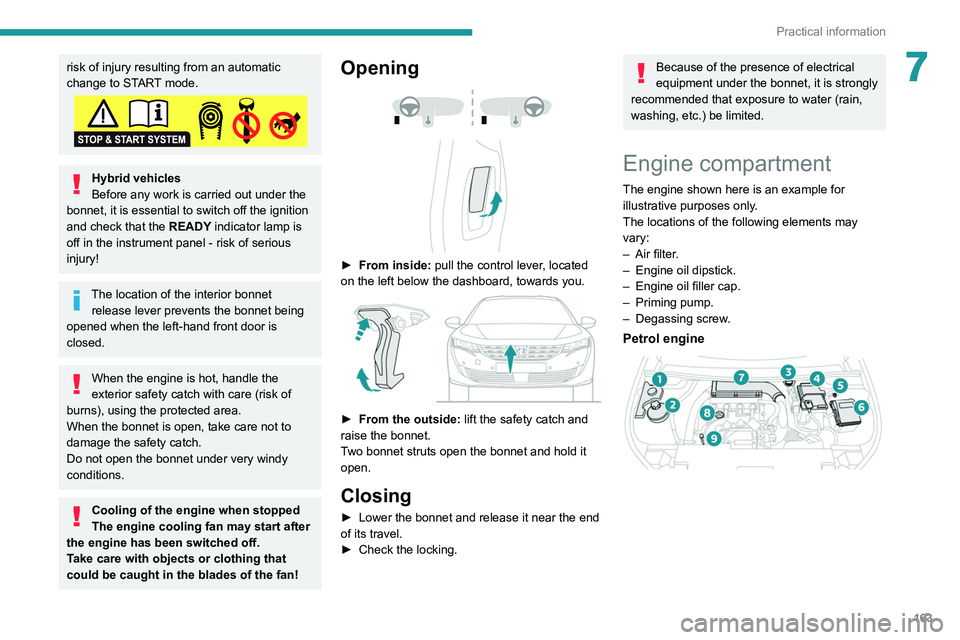
► From inside: pull the control lever , located
on the left below the dashboard, towards you.
► From the outside: lift the safety catch and
raise the bonnet.
T
wo bonnet struts open the bonnet and hold it
open.
Closing
► Lower the bonnet and release it near the end
of its travel.
►
Check the locking.
Because of the presence of electrical
equipment under the bonnet, it is strongly
recommended that exposure to water (rain,
washing, etc.) be limited.
Engine compartment
The engine shown here is an example for
illustrative purposes only.
The locations of the following elements may
vary:
–
Air filter
.
–
Engine oil dipstick.
–
Engine oil filler cap.
–
Priming pump.
–
Degassing screw
.
Petrol engine
Page 169 of 276
167
Practical information
7If the warning lamp stays on, this
indicates a low Diesel additive level.
For more information on Checking levels,
refer to the corresponding section.
Following prolonged operation of the
vehicle at very low speed or at idle, you
may, in exceptional circumstances, notice the
emission of water vapour at the exhaust on
acceleration. This does not affect the
behaviour of the vehicle or the environment.
New vehicle
The first particle filter regeneration
operations may be accompanied by a
"burning" smell, which is perfectly normal.
Manual gearbox
The gearbox does not require any maintenance (no oil change).
Automatic gearbox
The gearbox does not require any maintenance (no oil change).
Electric parking brake
This system does not require any routine servicing. However, in the event of a
problem, do not hesitate to have the system
checked by a PEUGEOT dealer or a qualified
workshop.
For more information on the Electric
parking brake, refer to the
corresponding section.
Brake pads
Brake wear depends on the style of
driving, particularly in the case of vehicles
used in town, over short distances. It may be
necessary to have the condition of the brakes
checked, even between vehicle services.
Unless there is a leak in the circuit, a drop in the
brake fluid level indicates that the brake pads
are worn.
After washing the vehicle, moisture, or in wintry conditions, ice can form on the
brake discs and pads: braking efficiency may
be reduced. Gently dab the brakes to dry and
defrost them.
Brake disc wear
For information on checking brake disc
wear, contact a PEUGEOT dealer or a
qualified workshop.
Wheels and tyres
The inflation pressure of all tyres,
including the spare wheel, must be
checked on "cold” tyres.
The pressures indicated on the tyre pressure
label are valid for "cold" tyres. If you have driven
for more than 10 minutes or more than 6 miles
(10 kilometres) at over 31 mph (50 km/h), add
0.3 bar (30 kPa) to the values indicated on the
label.
Under-inflation increases fuel
consumption. Non-compliant tyre
pressure causes premature wear on tyres and
has an adverse effect on the vehicle's road
holding - risk of an accident!
Driving with worn or damaged tyres reduces the
braking and road holding performance of the
vehicle. It is recommended to regularly check the
condition of the tyres (tread and sidewalls) and
wheel rims as well as the presence of the valves.
When the wear indicators no longer appear set
back from the tread, the depth of the grooves is
less than 1.6 mm; it is imperative to replace the
tyres.
Using different size wheels and tyres from those
specified can affect the lifetime of tyres, wheel
rotation, ground clearance, the speedometer
reading and have an adverse effect on road
holding.
Fitting different tyres on the front and rear axles
can cause the ESC to mistime.
Shock absorbers
It is not easy for drivers to detect when
shock absorbers are worn. Nevertheless,
the shock absorbers have a major impact on
road-holding and braking performance.
Page 172 of 276
170
Practical information
If the AdBlue® tank is completely empty
– which is confirmed by the message
"Top up
AdBlue: Starting impossible" – it is
essential to add at least 5 litres.
Free-wheeling
In certain situations, you must allow the vehicle
to free-wheel (while being towed, on a rolling
road, in an automatic car wash, or being
transported by rail or sea freight, etc.).
The procedure varies according to the type of
gearbox and parking brake.
With a manual gearbox and
electric parking brake
/
Release procedure
► With the engine running and while depressing
the brake pedal, move the gear selector to the
neutral position.
►
While depressing the brake pedal, switch off
the ignition.
►
Release the brake pedal, then switch on the
ignition again.
►
While depressing the brake pedal, press the
control lever to release the parking brake.
►
Release the brake pedal, then switch off the
ignition.
Reverting to normal operation
► While depressing the brake pedal, start the
engine.
With an automatic gearbox
and electric parking brake
/
Release procedure
► With the vehicle stationary and the engine
running, select mode N and switch off the
ignition.
Within 5
seconds:
►
Switch on the ignition again.
►
While depressing the brake pedal, move the
push selector forwards or backwards to confirm
mode
N.
►
While depressing the brake pedal, press the
control lever to release the parking brake.
►
Release the brake pedal, switch off the
ignition.
If the 5-second time limit is exceeded, the
gearbox engages mode P
; it is then necessary to
restart the procedure.
Reverting to normal operation
► While depressing the brake pedal, restart the
engine.
Keyless Entry and Starting
You must not depress the brake pedal
while switching the ignition on or off. If you do,
the engine will start, requiring you to restart
the procedure.
Advice on care and maintenance
General recommendations
Observe the following recommendations to avoid
damaging your vehicle.
Exterior
Never use a high-pressure jet wash in
the engine compartment, due to the risk
of damaging electrical components.
Do not wash the vehicle in strong sunshine or
extremely cold conditions.
When washing the vehicle at an
automatic roller-brush car wash, be sure
to lock the doors and, depending on version,
remove the electronic key and deactivate the
“hands-free” function (“Hands-Free Tailgate
Access”).
When using a pressure washer, hold the
lance at least 30 cm from the vehicle
(particularly when cleaning areas containing
chipped paint, sensors or seals).
Promptly clean up any stains containing
chemicals liable to damage the vehicle's paint
Page 176 of 276
174
In the event of a breakdown
The jack must only be used to change a wheel with a damaged or punctured tyre.
Do not use any jack other than the one
supplied with the vehicle.
If the vehicle does not have its original jack,
contact a PEUGEOT dealer or a qualified
workshop to obtain the one that was intended
by the manufacturer.
The jack meets European standards, as
defined in the Machinery Directive 2006/42/
CE.
The jack does not require any maintenance.
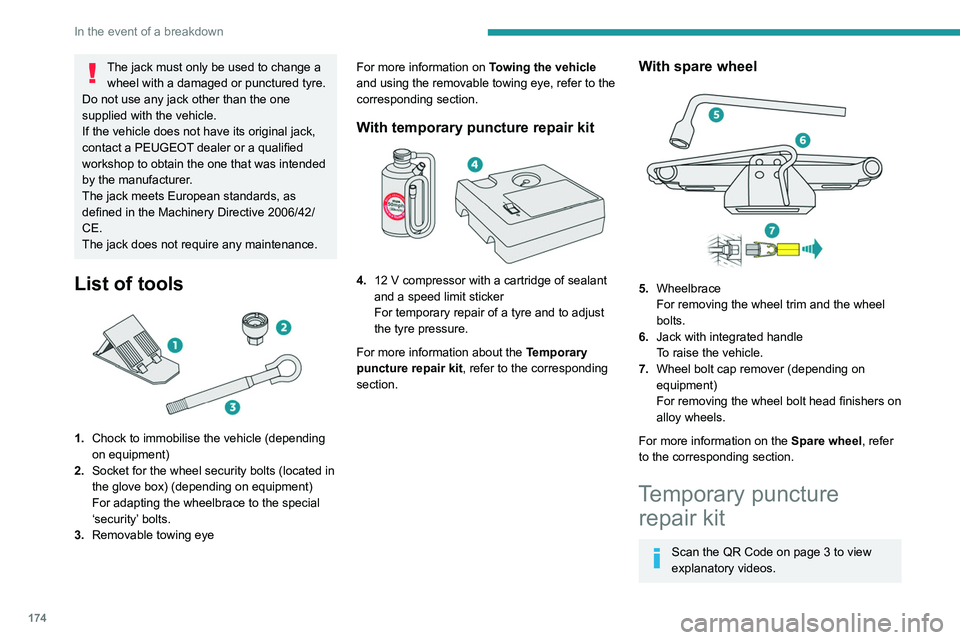
List of tools
1. Chock to immobilise the vehicle (depending
on equipment)
2. Socket for the wheel security bolts (located in
the glove box) (depending on equipment)
For adapting the wheelbrace to the special
‘security’ bolts.
3. Removable towing eye For more information on
Towing the vehicle
and using the removable towing eye, refer to the
corresponding section.
With temporary puncture repair kit
4. 12 V compressor with a cartridge of sealant
and a speed limit sticker
For temporary repair of a tyre and to adjust
the tyre pressure.
For more information about the Temporary
puncture repair kit, refer to the corresponding
section.
With spare wheel
5. Wheelbrace
For removing the wheel trim and the wheel
bolts.
6. Jack with integrated handle
To raise the vehicle.
7. Wheel bolt cap remover (depending on
equipment)
For removing the wheel bolt head finishers on
alloy wheels.
For more information on the Spare wheel, refer
to the corresponding section.
Temporary puncture repair kit
Scan the QR Code on page 3 to view
explanatory videos.