light Peugeot 508 2020 Owner's Manual
[x] Cancel search | Manufacturer: PEUGEOT, Model Year: 2020, Model line: 508, Model: Peugeot 508 2020Pages: 276, PDF Size: 8.43 MB
Page 4 of 276

2
Contents
■
Overview
■
Eco-driving
1Instruments
Digital instrument panels 9
Warning and indicator lamps 11
Indicators 16
Manual test 20
Total distance recorder 20
Lighting dimmer 20
Trip computer 21
Touch screen 22
Remote features (Hybrid) 24
2Access
Electronic key with remote control function and
built-in key, 25
Keyless Entry and Starting 27
Back-up procedures 29
Central locking 30
Alarm 31
Doors 33
Boot 34
Hands-free tailgate 34
Electric windows 38
Panoramic sunroof 39
3Ease of use and comfort
Driving position 41
Front seats 42
Steering wheel adjustment 45
Mirrors 45
Rear seats 46
Heating and Ventilation 48
Dual-zone automatic air conditioning 49
Front demisting - defrosting 52
Heated windscreen 52
Rear screen demisting/defrosting 52
Additional heating/ventilation system 53
Thermal pre-conditioning (Hybrid) 54
Front fittings 55
Courtesy lamps 58
Interior ambient lighting 59
Rear fittings 59
Boot fittings 60
4Lighting and visibility
Exterior lighting control stalk 65
Direction indicators 66
Headlamp beam height adjustment 67
Automatic illumination of headlamps 67
Guide-me-home and welcome lighting 67
Automatic headlamp dipping 68
Static cornering lighting 69
Night Vision 69
Wiper control stalk 71
Changing a wiper blade 73
Automatic wipers 73
5Safety
General safety recommendations 75
Hazard warning lamps 75
Horn 76
Pedestrian horn
(Hybrid) 76
Emergency or assistance call 76
Electronic stability control (ESC) 78
Seat belts 80
Airbags 81
Active bonnet 84
Child seats 85
Deactivating the front passenger airbag 87
ISOFIX child seats 89
i-Size child seats 93
Child lock 94
6Driving
Driving recommendations 96
Starting/Switching off the engine 97
Starting hybrid vehicles 98
Electric parking brake 99
Manual gearbox 102
Automatic gearbox 102
Electric automatic gearbox (Hybrid) 105
Hill start assist 106
Active Suspension Control 107
Driving modes 107
Gear efficiency indicator 108
Stop & Start 109
Under-inflation detection 11 0
Driving and manoeuvring aids - General
recommendations
11 2
Speed Limit Recognition and
Recommendation
11 3
Speed limiter 11 6
Programmable cruise control 11 9
Memorising speeds 120
Drive Assist Plus 121
Adaptive Cruise Control 121
Active Lane Keeping Assist 125
Page 6 of 276

4
Overview
Instruments and controls
These illustrations and descriptions are provided
for information. The presence and location of
some elements vary depending on the version
or trim level.
1.Sunroof and blind controls
Touch-sensitive courtesy lamp / Front touch-
sensitive reading lamps 2.
Warning lamp display for seat belts and front
passenger airbag
Emergency call / Assistance call
3. Interior mirror / Driving in
ELECTRIC mode
indicator LED
4. Head-up digital display
5. Side switch panel / Ticket holder
6. Fusebox
7. Bonnet release
8. Door mirror and electric window control
panel
9. Front armrest
Auxiliary (Jack) socket
10. 12 V socket or USB sockets
11 . Front passenger airbag
12. Glove box
1.Hazard warning lamps
Central locking
2. 8" (PEUGEOT Connect Radio) or 10"
HD
(PEUGEOT Connect Nav) touch screen
3. 12 V socket / USB socket(s)
Storage
Wireless smartphone charger
4. Gearbox control
Full Park Assist
5. Switching the engine on/off "START/STOP"
6. Electric parking brake
7. "DRIVE MODE" selector.
Steering mounted controls
1.Exterior lighting controls / Direction indicators
/ Service indicator
2. Wiper controls / Screenwash / Trip computer
3. Automatic gearbox control paddles
4. Horn / Driver front airbag
5. Cruise control / speed limiter controls /
Adaptive Cruise Control
Page 7 of 276
5
Overview
3.12 V socket / USB socket(s)
Storage
Wireless smartphone charger
4. Gearbox control
Full Park Assist
5. Switching the engine on/off "START/STOP"
6. Electric parking brake
7. "DRIVE MODE" selector.
Steering mounted controls
1.Exterior lighting controls / Direction indicators
/ Service indicator
2. Wiper controls / Screenwash / Trip computer
3. Automatic gearbox control paddles
4. Horn / Driver front airbag
5. Cruise control / speed limiter controls
/
Adaptive Cruise Control 6.
Audio system setting controls
A. Select the instrument panel display mode
B. Voice commands
C. Decrease / Increase volume
D. Select previous / next media
Confirm a selection
E. Access to the Telephone menu
Manage calls
F. Select an audio source
G. Display the list of radio stations / audio tracks
Side switch panel
1. Halogen headlamp beam height adjustment
2. Hands-free tailgate
3. Active Lane Keeping Assistance
4. Lane positioning assist
5. Alarm
6. Temperature pre-conditioning indicator lamp
7. Heated windscreen
8. Opening the fuel filler flap
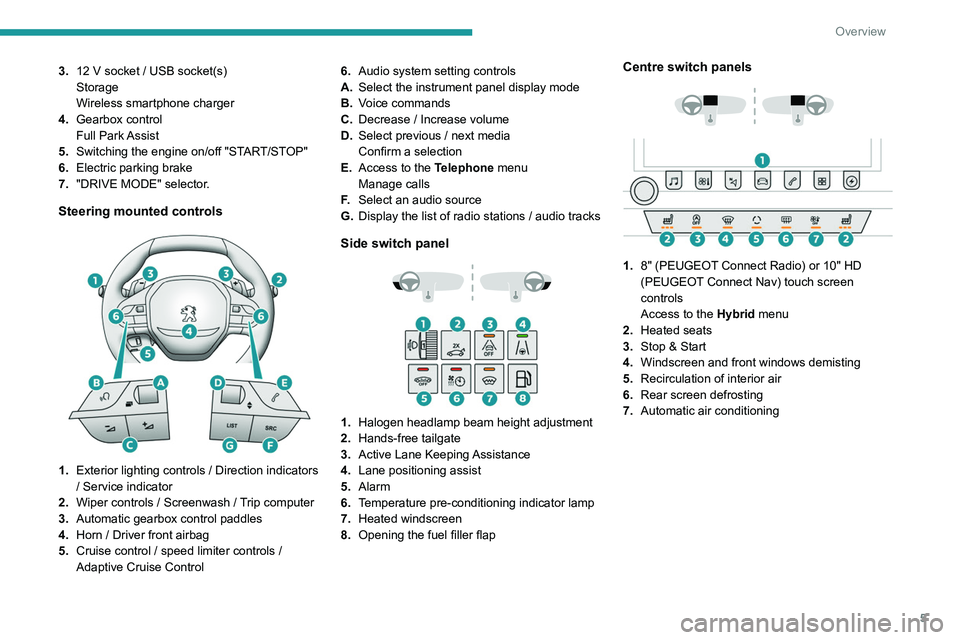
Centre switch panels
1. 8" (PEUGEOT Connect Radio) or 10" HD
(PEUGEOT Connect Nav) touch screen
controls
Access to the Hybrid menu
2. Heated seats
3. Stop & Start
4. Windscreen and front windows demisting
5. Recirculation of interior air
6. Rear screen defrosting
7. Automatic air conditioning
Page 13 of 276
.
•
\"G-metres \" (Sport mode).
•
\"Temperatures \" (engine oil).
•")
11
Instruments
1• "Driving aids".
• "Empty".
•
"Engine info " (Sport mode).
•
"G-metres " (Sport mode).
•
"Temperatures " (engine oil).
•
“Media".
•
“Navigation".
•
“Trip computer".
•
"Rev counter".
•
"Energy flow" (depending on version).
•
"Power indicator" (depending on version).
•
"Energy consumption " (depending on
version).
•
"Night vision ".
►
Confirm to save and exit.
The "
PERSONAL" display mode is enabled
immediately.
Warning and indicator
lamps
Displayed as symbols, the warning and indicator
lamps inform the driver of the occurrence of a
malfunction (warning lamps) or of the operating
status of a system (operation or deactivation
indicator lamps). Certain lamps light up in two
ways (fixed or flashing) and/or in several colours.
Associated warnings
The illumination of a lamp may be accompanied
by an audible signal and/or a message displayed
in a screen. Relating the type of alert to the operating status
of the vehicle allows you to determine whether
the situation is normal or whether a fault has
occurred: refer to the description of each lamp
for further information.
When the ignition is switched on
Certain red or orange warning lamps come on
for a few seconds when the ignition is switched
on. These warning lamps should go off as soon
as the engine is started.
For more information on a system or a function,
refer to the corresponding section.
Warning lamp continuously
lit
The illumination of a red or orange warning lamp
indicates the occurrence of a fault that needs
further investigation.
If a warning lamp remains lit
The references (1), (2) and (3) in the warning
and indicator lamp description indicate whether
you should contact a qualified professional in
addition to the immediate recommended actions.
(1): You must stop the vehicle
.
Stop as soon as it is safe to do so and switch off
the ignition.
(2): Contact a PEUGEOT dealer or a qualified
workshop.
(3): Visit a PEUGEOT dealer or a qualified
workshop.
List of warning and
indicator lamps
Red warning/indicator lamps
STOP
Fixed, associated with another warning
lamp, accompanied by the display of a
message and an audible signal.
A serious fault with the engine, braking system,
power steering, automatic gearbox or a major
electrical fault has been detected.
Carry out (1) and then (2).
Maximum engine coolant temperatureFixed.
The temperature of the cooling system is
too high.
Carry out (1), then wait until the engine has
cooled down before topping up the level, if
necessary. If the problem persists, carry out (2).
Engine oil pressureFixed.
There is a fault with the engine lubrication
system.
Carry out (1) and then (2).
System malfunction (Hybrid)Fixed.
The rechargeable hybrid system is faulty.
Carry out (1) and then (2).
Page 18 of 276

16
Instruments
The engine will not switch off at the next traffic
stop, if the exterior temperature is:
–
below 0°C.
–
above +35°C.
Flashing then fixed, accompanied by a
message.
The system has a fault.
Carry out (3).
Night VisionFixed.
The system has been activated, but
the vehicle is travelling too fast or the exterior
temperature conditions are outside the operating
range.
The display is available with the "Night vision"
mode but the system does not emit an alert.
Rear foglampsFixed.
The lamps are on.
Green warning/indicator lamps
Stop & Start
Fixed.
When the vehicle stops, the Stop & Start
puts the engine into STOP mode.
Flashing temporarily.
STOP mode is momentarily unavailable
or START mode is automatically triggered.
Vehicle ready to drive (Hybrid)Fixed, accompanied by an audible signal
when it comes on.
The vehicle is ready to drive. The indicator lamp goes out upon reaching a
speed of approximately 3 mph (5
km/h) and
lights up again when the vehicle stops moving.
The lamp will go out when you turn off the
engine and exit the vehicle.
Park Assist or Full Park AssistFixed.
The function is active.
Active Lane Keeping AssistFixed.
The function has been activated.
All the conditions have been met: the system is
operating.
Automatic wipingFixed.
Automatic windscreen wiping is activated.
Night VisionFixed.
The function has been activated.
All the conditions have been met: the system is
operating.
Direction indicators
Flashing with audible signal.
The direction indicators are on.
SidelampsFixed.
The lamps are on.
Dipped beam headlampsFixed.
The lamps are on.
Automatic headlamp dippingFixed.
The function has been activated
via the touch screen (Driving
/ Vehicle menu).
The lighting control stalk is in the "AUTO"
position.
Blue warning/indicator lamps
Main beam headlamps
Fixed.
The lamps are on.
Black/white warning lamps
Automatic gearbox or Electric automatic
gearbox (e-EAT8) (Hybrid)
Fixed.
The automatic gearbox is locked.
You must press the Unlock button to unlock it.
eSave function (Hybrid)Fixed, accompanied by the reserved
electric range.
The
eSave function is activated.
Indicators
Service indicator
The servicing information is expressed in terms
of distance (kilometres or miles) and time
(months or days).
The alert is given at whichever of these two
terms is reached first.
Page 19 of 276

17
Instruments
1The servicing information is displayed in the
instrument panel. Depending on the version of
the vehicle:
–
The distance recorder display line indicates
the distance remaining before the next service
is due, or the distance travelled since it was due
preceded by the "-" sign.
–
An alert message indicates the distance
remaining, as well as the period before the next
service is due or how long it is overdue.
The value indicated is calculated according to the distance covered and
the time elapsed since the last service.
The alert may also be triggered close to a
due date.
Service spannerOn temporarily when the ignition is
switched on.
Between 620 and 1,860 miles (1,000 and 3,000
km) remain before the next service is due.
Fixed, when the ignition is switched on.
The next service is due in less than 620
miles (1,000 km).
Have your vehicle serviced very soon.
Service spanner flashingFlashing then fixed, when the
ignition is switched on.
(With BlueHDi Diesel engines, combined with the
Service warning lamp.)
The servicing interval has been exceeded.
Have your vehicle serviced as soon as possible.
Resetting the service indicator
The service indicator must be reset after each
service.
If you have serviced your vehicle yourself:
►
Switch off the ignition.
► Press and hold the button located on the end
of the lighting control stalk .
►
With no action on the brake pedal, press the
ST
ART/STOP button once; a temporary display
window appears and a countdown begins.
►
When the display indicates =0, release the
lighting control stalk button; the spanner symbol
disappears.
If you disconnect the battery following
this operation, lock the vehicle and wait
at least 5 minutes for the reset to be
registered.
Retrieving the servicing information
You can view the servicing information by
pressing the " Check
/ Diagnostic" button
in the Driving
/ Vehicle touch screen menu.
Engine oil level indicator
(Depending on version.)
On versions fitted with an electric gauge, the
engine oil level status is displayed on the
instrument panel for a few seconds when
the ignition is switched on, after the servicing
information, in the form of messages.
The level read will only be correct if the vehicle is on level ground and the engine
has been off for more than 30 minutes.
Oil level incorrect
This is indicated by a message prompting you
to top up, accompanied by the lighting of the
Service warning lamp and an audible signal.
If the low oil level is confirmed by a check using
the dipstick, the level must be topped up to avoid
damage to the engine.
For more information on Checking levels, refer
to the corresponding section.
Gauge fault
This is indicated by the message " Oil level
measurement invalid" on the instrument panel.
Contact a PEUGEOT dealer or a qualified
workshop.
In the event of a fault with the electric
gauge, the oil level is no longer
monitored.
If the system is faulty, you must check the
engine oil level using the manual dipstick
located under the bonnet.
For more information on Checking levels,
refer to the corresponding section.
Page 20 of 276

18
Instruments
Engine coolant temperature
indicator
With the engine running:
– In zone A, the temperature is correct.
–
In zone
B, the temperature is too high; the
associated warning lamp and the central STOP
warning lamp come on in red on the instrument
panel, accompanied by the display of a message
and an audible signal.
You must stop the vehicle as soon as it is
safe to do so.
Wait a few minutes before switching off the
engine.
After switching off the ignition, carefully open the bonnet and check the coolant
level.
For more information on Checking
levels, refer to the corresponding
section.
AdBlue® range indicators
(BlueHDi)
The Diesel BlueHDi engines are equipped with
a system that associates the SCR (Selective
Catalytic Reduction) emissions control system
and the Diesel particle filter (DPF) for the
treatment of exhaust gases. They cannot
function without AdBlue
® fluid.
When the level of AdBlue® falls below the
reserve level (between 1,500 and 0 miles (2,400
and 0
km)), a warning lamp lights up when
the ignition is switched on and an estimate
of the distance that can be travelled before
engine starting is prevented is displayed in the
instrument panel.
The engine starting prevention system required by regulations is activated
automatically once the AdBlue
® tank is empty.
It is then no longer possible to start the
engine until the minimum level of AdBlue
® has
been topped up.
Manual display of the range
While the range is greater than 1,500 miles
(2,400 km), it is not displayed automatically.
The range information can be accessed via the "Check/Diagnostics" button in the
Driving/Vehicle menu of the touch screen.
Actions required related to a lack of AdBlue®
The following warning lamps light up when the
quantity of AdBlue® is lower than the reserve
level corresponding to a range of 1,500 miles
(2,400 km).
Together with the warning lamps, messages
regularly remind you of the need to top up to
avoid engine starting being prevented. Refer to
the Warning and indicator lamps section for
details of the messages displayed.
For more information on AdBlue®
(BlueHDi engines), and in particular on
topping up, refer to the corresponding section.
Warning/
indicator
lamps lit Action Remaining
range
Top up. Between 1,500 and
500
miles
(2,400 and
800
km)
Top up as
soon as
possible.Between 500
and 62
miles
(800 and
100
km)
Page 22 of 276
.
The cursor is located in this zone
during electric driving phases and
during optimal usage phases of the
petrol engine, a")
20
Instruments
ECO Optimal use of energy (internal combustion or electric).
The cursor is located in this zone
during electric driving phases and
during optimal usage phases of the
petrol engine, accessible with suitable
driving.
An indicator indicates the restart
threshold of the petrol engine. The
driver can therefore moderate their
acceleration to remain in electric
driving mode.
CHARGE Energy recovery for recharging the traction battery.
The cursor is located in this zone
during deceleration phases: taking
your foot off the accelerator pedal or
braking.
Charge level indicator
(Hybrid)
The charge level of the traction battery and
the remaining range in electric driving mode
are permanently displayed when the vehicle is
switched on.
With the ignition off, opening the driver's
door activates the indicator.
Manual test
This function allows you to check certain
indicators and display the alerts log.
It can be accessed via the "Diagnostic /
Check" button in the Driving / Vehicle
touch screen menu.
The following information is displayed on the
instrument panel:
–
Engine oil level.
–
Next service due.
–
T
yre pressures.
–
Driving range associated with the
AdBlue and
the SCR system (BlueHDi Diesel).
–
Active alerts.
This information is also displayed automatically every time the ignition is
switched on.
Total distance recorder
The total distance recorder measures the total
distance travelled by the vehicle since its initial
registration.
With the ignition on, the total distance is
displayed at all times. It remains displayed for
30 seconds after switching off the ignition. It is
displayed when the driver's door is opened, and
when the vehicle is locked or unlocked.
When travelling abroad, you may have to
change the distance units (km or miles):
the road speed must be displayed in the local
country’s official unit (km/h or mph).
The unit is changed via the screen
configuration menu, with the vehicle
stationary.
Lighting dimmer
This system allows the brightness of the
instruments and controls to be adjusted to suit
the ambient light level.
With 8" touch screen
► Press this button to select the
Settings menu.
► Select " Brightness".
► Adjust the brightness by pressing the
arrows or moving the slider .
The settings are applied immediately.
►
Press outside the settings window to exit.
Y
ou can also switch off the screen:
► Press this button to select the
Settings menu.
► Select " Dark".
The screen goes off completely.
Page 26 of 276
 and historical values:
–
Blue bar chart: directly consumed energy
supplied by the traction battery
.
–
G")
24
Instruments
1. Average electrical consumption for the current
trip (kWh/100 km) and historical values:
–
Blue bar chart: directly consumed energy
supplied by the traction battery
.
–
Green bar chart: energy recovered during
deceleration and braking, used to recharge the
battery
.
2. Average fuel consumption for the current trip
(kWh/100
km) and historical values (orange bar
chart).
►
Y
ou can change the displayed time scale by
pressing the
-
or + buttons.
eSave function
The eSave tab makes it possible to reserve all or
part of the electrical energy of the traction battery
for later use during a journey (e.g. driving in an
urban area or in an area reserved for electric
vehicles).
►
Activate the function by choosing ON
then
select the electrical energy to be reserved: 10
km, 20 km or all of the electrical energy ( MAX).
Activation of the function is confirmed by
the lighting up of this indicator lamp in the
instrument panel and the display of the energy
reserve in miles or kms.
►
T
o use the energy reserve, choose the
ELECTRIC driving mode in the mode selector.
The function settings are not saved when the
ignition is switched off.
If the requested range exceeds the
available range (not recommended), the internal combustion engine starts to ensure
that the traction battery is recharged to the
requested threshold - risk of downgraded
performance and overconsumption of fuel!
Information banner(s)
Certain information is displayed permanently in
the touch screen banner(s).
8" touch screen upper banner
– Time and exterior temperature (a blue warning
lamp appears if there is a risk of ice).
–
Reminder of the air conditioning information,
and direct access to the corresponding menu.
–
Reminder of the information in the
Radio
Media and Telephone menus.
–
Notifications.
–
Access to the
Settings for the touch screen
and the digital instrument panel (date/time,
languages, units, etc.).
10" HD touch screen side banners
– Exterior temperature (a blue warning lamp
appears if there is a risk of ice).
–
Access to the
Settings for the touch screen
and the digital instrument panel (date/time,
languages, units, etc.).
–
Notifications.
–
Reminder of the air conditioning information,
and direct access to the corresponding menu.
–
Time.
Remote features (Hybrid)
These features are accessible
using a smartphone, via the
MyPeugeot application:
–
Battery charge management.
–
T
emperature pre-conditioning management.
–
Consumption, charge status and driving range
statistics.
Installation procedure
► Download the MyPeugeot app from the
appropriate online store for your smartphone.
►
Create an account.
►
Enter the vehicle’
s VIN (code beginning with
"VF" on the vehicle registration document).
For more information on Identification
markings, refer to the corresponding section.
Network coverage
In order to be able to use the various
remotely operable features, ensure that your
vehicle is located in an area covered by the
mobile network.
A lack of network coverage may prevent
communication with the vehicle (for example,
if it is in an underground car park). In such
cases, the application will display a message
indicating that the connection with the vehicle
could not be established.
Page 27 of 276

25
Access
2Electronic key with
remote control function
and built-in key,
Remote control function
The remote control can be used for the following
remote functions, depending on version:
–
Unlocking / Locking / Deadlocking the vehicle.
–
Unlocking - Opening / Closing the boot.
–
Remote operation of lighting.
–
Folding / Unfolding the door mirrors.
–
Activating / Deactivating the alarm.
–
Locating the vehicle.
–
Opening / Closing the windows.
–
Closing the sunroof.
–
Activating the vehicle’
s electronic immobiliser.
Back-up procedures allow the vehicle to be
locked / unlocked in the event of a failure of the
remote control, the central locking, the battery,
etc. For more information on the Back-up procedures, please refer to the corresponding
section.
Integral key
The key built into the remote control can be
used for the following operations, depending on
version:
–
Unlocking/Locking/Deadlocking the vehicle.
–
Activation/Deactivation of the manual child
lock.
–
Activation/Deactivation of the front passenger
airbag.
–
Back-up Unlocking/Locking of the doors.
► To eject the key or put it back in place, pull
and hold the button.
Unlocking the vehicle
Selective unlocking (driver’s door, boot) is
configured in the Driving/Vehicle touch
screen menu.
Complete unlocking
► Press the unlocking button.
Selective unlocking
Driver’s door and fuel/charging flap
► Press the unlocking button.
►
Press it again
to unlock the other doors and
the boot.
Complete or selective unlocking and alarm
deactivation is confirmed by the flashing of the
sidelamps and/or daytime running lamps.
The door mirrors unfold.
Selective unlocking and opening of
the tailgate
By default, selective unlocking of the tailgate
is deactivated and its motorised operation is
activated.
► Press and hold this button to unlock
the boot and trigger the motorised
opening of the tailgate.
The doors and fuel filler flap remain locked.
If selective unlocking of the tailgate is
deactivated, pressing the button unlocks
the whole vehicle.