PEUGEOT 508 2021 Service Manual
Manufacturer: PEUGEOT, Model Year: 2021, Model line: 508, Model: PEUGEOT 508 2021Pages: 292, PDF Size: 8.61 MB
Page 41 of 292
39
Access
2► press button C or the exterior control B for
more than 3 seconds (memorisation is confirmed
by a brief audible signal).
Memorising is not available until the
height of opening is more than or equal
to 1 metre between the low position and the
high position of the tailgate.
To delete the memorised position:
►
open the tailgate to any position.
►
press button
C or the exterior control B for
more than 3 seconds (deletion is confirmed by a
long audible signal).
Manual operation
The tailgate can be manoeuvred by hand, even
with motorised operation activated.
The tailgate must be stationary.
When opening and closing the motorised tailgate
manually, there is no assistance from gas struts.
Resistance to opening and closing is therefore
entirely normal.
Repeatedly opening and closing the
motorised tailgate can cause overheating
of its electric motor, after which opening and
closing will not be possible.
Allow at least 10 minutes for the electric
motor to cool down before operating the
tailgate again.
If you are unable to wait, operate it manually.
Manual closing of the
motorised tailgate in case of
failure
This operation is only necessary in the case of
failure of the tailgate motor .
If the failure originates from the battery, it is
recommended to recharge it or change it with the
tailgate closed.
In this situation, a significant force may be
needed to close the tailgate.
►
Close it gently without slamming, as slowly as
possible, by pushing at the centre of the tailgate.
Do not lower the tailgate by pushing at
one of its sides - risk of damage!
Precautions in use
In wintry conditions
To avoid any operating problems, remove
the snow or wait until the ice melts before
requesting motorised opening of the tailgate.
When washing
When washing the vehicle in an
automatic car wash, do not forget to lock and
move away from the vehicle
to prevent any
risk of unwanted opening.
Hands-free function
(Hands-Free Tailgate
Access)
(Depending on version)
With the electronic key on your person, this
function allows the motorised tailgate to be
opened, closed or stopped via a "kicking"
movement under the rear bumper.
The "Hands-Free Tailgate/Access" function is set via the Driving/Vehicle
touch screen menu.
Ensure that you are steady on your feet
before performing the "kicking"
movement.
Take care not to touch the exhaust system
which may be hot - risk of burns!
Rechargeable hybrid vehicles
The function is not available when the
vehicle is connected.
Page 42 of 292
40
Access
► remove the electronic key from the
recognition zone, with the tailgate closed.
For more information on the Towing device
with quickly detachable towball , refer to the
corresponding section.
Electric windows
1. Left-hand front
2. Right-hand front
3. Right-hand rear
4. Left-hand rear
5. Deactivation of electric window controls
located by rear seats
Locking the rear doors - Electric child lock
(depending on version)
For more information on the Electric child lock,
refer to the corresponding section.
Manual operation
► To open/close the window, press/pull the
switch without passing the point of resistance;
the window stops as soon as the switch is
released.
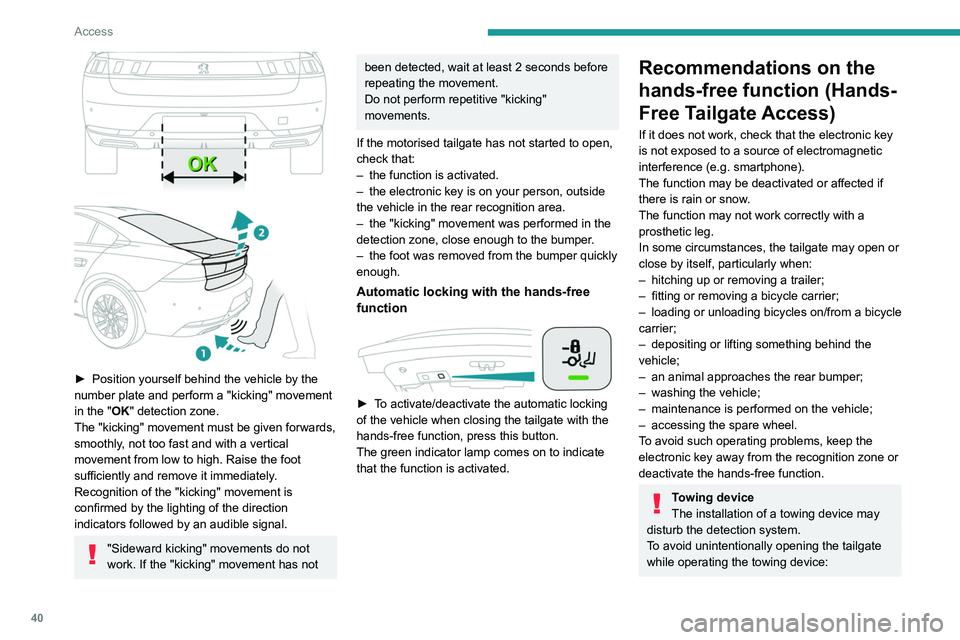
► Position yourself behind the vehicle by the
number plate and perform a "kicking" movement
in the "
OK" detection zone.
The "kicking" movement must be given forwards,
smoothly, not too fast and with a vertical
movement from low to high. Raise the foot
sufficiently and remove it immediately.
Recognition of the "kicking" movement is
confirmed by the lighting of the direction
indicators followed by an audible signal.
"Sideward kicking" movements do not
work. If the "kicking" movement has not
been detected, wait at least 2 seconds before
repeating the movement.
Do not perform repetitive "kicking"
movements.
If the motorised tailgate has not started to open,
check that:
–
the function is activated.
–
the electronic key is on your person, outside
the vehicle in the rear recognition area.
–
the "kicking" movement was performed in the
detection zone, close enough to the bumper
.
–
the foot was removed from the bumper quickly
enough.
Automatic locking with the hands-free
function
► To activate/deactivate the automatic locking
of the vehicle when closing the tailgate with the
hands-free function, press this button.
The green indicator lamp comes on to indicate
that the function is activated.
Recommendations on the
hands-free function (Hands-
Free Tailgate Access)
If it does not work, check that the electronic key
is not exposed to a source of electromagnetic
interference (e.g. smartphone).
The function may be deactivated or affected if
there is rain or snow.
The function may not work correctly with a
prosthetic leg.
In some circumstances, the tailgate may open or
close by itself, particularly when:
–
hitching up or removing a trailer;
–
fitting or removing a bicycle carrier;
–
loading
or unloading bicycles on/from a bicycle
carrier;
–
depositing or lifting something behind the
vehicle;
–
an animal approaches the rear bumper;
–
washing the vehicle;
–
maintenance is performed on the vehicle;
–
accessing the spare wheel.
T
o avoid such operating problems, keep the
electronic key away from the recognition zone or
deactivate the hands-free function.
Towing device
The installation of a towing device may
disturb the detection system.
To avoid unintentionally opening the tailgate
while operating the towing device:
Page 43 of 292
41
Access
2► remove the electronic key from the
recognition zone, with the tailgate closed.
For more information on the T
owing device
with quickly detachable towball , refer to the
corresponding section.
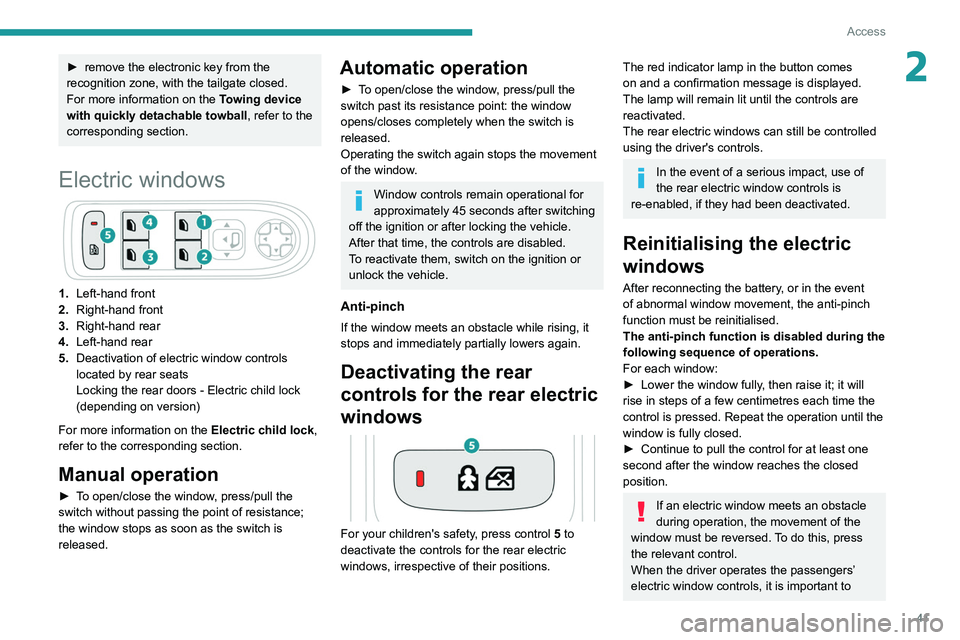
Electric windows
1. Left-hand front
2. Right-hand front
3. Right-hand rear
4. Left-hand rear
5. Deactivation of electric window controls
located by rear seats
Locking the rear doors - Electric child lock
(depending on version)
For more information on the Electric child lock,
refer to the corresponding section.
Manual operation
► To open/close the window, press/pull the
switch without passing the point of resistance;
the window stops as soon as the switch is
released.
Automatic operation
► To open/close the window, press/pull the
switch past its resistance point: the window
opens/closes completely when the switch is
released.
Operating the switch again stops the movement
of the window.
Window controls remain operational for
approximately 45 seconds after switching
off the ignition or after locking the vehicle.
After that time, the controls are disabled.
To reactivate them, switch on the ignition or
unlock the vehicle.
Anti-pinch
If the window meets an obstacle while rising, it
stops and immediately partially lowers again.
Deactivating the rear
controls for the rear electric
windows
For your children's safety, press control 5 to
deactivate the controls for the rear electric
windows, irrespective of their positions.
The red indicator lamp in the button comes
on and a confirmation message is displayed.
The lamp will remain lit until the controls are
reactivated.
The rear electric windows can still be controlled
using the driver's controls.
In the event of a serious impact, use of
the rear electric window controls is
re-enabled, if they had been deactivated.
Reinitialising the electric
windows
After reconnecting the battery, or in the event
of abnormal window movement, the anti-pinch
function must be reinitialised.
The anti-pinch function is disabled during the
following sequence of operations.
For each window:
►
Lower the window fully
, then raise it; it will
rise in steps of a few centimetres each time the
control is pressed. Repeat the operation until the
window is fully closed.
►
Continue to pull the control for at least one
second after the window reaches the closed
position.
If an electric window meets an obstacle
during operation, the movement of the
window must be reversed. To do this, press
the relevant control.
When the driver operates the passengers’
electric window controls, it is important to
Page 44 of 292
42
Access
ensure that nothing can prevent the window
from closing properly.
It is important to ensure that passengers use
the electric windows correctly.
Pay particular attention to children when
operating the windows.
Be aware of passengers and/or other persons
present when closing windows remotely using
the electronic key.
Do not put your head or arms through the
open windows when the vehicle is moving -
risk of serious injury!
Panoramic sunroof
The panoramic sunroof consists of a movable
glass panel that slides over the roof and a blind
that can be opened independently. Opening the
sunroof automatically opens the blind.
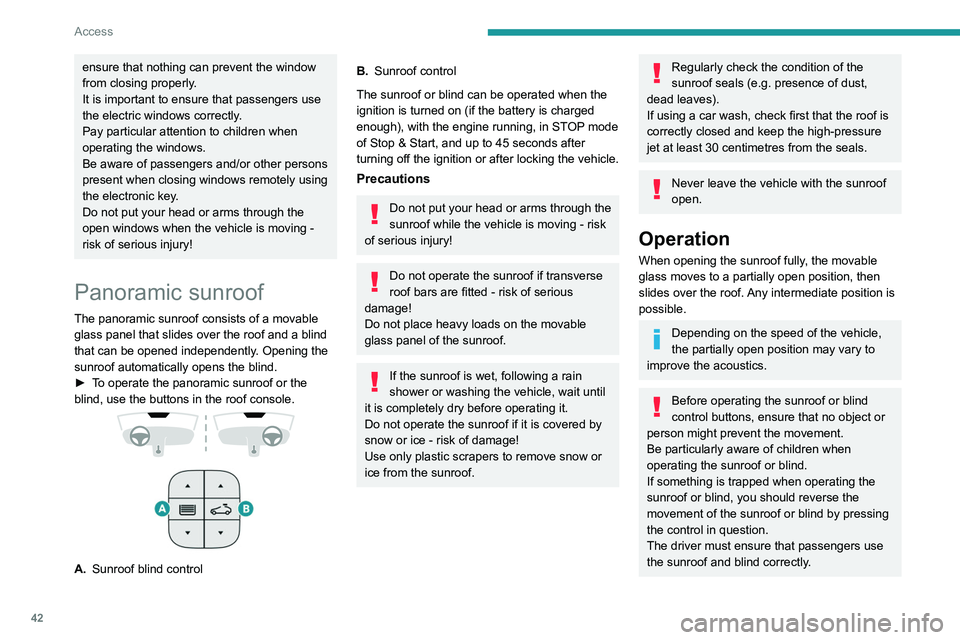
►
T
o operate the panoramic sunroof or the
blind, use the buttons in the roof console.
A. Sunroof blind control
B.Sunroof control
The sunroof or blind can be operated when the
ignition is turned on (if the battery is charged
enough), with the engine running, in STOP mode
of Stop & Start, and up to 45
seconds after
turning off the ignition or after locking the vehicle.
Precautions
Do not put your head or arms through the
sunroof while the vehicle is moving - risk
of serious injury!
Do not operate the sunroof if transverse
roof bars are fitted - risk of serious
damage!
Do not place heavy loads on the movable
glass panel of the sunroof.
If the sunroof is wet, following a rain
shower or washing the vehicle, wait until
it is completely dry before operating it.
Do not operate the sunroof if it is covered by
snow or ice - risk of damage!
Use only plastic scrapers to remove snow or
ice from the sunroof.
Regularly check the condition of the
sunroof seals (e.g. presence of dust,
dead leaves).
If using a car wash, check first that the roof is
correctly closed and keep the high-pressure
jet at least 30 centimetres from the seals.
Never leave the vehicle with the sunroof
open.
Operation
When opening the sunroof fully, the movable
glass moves to a partially open position, then
slides over the roof. Any intermediate position is
possible.
Depending on the speed of the vehicle,
the partially open position may vary to
improve the acoustics.
Before operating the sunroof or blind
control buttons, ensure that no object or
person might prevent the movement.
Be particularly aware of children when
operating the sunroof or blind.
If something is trapped when operating the
sunroof or blind, you should reverse the
movement of the sunroof or blind by pressing
the control in question.
The driver must ensure that passengers use
the sunroof and blind correctly.
Page 45 of 292

43
Access
2Anti-pinch system
If the sunroof or blind encounters an obstacle
when closing, the movement is automatically
reversed.
The roof anti-pinch system is designed to be
effective at speeds of up to 75 mph (120 km/h).
Opening/Closing
► To open the sunroof or the blind, use the
part of the button located towards the rear of the
vehicle.
►
T
o close the sunroof or the blind, use the part
of the button located towards the front of the
vehicle.
Operation of buttons
► Pressing a button beyond its point of
resistance directly opens or closes the sunroof
or blind fully
.
►
Pressing the button again stops the current
movement.
►
When holding a button (without going
beyond the point of resistance), the movement
of the sunroof or blind stops when this button is
released.
►
When the sunroof is closed: pressing once
without passing the point of resistance moves it
to a partially open position.
►
When the sunroof is partially open: pressing
once without passing the point of resistance
opens or closes it fully
.
The sunroof and windows, then the blind, can be closed by holding down the door
locking control. The manoeuvre stops as soon
as the locking control is released.
Closing of the blind is limited by the
position of the sunroof: the blind cannot
go further than the front of the movable glass.
During simultaneous movements of the
sunroof and blind, the blind automatically
stops or resumes movement depending on
the position of the sunroof.
Reinitialisation
Following reconnection of the battery or in the
event of a fault or jerky movement of the sunroof
or blind, reinitialisation is required.
►
Check that nothing is interfering with the
sunroof or blind and that the seals are clean.
►
With the ignition on, fully close the sunroof
and blind.
►
Press and hold the front part of button
B, until
the sunroof and blind move slightly, then hold for
a further 1 second before releasing.
►
W
ait 2 seconds and then press and hold the
front part of button B. The blind and the sunroof
will open and close, one after the other. When
both are completely closed again, hold for a
further 2 seconds and release.
If there is an operating fault, restart the
whole procedure.
Page 46 of 292
44
Ease of use and comfort
Driving position
Correct seating position
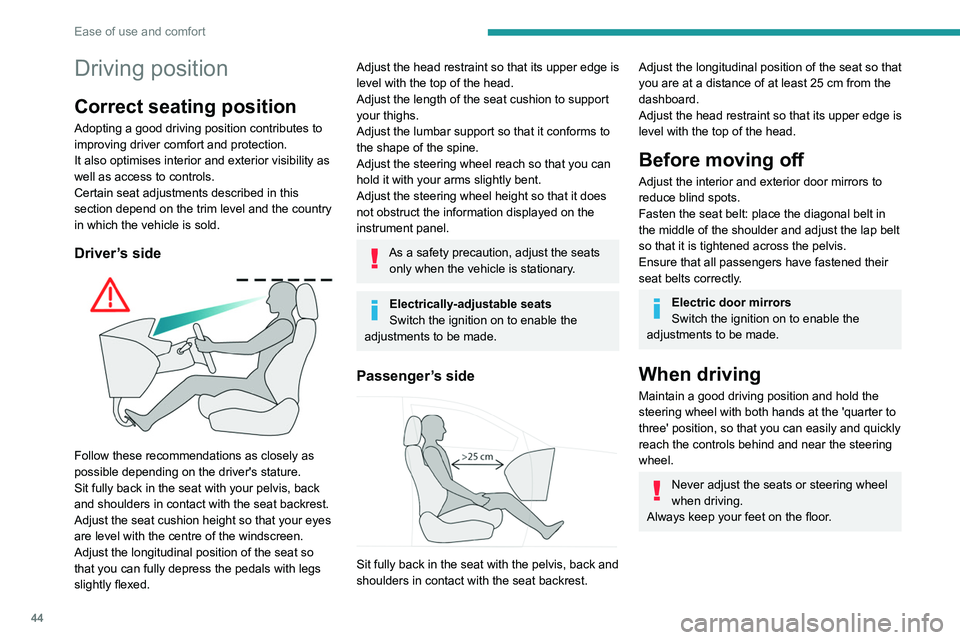
Adopting a good driving position contributes to
improving driver comfort and protection.
It also optimises interior and exterior visibility as
well as access to controls.
Certain seat adjustments described in this
section depend on the trim level and the country
in which the vehicle is sold.
Driver’s side
Follow these recommendations as closely as
possible depending on the driver's stature.
Sit fully back in the seat with your pelvis, back
and shoulders in contact with the seat backrest.
Adjust the seat cushion height so that your eyes
are level with the centre of the windscreen.
Adjust the longitudinal position of the seat so
that you can fully depress the pedals with legs
slightly flexed.
Adjust the head restraint so that its upper edge is
level with the top of the head.
Adjust the length of the seat cushion to support
your thighs.
Adjust the lumbar support so that it conforms to
the shape of the spine.
Adjust the steering wheel reach so that you can
hold it with your arms slightly bent.
Adjust the steering wheel height so that it does
not obstruct the information displayed on the
instrument panel.
As a safety precaution, adjust the seats only when the vehicle is stationary.
Electrically-adjustable seats
Switch the ignition on to enable the
adjustments to be made.
Passenger’s side
Sit fully back in the seat with the pelvis, back and
shoulders in contact with the seat backrest.
Adjust the longitudinal position of the seat so that
you are at a distance of at least 25 cm from the
dashboard.
Adjust the head restraint so that its upper edge is
level with the top of the head.
Before moving off
Adjust the interior and exterior door mirrors to
reduce blind spots.
Fasten the seat belt: place the diagonal belt in
the middle of the shoulder and adjust the lap belt
so that it is tightened across the pelvis.
Ensure that all passengers have fastened their
seat belts correctly.
Electric door mirrors
Switch the ignition on to enable the
adjustments to be made.
When driving
Maintain a good driving position and hold the
steering wheel with both hands at the 'quarter to
three' position, so that you can easily and quickly
reach the controls behind and near the steering
wheel.
Never adjust the seats or steering wheel
when driving.
Always keep your feet on the floor.
Front seats
Before moving the seat backwards,
ensure that there is no person or object
that might prevent the full travel of the seat.
There is a risk of trapping or pinching
passengers if present in the rear seats or of
jamming the seat if large objects are placed
on the floor behind the seat.
Front head restraints
Adjusting the height
Upwards:
► Pull the head restraint up to the desired
position; you can feel the head restraint clicking
into position.
Downwards:
► Depending on equipment, press lug A or
button B and then, while still pressing, lower the
head restraint.
Page 47 of 292
45
Ease of use and comfort
3Front seats
Before moving the seat backwards,
ensure that there is no person or object
that might prevent the full travel of the seat.
There is a risk of trapping or pinching
passengers if present in the rear seats or of
jamming the seat if large objects are placed
on the floor behind the seat.
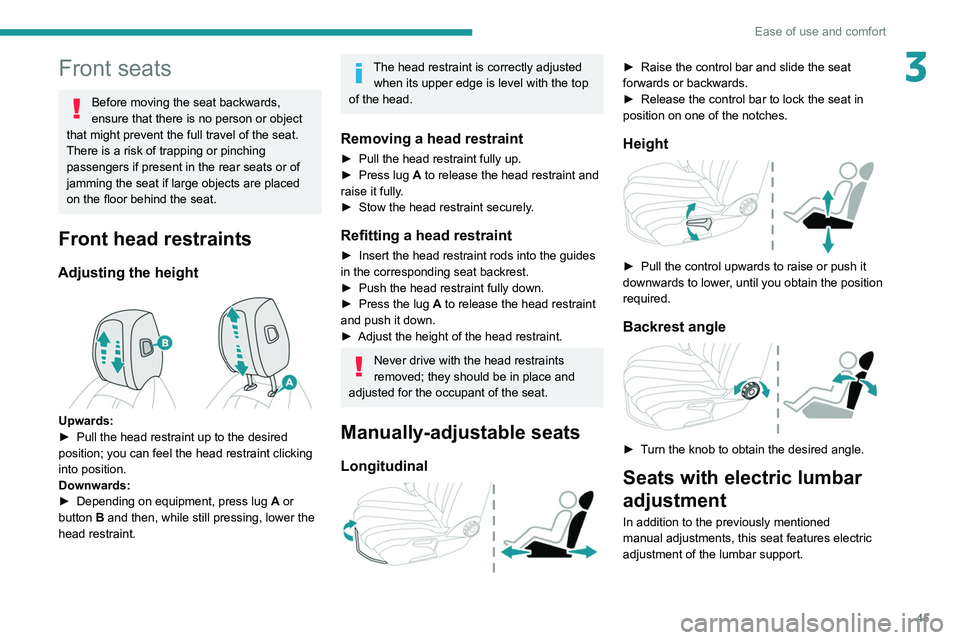
Front head restraints
Adjusting the height
Upwards:
► Pull the head restraint up to the desired
position; you can feel the head restraint clicking
into position.
Downwards:
►
Depending on equipment, press lug A
or
button B and then, while still pressing, lower the
head restraint.
The head restraint is correctly adjusted when its upper edge is level with the top
of the head.
Removing a head restraint
► Pull the head restraint fully up.
► Press lug A to release the head restraint and
raise it fully.
►
Stow the head restraint securely
.
Refitting a head restraint
► Insert the head restraint rods into the guides
in the corresponding seat backrest.
►
Push the head restraint fully down.
►
Press the lug
A to release the head restraint
and push it down.
►
Adjust the height of the head restraint.
Never drive with the head restraints
removed; they should be in place and
adjusted for the occupant of the seat.
Manually-adjustable seats
Longitudinal
► Raise the control bar and slide the seat
forwards or backwards.
►
Release the control bar to lock the seat in
position on one of the notches.
Height
► Pull the control upwards to raise or push it
downwards to lower , until you obtain the position
required.
Backrest angle
► Turn the knob to obtain the desired angle.
Seats with electric lumbar
adjustment
In addition to the previously mentioned
manual adjustments, this seat features electric
adjustment of the lumbar support.
Page 48 of 292
46
Ease of use and comfort
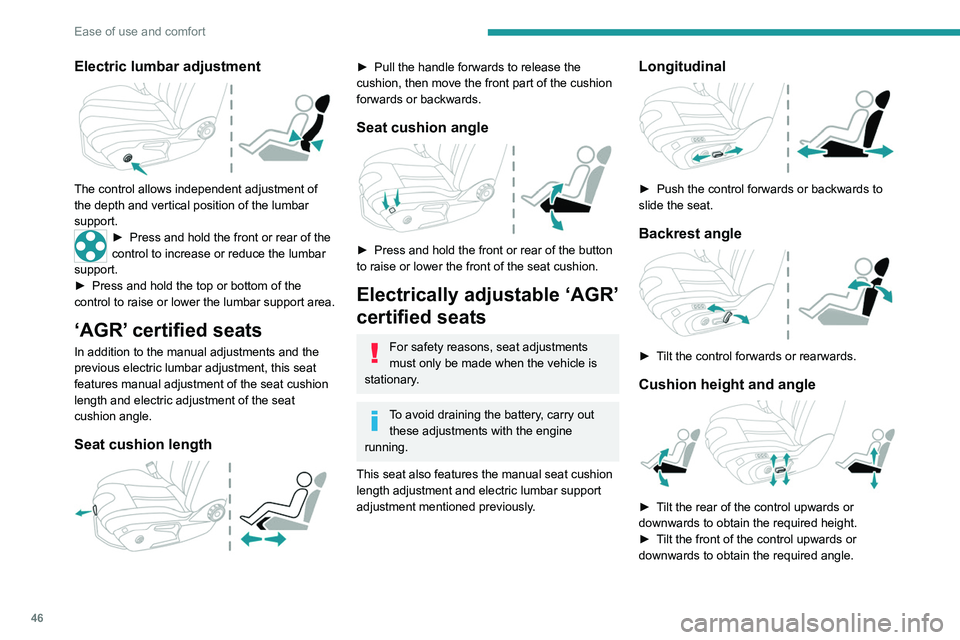
Electric lumbar adjustment
The control allows independent adjustment of
the depth and vertical position of the lumbar
support.
► Press and hold the front or rear of the
control to increase or reduce the lumbar
support.
►
Press and hold the top or bottom of the
control to raise or lower the lumbar support area.
‘AGR’ certified seats
In addition to the manual adjustments and the
previous electric lumbar adjustment, this seat
features manual adjustment of the seat cushion
length and electric adjustment of the seat
cushion angle.
Seat cushion length
► Pull the handle forwards to release the
cushion, then move the front part of the cushion
forwards or backwards.
Seat cushion angle
► Press and hold the front or rear of the button
to raise or lower the front of the seat cushion.
Electrically adjustable ‘AGR’
certified seats
For safety reasons, seat adjustments
must only be made when the vehicle is
stationary.
To avoid draining the battery, carry out these adjustments with the engine
running.
This seat also features the manual seat cushion
length adjustment and electric lumbar support
adjustment mentioned previously.
Longitudinal
► Push the control forwards or backwards to
slide the seat.
Backrest angle
► Tilt the control forwards or rearwards.
Cushion height and angle
► Tilt the rear of the control upwards or
downwards to obtain the required height.
►
T
ilt the front of the control upwards or
downwards to obtain the required angle.
Memorising driving
positions
Associated with the electrically-adjusted driver’s
seat, this function allows two driving positions
to be memorised, to make these adjustments
easier if there are frequent driver changes.
It records the electric adjustments made to the
seat and door mirrors.
Using buttons M/1/2
► Enter the vehicle and switch the ignition on.
► Adjust your seat and the door mirrors.
► Press button M, then press button 1 or 2
within 4 seconds.
An audible signal confirms the memorisation.
Memorising a new position cancels the previous
position.
Recalling a stored position
While the seat is moving, take care that
no person or object hinders the
automatic movement of the seat.
With the ignition on or engine running
Page 49 of 292
47
Ease of use and comfort
3Memorising driving
positions
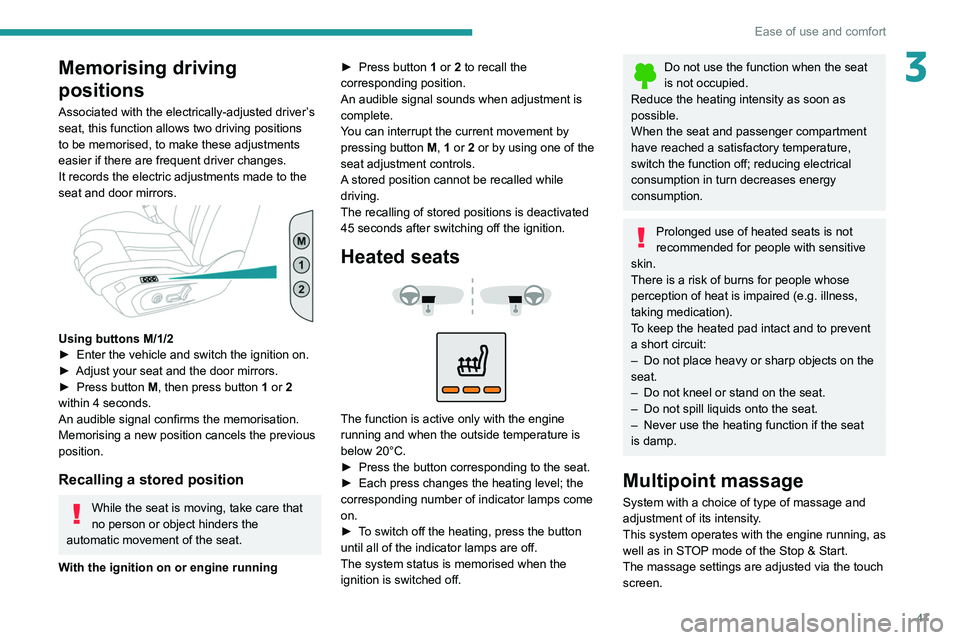
Associated with the electrically-adjusted driver’s
seat, this function allows two driving positions
to be memorised, to make these adjustments
easier if there are frequent driver changes.
It records the electric adjustments made to the
seat and door mirrors.
Using buttons M/1/2
► Enter the vehicle and switch the ignition on.
►
Adjust your seat and the door mirrors.
►
Press button
M, then press button 1 or 2
within 4 seconds.
An audible signal confirms the memorisation.
Memorising a new position cancels the previous
position.
Recalling a stored position
While the seat is moving, take care that
no person or object hinders the
automatic movement of the seat.
With the ignition on or engine running ►
Press button
1 or 2 to recall the
corresponding position.
An audible signal sounds when adjustment is
complete.
You can interrupt the current movement by
pressing button M, 1 or 2 or by using one of the
seat adjustment controls.
A stored position cannot be recalled while
driving.
The recalling of stored positions is deactivated
45 seconds after switching off the ignition.
Heated seats
The function is active only with the engine
running and when the outside temperature is
below 20°C.
►
Press the button corresponding to the seat.
►
Each press changes the heating level; the
corresponding number of indicator lamps come
on.
►
T
o switch off the heating, press the button
until all of the indicator lamps are off.
The system status is memorised when the
ignition is switched off.
Do not use the function when the seat
is not occupied.
Reduce the heating intensity as soon as
possible.
When the seat and passenger compartment
have reached a satisfactory temperature,
switch the function off; reducing electrical
consumption in turn decreases energy
consumption.
Prolonged use of heated seats is not
recommended for people with sensitive
skin.
There is a risk of burns for people whose
perception of heat is impaired (e.g.
illness,
taking medication).
To keep the heated pad intact and to prevent
a short circuit:
–
Do not place heavy or sharp objects on the
seat.
–
Do not kneel or stand on the seat.
–
Do not spill liquids onto the seat.
–
Never use the heating function if the seat
is damp.
Multipoint massage
System with a choice of type of massage and
adjustment of its intensity.
This system operates with the engine running, as
well as in STOP mode of the
Stop & Start.
The massage settings are adjusted via the touch screen.
Page 50 of 292

48
Ease of use and comfort
Adjustment
► Move control A to the right or to the left to
select the corresponding mirror.
► Move control B in any of the four directions
to adjust.
► Return control A to its central position.
Electric folding
Depending on equipment, the door mirrors can
be folded electrically.
► From the inside, with the
ignition on, place control A in the
central position.
► Pull control A backwards.
► Lock the vehicle from the outside.
From the front seat:► Press this button; its green indicator
lamp comes on.
The settings page is displayed on the touch
screen with the last memorised settings.
If the settings suit you and you make no
changes, the display returns to its previous state,
and the function activates immediately
.
Seats must be adjusted one after another,
starting with the driver's seat.
To modify the settings:
►
Begin with the driver
’s seat.
►
Select a massage intensity from the three
levels offered: " 1
" (Low), "2" (Normal) or "3"
(High).
►
Select another type of massage from those
offered.
►
W
ait for the driver's seat settings page to
disappear.
►
Next, proceed with the passenger's seat in
the same way
.
The changes are applied immediately.
Once activated, the system starts a one hour
massage cycle, made up of sequences of 6
minutes of massage followed by 3 minutes at
rest.
The system automatically stops at the end of the
cycle; the indicator lamp for the button goes off.Steering wheel
adjustment
► When stationary , pull the control to release
the steering wheel.
►
Adjust the height and reach to suit your
driving position.
►
Push the control to lock the steering wheel.
For safety reasons, these adjustments
must only be carried out with the vehicle
stationary.
PEUGEOT i-Cockpit®
The instrument panel information is
visible above the steering wheel, for greater
safety and driving comfort.
Adjust the steering wheel height so that it
does not obstruct the instrument panel.
Mirrors
Door mirrors
Depending on version, the electrochrome system
uses a sensor that detects the level of exterior
brightness and that coming from the rear of the
vehicle, in order to automatically and gradually
switch between day and night usage.
As a safety measure, the mirrors should be adjusted to reduce the "blind spots".
The objects that you see in the mirrors are
in fact closer than they appear. Take this
into account in order to correctly judge the
distance of vehicles approaching from behind.
Demisting/Defrosting
The demisting/defrosting of the door mirrors works with the demisting/
defrosting of the rear screen.
For more information on Rear screen
demisting/defrosting , refer to the
corresponding section.