roof Peugeot 508 Hybrid 2014 Owner's Manual
[x] Cancel search | Manufacturer: PEUGEOT, Model Year: 2014, Model line: 508 Hybrid, Model: Peugeot 508 Hybrid 2014Pages: 380, PDF Size: 10.94 MB
Page 4 of 380
.
.
508_en_Chap00a_sommaire_ed02-2014
Instrument panel 12
Indicator and warning lamps
1
4
ga
uges and indicators
2
6
tr
ip computer
3
1
to
uch screen
3
5
Setting the date and time
3
9
MonitoringOver view
e
co-driving
Remote control key 4
1
Alarm
52
el
ectric windows
5
4
Boot
56
Motorised tailgate (SW)
5
7
Sunroof
6
0
Panoramic sunroof (SW)
6
2
Fuel tank
6
3
Diesel misfuel prevention
6
4
Access
Front seats 6 6
Rear seats
7
1
Mirrors
7
3
Steering wheel adjustment
7
5
Interior fittings
7
6
Boot fittings (Saloon)
7
9
Boot fittings (SW)
8
0
Heating and Ventilation
8
4
Manual air conditioning
8
7
Dual-zone digital air conditioning
8
9
Quad-zone digital air conditioning
9
2
Switching off the air conditioning may result in some discomfort (humidity, misting).
9
3
Front demist - defrost
9
7
Rear screen demist - defrost
9
7
Programmable Heating / Ventilation
9
8
Comfort
Starting-switching off the engine 100
el
ectric parking brake
1
03
Manual parking brake
1
09
Manual gearbox
1
10
ge
ar shift indicator
1
11
Automatic gearbox
1
12
ele
ctronic gearbox
1
16
Stop & Start
1
20
Hill start assist
1
23
Head-up display
1
24
Blind spot sensors
1
26
Speed limiter
1
30
Cruise control
1
32
Parking sensors
1
34
Reversing camera
1
37
Driving
Lighting controls 138
Automatic illumination of headlamps
1
43
Headlamp adjustment
1
46
Additional headlamps
1
47
Wiper controls
1
49
Automatic rain sensitive wipers
1
51
Courtesy lamps
1
53
Interior mood lighting
1
54
Visibility
Contents
Page 5 of 380
.
.
508_en_Chap00a_sommaire_ed02-2014
Child seats 155
Deactivating the passenger's front airbag
1
58
ISOFIX child seats
1
64
Child lock
1
70
Child safety
Direction indicators 1 71
em
ergency or assistance call
1
72
H o r n
172
Warning triangle
1
73
Tyre under-inflation detection
1
74
e
SC system
1
76
Seat belts
1
79
Airbags
1
82
Safety
temporary puncture repair kit 186
Changing a wheel
1
92
Snow chains
1
99
Changing a bulb
2
00
Changing a fuse
2
07
12 V battery
2
11
Removing - refitting the battery
2
15
en
ergy economy mode
2
19
Changing a wiper blade
2
20
to
wing the vehicle
2
21
to
wing a trailer
2
23
Fitting roof bars
2
25
Very cold climate screen
2
26
Accessories
227
Practical information
Opening the bonnet 2 30
Running out of fuel (Diesel)
2
31
Petrol engines
2
32
Diesel engines
2
34
BlueHDi Diesel engines
2
36
Checking levels
23
7
Checks
240
AdBlue
® additive and SCR system
(BlueHDi Diesel) 2 42
Checks
Petrol engines 2 50
Petrol weights
2
52
Diesel engines
2
54
Diesel weights
2
58
Dimensions
262
Identification markings
2
64
technical data
emergency or assistance 2 65
JBL equipment
2
67
7-inch touch screen
2
69
Audio system
3
41
Audio equipment and telematics
Alphabetical indexVisual search
Contents
Page 6 of 380
4
4 4, 10124262
120
508_en_Chap00b_vue-ensemble_ed02-2014
Over view
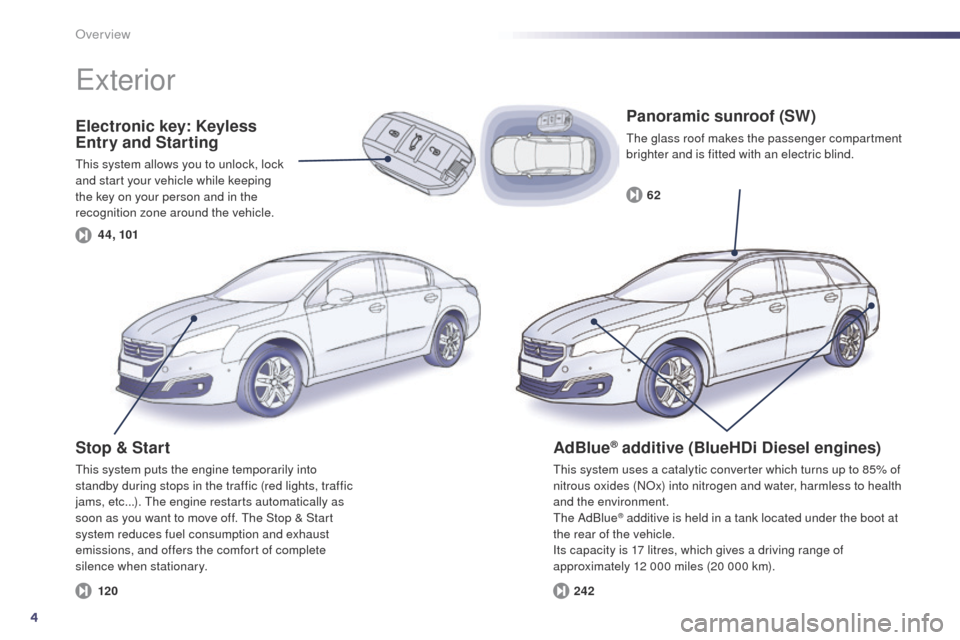
Electronic key: Keyless
Entry and Starting
this system allows you to unlock, lock
and start your vehicle while keeping
the key on your person and in the
recognition zone around the vehicle.
exterior
Stop & Start
this system puts the engine temporarily into
standby during stops in the traffic (red lights, traffic
jams, etc...). t
h
e engine restarts automatically as
soon as you want to move off.
t
h
e Stop & Start
system reduces fuel consumption and exhaust
emissions, and offers the comfort of complete
silence when stationary.
Panoramic sunroof (SW)
the glass roof makes the passenger compartment
brighter and is fitted with an electric blind.
AdBlue® additive (BlueHDi Diesel engines)
this system uses a catalytic converter which turns up to 85% of
nitrous oxides (NOx) into nitrogen and water, harmless to health
and the environment.
th
e AdBlue
® additive is held in a tank located under the boot at
the rear of the vehicle.
Its capacity is 17 litres, which gives a driving range of
approximately 12 000 miles (20 000 km).
Page 12 of 380
10
eco-driving
eco-driving is a range of everyday practices that allow the motorist to optimise their fuel consumption and CO2 emissions.
Optimise the use of your gearbox
With a manual gearbox, move off gently and change up without waiting.
During acceleration change up early.
With an automatic or electronic gearbox, give preference to automatic
mode and avoid pressing the accelerator pedal heavily or suddenly.
th
e gear shift indicator invites you engage the most suitable gear: as
soon as the indication is displayed in the instrument panel, follow it
straight away.
For vehicles fitted with an electronic or automatic gearbox, this
indicator appears only in manual mode.
Drive smoothly
Maintain a safe distance between vehicles, use engine braking rather
than the brake pedal, and press the accelerator progressively. th ese
practices contribute towards a reduction in fuel consumption and CO
2
emissions and also helps reduce the background traffic noise.
If your vehicle has cruise control, make use of the system at speeds
above 25 mph (40 km/h) when the traffic is flowing well.
Control the use of your electrical
equipment
Before moving off, if the passenger compartment is too warm, ventilate it
by opening the windows and air vents before using the air conditioning.
Above 30 mph (50 km/h), close the windows and leave the air vents
open.
Remember to make use of equipment that can help keep the
temperature in the passenger compartment down (sunroof and window
blinds...).
Switch off the air conditioning, unless it has automatic regulation, as
soon as the desired temperature is attained.
Switch off the demisting and defrosting controls, if not automatic.
Switch off the heated seat as soon as possible.
Switch off the headlamps and front foglamps when the level of light
does not require their use.
Avoid running the engine before moving off, particularly in winter; your
vehicle will warm up much faster while driving.
As a passenger, if you avoid connecting your multimedia devices
(film, music, video game...), you will contribute towards limiting the
consumption of electrical energy, and so of fuel.
Disconnect your portable devices before leaving the vehicle.
eco-driving
Page 13 of 380
11
Limit the causes of excess consumption
Spread loads throughout the vehicle; place the heaviest items in the
bottom of the boot, as close as possible to the rear seats.
Limit the loads carried in the vehicle and reduce wind resistance (roof
bars, roof rack, bicycle carrier, trailer...). u
s
e a roof box in preference.
Remove roof bars and roof racks after use.
At the end of winter, remove snow tyres and refit your summer tyres.
Observe the recommendations on
maintenance
Check the tyre pressures regularly, when cold, referring to the label in
the door aperture, driver's side.
Carry out this check in particular:
-
b
efore a long journey,
-
a
t each change of season,
-
a
fter a long period out of use.
Don't forget the spare wheel and the tyres on any trailer or caravan.
Have your vehicle serviced regularly (engine oil, oil filter, air filter,
passenger compartment filter...) and observe the schedule of
operations recommended in the warranty and maintenance record.
When refuelling, do not continue after the third cut-off of the nozzle to
avoid any over flow.
At the wheel of your new vehicle, it is only after the first 1 800 miles
(3 000 kilometres) that you will see the fuel consumption settle down to
a consistent average.
.
Eco-driving
Page 47 of 380
45
508_en_Chap02_ouvertures_ed02-2014
Locking the vehicle
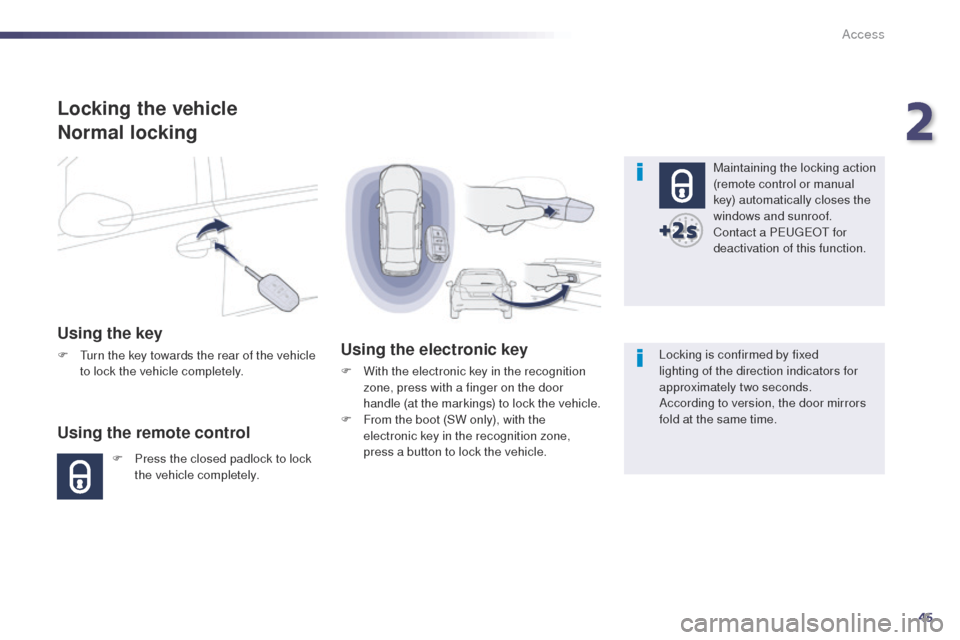
Normal locking
Using the key
F turn the key towards the rear of the vehicle to lock the vehicle completely.
Using the remote control
F Press the closed padlock to lock the vehicle completely.
Using the electronic key
F With the electronic key in the recognition zone, press with a finger on the door
handle (at the markings) to lock the vehicle.
F
F
rom the boot (SW only), with the
electronic key in the recognition zone,
press a button to lock the vehicle. Maintaining the locking action
(remote control or manual
key) automatically closes the
windows and sunroof.
Contact a P
e
uge
Ot
for
deactivation of this function.
Locking is confirmed by fixed
lighting of the direction indicators for
approximately two seconds.
According to version, the door mirrors
fold at the same time.
2
Access
Page 62 of 380
60
508_en_Chap02_ouvertures_ed02-2014
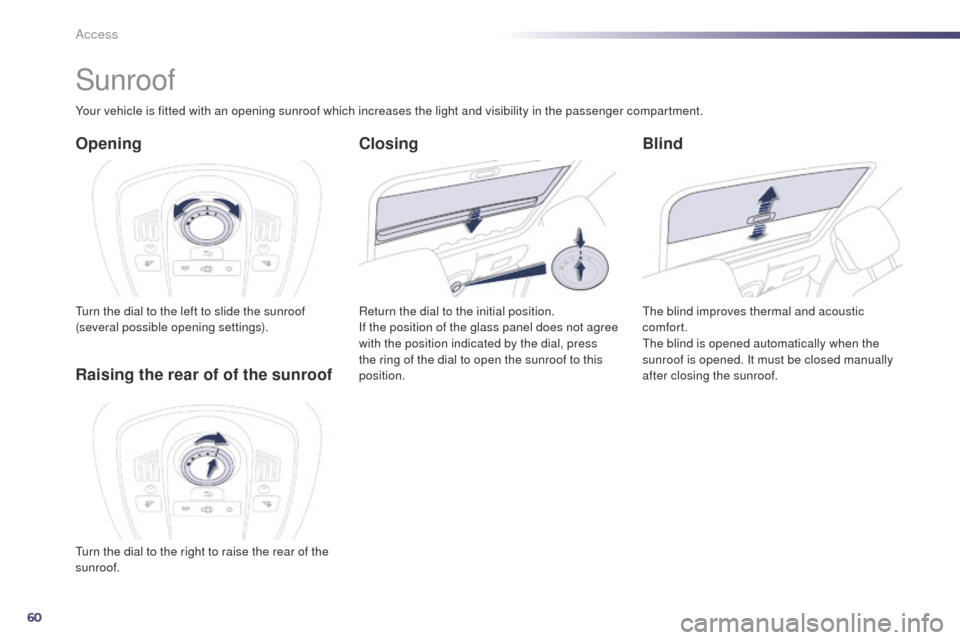
Sunroof
Opening
turn the dial to the left to slide the sunroof
(several possible opening settings).
Blind
the blind improves thermal and acoustic
comfort.
the
blind is opened automatically when the
sunroof is opened. It must be closed manually
after closing the sunroof.
Raising the rear of of the sunroof
Your vehicle is fitted with an opening sunroof which increases the light and visibility in the passenger compartment.
Return the dial to the initial position.
If the position of the glass panel does not agree
with the position indicated by the dial, press
the ring of the dial to open the sunroof to this
position.
Closing
turn the dial to the right to raise the rear of the
sunroof.
Access
Page 63 of 380
61
508_en_Chap02_ouvertures_ed02-2014
Safety anti-pinch
Am anti-pinch system stops the closing of the
roof, whether sliding or from the raised at the
rear position. If the sunroof encounters an
obstacle it partially opens again.
If the sunroof fails to close at a second attempt,
it may be necessary to force the closing of the
sunroof using the reinitialisation procedure.
Reinitialising the system
Following reconnection of the battery, or in the
event of a malfunction in its operation, it may
be necessary to reinitialise the system:
F
t
urn the dial to the right to raise the sunroof
at the rear,
F
w
ait until the sunroof is fully up at the rear,
F
t
hen immediately press the dial for at least
3 seconds.
If the sunroof opens on its own when closing,
as soon as possible after the sunroof stops:
-
p
ut the dial in the fully closed position,
-
p
ress the dial,
-
m
aintain pressure on the dial until the
sunroof closes.
The anti-pinch function is inoperative
during these operations.th e driver should ensure that
passengers use the sunroof correctly.
Be aware of children when operating
the sunroof.
2
Access
Page 64 of 380
62
508_en_Chap02_ouvertures_ed02-2014
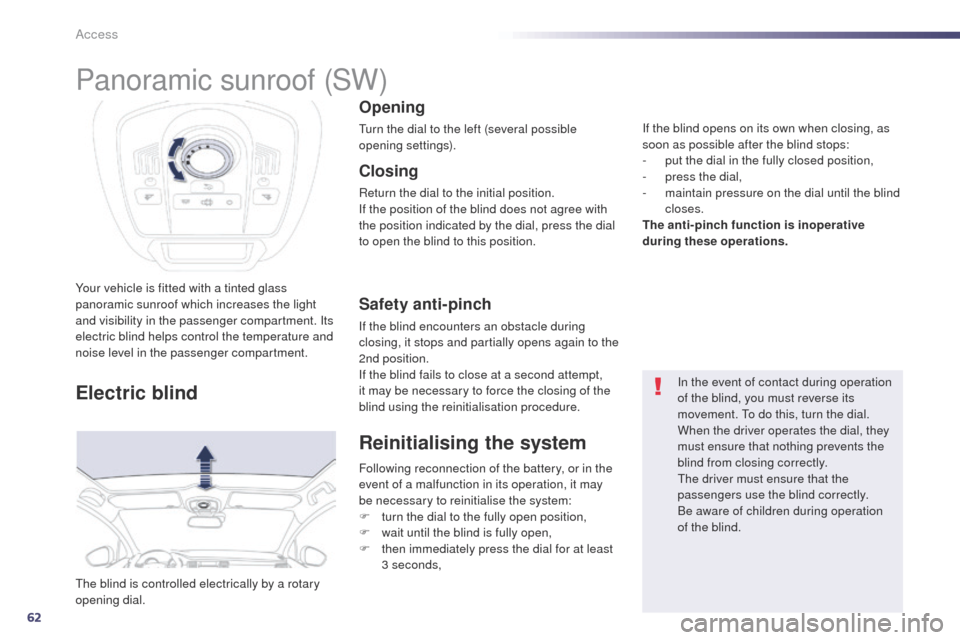
Your vehicle is fitted with a tinted glass
panoramic sunroof which increases the light
and visibility in the passenger compartment. Its
electric blind helps control the temperature and
noise level in the passenger compartment.
th
e blind is controlled electrically by a rotary
opening dial.
Opening
turn the dial to the left (several possible
opening settings).
Safety anti-pinch
If the blind encounters an obstacle during
closing, it stops and partially opens again to the
2nd position.
If the blind fails to close at a second attempt,
it may be necessary to force the closing of the
blind using the reinitialisation procedure.
Closing
Return the dial to the initial position.
If the position of the blind does not agree with
the position indicated by the dial, press the dial
to open the blind to this position.
Electric blindIn the event of contact during operation
of the blind, you must reverse its
movement.
t
o d
o this, turn the dial.
When the driver operates the dial, they
must ensure that nothing prevents the
blind from closing correctly.
th
e driver must ensure that the
passengers use the blind correctly.
Be aware of children during operation
of the blind.
Reinitialising the system
Following reconnection of the battery, or in the
event of a malfunction in its operation, it may
be necessary to reinitialise the system:
F
t
urn the dial to the fully open position,
F
w
ait until the blind is fully open,
F
t
hen immediately press the dial for at least
3 seconds, If the blind opens on its own when closing, as
soon as possible after the blind stops:
-
p
ut the dial in the fully closed position,
-
p
ress the dial,
-
m
aintain pressure on the dial until the blind
closes.
The anti-pinch function is inoperative
during these operations.
Panoramic sunroof (SW)
Access
Page 84 of 380
82
508_en_Chap03_confort_ed02-2014
High load retaining net
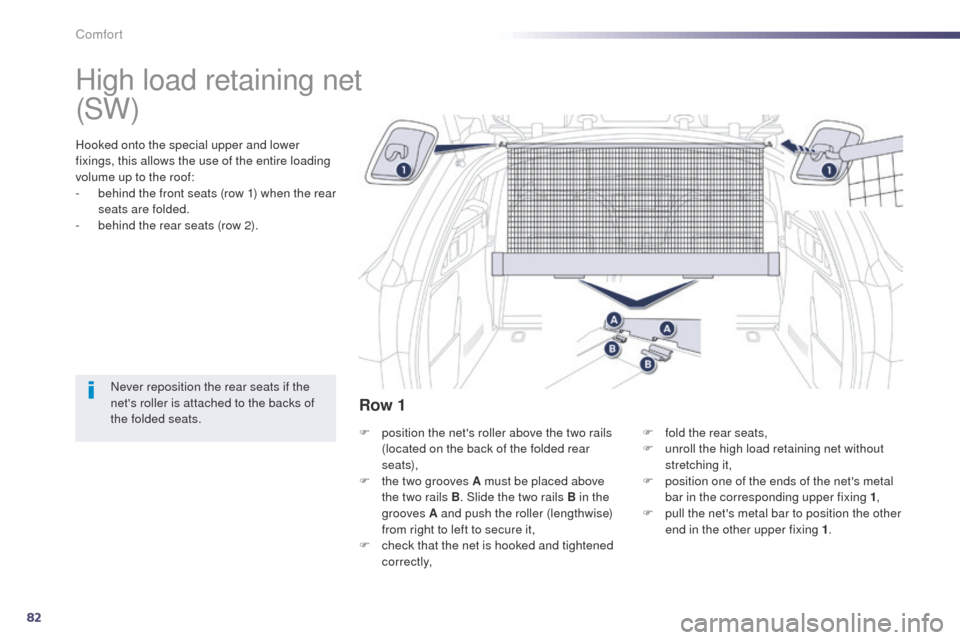
Hooked onto the special upper and lower
fixings, this allows the use of the entire loading
volume up to the roof:
-
b
ehind the front seats (row 1) when the rear
seats are folded.
-
b
ehind the rear seats (row 2).
Never reposition the rear seats if the
net's roller is attached to the backs of
the folded seats. F
p
osition the net's roller above the two rails
(located on the back of the folded rear
seats),
F
t
he two grooves A must be placed above
the two rails B . Slide the two rails B in the
grooves A and push the roller (lengthwise)
from right to left to secure it,
F
c
heck that the net is hooked and tightened
c o r r e c t l y, F
f
old the rear seats,
F
u
nroll the high load retaining net without
stretching it,
F
p
osition one of the ends of the net's metal
bar in the corresponding upper fixing 1 ,
F
p
ull the net's metal bar to position the other
end in the other upper fixing 1 .
Row 1
(SW)
Comfort