seats Peugeot 508 RXH 2016 Owner's Manual
[x] Cancel search | Manufacturer: PEUGEOT, Model Year: 2016, Model line: 508 RXH, Model: Peugeot 508 RXH 2016Pages: 364, PDF Size: 10.31 MB
Page 4 of 364
.
.
508_en_Chap00a_sommaire_ed01-2016
Instrument panel 13
Indicator and warning lamps
1
4
Indicators
29
Distance recorders
2
9
tr
ip computer
3
9
to
uch screen
4
3
Setting the date and time
4
7
Remote control key
4
9
Back-up procedure - Remote controls
5
3
"Keyless
e
n
try and Starting"
electronic key
5
5
Back-up procedure -
e
le
ctronic keys
6
2
Boot
65
Motorised tailgate (SW and non-hybrid RHX)
6
6
Alarm
70
el
ectric windows
7
3Front seats
7
5
Steering wheel adjustment
7
9
Mirrors 80
Heating and Ventilation
8
3
Manual air conditioning
8
6
Dual-zone digital air conditioning
8
8
Quad-zone digital air conditioning
9
1
Front demist - defrost
9
6
Rear screen demist - defrost 96
Programmable Heating / Ventilation 9 7
Front fittings
9
9
Courtesy lamps
1
02
Interior mood lighting
1
03
Sunroof
104
Panoramic sunroof (SW and non-hybrid RHX)
1
06
Centre console
1
07
Rear seats
1
09
Rear fittings
1
11
Boot fittings (Saloon)
1
12
Boot fittings (SW and non-hybrid RHX)
1
13Lighting controls
1
17
Direction indicators
1
20
Daytime running lamps
1
20
Automatic illumination of headlamps
1
21
Adaptive lighting
1
22
Cornering lighting
1
23
gu
ide-me-home lighting
1
24
Headlamp beam height adjustment
1
26
Wiper controls 1 27
Automatic rain sensitive wipers 1 29
ge
neral safety
recommendations
131
Hazard warning lamps
1
32
H or n
132
em
ergency or assistance call
1
32
ele
ctronic stability control
(
e
SC) 133
Seat belts
1
36
Airbags
139
Child seats
1
43
Deactivating the passenger's front airbag
146
ISOFIX child seats
1
52
Child lock
1
58
Over view
e
co-driving
Instruments
Accessea se of use and comfort
Lighting and visibility
Safety
Contents
Page 8 of 364
6
508_en_Chap00b_vue-ensemble_ed01-2016
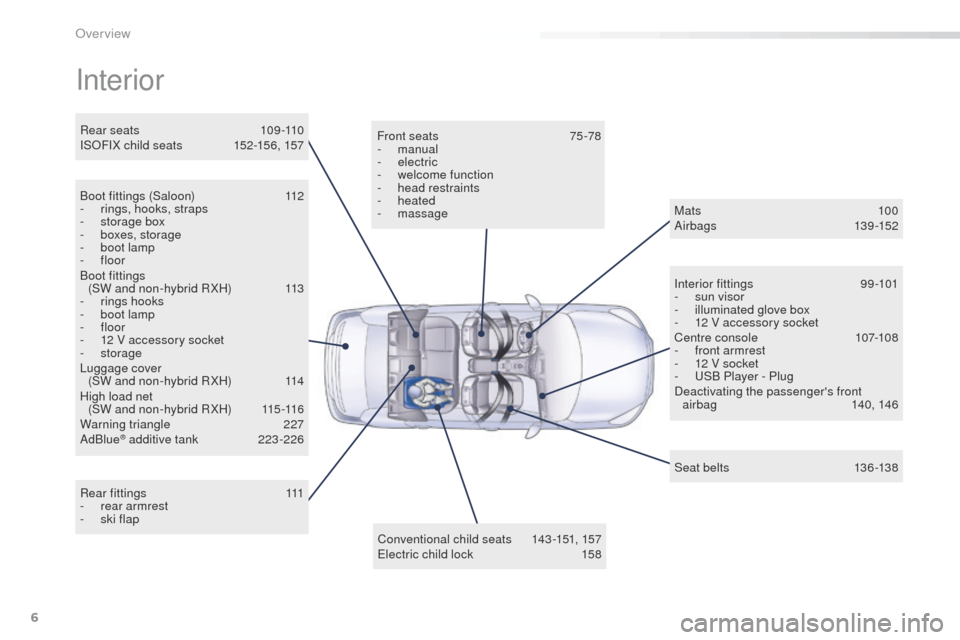
Interior
Boot fittings (Saloon) 112
- r ings, hooks, straps
-
s
torage box
-
bo
xes, storage
-
b
oot lamp
-
floor
Boot fittings (SW and non-hybrid R XH)
1
13
-
r
ings hooks
-
b
oot lamp
-
floor
-
1
2 V accessory socket
-
storage
Luggage cover (SW and non-hybrid R XH)
1
14
High load net (SW and non-hybrid R XH)
1
15 -116
Warning triangle
2
27
AdBlue
® additive tank 2 23 -226
Rear fittings
1
11
-
r
ear armrest
-
sk
i flap Front seats
7
5 -78
-
manual
-
electric
-
w
elcome function
-
h
ead restraints
-
heated
- massage
Conventional child seats
1
43 -151, 157
el
ectric child lock
1
58Mats
10 0
Airbags
1
39-152
Interior fittings
9
9-101
-
s
un visor
-
i
lluminated glove box
-
1
2 V accessory socket
Centre console
10
7-108
-
f
ront armrest
-
1
2 V socket
- u
S
B Player - Plug
Deactivating the passenger's front air bag
14
0, 146
Seat belts
1
36-138
Rear seats
1
09-110
ISOFIX child seats
1
52-156, 157
Over view
Page 14 of 364
12
508_en_Chap00c_eco-conduite_ed01-2016
Limit the causes of excess consumption
Spread loads throughout the vehicle; place the heaviest items in the
bottom of the boot, as close as possible to the rear seats.
Limit the loads carried in the vehicle and reduce wind resistance (roof
bars, roof rack, bicycle carrier, trailer...). u
s
e a roof box in preference.
Remove roof bars and roof racks after use.
At the end of winter, remove snow tyres and refit your summer tyres.
Observe the recommendations on
maintenance
Check the tyre pressures regularly, when cold, referring to the label in
the door aperture, driver's side.
Carry out this check in particular:
-
b
efore a long journey,
-
a
t each change of season,
-
a
fter a long period out of use.
Don't forget the spare wheel and the tyres on any trailer or caravan.
Have your vehicle serviced regularly (engine oil, oil filter, air filter,
passenger compartment filter...) and observe the schedule of
operations recommended in the manufacturer's service schedule.
With a BlueHDi Diesel engine, if the SCR system is faulty your vehicle
becomes polluting; go to a P
e
uge
Ot
dealer or a qualified workshop
without delay to have the emissions of nitrous oxides brought back to
the legal level.
When refuelling, do not continue after the third cut-off of the nozzle to
avoid any over flow.
At the wheel of your new vehicle, it is only after the first 1 800 miles
(3
000 kilometres) that you will see the fuel consumption settle down to
a consistent average.
eco-driving
Page 70 of 364
68
508_en_Chap02_ouvertures_ed01-2016
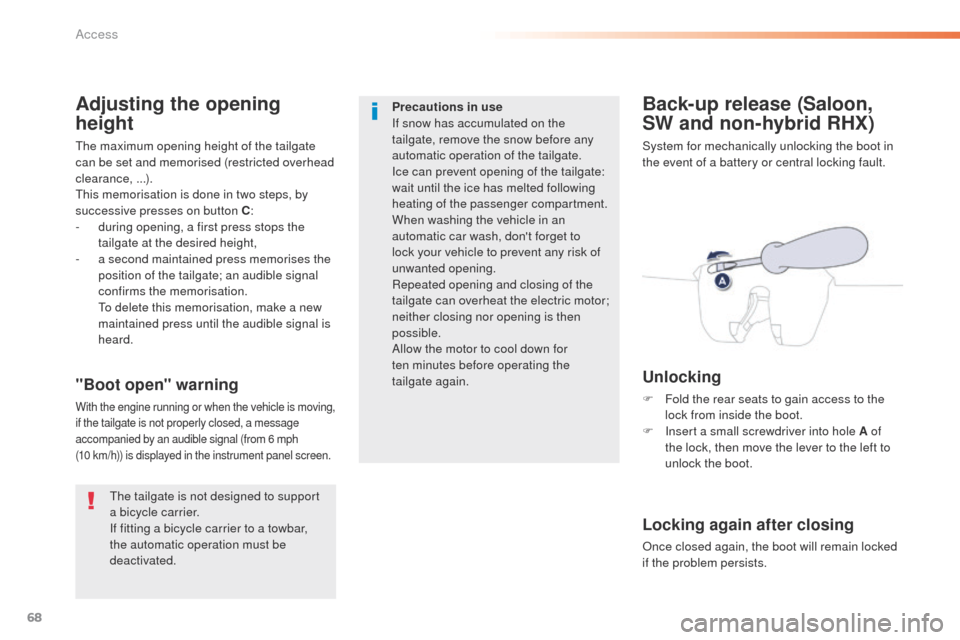
Back-up release (Saloon,
SW and non-hybrid RHX)
System for mechanically unlocking the boot in
the event of a battery or central locking fault.
Unlocking
F Fold the rear seats to gain access to the lock from inside the boot.
F
I
nsert a small screwdriver into hole A of
the lock, then move the lever to the left to
unlock the boot."Boot open" warning
With the engine running or when the vehicle is moving,
if the tailgate is not properly closed, a message
accompanied by an audible signal (from 6 mph
(10
km/h)) is displayed in the instrument panel screen.
Locking again after closing
Once closed again, the boot will remain locked
if the problem persists.
Adjusting the opening
height
the maximum opening height of the tailgate
can be set and memorised (restricted overhead
clearance, ...).
th
is memorisation is done in two steps, by
successive presses on button C :
-
d
uring opening, a first press stops the
tailgate at the desired height,
-
a s
econd maintained press memorises the
position of the tailgate; an audible signal
confirms the memorisation.
t
o d
elete this memorisation, make a new
maintained press until the audible signal is
heard.
th
e tailgate is not designed to support
a bicycle carrier.
If fitting a bicycle carrier to a towbar,
the automatic operation must be
deactivated. Precautions in use
If snow has accumulated on the
tailgate, remove the snow before any
automatic operation of the tailgate.
Ice can prevent opening of the tailgate:
wait until the ice has melted following
heating of the passenger compartment.
When washing the vehicle in an
automatic car wash, don't forget to
lock your vehicle to prevent any risk of
unwanted opening.
Repeated opening and closing of the
tailgate can overheat the electric motor;
neither closing nor opening is then
possible.
Allow the motor to cool down for
ten
minutes before operating the
tailgate again.
Access
Page 77 of 364
75
508_en_Chap03_ergonomie-et-confort_ed01-2016
Front seats
Manual adjustments
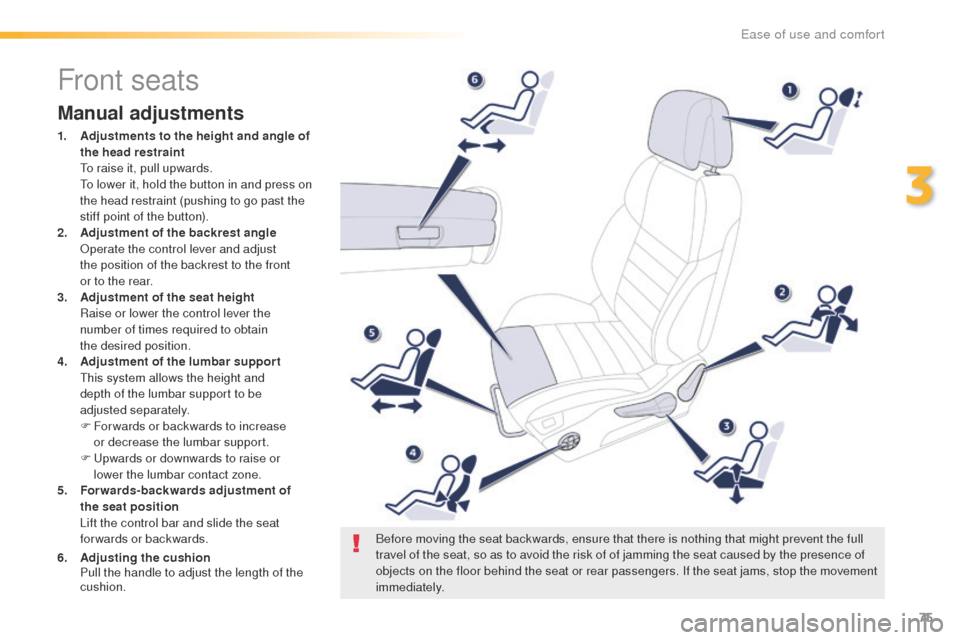
1. Adjustments to the height and angle of the head restraint
t
o r
aise it, pull upwards.
t
o l
ower it, hold the button in and press on
the head restraint (pushing to go past the
stiff point of the button).
2.
A
djustment of the backrest angle
O
perate the control lever and adjust
the
position of the backrest to the front
or
to the rear.
3.
A
djustment of the seat height
R
aise or lower the control lever the
number
of times required to obtain
the
desired position.
4.
A
djustment of the lumbar suppor t
t
h
is system allows the height and
depth
of the lumbar support to be
adjusted
separately.
F
F
or wards or backwards to increase
or
decrease the lumbar support.
F
u
p
wards or downwards to raise or
lower
the lumbar contact zone.
5.
F
orwards-backwards adjustment of
the
seat position
L
ift the control bar and slide the seat
forwards or backwards.
6.
A
djusting the cushion
P
ull the handle to adjust the length of the
cushion. Before moving the seat backwards, ensure that there is nothing that might prevent the full
travel of the seat, so as to avoid the risk of of jamming the seat caused by the presence of
objects on the floor behind the seat or rear passengers. If the seat jams, stop the movement
immediately.
3
ease of use and comfort
Page 80 of 364
78
508_en_Chap03_ergonomie-et-confort_ed01-2016
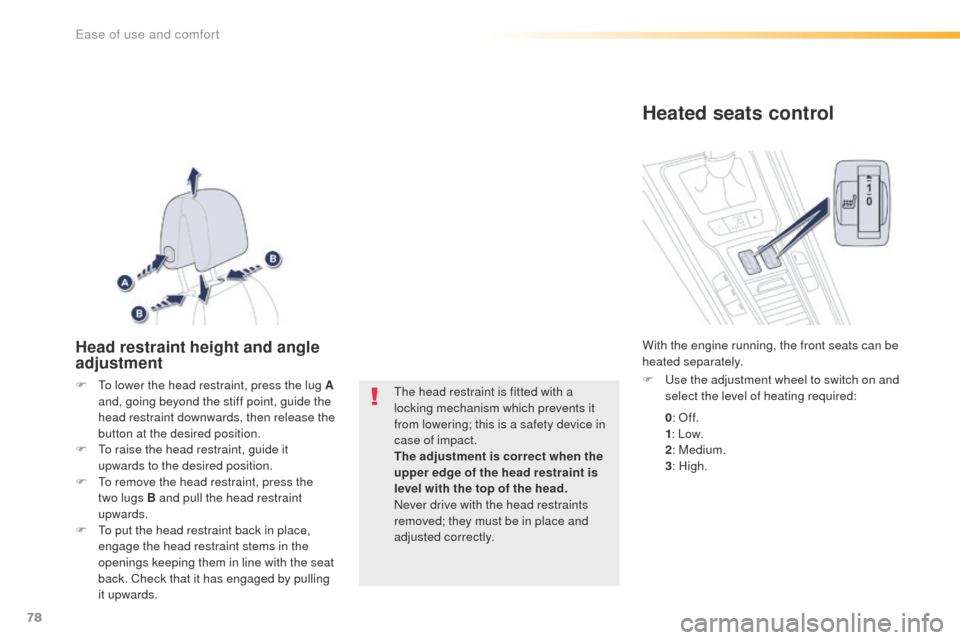
Head restraint height and angle
adjustment
F to lower the head restraint, press the lug A and, going beyond the stiff point, guide the
head restraint downwards, then release the
button at the desired position.
F
t
o r
aise the head restraint, guide it
upwards to the desired position.
F
t
o r
emove the head restraint, press the
two
lugs B and pull the head restraint
upwards.
F
t
o p
ut the head restraint back in place,
engage the head restraint stems in the
openings keeping them in line with the seat
back. Check that it has engaged by pulling
it upwards.th e head restraint is fitted with a
locking mechanism which prevents it
from lowering; this is a safety device in
case of impact.
The adjustment is correct when the
upper edge of the head restraint is
level with the top of the head.
Never drive with the head restraints
removed; they must be in place and
adjusted correctly.
Heated seats control
F use the adjustment wheel to switch on and select the level of heating required:
With the engine running, the front seats can be
heated separately.
0: Of f.
1 : Low.
2 : Medium.
3 : High.
ease of use and comfort
Page 111 of 364
109
508_en_Chap03_ergonomie-et-confort_ed01-2016
Rear seatsBench seat the left-hand (1/3) or right-hand (2/3) section of which can be folded to adapt the boot load space.
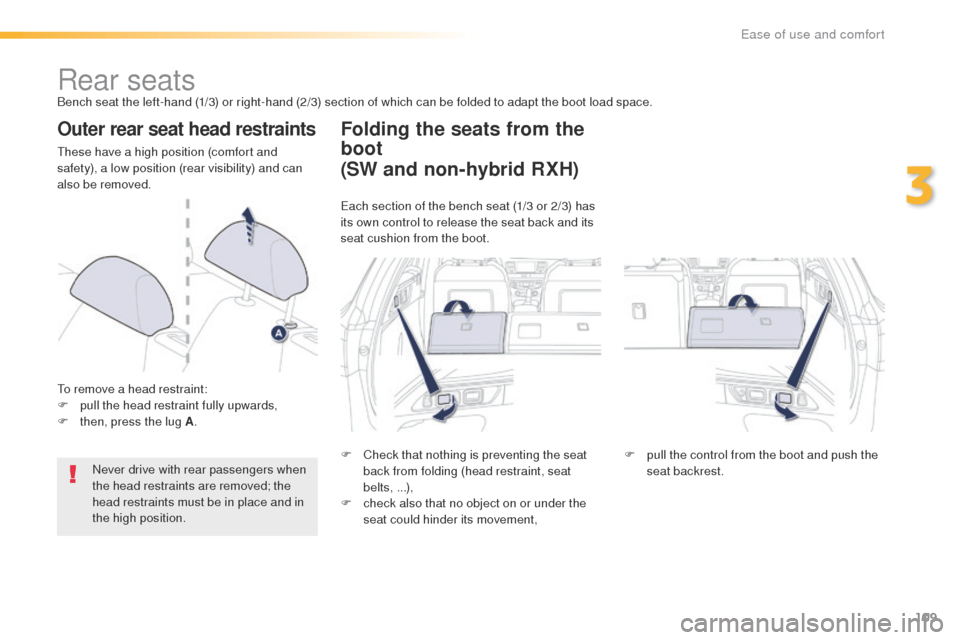
Outer rear seat head restraints
these have a high position (comfort and
safety), a low position (rear visibility) and can
also be removed.
to r
emove a head restraint:
F
p
ull the head restraint fully upwards,
F
t
hen, press the lug A .
Never drive with rear passengers when
the head restraints are removed; the
head restraints must be in place and in
the high position.
Folding the seats from the
boot
F Check that nothing is preventing the seat back from folding (head restraint, seat
belts, ...),
F
c
heck also that no object on or under the
seat could hinder its movement, F
p ull the control from the boot and push the
seat backrest.
(SW and non-hybrid RXH)
each section of the bench seat (1/3 or 2/3) has
its own control to release the seat back and its
seat cushion from the boot.
3
ease of use and comfort
Page 115 of 364
113
508_en_Chap03_ergonomie-et-confort_ed01-2016
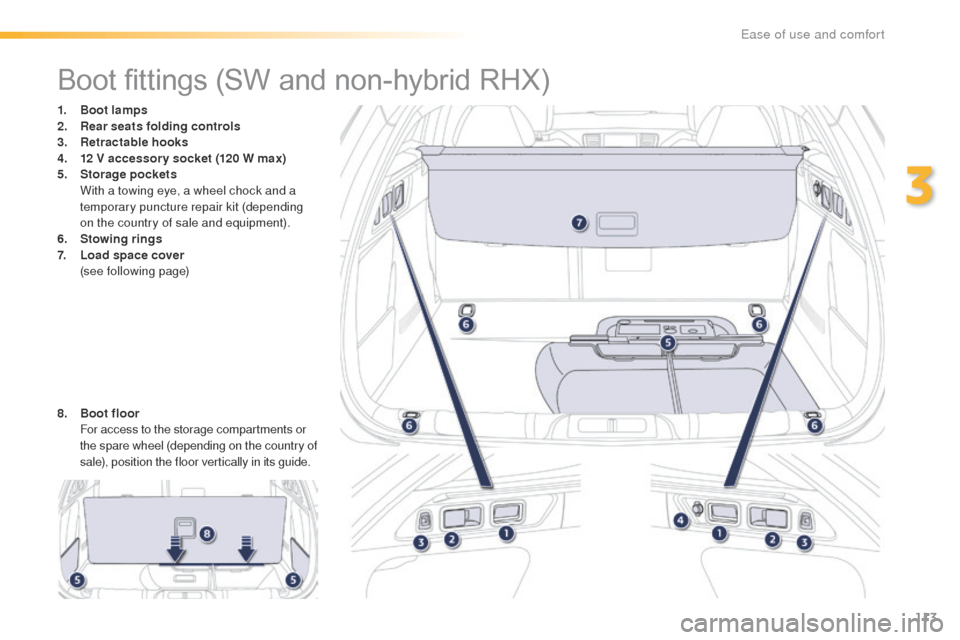
Boot fittings (SW and non-hybrid RHX)
1. Boot lamps
2. Rear seats folding controls
3.
R
etractable hooks
4.
1
2 V accessor y socket (120 W max)
5.
Sto
rage pockets
W
ith a towing eye, a wheel chock and a
temporary puncture repair kit (depending
on the country of sale and equipment).
6.
S
towing rings
7.
L
oad space cover
(
see following page)
8.
B
oot floor
F
or access to the storage compartments or
the spare wheel (depending on the country of
sale), position the floor vertically in its guide.
3
ease of use and comfort
Page 117 of 364
115
508_en_Chap03_ergonomie-et-confort_ed01-2016
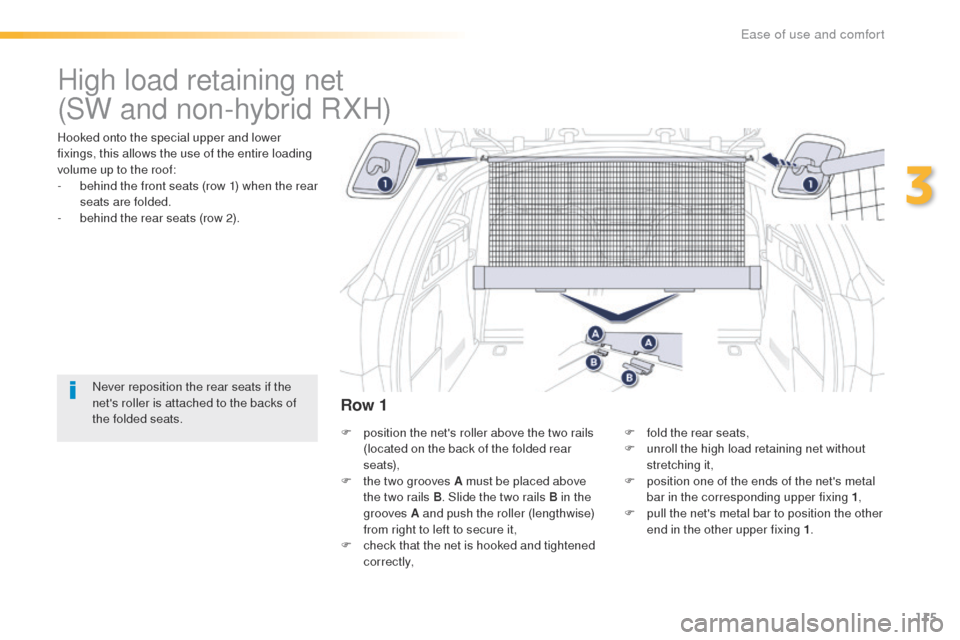
High load retaining net
Hooked onto the special upper and lower
fixings, this allows the use of the entire loading
volume up to the roof:
-
b
ehind the front seats (row 1) when the rear
seats are folded.
-
b
ehind the rear seats (row 2).
Never reposition the rear seats if the
net's roller is attached to the backs of
the folded seats. F
p
osition the net's roller above the two rails
(located on the back of the folded rear
seats),
F
t
he two grooves A must be placed above
the two rails B . Slide the two rails B in the
grooves A and push the roller (lengthwise)
from right to left to secure it,
F
c
heck that the net is hooked and tightened
c o r r e c t l y, F
f
old the rear seats,
F
u
nroll the high load retaining net without
stretching it,
F
p
osition one of the ends of the net's metal
bar in the corresponding upper fixing 1 ,
F
p
ull the net's metal bar to position the other
end in the other upper fixing 1 .
Row 1
(SW and non-hybrid RXH)
3
ease of use and comfort
Page 138 of 364
136
508_en_Chap05_securite_ed01-2016
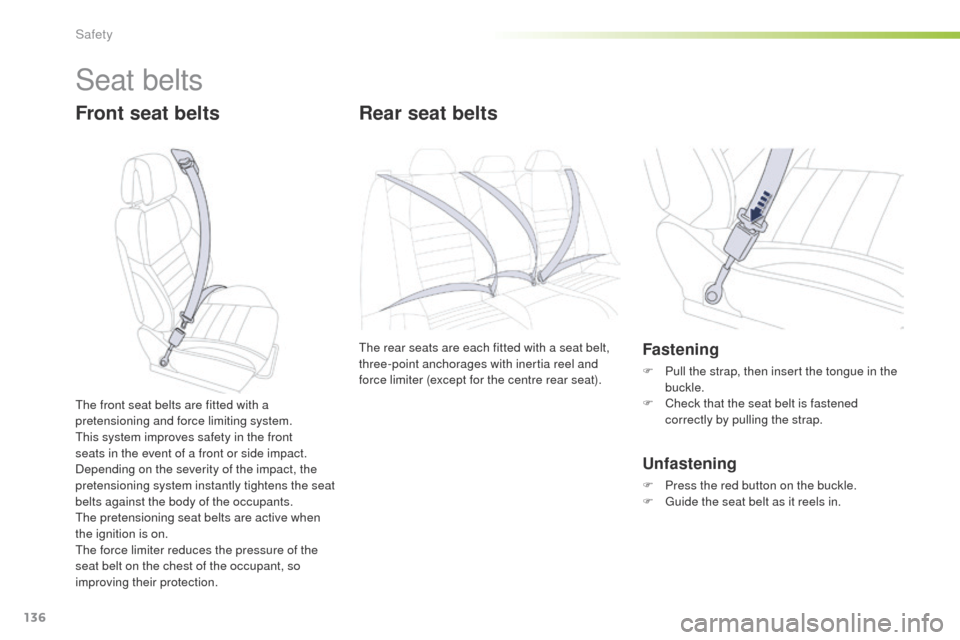
Seat belts
Front seat beltsRear seat belts
the rear seats are each fitted with a seat belt,
three-point anchorages with inertia reel and
force limiter (except for the centre rear seat).Fastening
F Pull the strap, then insert the tongue in the
buckle.
F
C
heck that the seat belt is fastened
correctly by pulling the strap.
Unfastening
F Press the red button on the buckle.
F gu ide the seat belt as it reels in.
th
e front seat belts are fitted with a
pretensioning and force limiting system.
th
is system improves safety in the front
seats in the event of a front or side impact.
Depending on the severity of the impact, the
pretensioning system instantly tightens the seat
belts against the body of the occupants.
the
pretensioning seat belts are active when
the ignition is on.
th
e force limiter reduces the pressure of the
seat belt on the chest of the occupant, so
improving their protection.
Safety