radio PEUGEOT BOXER 2021 Owners Manual
[x] Cancel search | Manufacturer: PEUGEOT, Model Year: 2021, Model line: BOXER, Model: PEUGEOT BOXER 2021Pages: 212, PDF Size: 6.37 MB
Page 5 of 212
3
Contents
Diesel engines 108
Electric motor 109
Checking levels 109
Checks 111
AdBlue® (BlueHDi engines) 11 4
Advice on care and maintenance 11 6
8In the event of a breakdownTemporary puncture repair kit 11 8
Spare wheel 11 9
Changing a bulb 125
Fuses 129
12
V battery
/ Accessory battery 130
Towing 132
9Technical dataEngine technical data and towed loads 135
Diesel engines 136
Electric motor 137
Weights 138
Dimensions 141
Identification markings 145
Glossary of labels 146
10Special featuresCrew cab 148
Chassis cab / Flatbed cab 148
Double cab 154
Drop-side back 157
11Audio systemFirst steps 162
Steering mounted controls 162
Radio 163
Media 163
Telephone 165
Settings 165
Voice commands 166
12Touch screen audio and telematics systemFirst steps 169
Steering mounted controls 170
Menus 170
Radio 171
DAB (Digital Audio Broadcasting) radio 172
Media 172
Navigation 174
Telephone 177
Vehicle information 179
Settings 179
Voice commands 180
13ALPINE® X902D systemFirst steps 184
Menus 185
14Event data recorders
■
Alphabetical index
Page 23 of 212
21
Instruments
1Touch screen audio and telematics system
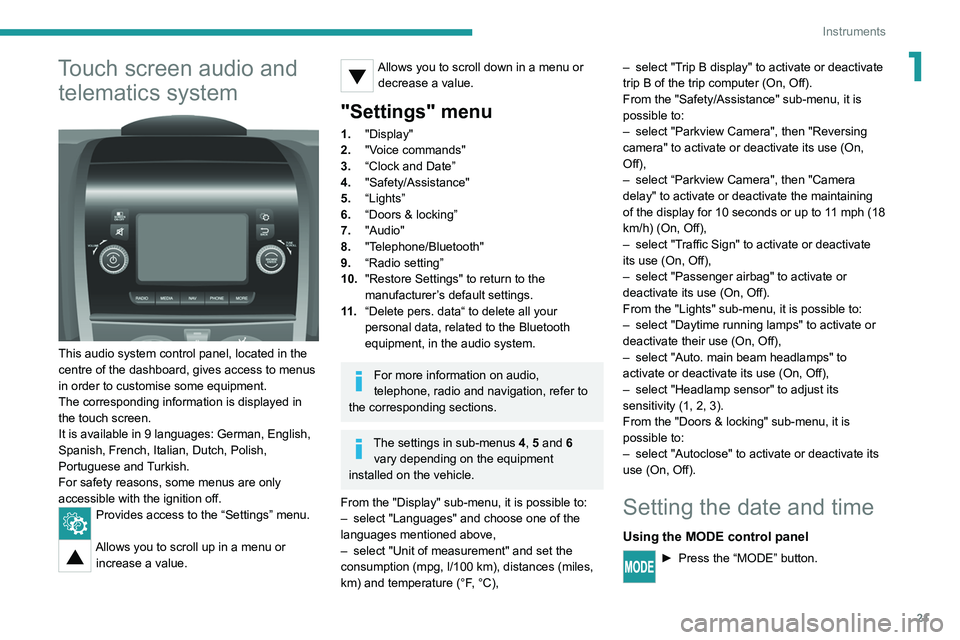
This audio system control panel, located in the
centre of the dashboard, gives access to menus
in order to customise some equipment.
The corresponding information is displayed in
the touch screen.
It is available in 9 languages: German, English,
Spanish, French, Italian, Dutch, Polish,
Portuguese and Turkish.
For safety reasons, some menus are only
accessible with the ignition off.
Provides access to the “Settings” menu.
Allows you to scroll up in a menu or
increase a value.
Allows you to scroll down in a menu or decrease a value.
"Settings" menu
1. "Display"
2. "Voice commands"
3. “Clock and Date”
4. "Safety/Assistance"
5. “Lights”
6. “Doors & locking”
7. "Audio"
8. "Telephone/Bluetooth"
9. “Radio setting”
10. "Restore Settings" to return to the
manufacturer’s default settings.
11 . “Delete pers. data“ to delete all your
personal data, related to the Bluetooth
equipment, in the audio system.
For more information on audio,
telephone, radio and navigation, refer to
the corresponding sections.
The settings in sub-menus 4, 5 and 6
vary depending on the equipment
installed on the vehicle.
From the "Display" sub-menu, it is possible to:
–
select "Languages" and choose one of the
languages mentioned above,
–
select "Unit of measurement" and set the
consumption (mpg, l/100 km), distances (miles,
km) and temperature (°F
, °C), –
select "T
rip B display" to activate or deactivate
trip B of the trip computer (On, Off).
From the "Safety/Assistance" sub-menu, it is
possible to:
–
select "Parkview Camera", then "Reversing
camera" to activate or deactivate its use (On,
Off),
–
select “Parkview Camera", then "Camera
delay" to activate or deactivate the maintaining
of the display for 10 seconds or up to 1
1 mph (18
km/h) (On, Off),
–
select "T
raffic Sign" to activate or deactivate
its use (On, Off),
–
select "Passenger airbag" to activate or
deactivate its use (On, Off).
From the "Lights" sub-menu, it is possible to:
–
select "Daytime running lamps" to activate or
deactivate their use (On, Off),
–
select "Auto. main beam headlamps" to
activate or deactivate its use (On, Off),
–
select "Headlamp sensor" to adjust its
sensitivity (1, 2, 3).
From the "Doors & locking" sub-menu, it is
possible to:
–
select "Autoclose" to activate or deactivate its
use (On, Off).
Setting the date and time
Using the MODE control panel
► Press the “MODE” button.
Page 36 of 212
34
Ease of use and comfort
As a safety precaution, these operations should only be carried out while the
vehicle is stationary.
Mirrors
Door mirrors
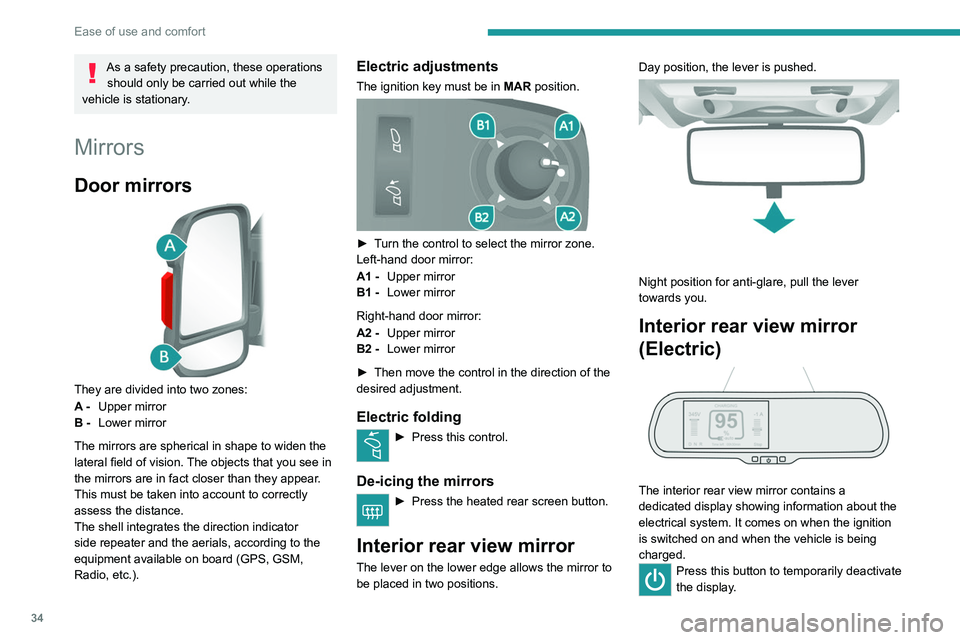
They are divided into two zones:
A - Upper mirror
B - Lower mirror
The mirrors are spherical in shape to widen the
lateral field of vision. The objects that you see in
the mirrors are in fact closer than they appear.
This must be taken into account to correctly
assess the distance.
The shell integrates the direction indicator
side repeater and the aerials, according to the
equipment available on board (GPS, GSM,
Radio, etc.).
Electric adjustments
The ignition key must be in MAR position.
► Turn the control to select the mirror zone.
Left-hand door mirror:
A1 -Upper mirror
B1 - Lower mirror
Right-hand door mirror:
A2 - Upper mirror
B2 - Lower mirror
►
Then move the control in the direction of the
desired adjustment.
Electric folding
► Press this control.
De-icing the mirrors
► Press the heated rear screen button.
Interior rear view mirror
The lever on the lower edge allows the mirror to
be placed in two positions. Day position, the lever is pushed.
Night position for anti-glare, pull the lever
towards you.
Interior rear view mirror
(Electric)
The interior rear view mirror contains a
dedicated display showing information about the
electrical system. It comes on when the ignition
is switched on and when the vehicle is being
charged.
Press this button to temporarily deactivate
the display .
Page 47 of 212
45
Ease of use and comfort
3Front door pockets
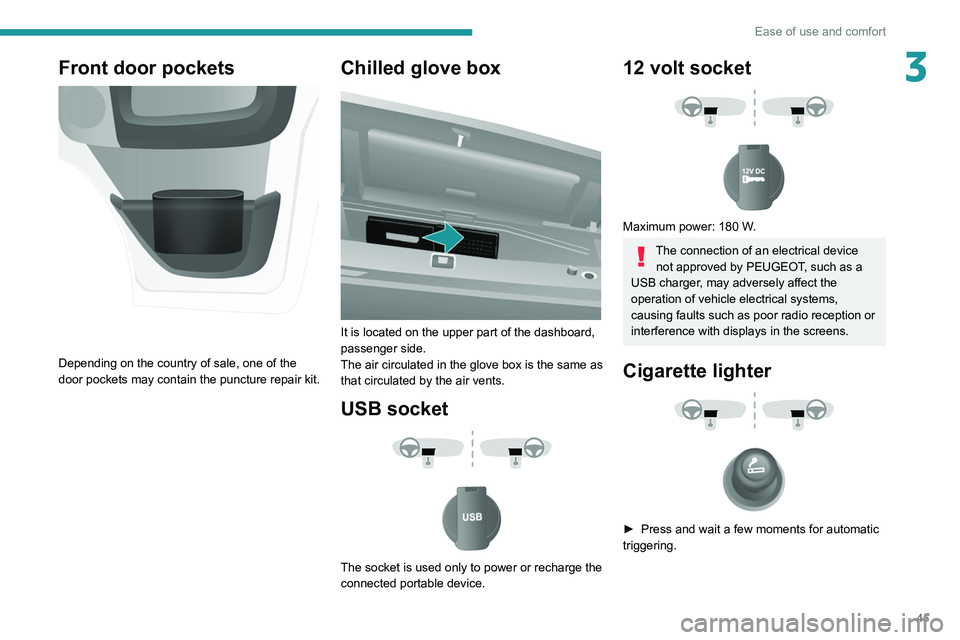
Depending on the country of sale, one of the
door pockets may contain the puncture repair kit.
Chilled glove box
It is located on the upper part of the dashboard,
passenger side.
The air circulated in the glove box is the same as
that circulated by the air vents.
USB socket
The socket is used only to power or recharge the
connected portable device.
12 volt socket
Maximum power: 180 W.
The connection of an electrical device not approved by PEUGEOT, such as a
USB charger, may adversely affect the
operation of vehicle electrical systems,
causing faults such as poor radio reception or
interference with displays in the screens.
Cigarette lighter
► Press and wait a few moments for automatic
triggering.
Page 49 of 212
47
Ease of use and comfort
3Rear fittings
Stowing rings
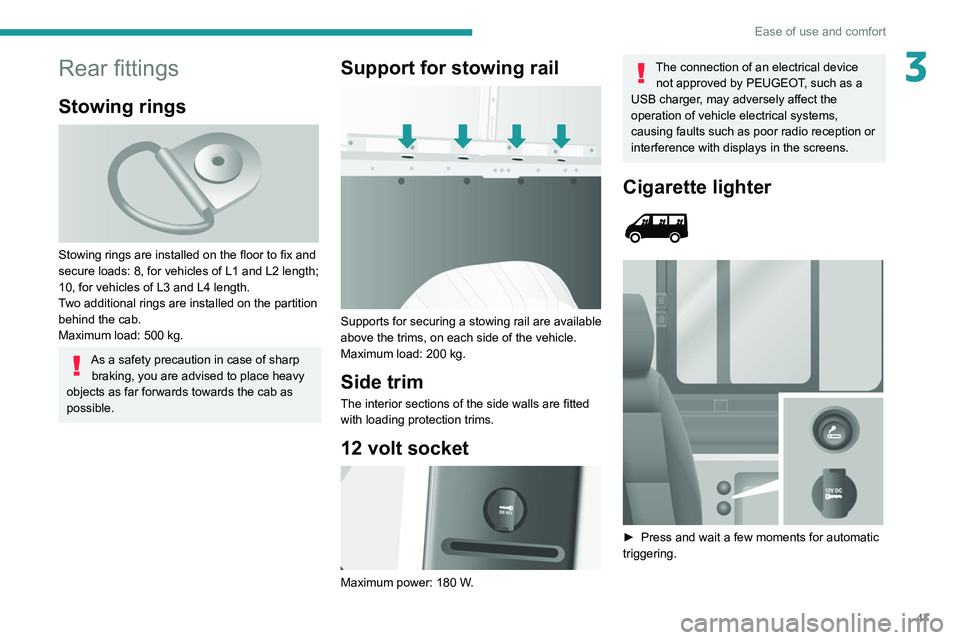
Stowing rings are installed on the floor to fix and
secure loads: 8, for vehicles of L1 and L2 length;
10, for vehicles of L3 and L4 length.
Two additional rings are installed on the partition
behind the cab.
Maximum load: 500 kg.
As a safety precaution in case of sharp braking, you are advised to place heavy
objects as far forwards towards the cab as
possible.
Support for stowing rail
Supports for securing a stowing rail are available
above the trims, on each side of the vehicle.
Maximum load: 200 kg.
Side trim
The interior sections of the side walls are fitted
with loading protection trims.
12 volt socket
Maximum power: 180 W.
The connection of an electrical device not approved by PEUGEOT, such as a
USB charger, may adversely affect the
operation of vehicle electrical systems,
causing faults such as poor radio reception or
interference with displays in the screens.
Cigarette lighter
► Press and wait a few moments for automatic
triggering.
Page 58 of 212
56
Safety
General safety
recommendations
Do not remove the labels attached in
different places on your vehicle. They
include safety warnings as well as
identification information for the vehicle.
For all work on your vehicle, use a
qualified workshop that has the technical
information, skills and equipment required, all
of which a PEUGEOT dealer is able to
provide.
Depending on country regulations,
certain safety equipment may be
mandatory: high visibility safety vests,
warning triangles, breathalysers, spare bulbs,
spare fuses, fire extinguisher, first aid kit, mud
flaps at the rear of the vehicle, etc.
Installing electrical accessories:
– The fitting of electrical equipment or
accessories not approved by PEUGEOT
may
cause excessive current consumption and
faults and failures with the electrical system
of your vehicle. Contact a PEUGEOT dealer
for information on the range of approved
accessories.
–
As a safety measure, access to the
diagnostic socket, used for the vehicle's
electronic systems, is reserved strictly for
PEUGEOT dealers or qualified workshops,
equipped with the special tools required (risk
of malfunctions of the vehicle's electronic
systems that could cause breakdowns or
serious accidents). The Manufacturer cannot
be held responsible if this advice is not
followed.
–
Any modification or adaptation not intended
or authorised by PEUGEOT
or carried out
without meeting the technical requirements
defined by the Manufacturer will result in the
suspension of the commercial warranty.
Installation of accessory radio
communication transmitters
Before installing a radio communication
transmitter with an external aerial, you must
without fail contact a PEUGEOT dealer for
the specification of transmitters which can
be fitted (frequency, maximum power, aerial
position, specific installation requirements),
in line with the Vehicle Electromagnetic
Compatibility Directive (2004/104/EC).
Declarations of conformity for radio
equipment
The relevant certificates are available on the
http://public.servicebox.peugeot.com/APddb/
website.
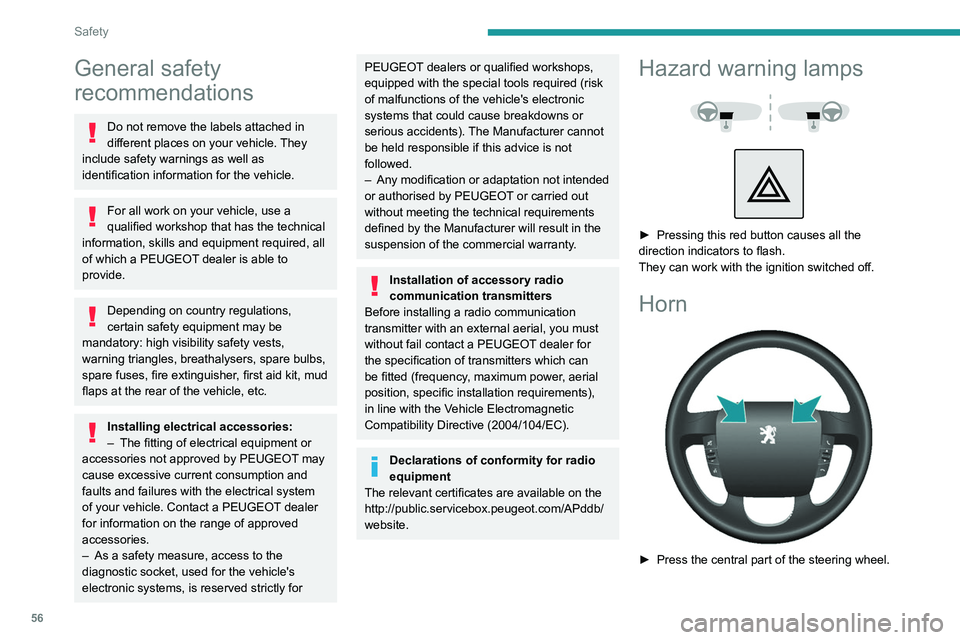
Hazard warning lamps
► Pressing this red button causes all the
direction indicators to flash.
They can work with the ignition switched off.
Horn
► Press the central part of the steering wheel.
Page 75 of 212
73
Driving
6Starting/Switching off the
motor (Electric)
Starting
► With the parking brake applied, turn the key
to the AV V position and then release it so it
returns to the MAR position.
The message "Go green" appears in the display
integrated into the rear view mirror.
►
Depress the brake pedal fully
, then press
button D (Drive) or R (Reverse) on the drive
selector.
The pedestrian horn comes on.
►
Release the parking brake.
If the electric motor does not start first time, turn
the key to the
STOP position and repeat the
procedure.
Do not depress the accelerator pedal
when switching on the ignition.
Switching off
► Press button N (Neutral) on the drive selector
and then apply the parking brake.
►
Move the key back to the
STOP position.
The parking brake must be applied each time the ignition is switched off.
If the parking brake is not applied, the
message "ENGAGE HANDBRAKE " appears
in the rear view mirror accompanied by an
audible signal lasting 10 seconds.
If the driver's door is opened with mode
D or R selected, the drive selector
automatically switches to mode N. The
message "DRIVE ACTIVE" is displayed in the
rear view mirror accompanied by an audible
signal.
Always remove the key from the ignition switch when the vehicle is parked in
order to avoid discharging the 12
V accessory
battery.
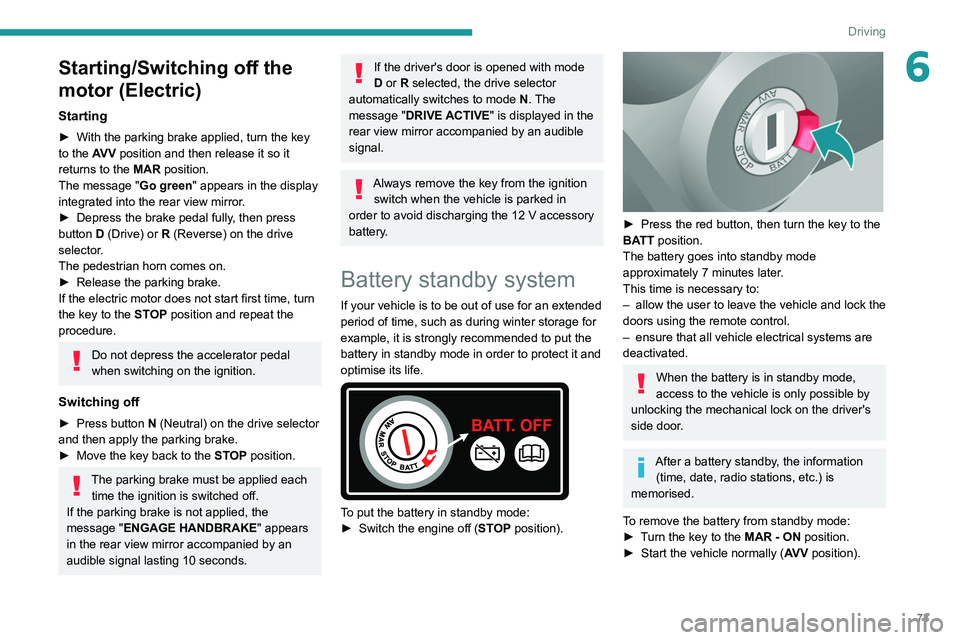
Battery standby system
If your vehicle is to be out of use for an extended
period of time, such as during winter storage for
example, it is strongly recommended to put the
battery in standby mode in order to protect it and
optimise its life.
To put the battery in standby mode:
► Switch the engine off ( ST
OP position).
► Press the red button, then turn the key to the
BA TT position.
The battery goes into standby mode
approximately 7 minutes later.
This time is necessary to:
–
allow the user to leave the vehicle and lock the
doors using the remote control.
–
ensure that all vehicle electrical systems are
deactivated.
When the battery is in standby mode,
access to the vehicle is only possible by
unlocking the mechanical lock on the driver's
side door.
After a battery standby, the information (time, date, radio stations, etc.) is
memorised.
To remove the battery from standby mode:
►
T
urn the key to the MAR - ON position.
►
Start the vehicle normally ( AV
V position).
Page 164 of 212
162
Audio system
Audio system
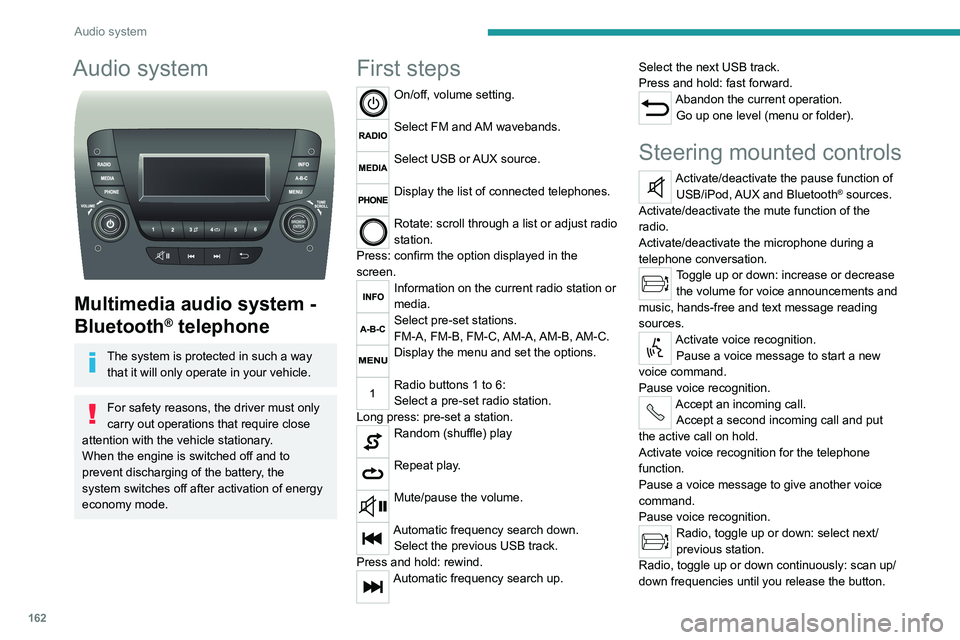
Multimedia audio system -
Bluetooth
® telephone
The system is protected in such a way that it will only operate in your vehicle.
For safety reasons, the driver must only
carry out operations that require close
attention with the
vehicle stationary.
When the engine is switched off and to
prevent discharging of the battery, the
system switches off after activation of energy
economy mode.
First steps
On/off, volume setting.
Select FM and AM wavebands.
Select USB or AUX source.
Display the list of connected telephones.
Rotate: scroll through a list or adjust radio
station.
Press: confirm the option displayed in the
screen.
Information on the current radio station or
media.
Select pre-set stations.
FM-A, FM-B, FM-C, AM-A, AM-B, AM-C.
Display the menu and set the options.
Radio buttons 1 to 6:
Select a pre-set radio station.
Long press: pre-set a station.
Random (shuffle) play
Repeat play.
Mute/pause the volume.
Automatic frequency search down. Select the previous USB track.
Press and hold: rewind.
Automatic frequency search up. Select the next USB track.
Press and hold: fast forward.
Abandon the current operation.
Go up one level (menu or folder).
Steering mounted controls
Activate/deactivate the pause function of USB/iPod, AUX and Bluetooth® sources.
Activate/deactivate the mute function of the
radio.
Activate/deactivate the microphone during a
telephone conversation.
Toggle up or down: increase or decrease the volume for voice announcements and
music, hands-free and text message reading
sources.
Activate voice recognition. Pause a voice message to start a new
voice command.
Pause voice recognition.
Accept an incoming call. Accept a second incoming call and put
the active call on hold.
Activate voice recognition for the telephone
function.
Pause a voice message to give another voice
command.
Pause voice recognition.
Radio, toggle up or down: select next/
previous station.
Radio, toggle up or down continuously: scan up/
down frequencies until you release the button.
Page 165 of 212
163
Audio system
11Media, toggle up or down: select next/previous
track.
Media, toggle up or down continuously: fast
forward/rewind until you release the button.
Refuse an incoming call.
End the call in progress.
Radio
Selecting a station
The exterior environment (hills, buildings, tunnels, car parks, underground location,
etc.) may block reception, including in RDS
mode.
This behaviour is normal in the propagation of
radio waves and does not indicate any fault
with the audio system.
Press the "RADIO" button to select the
FM or AM waveband.
Briefly press one of the buttons to
automatically search for a lower/
higher frequency.
Turn the knob to manually search for a lower/higher frequency.
Press the knob to display the list of
stations received locally.
Turn the knob to select a station and press to
select it.
Memorising a station
Press the "RADIO" button to select the
FM or AM waveband.
Press the "A-B-C" button to select one of
the three memorised station levels.
Press and hold a button to memorise the
station being listened to.
The name of the station is displayed and an
audible signal confirms the memorisation.
Press "INFO" to display the information of
the station being listened to.
RDS
RDS, if displayed, allows you to continue
listening to the same station by
automatically retuning to alternative
frequencies. However, in certain conditions,
following this RDS station is not guaranteed
over the whole country, because radio
stations do not cover 100% of the area. When
the reception is weak, the frequency switches
to a regional station.
Press the "MENU" button.
Select "Regional" then press to activate
or deactivate RDS.
Alternative frequency (AF)
Select "Alternative frequency (AF)" then
press to activate or deactivate the
frequency.
When the "Regional” function is
activated, the system is therefore able to
search at any time
for the best available
frequency.
Playing TA messages
The TA (Traffic Announcement) function gives priority to TA alert messages. To
operate, this function needs good reception of
a radio station that carries this type of
message. While traffic information is being
broadcast, the current media is automatically
interrupted so that the TA message can be
heard. Normal play of the previously playing
media resumes at the end of the message.
Press the "MENU" button.
Select "Traffic announcement (TA)" then
press to activate or deactivate the
reception of traffic announcements.
Media
USB socket
Insert the USB memory stick or connect
the device to the USB socket in the
central storage space , provided for transferring
data to the system, using a suitable cable (not
supplied).
Page 168 of 212
166
Audio system
Voice commands
Information - Using the
system
Instead of touching the screen, you can
use your voice to control the system.
To ensure that voice commands are always recognised by the system, please
observe the following recommendations:
–
speak in a normal tone of voice,
–
before speaking, always wait for the "beep"
(acoustic signal),
–
the system is able to recognise the voice
commands provided, regardless of gender
,
tone and inflection of the voice of the speaker,
–
if possible, minimise the noise inside the
passenger compartment,
–
before issuing a voice command, ask any
other passengers to refrain from speaking.
Since the system recognises commands
regardless of who is speaking, when several
people are speaking simultaneously
, it
is possible for the system to recognise
commands that are different or additional to
what has been requested,
–
for optimal operation, you are advised to
close the windows and any sunroof present
(on versions/markets where fitted) to avoid
any external source of disturbance.
Steering-mounted controls
This button is used to activate the “Telephone” voice recognition mode that
allows you to make calls, view recent/received/
outgoing calls, display the directory, etc.
This button is used to activate the "Radio/ Media" voice recognition mode that allows
you to tune to a specific radio station or a
specific AM/FM radio frequency, play a track or
an album contained on a USB stick/iPod/MP3/
CD.
Quick voice interaction can be used if
these buttons are depressed during a
voice message from the system; it allows you
to directly say a voice command.
For example, if the system is in the middle
of saying a voice help message and if we
know the command to give the system, by
pressing these buttons, the voice message
is interrupted and it is possible to directly
say the desired voice command (so avoiding
having to listen to the complete voice help
message).
When the system is waiting for a voice
command from the user, pressing these
buttons closes the voice session.
Each time a button is pressed, a "beep"
(acoustic signal) is emitted and the
screen displays a screen page of suggestions
asking the user to say a command.
Global voice commands
These commands can be made from any screen page after
pressing the voice recognition or telephone
button located on the steering wheel, as long as
there is no telephone call in progress.
Help
Provide generic help to the user by offering
some available commands.
Cancel
Close the current voice sequence.
Repeat
Repeat the last spoken voice message to the
user.
Voice tutorial
Provide a detailed description to the user on how
to use the voice system.
"Telephone" voice
commands
If a telephone is connected to the system,
the following voice commands can be
made from any main screen page after pressing
the telephone button located on the steering
wheel, as long as there is no telephone call in
progress.
If no telephone is connected, a voice message
announces: "No telephone is connected.
Connect a telephone and try again” and the
voice session will be closed.