window PEUGEOT BOXER 2021 Owners Manual
[x] Cancel search | Manufacturer: PEUGEOT, Model Year: 2021, Model line: BOXER, Model: PEUGEOT BOXER 2021Pages: 212, PDF Size: 6.37 MB
Page 4 of 212
2
Contents
■
Overview
■
Eco-driving
1InstrumentsInstrument panel 8
Warning and indicator lamps 9
Indicators 13
Vehicle configuration (MODE) 15
Touch screen audio and multimedia system 21
Setting the date and time 21
Trip computer 22
Trip computer 22
2AccessKey 23
Remote control 23
Front doors 26
Sliding side door 26
Rear doors 27
Alarm 27
Electric windows 28
3Ease of use and comfortFront seats 30
Front bench seat 31
Rear seats 32
Rear bench seat 32
Steering wheel adjustment 33
Mirrors 34
Heating and Ventilation 35
Heating/Manual air conditioning 35
Automatic air conditioning 36
Heating (Electric) 37
Additional heating systems 39
Rear heating/air conditioning 39
Additional programmable heating 40
Front demist - defrost 42
Rear screen de-icing 42
Cab layout 43
Rear fittings 47
Exterior fittings 49
4Lighting and visibilityLighting control stalk 51
Direction indicators 51
LED daytime running lamps 51
Automatic headlamp dipping 52
Headlamp beam height adjustment 54
Wiper control stalk 54
Changing a wiper blade 55
5SafetyGeneral safety recommendations 56
Hazard warning lamps 56
Horn 56
Pedestrian horn (Electric) 57
Electronic stability control (ESC) 57
Seat belts 60
Airbags 62
Child seats 63
Deactivating the front passenger airbag 65
ISOFIX seats 66
Child lock 68
6DrivingDriving recommendations 69
Starting-switching off the engine 72
Battery standby system 73
Parking brake 74
Gearbox 74
Drive selector (Electric) 75
Gear shift indicator 75
Stop & Start 76
Hill start assist 77
Tyre under-inflation detection 78
Pneumatic suspension 79
Driving and manoeuvring aids - General
recommendations
80
Road signs recognition 82
Speed limiter 83
Cruise control - Specific recommendations 85
Cruise control 85
Lane departure warning system 86
Blind spot monitoring with trailer detection 89
Active Safety Brake with Collision Risk Alert and
Intelligent emergency braking assistance
90
Rear parking sensors 93
Reversing camera 94
7Practical informationFuel 96
Compatibility of fuels 97
Charging system (Electric) 97
Charging the traction battery (Electric) 101
Snow chains 103
Towing a trailer 104
Towbar with quickly detachable towball 104
Roof-mounted carrying system 107
Bonnet 107
Page 8 of 212
6
Eco-driving
Eco-driving
Eco-driving refers to a range of everyday
practices that allow the motorist to optimise
the vehicle's energy consumption (fuel and/or
electricity) and CO
2 emissions.
Optimise your use of the gearbox
With a manual gearbox, move off gently and
change up promptly. While accelerating, change
up early.
The gear shift indicator prompts you to engage
the most suitable gear. Whenever this indication
is displayed on the instrument panel, follow it
straight away.
Drive smoothly
Maintain a safe distance between vehicles, use
engine braking rather than the brake pedal and
press the accelerator gradually. These practices
help to save on energy consumption, reduce
CO
2 emissions and decrease general traffic
noise.
If the vehicle has the steering-mounted
"CRUISE" control, use cruise control at speeds
above 19 mph (30
km/h) when the traffic is
flowing smoothly.
Control the use of electrical equipment
Before moving off, if the passenger compartment
is too warm, ventilate it by opening the windows
and air vents before using the air conditioning.
At speeds above 31
mph (50 km/h), close the
windows and leave the air vents open. Consider using equipment that can help keep
the temperature in the passenger compartment
down.
Unless automatically regulated, switch off the air
conditioning as soon as the desired temperature
has been reached.
Switch off the demisting and defrosting functions,
if they are not managed automatically.
Switch off the heated seat as soon as possible.
Adapt your use of the headlamps and/or
foglamps to the level of visibility, in accordance
with current legislation in the country in which
you are driving.
Avoid running the engine before moving off,
particularly in winter (other than in severe wintry
conditions: temperature below -23°C). The
vehicle will warm up much faster while driving.
As a passenger, avoid connecting your
multimedia devices (e.g.
film, music, video
game) to help reduce the consumption of energy.
Disconnect all portable devices before leaving
the vehicle.
Limit the causes of excess consumption
Spread loads throughout the vehicle.
Limit the loads carried in the vehicle and
minimise wind resistance (e.g.
roof bars, roof
rack, bicycle carrier, trailer). Preferably, use a
roof box.
Remove roof bars and roof racks after use.
At the end of winter, remove snow tyres and refit
summer tyres.
Comply with the servicing instructions
Check tyre pressures regularly, with the tyres
cold, referring to the label in the door aperture on
the driver's side.
Carry out this check in particular:
–
before a long journey
.
–
at each change of season.
–
after a long period out of use.
Do not forget the spare wheel and, where
applicable, the tyres on your trailer or caravan.
Have your vehicle serviced regularly (e.g.
engine
oil, oil filter, air filter, passenger compartment
filter, etc.). Observe the schedule of operations in
the manufacturer's service schedule.
With a BlueHDi Diesel engine, if the SCR system
has a fault, your vehicle will emit pollution. Visit
a PEUGEOT dealer or a qualified workshop
as soon as possible to restore your vehicle's
nitrogen oxide emissions to legal levels.
When filling the fuel tank, do not continue after
the third cut-out of the nozzle, to avoid overflow.
You will only see the fuel consumption of your
new vehicle settle down to a consistent average
after the first 1,900 miles (3,000 kilometres).
Optimising the driving range (Electric)
The vehicle’s electrical consumption depends
heavily on the route, the vehicle speed and your
driving style.
Drive smoothly and maintain a steady speed.
Anticipate the need to slow down and brake
smoothly, whenever possible using engine
braking.
Page 30 of 212
28
Access
- Anti-tilt monitoring
The system checks for any change in the attitude
of the vehicle.
Activation
► Switch off the ignition and exit the vehicle.► Press this button of the remote
control.
The protections are active after a few seconds.
Triggering of the alarm
This is signalled by the siren sounding and
flashing of the direction indicators for thirty
seconds.
The alarm then returns to monitoring mode but the triggering event is stored
and is indicated by illumination of the electronic
immobiliser warning lamp for about 10 seconds
when the ignition is switched on.
The alarm is also triggered after interruption of
the electrical supply and when it is reconnected.
Deactivation using the
remote control
► Press this button.
The standby mode is deactivated when the
vehicle is unlocked.
Deactivating the anti-tilt
monitoring
(Depending on engine)► Press this button to deactivate the
protection (e.g. when towing the vehicle
with the alarm on).
The protection remains active until the central
opening of the doors.
Failure of the remote control
► Unlock the doors using the key in the lock;
the alarm goes off.
►
T
urn the ignition on; the identification of the
key code will turn off the alarm.
Locking the doors using the key in the
lock does not activate the alarm.
To deactivate the siren quickly
following a false alarm:
►
switch on the ignition, recognition of the
key code stops the alarm,
►
press the unlocking button (cab and key)
on the remote control.
T
o avoid setting the alarm, when washing the
vehicle for example, lock the vehicle using
the key.
Unlocking the vehicle using the remote
control deactivates the siren automatically.
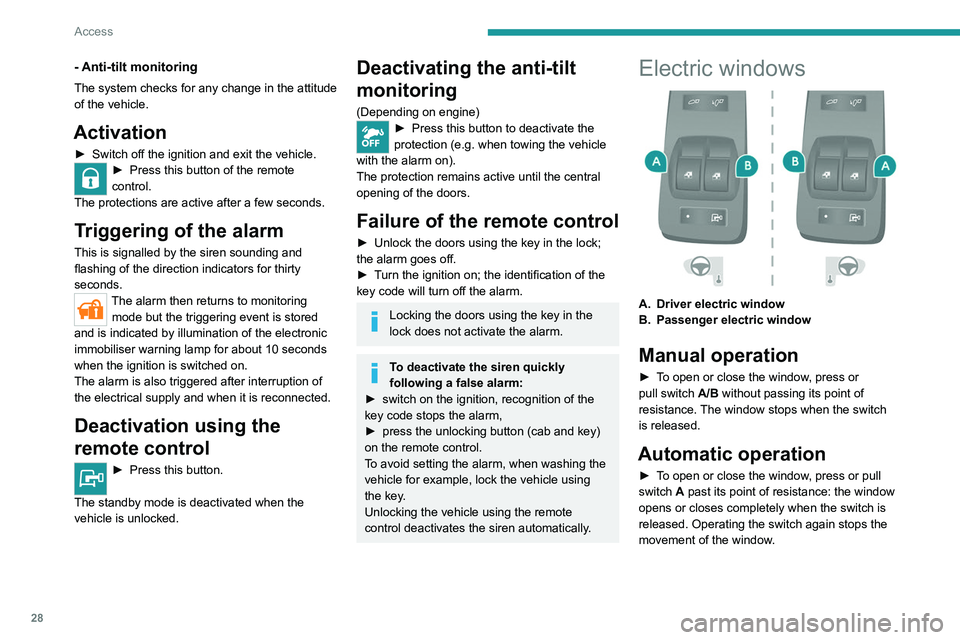
Electric windows
A. Driver electric window
B. Passenger electric window
Manual operation
► To open or close the window, press or
pull switch A/B without passing its point of
resistance. The window stops when the switch
is released.
Automatic operation
► To open or close the window, press or pull
switch A past its point of resistance: the window
opens or closes completely when the switch is
released. Operating the switch again stops the
movement of the window.
Page 31 of 212
29
Access
2Always remove the key from the ignition when leaving the vehicle, even for a
short time.
If an obstacle is encountered during operation
of the electric windows, you must reverse the
movement of the window. To do this, press
the window control concerned.
When the driver operates the passenger
electric windows, they must ensure that
no one is preventing correct closing of the
windows.
The driver must ensure that all passengers
make correct use of electric windows.
Be particularly aware of children when
operating the windows.
Page 38 of 212
36
Ease of use and comfort
Electric vehicles
To heat the passenger compartment, you
must use the control panel located next to the
steering wheel.
For more information, refer to the Heating
(Electric) section.
Air conditioning
The air conditioning mode is only operational
when the engine is running.
The air blower must be set to at least 1.
►
Press button
1 to activate/deactivate the
air conditioning system (confirmed by the LED
coming on/going out).
Temperature
► Turn knob 2 to select a position between blue
(cold) and red (warm).
Air flow
► Set control 3 to the desired position to obtain
the necessary air flow for your comfort.
If the air flow control is in
position 0 (system deactivated), thermal
comfort is no longer managed. A slight flow of
air can still be felt, due to the forward
movement of the vehicle.
Air distribution
The distribution of incoming air is directed by
turning the control towards:
the side vents and central vents,
the side vents, central vents and
footwells,
the footwells,
the windscreen, footwells and side
windows,
the windscreen and side windows.
Air intake/Air recirculation
The intake of exterior air prevents the formation
of mist on the windscreen and side windows.
Recirculating the interior air isolates the
passenger compartment from exterior odours
and fumes.
Used simultaneously with the air conditioning
switched on and the setting for the blown air
strength (from 1 to 4), recirculation makes it
possible to achieve the desired ambient air
comfort for both hot and cold settings.
Return to exterior air intake as soon as possible
to avoid deterioration of the air quality and the
formation of mist.
► Put the control in this position to
activate interior air recirculation.
► Put the control in this position to
restore exterior air intake.
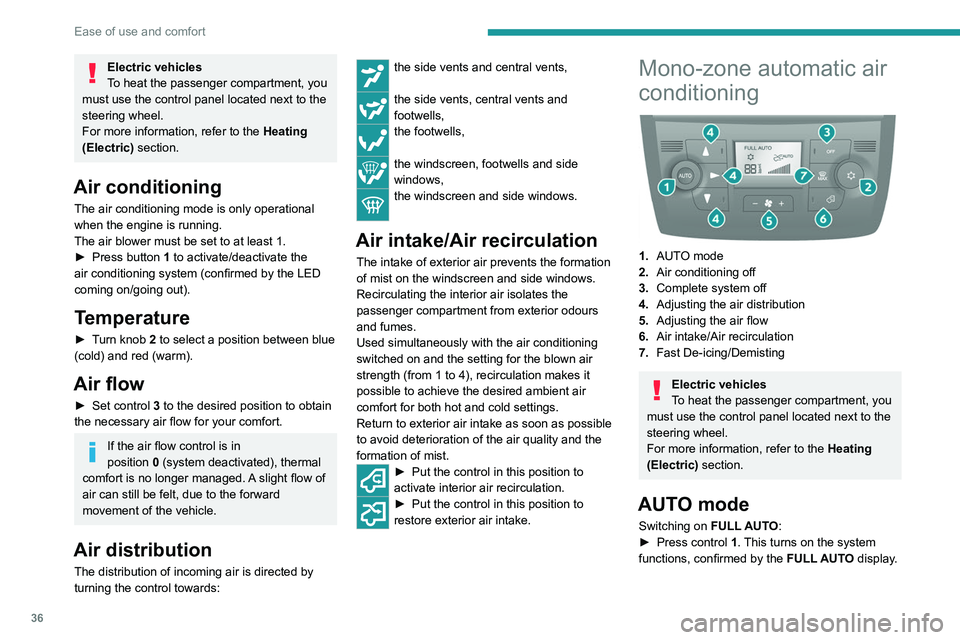
Mono-zone automatic air
conditioning
1. AUTO mode
2. Air conditioning off
3. Complete system off
4. Adjusting the air distribution
5. Adjusting the air flow
6. Air intake/Air recirculation
7. Fast De-icing/Demisting
Electric vehicles
To heat the passenger compartment, you
must use the control panel located next to the
steering wheel.
For more information, refer to the Heating
(Electric) section.
AUTO mode
Switching on FULL AUTO:
► Press control 1. This turns on the system
functions, confirmed by the FULL AUTO display.
Page 39 of 212
37
Ease of use and comfort
3This is the normal operating mode for the
automatic air conditioning system.
–
Using the moving ring surrounding the
AUTO
control, adjust the comfort temperature to be
reached according to a scale between: •
HI (High up to ≈32) and
•
LO (Low until ≈16).
The system manages the air distribution, flow
and intake to ensure the comfort equivalent
to the graduation displayed and sufficient air
recirculation in the passenger compartment.
Customisable AUTO mode
In AUTO mode, some settings can be changed:
distribution, air flow, air conditioning and air
intake/recirculation.
The display changes from FULL AUTO to
AUTO.
►
T
o return to fully automatic operation, press
button 1 again. The control panel display
changes from AUTO to
FULL AUTO.
If after manual adjustments, the system cannot
maintain the selected graduation, this will flash
and AUTO will then go out. Press control 1 to
return to the automatic settings.
Air conditioning off
► Press button 2 to switch off the air
conditioning functions. The snowflake goes out
on the display.
Complete switch-off
► Press button 3 to switch off the system. The
LED and the display go out.
Temperature
The scale is between:
– a rise in interior air temperature HI (High),
which heats up to a maximum graduation of 32,
–
a cooling of interior air temperature LO (Low),
which decreases to a graduation
of 16.
Air distribution
► Press one of the buttons 4 to direct the air
flow towards:
the windscreen and front side window
vents (demisting - defrosting windows),
the central and side vents (chest and
face),
the diffusers of the front and rear zones
(footwells).
Combining buttons makes it possible to refine
the air distribution.
Air flow
► Press one of the buttons 5 to increase or
decrease the air flow.
Air intake/Air recirculation
The intake of exterior air prevents the formation
of mist on the windscreen and side windows.
Recirculating the interior air isolates the
passenger compartment from exterior odours
and fumes.
This function allows hot or cold air to be delivered selectively and more quickly.
Return to exterior air intake as soon as possible
to avoid deterioration of the air quality and the
formation of mist.
►
Press button
6 to activate interior air
recirculation. The indicator lamp comes on.
Pressing this button again restores exterior air
intake. The indicator lamp goes off.
Pressing button 1 also restores exterior
air intake. Returning to this position
allows the air in the passenger compartment
to be renewed and demisting. Pressing button
1
again restores the FULL AUTO function.
Heating (Electric)
A thermostatic control panel is used to heat
the passenger compartment, in addition to the
standard controls located on the central console.
The control panel is located next to the steering
wheel, below the MODE control panel.
Page 44 of 212
42
Ease of use and comfort
The memorisation is confirmed by the
disappearance of the duration on the screen or
by pressing button 3 again.
Switching the heating off
In the event of a delayed start, the heating
switches off automatically at the end of the
programmed duration.
►
In the event of an immediate start, press
button
2 again to switch it off manually.
The heating cycle indicator lamp and the screen
switch off.
Have the additional heating checked at
least once a year at the beginning of
winter.
For maintenance and repairs, contact a
PEUGEOT dealer or a qualified workshop
only.
Only use approved replacement parts.
To avoid the risks of poisoning or asphyxia, the programmable heating
must not be used, even for short periods, in a
closed environment such as a garage or
workshop which is not equipped with an
exhaust gas extraction system.
The additional heating turns off when the
battery voltage is low, to allow the vehicle to
start.
The additional heating is supplied by the
vehicle fuel tank. Make sure the fuel gauge
level indicator is not in the reserve.
Always switch off the additional heating when
refuelling to avoid any risk of fire or explosion!
The temperature in the vicinity of the heater
must not exceed 120°C. A higher temperature
(e.g. in the case of oven painting) could
damage electronic circuits components.
The additional heating is equipped with a
thermal limiter which cuts off combustion in
case of engine overheating due to lack of
coolant. Check the level and top-up with fluid,
if necessary.
For more information on Checking levels,
refer to the corresponding section.
Then press the programme selection button
before turning on the heating again.
Front demist - defrost
These markings on the control panel indicate the control positions for rapid
demisting or defrosting of the windscreen and
side windows.
With manual air
conditioning
► Set the air flow and air distribution
controls to the appropriately marked
positions.
T
o make the windscreen de-icing and demisting
more efficient and faster:
►
increase the air flow setting,
► momentarily swi tch the exterior air
intake control to air recirculation.
With automatic air
conditioning
► Press this button. The indicator lamp
lights up.
The system manages the air conditioning, the air
flow and intake, the de-icing of the rear screen
and distributes air optimally to the windscreen
and front side windows.
If the vehicle is equipped with an additional
heating system, deactivate it to ensure fast and
efficient demisting / de-icing.
De-icing the rear screen
and/or door mirrors
► Press this button to activate/deactivate
demisting/de-icing of the rear screen and
door mirrors.
The indicator lamp illuminates
when the fonction is activated.
This function turns off automatically to prevent
excessive power consumption.
Rear screen demisting/de-icing can only
operate when the engine is running.
Page 51 of 212

49
Ease of use and comfort
3Sliding side windows
Depending on version, the vehicle has side
windows that can be opened.
►
Pinch both controls, then slide the window
.
When driving, the window must be
closed or locked in an intermediate
position.
Do not place long objects that protrude from
the window.
Exterior fittings
Protective grille
Depending on the country of sale, a protective
grille, fixed inside the front bumper, protects the
engine parts against loose chippings, etc.
Very cold climate protectors
Depending on the country of sale, protective
foam is present to prevent the penetration of
cold or snow in the upper part of the engine
compartment.
Located at the end of each headlamp unit, they
are fixed on the crossmember on the upper part
of the radiator.
To remove them, slide them sideways towards
the outside of the vehicle.
Page 65 of 212
63
Safety
5Lateral airbags and curtain
airbags
If fitted to your vehicle, the lateral airbags are
built into the backrests of the front seats, on the
side by the door.
The curtain airbags are built into the pillars and
the upper passenger compartment area, in the
roof above the front seats.
They inflate between the occupant and the
window.
They deploy on one side only (the side where
the collision occurs).
Malfunction
If this warning lamp comes on, contact a
PEUGEOT dealer to have the system
checked.
Advice
For the airbags to be fully effective,
observe the safety recommendations
below.
Adopt a normal upright sitting position.
Fasten the seat belt ensuring it is correctly
positioned and adjusted.
Do not leave anything between the occupants
and the airbags (a child, pet, object, etc.), nor
fix or attach anything close to or in the way of
the airbag release trajectory; this could cause
injuries during their deployment.
Never modify the original definition of your
vehicle, particularly in the area directly around
the airbags.
After an accident or if the vehicle has been
stolen, have the airbag systems checked.
All work on the airbag systems must only
be performed by a PEUGEOT dealer or a
qualified workshop.
Even if all of the precautions mentioned
are observed, a risk of injury or of minor
burns to the head, chest or arms cannot be
ruled out when an airbag is deployed. The
airbag inflates almost instantly (within a few
milliseconds) then deflates within the same
time discharging the hot gas via openings
provided for this purpose.
Front airbags
Do not drive holding the steering wheel
by its spokes or resting your hands on the
centre part of the wheel.
Passengers must not place their feet on the
dashboard.
Do not smoke as deployment of the airbags
can cause burns or the risk of injury from a
cigarette or pipe.
Never remove or pierce the steering wheel or
hit it violently.
Do not fix or attach anything to the steering
wheel or dashboard, as this could cause
injuries when the airbags are deployed.
Lateral airbags
Use only approved covers on the seats,
compatible with the deployment of the lateral
airbags. For information on the range of seat
covers suitable for your vehicle, contact a
PEUGEOT dealer.
Do not fix or attach anything to the seat
backrests (clothes, etc.), as this could cause
injuries to the thorax or arm when the lateral
airbag is deployed.
Do not sit with the upper part of the body any
nearer to the door than necessary.
Curtain airbags
Do not fix or attach anything to the roof,
as this could cause head injuries when the
curtain airbag is deployed.
Do not remove the grab handles installed on
the roof, as they play a part in securing the
curtain airbags.
Child seats
The regulations on carrying children are specific to each country. Refer to the
legislation in force in your country.
For maximum safety, please observe the
following recommendations:
–
In accordance with European regulations,
all children under the age of 12 or less than
1.5 metres tall must travel in approved child
Page 66 of 212
64
Safety
seats suited to their weight, on seats fitted with
a seat belt or ISOFIX mountings.
–
Statistically
, the safest seats in your
vehicle for carrying children are the rear
seats.
–
Children weighing less than 9 kg must
travel in the "rearward facing" position,
whether in the front or rear of the vehicle.
It is recommended that children travel
on the rear seats of the vehicle:
–
"rearward facing" up to the age of 3,
–
"forward facing" over the age of 3.
Make sure that the seat belt is correctly
positioned and tightened.
For child seats with a support leg, ensure that
the support leg is in firm and steady contact
with the floor.
An incorrectly installed child seat in a vehicle compromises the child's safety in
the event of an accident.
Ensure that there is no seat belt or seat belt
buckle under the child seat, as this could
destabilise it.
Remember to fasten the seat belts or the
child seat harness keeping the slack relative
to the child's body to a minimum, even for
short journeys.
When installing a child seat using the seat
belt, ensure that the seat belt is tightened
correctly on the child seat and that it secures
the child seat firmly on the vehicle seat. If
the passenger seat is adjustable, move it
forwards if necessary.
Remove the head restraint before
installing a child seat with a backrest on a
passenger seat.
Ensure that the head restraint is stored or
attached securely to prevent it from being
thrown around the vehicle in the event of
sharp braking. Refit the head restraint once
the child seat has been removed.
Installing a booster seat
The chest part of the seat belt must be
positioned on the child's shoulder without
touching the neck.
Ensure that the lap part of the seat belt
passes correctly over the child's thighs.
Use a booster seat with a backrest, equipped
with a belt guide at shoulder level.
Additional protections
To prevent accidental opening of the
doors and rear windows, use the "Child lock".
Take care not to open the rear windows by
more than one third.
To protect young children from the sun's rays,
fit side blinds on the rear windows.
As a safety measure, do not leave:
–
A
child alone and unsupervised inside a
vehicle.
– A child or an animal in a vehicle which is
exposed to the sun, with the windows closed.
–
The keys within reach of children inside the
vehicle.
Child seat at the rear
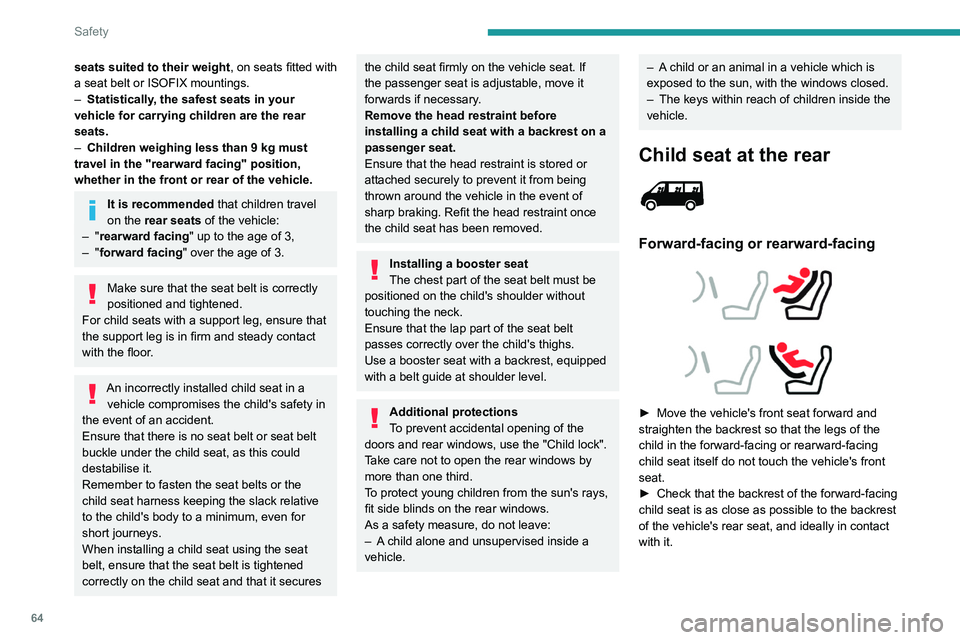
Forward-facing or rearward-facing
► Move the vehicle's front seat forward and
straighten the backrest so that the legs of the
child in the forward-facing or rearward-facing
child seat itself do not touch the vehicle's front
seat.
►
Check that the backrest of the forward-facing
child seat is as close as possible to the backrest
of the vehicle's rear seat, and ideally in contact
with it.