Peugeot Expert VU 2013 Workshop Manual
Manufacturer: PEUGEOT, Model Year: 2013, Model line: Expert VU, Model: Peugeot Expert VU 2013Pages: 248, PDF Size: 9.37 MB
Page 51 of 248
49
Steering mounted controls
EASE OF USE AND COMFOR
T
3
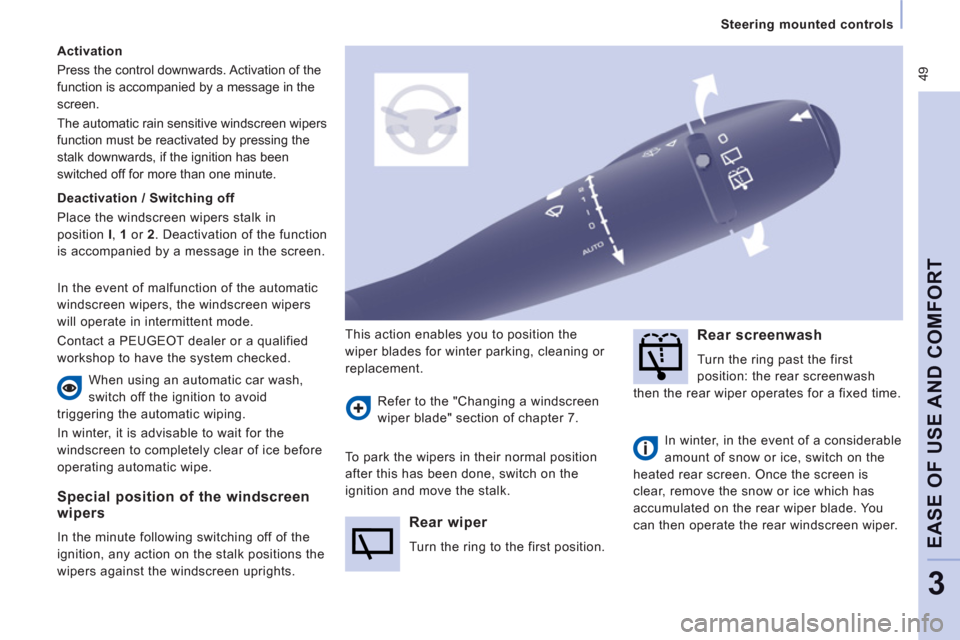
Special position of the windscreen
wipers
In the minute following switching off of the
i
gnition, any action on the stalk positions the
wipers a
gainst the windscreen uprights.This action enables
you to position the
wiper blades
for winter parking, cleaning or
replacement.
Re
fer to the "Changing a windscreen
wi
per blade" section of chapter 7. When using an automatic car wash,
switch off the ignition to avoid
tr
iggering the automatic wiping.
In winter, it is advisable to wait for the
windscreen to completel
y clear of ice before
operatin
g automatic wipe.
Rear wiper
Turn the ring to the first position.
Rear screenwash
Turn the ring past the first
pos
ition: the rear screenwash
then the rear wiper operates
for a fixed time.
In winter, in the event of a considerable
amount o
f snow or ice, switch on the
heated rear screen. Once the screen is
clear, remove the snow or ice which has
accumu
lated on the rear wiper blade. You
can then operate the rear windscreen wiper.
To park the wipers in their normal position
after this has been done, switch on the
i
gnition and move the stalk.
Activation
Pr
ess the control downwards. Activation of the
function is accompanied by a message in the
screen.
The automatic rain sensitive windscreen wi
pers
function must be reactivated by pressing the
stalk downwards, if the ignition has been
switched off for more than one minute.
Deactivation / Switching off
Place the windscreen wipers stalk in
position I, 1
or 2
. Deactivation of the function
is accompanied by a message in the screen.
In th
e event of malfunction of the automatic
windscreen wipers, the windscreen wipers
w
ill operate in intermittent mode.
Contact a PEUGE
OT dealer or a qualified
workshop to have the system checked.
Page 52 of 248
50
Steering mounted controls
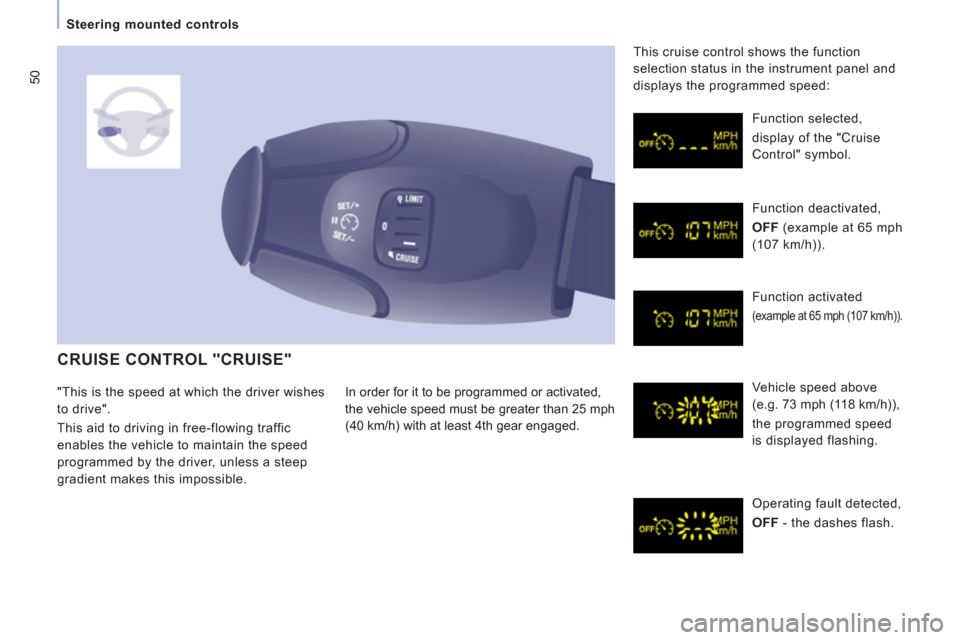
CRUISE CONTROL "CRUISE"
In order for it to be programmed or activated,
the vehicle speed must be
greater than 25 mph
(40 km/h) with at least 4th gear engaged. Function selected,
displa
y of the "Cruise
Control" s
ymbol.
Function deactivated,
OFF
(example at 65 mph
(107 km/h)).
F
unction activated
(example at 65 mph (107 km/h)).
Vehicle speed above
(e.g. 73 mph (118 km/h)),
the pro
grammed speed
is displa
yed flashing.
Operating fault detected,
OFF
- th
e dashes flash. Thi
s cruise control shows the function
selection status in the instrument panel and
displays the programmed speed:
"This is the speed at which the driver wishes
t
o drive".
This aid to drivin
g in free-flowing traffic
enables the vehicle to maintain the speed
programmed by the driver, unless a steep
gradient makes this impossible.
Page 53 of 248
51
Steering mounted controls
EASE OF USE AND COMFOR
T
3
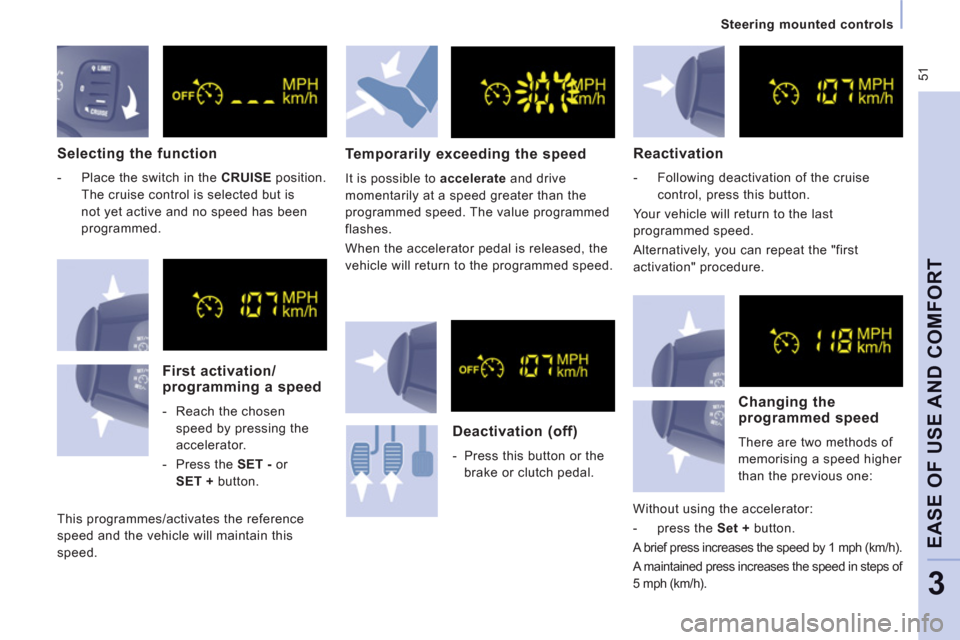
Selecting the function
- Place the switch in the CRUISE
position.
The cruise control is selected but is
not yet active and no speed has been
programmed.
First activation/programming a speed
- Reach the chosen
speed by pressing the
accelerator.
- Press the SET -
or
SET +
button.
This pro
grammes/activates the reference
speed and the vehicle will maintain this
speed.
Temporarily exceeding the speed
It is possible to accelerate
and drive
momentarily at a speed greater than the
pro
grammed speed. The value programmed
flashes.
When the accelerator pedal is released, the
vehicle will return to the pro
grammed speed.
Reactivation
- Following deactivation of the cruise
control, press this button.
Y
our vehicle will return to the last
programmed speed.
Alternatively, you can repeat the "first
activation" procedure.
Deactivation (off)
- Press this button or the
brake or clutch pedal.
Changing the
programmed speed
There are two methods of
memorisin
g a speed higher
t
han the previous one:
Without using the accelerator:
- press the Set +
button.
A brief press increases the speed by 1 mph (km/h).
A maintained press increases the speed in steps o
f
5 mph (km/h).
Page 54 of 248
52
Steering mounted controls
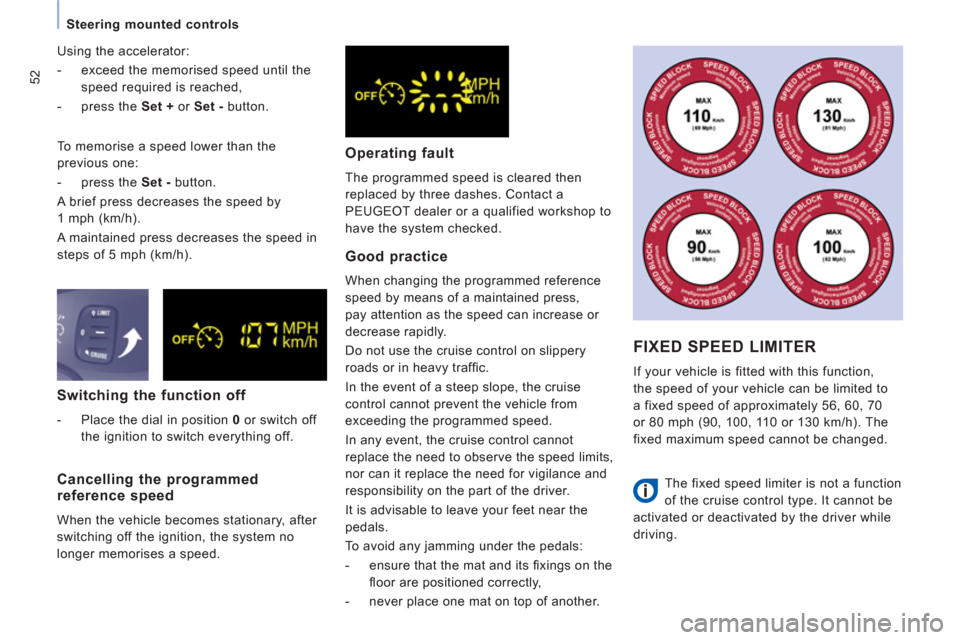
Switching the function off
- Place the dial in position 0
or switch off
the ignition to switch everything off.
Good practice
When changing the programmed reference
speed by means of a maintained press,
pa
y attention as the speed can increase or
decrease rapidly.
Do not use the cruise control on slippery
roads or in heav
y traffi c.
In the event o
f a steep slope, the cruise
control cannot prevent the vehicle from
exceedin
g the programmed speed.
In an
y event, the cruise control cannot
rep
lace the need to observe the speed limits,
nor can it replace the need
for vigilance and
responsibilit
y on the part of the driver.
It is advisable to leave
your feet near the
pe
dals.
To avoid an
y jamming under the pedals:
- ensure that the mat and its fi xings on the
fl oor are positioned correctly,
- never place one mat on top of another.
Cancelling the programmed
reference speed
When the vehicle becomes stationary, after
switching off the ignition, the system no
lon
ger memorises a speed. Usin
g the accelerator:
- exceed the memorised speed until the
speed required is reached,
- press the Set +
or Set -
button.
To memorise a speed lower than the
previous one:
- press the Set -
button.
A brief press decreases the speed by
1 mph
(km/h).
A maintained press decreases the speed in
steps of 5 mph (km/h).
Operating fault
The programmed speed is cleared then
replaced b
y three dashes. Contact a
PEUGE
OT dealer or a qualified workshop to
have the system checked.
FIXED SPEED LIMITER
If your vehicle is fitted with this function,
the speed o
f your vehicle can be limited to
a fixed speed of approximatel
y 56, 60, 70
or 80 mph
(90, 100, 110 or 130 km/h). The
fixed maximum speed cannot be changed.
The
fixed speed limiter is not a function
of the cruise control type. It cannot be
act
ivated or deactivated by the driver while
drivin
g.
Page 55 of 248
53
Steering mounted controls
EASE OF USE AND COMFOR
T
3
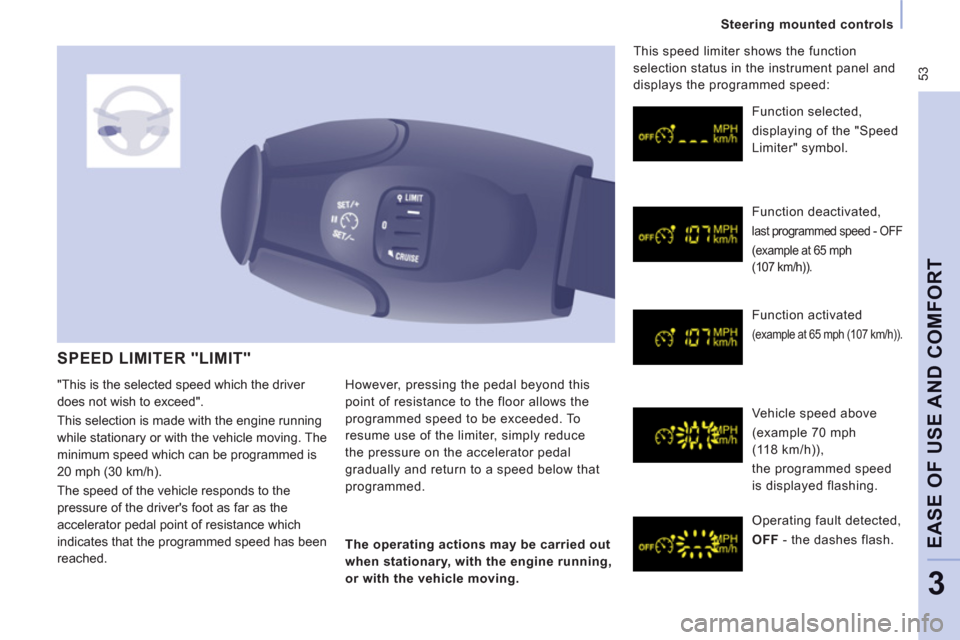
SPEED LIMITER "LIMIT"
However, pressing the pedal beyond this
point of resistance to the floor allows the
pro
grammed speed to be exceeded. To
resume use o
f the limiter, simply reduce
the
pressure on the accelerator pedal
gradually and return to a speed below that
programmed.
Function selected,
displa
ying of the "Speed
Limiter" s
ymbol.
Function deactivated,
last programmed speed - OFF
(example at 65 mph
(107 km/h)).
Function activated
(example at 65 mph (107 km/h)).
Vehicle speed above
(example 70 mph
(118 km/h)),
t
he programmed speed
is displayed flashing.
Operating fault detected,
OFF- th
e dashes flash. This speed limiter shows the
function
selection status in the instrument panel and
displays the programmed speed:
The operating actions may be carried out
w
hen stationary, with the engine running,
or with the vehicle movin
g.
"This is the selected speed which the driver
does not wish to exceed".
This selection is made with the en
gine running
while stationar
y or with the vehicle moving. The
minimum speed which can be programmed is
20 mph
(30 km/h).
The speed o
f the vehicle responds to the
pressure of the driver's foot as far as the
accelerator pedal point of resistance which
indicates that the programmed speed has been
reached.
Page 56 of 248
54
Steering mounted controls
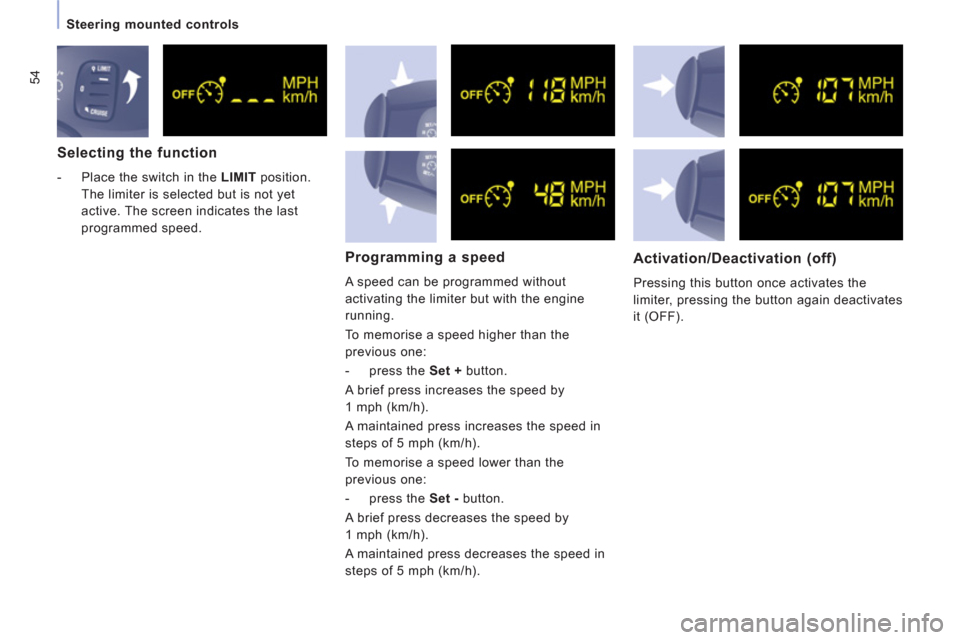
Selecting the function
- Place the switch in the LIMIT
position.
The limiter is selected but is not yet
active. The screen indicates the last
programmed speed.
Programming a speed
A speed can be programmed without
activating the limiter but with the engine
runnin
g.
To memorise a speed hi
gher than the
prev
ious one:
- press the Set +
button.
A brief press increases the speed b
y
1 mph (km/h).
A maintained press increases the speed in
steps of 5 mph (km/h).
To memorise a speed lower than the
previous one:
- press the Set -
button.
A brie
f press decreases the speed by
1 mph (km/h).
A maintained press decreases the speed in
steps of 5 mph (km/h).
Activation/Deactivation (off)
Pressing this button once activates the
limiter, pressing the button again deactivates
it
(OFF).
Page 57 of 248
55
Steering mounted controls
EASE OF USE AND COMFOR
T
3
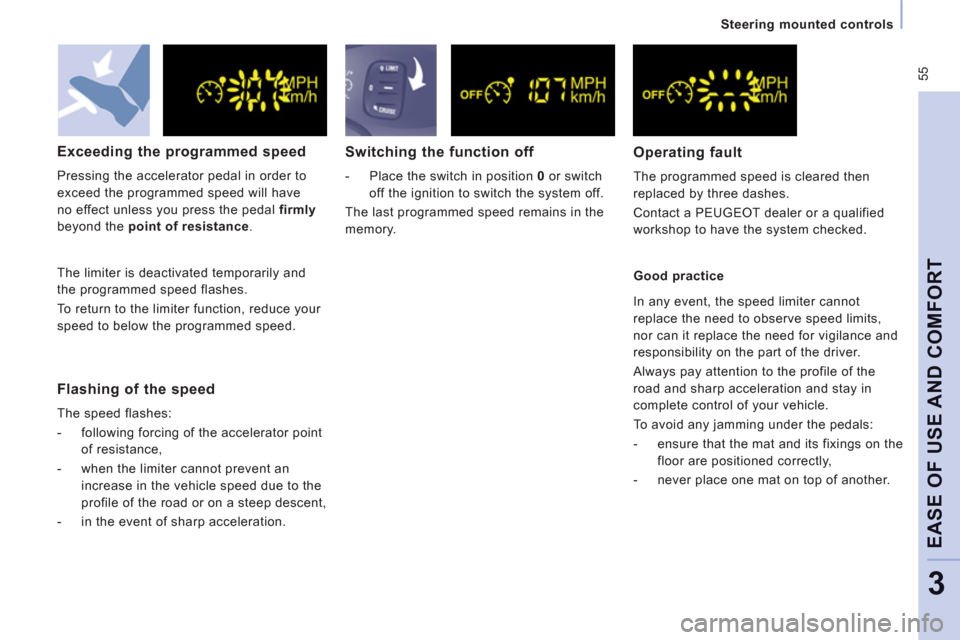
Flashing of the speed
The speed flashes:
- following forcing of the accelerator point
of resistance,
- when the limiter cannot prevent an
increase in the vehicle speed due to the
profile of the road or on a steep descent,
- in the event of sharp acceleration.
Exceeding the programmed speed
Pressing the accelerator pedal in order to
exceed the programmed speed will have
no effect unless you press the pedal firmly
beyond the point of resistance.
Good practice
Operating fault
The programmed speed is cleared then
replaced by three dashes.
Contact a PEUGEOT dealer or a qualified
workshop to have the s
ystem checked.
The limiter is deactivated temporaril
y and
the pro
grammed speed flashes.
To return to the limiter
function, reduce your
speed to below the programmed speed.
Switching the function off
- Place the switch in position 0
or switch
off the ignition to switch the system off.
The last programmed speed remains in the
memory.
In an
y event, the speed limiter cannot
replace the need to observe speed limits,
nor can it replace the need for vigilance and
responsibility on the part of the driver.
Always pay attention to the profile of the
road and sharp acceleration and stay in
complete control of your vehicle.
To avoid any jamming under the pedals:
- ensure that the mat and its fixings on the
floor are positioned correctly,
- never place one mat on top of another.
Page 58 of 248
Ventilation
WITH MANUAL SETTINGS
If your vehicle is fitted with these controls,
the
y are located on the control panel of the
dashboard centre console.
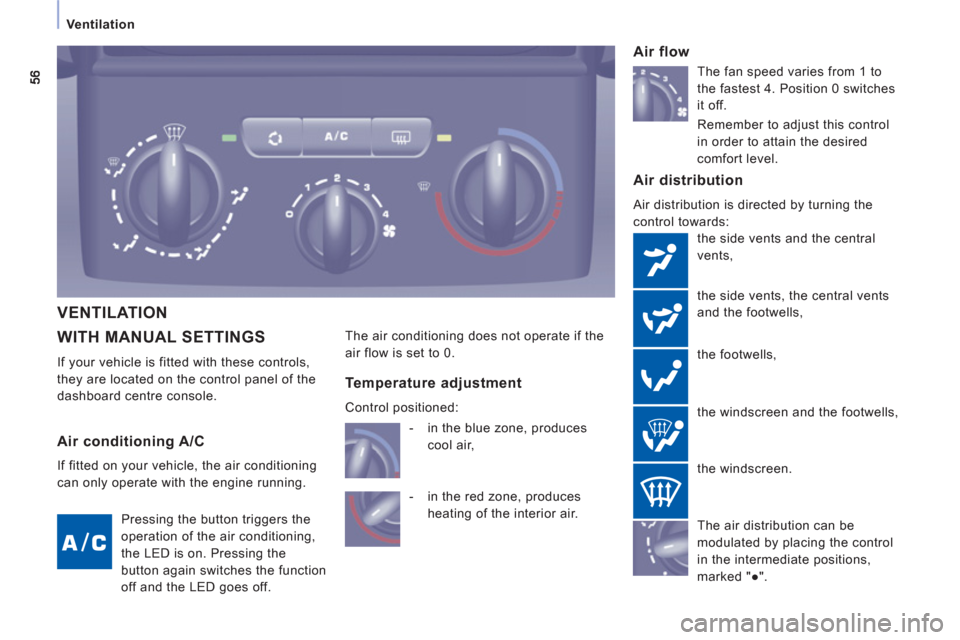
Air distribution
Air distribution is directed by turning the
control towards:
t
he side vents and the central
vents,
t
he side vents, the central vents
and the
footwells,
the footwells,
the windscreen and the
footwells,
Air flow
The air conditioning does not operate if the
air flow is set to 0.
th
e windscreen.
Air conditioning A/C
If fitted on your vehicle, the air conditioning
can only operate with the engine running.
Pressing the button triggers the
operation of the air conditioning,
the LED is on. Pressin
g the
button a
gain switches the function
off and the LED goes off.
Temperature adjustment
Control positioned:
- in the red zone, produces
heating of the interior air.
- in the blue zone, produces
cool air,
Th
e air distribution can be
modulated by placing the control
in the intermediate positions,
m
arked "●". The
fan speed varies from 1 to
th
e fastest 4. Position 0 switches
it off.
Remember to ad
just this control
in order to attain the desired
comfort level.
VENTILATION
Page 59 of 248
57
Ventilation
EASE OF USE AND COMFOR
T
3
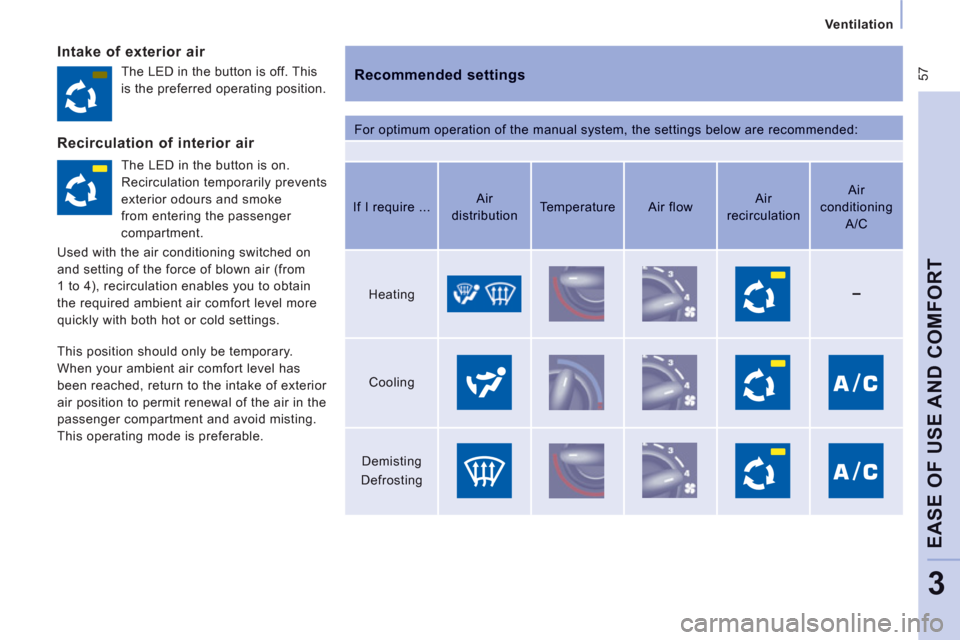
Intake of exterior air
Recommended settings
For optimum operation of the manual system, the settings below are recommended: Th
e LED in the button is off. This
is the pre
ferred operating position.
Recirculation of interior air
The LED in the button is on.
Recirculation temporarily prevents
exterior odours and smoke
from entering the passenger
compartment.
Used with the air conditionin
g switched on
and settin
g of the force of blown air (from
1 to 4
), recirculation enables you to obtain
the re
quired ambient air comfort level more
quickly with both hot or cold settings.
This position should onl
y be temporary.
When your ambient air comfort level has
been reached, return to the intake o
f exterior
air position to permit renewal of the air in the
passenger compartment and avoid misting.
This operatin
g mode is preferable.
If I require ... Air
distribution
Te mperature
Air flow Air
recirculation
Air
conditioning
A/C
Heating
Cooling
Demisting
Defrosting
Page 60 of 248
58
Ventilation
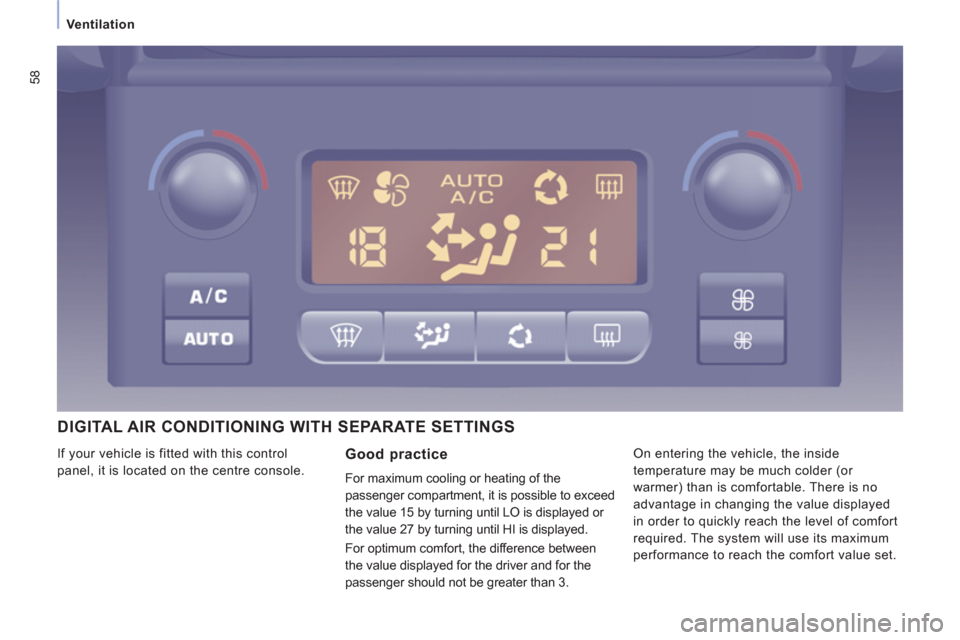
DIGITAL AIR CONDITIONING WITH SEPARATE SETTINGS
Good practice
For maximum cooling or heating of the
passen
ger compartment, it is possible to exceed
the value 15 b
y turning until LO is displayed or
the value 27 b
y turning until HI is displayed.
For optimum com
fort, the difference between
the value displa
yed for the driver and for the
passen
ger should not be greater than 3. I
f your vehicle is fitted with this control
panel, it is located on the centre console.
On entering the vehicle, the inside
temperature ma
y be much colder (or
warmer
) than is comfortable. There is no
a
dvantage in changing the value displayed
in order to quickl
y reach the level of comfort
required. The system will use its maximum
performance to reach the comfort value set.