boot Peugeot Expert VU 2016 Owner's Manual
[x] Cancel search | Manufacturer: PEUGEOT, Model Year: 2016, Model line: Expert VU, Model: Peugeot Expert VU 2016Pages: 599, PDF Size: 13.14 MB
Page 15 of 599
13
Expert_en_Chap00c_eco-conduite_ed01-2016
Limit the causes of excess
consumption
Spread loads throughout the vehicle; place the
heaviest items in the bottom of the boot, as
close as possible to the rear seats.
Limit the loads carried in the vehicle and reduce
wind resistance (roof bars, roof rack, bicycle
carrier, trailer...). u
s
e a roof box in preference.
Remove roof bars and roof racks after use.
At the end of winter, remove snow tyres and refit
your summer tyres.
Observe the recommendations
on maintenance
Check the tyre pressures regularly, when cold,
referring to the label in the door aperture,
driver's side.
Carry out this check in particular:
-
b
efore a long journey,
-
a
t each change of season,
-
a
fter a long period out of use.
Don't forget the spare wheel and the tyres on
any trailer or caravan.
Have your vehicle serviced regularly (engine
oil, oil filter, air filter, passenger compartment
filter...) and observe the schedule of operations
recommended in the manufacturer's service
schedule.
With a BlueHDi Diesel engine, if the SCR
system is faulty your vehicle becomes polluting;
go to a PE
u
g
Eo
t dealer or a qualified
workshop without delay to have the emissions
of nitrogen oxides brought back to the legal
level. When refuelling, do not continue after the third
cut-off of the nozzle to avoid any over flow.
At the wheel of your new vehicle, it is only after
the first 1 800 miles (3 000 kilometres) that you
will see the fuel consumption settle down to a
consistent average.
.
Eco-driving
Page 53 of 599
51
Expert_en_Chap02_ouvertures_ed01-2016
Deadlocking
Deadlocking renders the exterior and
interior door controls inoperative.
It also deactivates the manual central
control button.
th
erefore, never leave anyone inside
the vehicle when it is deadlocked.
to d
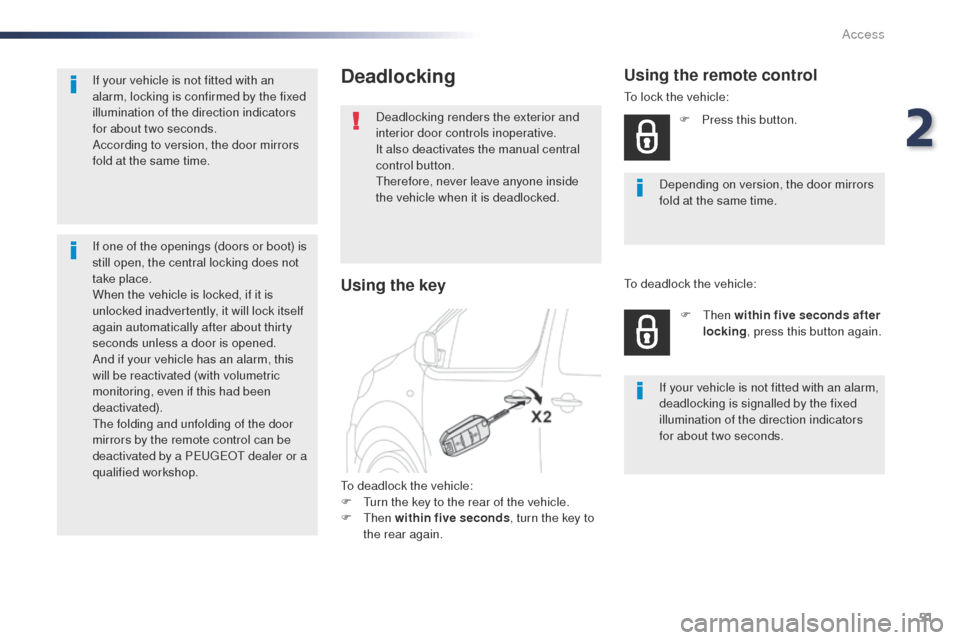
eadlock the vehicle:
F
t
u
rn the key to the rear of the vehicle.
F
t
hen
within five seconds , turn the key to
the rear again. Depending on version, the door mirrors
fold at the same time.
Using the remote control
to lock the vehicle:
F
P
ress this button.
F
t
hen
within five seconds after
locking , press this button again.
If your vehicle is not fitted with an alarm,
deadlocking is signalled by the fixed
illumination of the direction indicators
for about two seconds.
to d
eadlock the vehicle:
Using the key
If your vehicle is not fitted with an
alarm, locking is confirmed by the fixed
illumination of the direction indicators
for about two seconds.
According to version, the door mirrors
fold at the same time.
If one of the openings (doors or boot) is
still open, the central locking does not
take place.
When the vehicle is locked, if it is
unlocked inadvertently, it will lock itself
again automatically after about thirty
seconds unless a door is opened.
And if your vehicle has an alarm, this
will be reactivated (with volumetric
monitoring, even if this had been
deactivated).
th
e folding and unfolding of the door
mirrors by the remote control can be
deactivated by a PE
u
g
Eo
t dealer or a
qualified workshop.
2
Access
Page 61 of 599
59
Expert_en_Chap02_ouvertures_ed01-2016
the unlocking, locking or deadlocking
does not take place:
-
i
f the ignition is on,
-
i
f one of the doors or the boot is still
open,
-
i
f the key for the Keyless Entry and
Starting system has been left inside
the vehicle.
When the vehicle is locked (with the
remote control or Keyless Entry and
Starting), if it is unlocked inadvertently,
it will lock itself again automatically after
about thirty seconds unless a door has
been opened.
And if your vehicle has an alarm, this
will be reactivated (with volumetric
monitoring, even if this had been
deactivated).
"Keyless Entry and
Starting" on your person
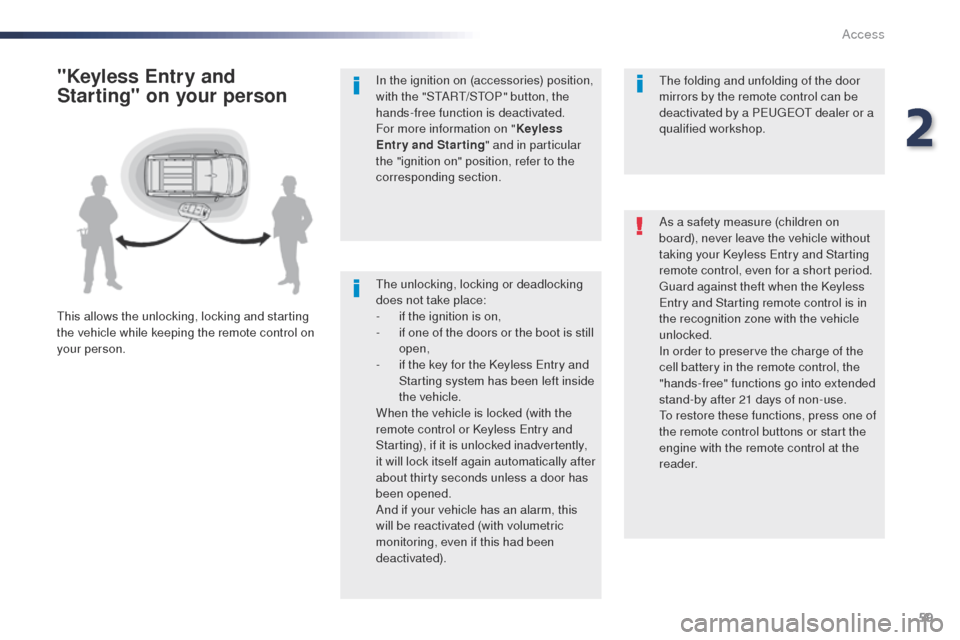
this allows the unlocking, locking and starting
the vehicle while keeping the remote control on
your person. As a safety measure (children on
board), never leave the vehicle without
taking your Keyless Entry and Starting
remote control, even for a short period.
gu
ard against theft when the Keyless
Entry and Starting remote control is in
the recognition zone with the vehicle
unlocked.
In order to preserve the charge of the
cell battery in the remote control, the
"hands-free" functions go into extended
stand-by after 21 days of non-use.
to r
estore these functions, press one of
the remote control buttons or start the
engine with the remote control at the
reader.
th
e folding and unfolding of the door
mirrors by the remote control can be
deactivated by a PE
u
g
Eo
t dealer or a
qualified workshop.
In the ignition on (accessories) position,
with the "S
tA
R
t/
S
t
o
P
" button, the
hands-free function is deactivated.
For more information on " Keyless
Entry and Starting " and in particular
the "ignition on" position, refer to the
corresponding section.
2
Access
Page 99 of 599
97
Expert_en_Chap02_ouvertures_ed01-2016
Failure of the remote control
to deactivate the monitoring functions:
F un lock the vehicle using the key (integral
with the remote control with Keyless Entry
and Starting) in the driver's door lock.
F
o
p
en the door; the alarm is triggered.
F
S
witch on the ignition; the alarm stops. t
h
e
indicator lamp in the button goes off.
Locking the vehicle without
activating the alarm
F Lock or deadlock the vehicle using the key (integral with the remote control with
Keyless Entry and Starting) in the driver's
door lock.
Operating fault
When the ignition is switched on,
fixed illumination of the indicator
lamp in the button indicates a fault in
the system.
Have it checked by a PE
u
g
Eo
t
dealer or a qualified workshop.
Automatic activation
this function is either not available, an option
or is standard.
2 minutes after the last opening (door or boot)
is closed, the system is activated automatically.
F
t
o a
void triggering the alarm on entering
the vehicle, first press the unlocking button
on the remote control or unlock the vehicle
using the "Keyless Entry and Starting"
system.
2
Access
Page 144 of 599
142
Expert_en_Chap03_ergonomie-et-confort_ed01-2016
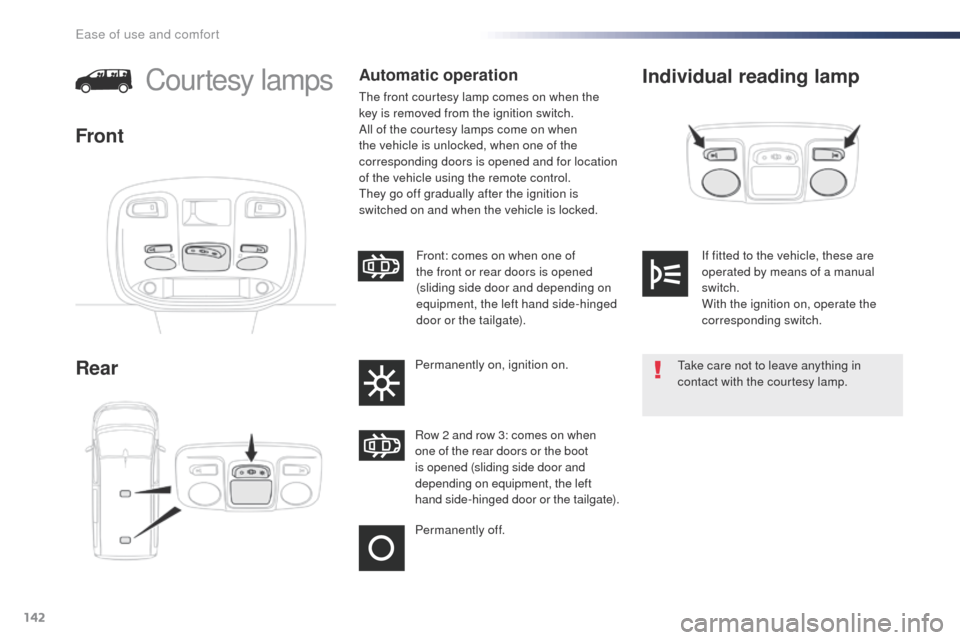
Individual reading lamp
RearCourtesy lampsAutomatic operation
the front courtesy lamp comes on when the
key is removed from the ignition switch.
All of the courtesy lamps come on when
the vehicle is unlocked, when one of the
corresponding doors is opened and for location
of the vehicle using the remote control.
th
ey go off gradually after the ignition is
switched on and when the vehicle is locked.
Front
Permanently off. Row 2 and row 3: comes on when
one of the rear doors or the boot
is opened (sliding side door and
depending on equipment, the left
hand side-hinged door or the tailgate). Front: comes on when one of
the front or rear doors is opened
(sliding side door and depending on
equipment, the left hand side-hinged
door or the tailgate).
Permanently on, ignition on.
ta
ke care not to leave anything in
contact with the courtesy lamp. If fitted to the vehicle, these are
operated by means of a manual
switch.
With the ignition on, operate the
corresponding switch.
Ease of use and comfort
Page 160 of 599
158
Expert_en_Chap04_eclairage-et-visibilite_ed01-2016
If a significant accumulation of snow or
ice is present, or when using a bicycle
carrier on the boot, deactivate the
automatic rear wiper.
th
is function is activated by default.
Reverse gear
When reverse gear is engaged, the rear wiper
will come into operation automatically if the
windscreen wipers are operating.
In the vehicle settings menu, activate/
deactivate "
Rear wiper in reverse ".
With the audio system
In the "Personalisation-configuration " menu,
activate/deactivate " Rear wipe in reverse
gear ".
With the touch screen Activation / Deactivation
Activation or deactivation of the function is
done in the vehicle configuration menu.
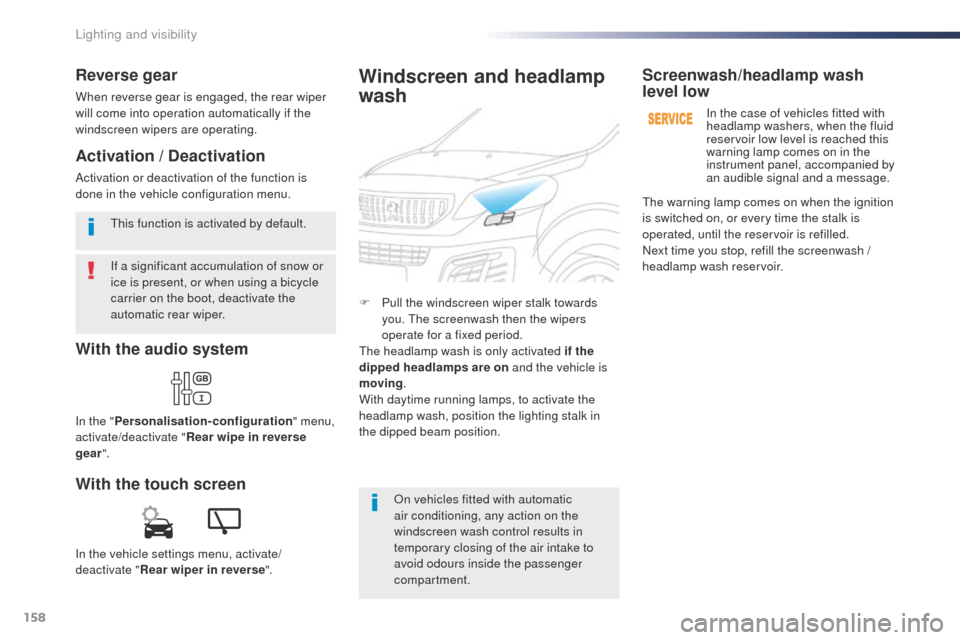
F
P
ull the windscreen wiper stalk towards
you.
t
he
screenwash then the wipers
operate for a fixed period.
th
e headlamp wash is only activated if the
dipped headlamps are on and the vehicle is
moving .
With daytime running lamps, to activate the
headlamp wash, position the lighting stalk in
the dipped beam position.
Windscreen and headlamp
wash
on vehicles fitted with automatic
air conditioning, any action on the
windscreen wash control results in
temporary closing of the air intake to
avoid odours inside the passenger
compartment.
Screenwash/headlamp wash
level low
In the case of vehicles fitted with
headlamp washers, when the fluid
reservoir low level is reached this
warning lamp comes on in the
instrument panel, accompanied by
an audible signal and a message.
th
e warning lamp comes on when the ignition
is switched on, or every time the stalk is
operated, until the reservoir is refilled.
Next time you stop, refill the screenwash /
headlamp wash reservoir.
Lighting and visibility
Page 261 of 599

259
Expert_en_Chap06_conduite_ed01-2016
180° rear vision
this system allows the near surroundings of the
vehicle to be viewed in the display screen using
cameras located at the rear of the vehicle. t
h
e
parking sensors in the rear and/or front bumper
complete the information on the view from
above the vehicle (right-hand part).
In addition to the view from above the vehicle
(right-hand part) several types of view can be
displayed (left-hand part):
-
s
tandard rear view,
-
1
80° rear view,
-
r
econstructed zoom rear view.
Principle of image
reconstruction
the system displays the contextual view
(left-hand part) as well as the view from above
the vehicle in its close surroundings.
By default, A
u
to
m
atic mode is activated.
In this mode, the system chooses the best view
to display (standard or zoom) according to the
information received from the parking sensors.
th
e 180° view is only available through the
menus.
th
e display disappears above
approximately 6 mph (10 km/h).
th
e system is automatically deactivated
about 7 seconds after coming out of
reverse or on opening a door or the
boot.
th
is system is a visual aid and cannot
in any circumstances replace the need
for vigilance on the part of the driver.
th
e images provided by the cameras
may appear distorted by the
surroundings (exterior conditions,
driving mode, ...).
th
e presence of areas in shadow, bright
sunlight, or poor lighting conditions
may make the image dark and reduce
contrast.
us
ing the rear camera, the system records the
vehicle's surroundings during a manoeuvre.
An image from above your vehicle in its close
surroundings is reconstructed (represented
between the blue brackets) in real time and as
the manoeuvre progresses.
th
is representation facilitates the alignment of
your vehicle when parking and allows you to
see all of the obstacles close to the vehicle.
th
is reconstructed view is automatically erased
if the vehicle remains stationary for too long.
6
Driving
Page 273 of 599
271
Expert_en_Chap07_info-pratiques_ed01-2016
Accessories
A wide range of accessories and genuine parts is available from the PEugEo t dealer network.th
ese accessories and parts are all suitable for your vehicle and benefit from PEu gEo t' s
recommendation and warranty.
"Comfort"
Door deflectors, cigarette lighter, boot dividers,
coat hanger fixed to head restraint, front and
rear parking sensors, styling mudflaps, boot
management system, ...
"Transport solutions"
Boot liners, roof bars, bicycle carrier on roof
bars, ski carrier, roof box, towbar harness, ....
to
w bar, which must be fitted by PE
u
g
Eo
t
dealer or a qualified workshop.
"Styling"
Wheel trims, wheel caps, door sills, gear lever
knobs, ...
"Security and safety"
Anti-theft alarm, window engraving, wheel
security bolts, child seats, breathalyzer, first aid
kit, warning triangle, high visibility jacket, stolen
vehicle tracking system, fleet management unit,
snow chains, tyre snow socks, front foglamps
kit, ...
"Protection"
Mats*, seat covers compatible with lateral
airbags, mud flaps, side protection rubbing
strips, bumper protectors, loading area
protection (on wood or plastic), rear sill
finishers, rear mat,
...
th
e fitting of electrical equipment or
accessories which are not recommended
by PE
u
g
Eo
t
may result in a failure of
your vehicle's electronic system and
excessive electrical consumption.
Contact a PE
u
g
Eo
t
dealer
for information on the range of
recommended equipment and
accessories.
Installation of radio
communication
transmitters
Before installing any after-market radio
communication transmitter, you can
contact a PE
u
g
Eo
t dealer for the
specification of transmitters which can
be fitted (frequency, maximum power,
aerial position, specific installation
requirements), in line with the Vehicle
Electromagnetic Compatibility Directive
(2004/104/EC).
Depending on the legislation in force in
the country, certain safety equipment
may be compulsory: high visibility
safety vests, warning triangles,
breathalyzers, spare bulbs, spare fuses,
fire extinguisher, first aid kit, mud flaps
at the rear of the vehicle. *
t
o a
void any risk of jamming of the pedals:
-
e
nsure that the mat is positioned and
secured correctly,
-
n
ever fit one mat on top of another.
7
Practical information
Page 315 of 599
313
Expert_en_Chap08_En-cas-de-panne_ed01-2016
Rear lamps
(tailgate)
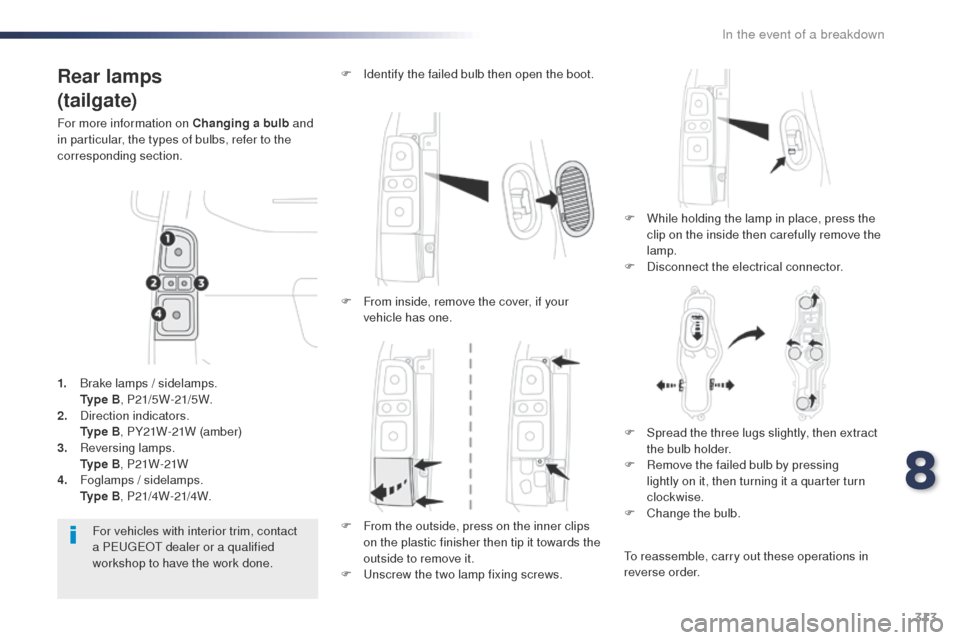
For more information on Changing a bulb and
in particular, the types of bulbs, refer to the
corresponding section.
F
W
hile holding the lamp in place, press the
clip on the inside then carefully remove the
lamp.
F
D
isconnect the electrical connector.
F
I
dentify the failed bulb then open the boot.
For vehicles with interior trim, contact
a PE
u
g
Eo
t dealer or a qualified
workshop to have the work done.
1.
B
rake lamps / sidelamps.
Ty
p e B, P21/5W-21/5W.
2.
D
irection indicators.
Ty
p e B, PY21W-21W (amber)
3.
R
eversing lamps.
Ty
p e B, P21W-21W
4.
F
oglamps / sidelamps.
Ty
p e B, P21/4W-21/4W. F
F
rom inside, remove the cover, if your
vehicle has one.
F
F
rom the outside, press on the inner clips
on the plastic finisher then tip it towards the
outside to remove it.
F
u
n
screw the two lamp fixing screws.F
S
pread the three lugs slightly, then extract
the bulb holder.
F
R
emove the failed bulb by pressing
lightly on it, then turning it a quarter turn
clockwise.
F
C
hange the bulb.
to r
eassemble, carry out these operations in
reverse order.
8
In the event of a breakdown
Page 508 of 599
506
Expert_en_Chap11_index-alpha_ed01-2016
ABS ...............................................................161
Access, AdBlue tank ..................................... 285
Accessories
.................................. 203, 271, 272
Access to the spare wheel
............................297
Active Safety Brake........................ 23, 243, 246
AdBlue
® ................................ 2 6, 35 -37, 283 -285
Additive, AdBlue ...................................... 26, 285
Additive, Diesel
....................................... 26, 285
Adjusting headlamp beam height
................. 15
5
Adjusting headlamps
.................................... 155
Adjusting head restraints
......................103, 104
Adjusting seat
......................................... 99, 102
Adjusting the air distribution
.........................128
Adjusting the air flow
..................................... 128
Adjusting the date
........................... 46, 420, 476
Adjusting the height and reach of the steering wheel
.................................... 99
Adjusting the lumbar support
........................10 0
Adjusting the seat belt height
.......................166
Adjusting the temperature
............................ 12
8
Adjusting the time
........................... 46, 421, 477
Advice on driving
.................................. 19 6 -198
Airbags
............................................ 24, 170, 17 7
Airbags, curtain
............................................. 17
3
Airbags, front ......................................... 171, 173
Airbags, lateral
...................................... 172 , 173Air conditioning
...............
12, 127, 129, 130, 137
Air conditioning, automatic
...........................
13 5
Air conditioning, digital
.........................
132, 13 6
Air conditioning, dual-zone automatic
..........
128
Air conditioning, manual
.......
126, 132, 13 5, 13 6
Air intake
...............................
125, 126, 128, 131
Alarm
...............................................................
95
Alarm, volumetric
............................................
95
Anti-lock braking system (ABS) ....................
161
Anti-theft
...........................................
52, 67, 205
Area, loading
...............................
........
47, 55, 73
Armrest, front ................................................
103
ASR
...............................................................
161
Assistance call
......................................
160, 338
Assistance, emergency braking
........... 1
61, 247
Audio streaming (Bluetooth)
..............................
...
398, 454, 495
Audio system (radio) ......
89, 150 -152, 158, 226,
245, 247, 250, 256, 264, 483
Auxiliary
...............................................398, 454
A
B
C
Blinds, side .................................................... 123
BlueHDi ..................................... 31, 35, 208, 283
Bluetooth (hands-free)
............... 4
06, 407, 462, 463, 497
Bluetooth (telephone)
............406-408, 462-464
Bonnet
........................................................... 276
Boot
................................................................. 94
Boot lid
................................ 64, 65, 94, 313, 314
Brake discs
.................................................... 28
2
Brake lamps
........................... 310, 311, 313 - 315
Brakes
............................................... 18, 22, 282
Braking, automatic emergency
............................ 23, 243, 245 -247
Bulbs (changing)
................... 3
03, 304, 310, 313
Bulbs (changing, type)
.................................. 3
03
Battery
.................................... 270, 281, 321-325
Battery capacity
...............................
............. 325
Battery, charging
........................................... 323
Battery, remote control
............... 5
4, 70, 71, 139
Bench seat, one-piece, fixed
........................ 11 0
Blind spot monitoring system
......... 29, 252, 254 Cable, audio
......................................... 398, 454
Cable, jack
........................................... 398, 454
Capacity, fuel tank
..............................
..........265
Cap, fuel filler
................................................ 265
CarPlay connection ..............................386, 442
CD
................................................ 398, 454, 494
CD, MP3
....................................... 3
98, 454, 494
Central locking
.......................................... 59, 64
Changing a bulb
.....3 03, 3 0 4, 310, 311, 313 - 315
Changing a bulb (boot lid)
.............................313
Changing a bulb (side-hinged doors)
........... 3
10
180° rear vision
............................................. 259
Alphabetical index