glove box PEUGEOT LANDTREK 2023 Owners Manual
[x] Cancel search | Manufacturer: PEUGEOT, Model Year: 2023, Model line: LANDTREK, Model: PEUGEOT LANDTREK 2023Pages: 164, PDF Size: 6.1 MB
Page 6 of 164
4
Overview
Instruments and controls
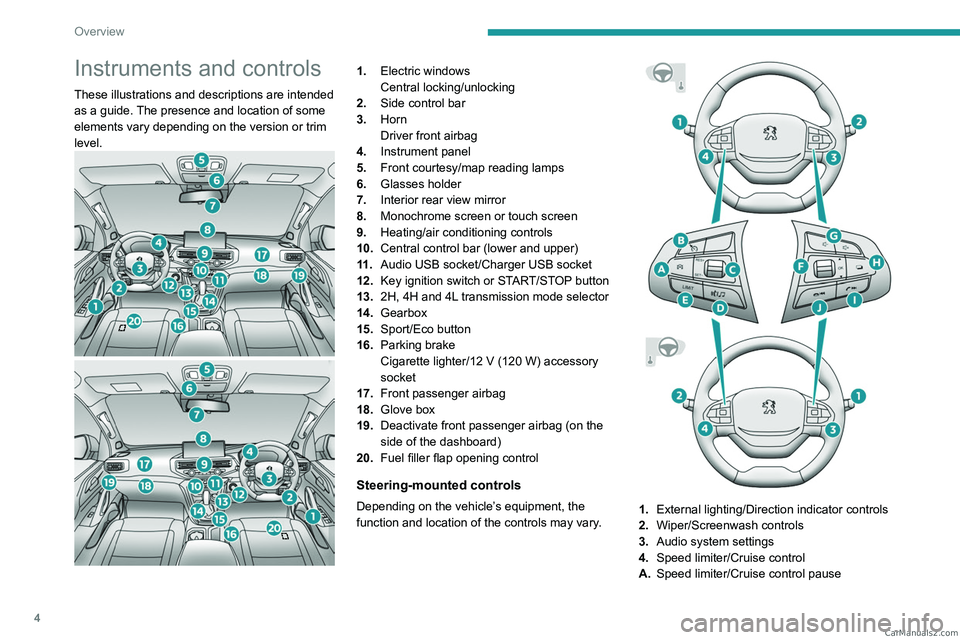
These illustrations and descriptions are intended
as a guide. The presence and location of some
elements vary depending on the version or trim
level.
1.Electric windows
Central locking/unlocking
2. Side control bar
3. Horn
Driver front airbag
4. Instrument panel
5. Front courtesy/map reading lamps
6. Glasses holder
7. Interior rear view mirror
8. Monochrome screen or touch screen
9. Heating/air conditioning controls
10. Central control bar (lower and upper)
11 . Audio USB socket/Charger USB socket
12. Key ignition switch or START/STOP button
13. 2H, 4H and 4L transmission mode selector
14. Gearbox
15. Sport/Eco button
16. Parking brake
Cigarette lighter/12
V (120 W) accessory
socket
17. Front passenger airbag
18. Glove box
19. Deactivate front passenger airbag (on the
side of the dashboard)
20. Fuel filler flap opening control
Steering-mounted controls
Depending on the vehicle’s equipment, the
function and location of the controls may vary.1.External lighting/Direction indicator controls
2. Wiper/Screenwash controls
3. Audio system settings
4. Speed limiter/Cruise control
A. Speed limiter/Cruise control pause CarM an uals 2 .c o m
Page 42 of 164

40
Ease of use and comfort
Front demisting/defrosting
With heating or manual air
conditioning
► Adjust the temperature to maximum (red).
► Adjust the air flow to maximum.
► Press this button to activate the air
distribution to the "Windscreen" position;
its indicator lamp comes on.
►
Check that the recirculation of interior air is
deactivated; its indicator lamp must be off.
►
Depending on version, switch on the air
conditioning by pressing the " A/C
" button; its
indicator lamp comes on.
With automatic dual-zone
air conditioning
Automatic Visibility programme
This mode allows the windscreen and side
windows to be demisted or defrosted as quickly
as possible.
► Press this button to activate/deactivate
the mode (confirmed by the illumination/
extinction of the
indicator lamp).
The programme automatically manages the air
conditioning (depending on version), air flow
and air intake, and provides optimum distribution
towards the windscreen and side windows.
It is possible to manually change the air flow
without deactivating the automatic Visibility
programme.
In wintry conditions, before moving off, it
is essential to remove any snow or ice
from the windscreen around the sensor.
Otherwise, the operation of equipment which
uses the sensor may be affected.
Rear screen demisting/
defrosting
This demisting/de-icing only works with the engine running.
Depending on version, it also demists/de-ices
the door mirrors.
► Press this button to activate/deactivate
the function (confirmed by the indicator
lamp coming on/switching off).
Demisting/defrosting switches off automatically
to prevent an excessive consumption of
electrical current.
Switch off demisting/defrosting when
you no longer need it; reducing
electrical consumption in turn decreases
energy consumption.
Front fittings
1. Grab handle
2. Sun visor
3. Boarding assistance handle
4. Glasses holder
5. Illuminated glove box with refrigeration
(depending on version)
6. Door pockets CarM an uals 2 .c o m
Page 43 of 164
41
Ease of use and comfort
37.Retractable cup holder (press on it to
release)
8. USB socket and USB charger socket
9. Cigarette lighter/12
V (120 W) accessory
socket
10. Storage compartment
11 . Card holder
12. Cup holder and storage compartment
13. Front armrest with storage (depending on
version)
Ensure the retractable cup holder 7 is
clean before putting it back in its housing
- risk of jamming the mechanism.
Make sure you do not leave any item in
the passenger compartment which could
act like a magnifying glass under the effect of
the sun's rays and cause a fire - risk of fire or
damage to interior surfaces!
Glove box
► To open the glove box, lift the handle.
With the ignition on, the glove box is lit when
open.
Depending on version, it contains an adjustable
ventilation nozzle, distributing the same
conditioned air as the vents in the passenger
compartment.
Never drive with the glove box open
when a passenger is at the front. It may
cause injury during sharp deceleration!
Cigarette lighter/12 V
accessory socket(s)
► To use the cigarette lighter, press it in and
wait a few seconds until it pops out automatically.
►
T
o use a 12 V accessory (max. power:
120
W), remove the cigarette lighter and connect
a suitable adaptor.
You can use this socket to connect a telephone
charger, a bottle warmer, etc.
After use, put the cigarette lighter back into place
straight away.
The connection of an electrical device not approved by PEUGEOT, such as a
USB charger, may adversely affect the
operation of vehicle electrical systems,
causing faults such as poor radio reception or
interference with displays in the screens.
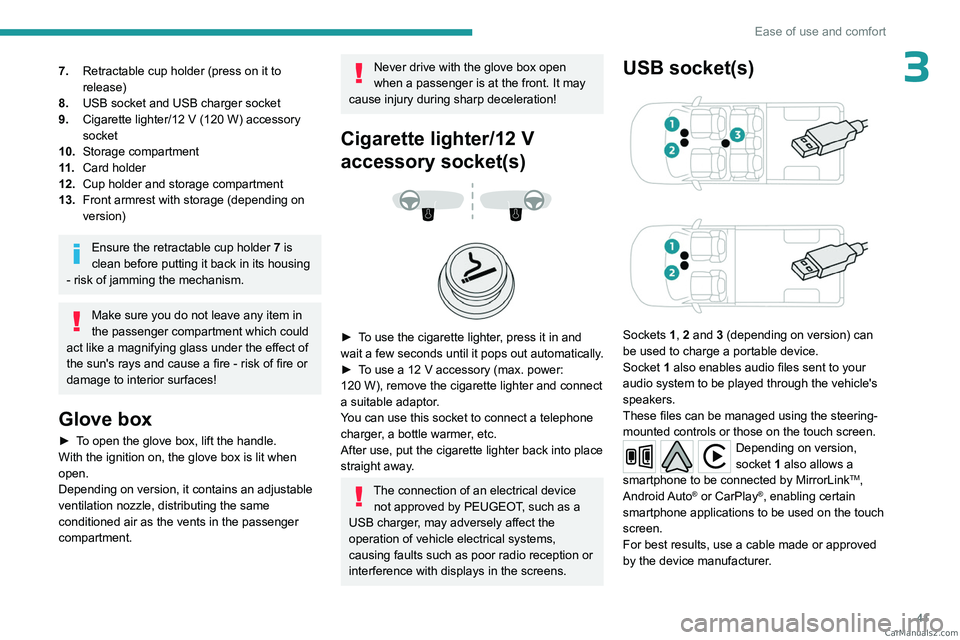
USB socket(s)
Sockets 1, 2 and 3 (depending on version) can
be used to charge a portable device.
Socket
1 also enables audio files sent to your
audio system to be played through the vehicle's
speakers.
These files can be managed using the steering-
mounted controls or those on the touch screen.
Depending on version,
socket 1 also allows a
smartphone to be connected by MirrorLink
TM,
Android Auto® or CarPlay®, enabling certain
smartphone applications to be used on the touch
screen.
For best results, use a cable made or approved
by the device manufacturer. CarM an uals 2 .c o m
Page 62 of 164
60
Safety
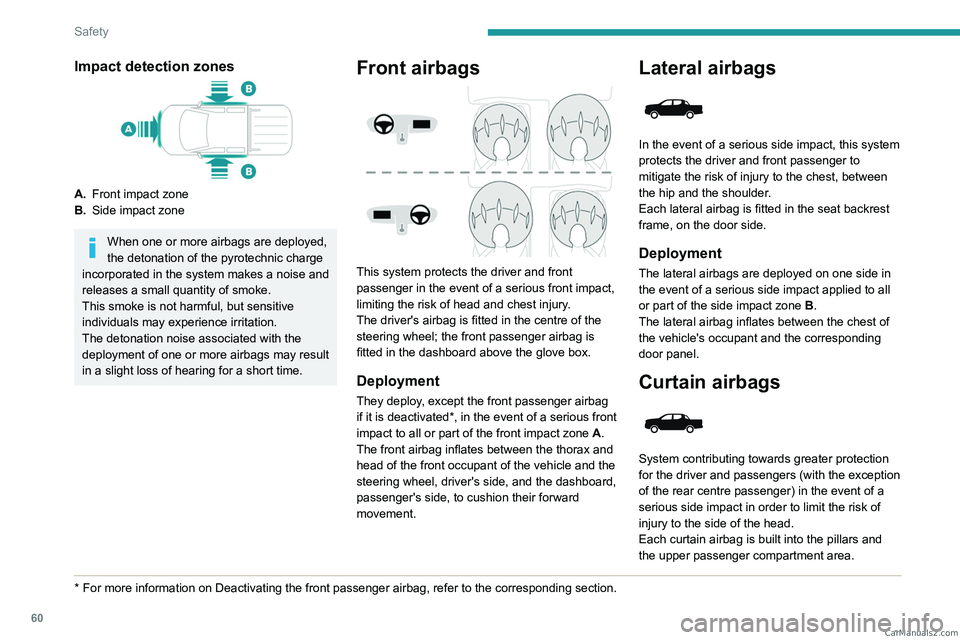
Impact detection zones
A.Front impact zone
B. Side impact zone
When one or more airbags are deployed,
the detonation of the pyrotechnic charge
incorporated in the system makes a noise and
releases a small quantity of smoke.
This smoke is not harmful, but sensitive
individuals may experience irritation.
The detonation noise associated with the
deployment of one or more airbags may result
in a slight loss of hearing for a short time.
* For more information on Deactivating the front passenger airbag, refer t\
o the corresponding section.
Front airbags
This system protects the driver and front
passenger in the event of a serious front impact,
limiting the risk of head and chest injury.
The driver's airbag is fitted in the centre of the
steering wheel; the front passenger airbag is
fitted in the dashboard above the glove box.
Deployment
They deploy, except the front passenger airbag
if it is deactivated*, in the event of a serious front
impact to all or part of the front impact zone A.
The front airbag inflates between the thorax and
head of the front occupant of the vehicle and the
steering wheel, driver's side, and the dashboard,
passenger's side, to cushion their forward
movement.
Lateral airbags
In the event of a serious side impact, this system
protects the driver and front passenger to
mitigate the risk of injury to the chest, between
the hip and the shoulder.
Each lateral airbag is fitted in the seat backrest
frame, on the door side.
Deployment
The lateral airbags are deployed on one side in
the event of a serious side impact applied to all
or part of the side impact zone B.
The lateral airbag inflates between the chest of
the vehicle's occupant and the corresponding
door panel.
Curtain airbags
System contributing towards greater protection
for the driver and passengers (with the exception
of the rear centre passenger) in the event of a
serious side impact in order to limit the risk of
injury to the side of the head.
Each curtain airbag is built into the pillars and
the upper passenger compartment area. CarM an uals 2 .c o m
Page 109 of 164
107
Practical information
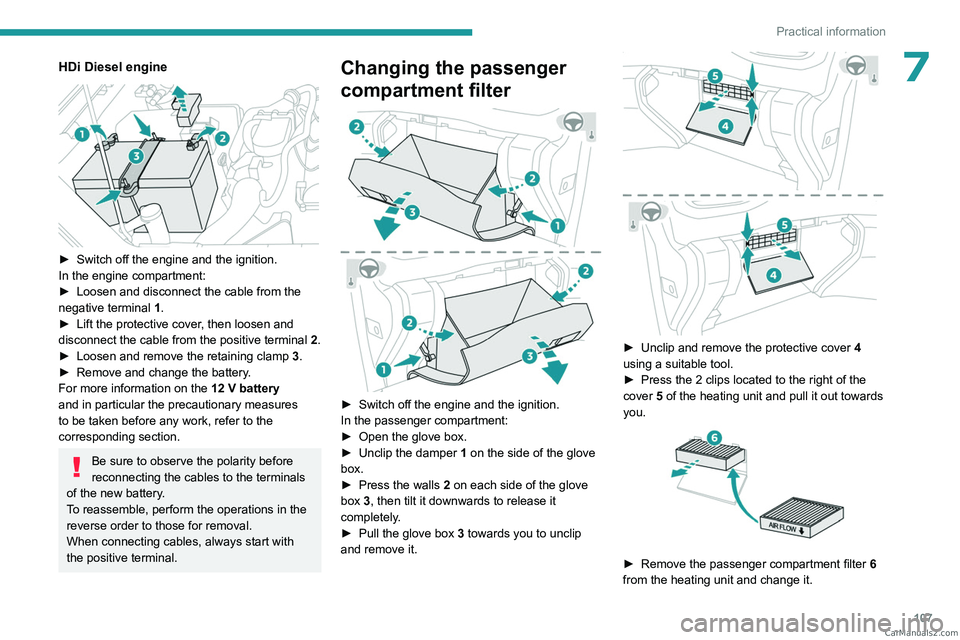
7HDi Diesel engine
► Switch off the engine and the ignition.
In the engine compartment:
►
Loosen and disconnect the cable from the
negative terminal
1
.
►
Lift the protective cover
, then loosen and
disconnect the cable from the positive terminal
2
.
►
Loosen and remove the retaining clamp
3
.
►
Remove and change the battery
.
For more information on the 12 V battery
and in particular the precautionary measures
to be taken before any work, refer to the
corresponding section.
Be sure to observe the polarity before
reconnecting the cables to the terminals
of the new battery.
To reassemble, perform the operations in the
reverse order to those for removal.
When connecting cables, always start with
the positive terminal.
Changing the passenger
compartment filter
► Switch off the engine and the ignition.
In the passenger compartment:
►
Open the glove box.
►
Unclip the damper 1
on the side of the glove
box.
►
Press the walls
2 on each side of the glove
box 3, then tilt it downwards to release it
completely.
►
Pull the glove box 3
towards you to unclip
and remove it.
► Unclip and remove the protective cover 4
using a suitable tool.
►
Press the 2 clips located to the right of the
cover
5 of the heating unit and pull it out towards
you.
► Remove the passenger compartment filter 6
from the heating unit and change it. CarM an uals 2 .c o m
Page 154 of 164
152
Alphabetical index
Container, AdBlue® 104
Control, emergency door
24
Control stalk, lighting
47, 49
Control stalk, wipers
50, 52
Courtesy lamp, rear
43
Courtesy lamps
43
Cruise control
82–84
Cup holder
41
D
Date (setting) 17, 147
Daytime running lamps
48, 120
Deactivating the passenger airbag
60, 63–64
Defrosting
33, 40
Defrosting, front
40
Defrosting, rear screen
40
Demisting
33, 40
Demisting, front
40
Demisting, rear
40
Dials and gauges
8
Dimensions
135
Dipstick
98
Direction indicators
(turn signals)
49, 120, 122–123
Display screen, instrument panel
8
Door pockets
41
Doors
25–26
Driving
66–67
Driving aids camera (warnings)
80
Driving aids (recommendations)
80
Driving economically 6
Dynamic stability control (DSC)
54–55
E
EBFD 54
Eco-driving (advice)
6
ECO mode
77
Electric windows
28
Electronic brake force distribution (EBFD)
54
Emergency braking assistance (EBA)
54
Emergency switching off
71
Emergency warning lamps
53, 114
Emissions control system, SCR
15, 103
Engine
103
Engine compartment
97–98
Engine, Diesel
94, 97, 115, 133–134
Engine, petrol
97, 132
Engines
131–134
Environment
6, 25
ESC (electronic stability control)
54
Extinguisher
11 4
F
Filling the AdBlue® tank 100, 104
Filling the fuel tank
94
Filter, air
101, 108
Filter, Diesel fuel
109
Filter, oil
101, 109
Filter, particle 101
Filter, passenger compartment
36, 100, 107
Fitting a wheel
117, 119
Fitting roof bars
96
Fittings, front
41
Fittings, interior
41–42
Fittings, rear
43–44
Flap, fuel filler
94
Flashing indicators
49, 122
Floor storage compartment
35
Fluid, brake
99
Fluid, engine coolant
99
Fluid, power steering
99
Foglamps, front
47–48, 120, 123
Foglamps, rear
47
Folding the rear seat backrest
32
Folding the rear seats
34
Fuel
6, 94
Fuel consumption
6
Fuel level, low
94
Fuel (tank)
94
Fuses
124
G
Gauge, fuel 94
Gearbox, automatic
75, 78, 101, 125
Gearbox, manual
74–75, 78, 101
Gear lever, manual gearbox
74–75
Gear shift indicator
78
Glove box
41 CarM an uals 2 .c o m