warning light PEUGEOT PARTNER TEPEE 2020 Owners Manual
[x] Cancel search | Manufacturer: PEUGEOT, Model Year: 2020, Model line: PARTNER TEPEE, Model: PEUGEOT PARTNER TEPEE 2020Pages: 216, PDF Size: 8.46 MB
Page 4 of 216

2
.
.
Instrument panel 7
W arning and indicator lamps 8
I
ndic ators
18
Lighting dimmer
2
2
Trip computer
2
2
Date and time setting
2
3
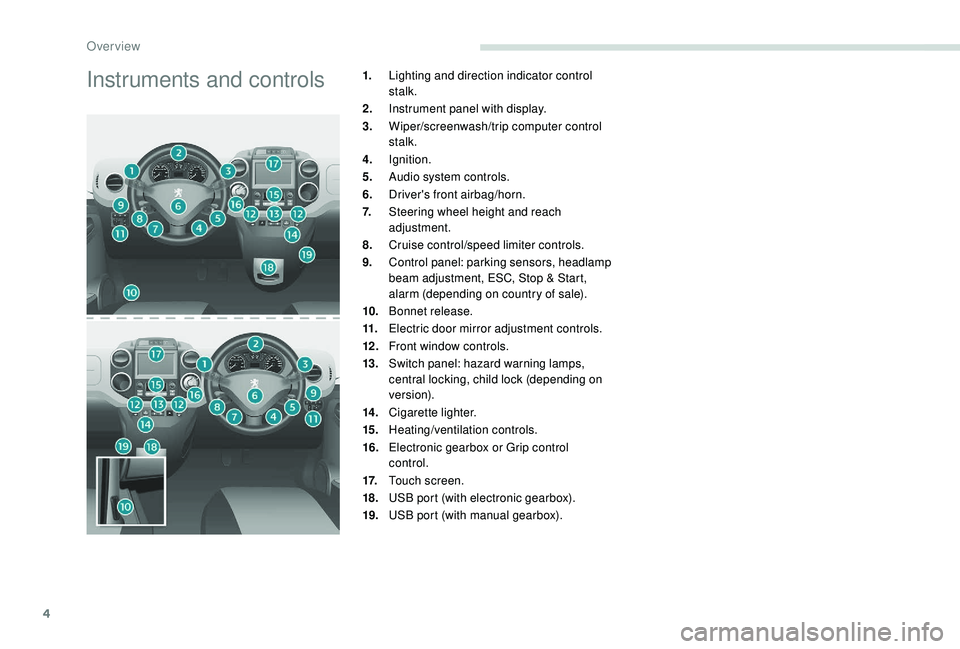
Instruments and controls
4
K
ey
25
Remote control
2
5
Front doors
2
8
Sliding side door(s)
2
8
Operation in the event of a battery failure
2
9
Tailgate
29
Side-hinged rear doors
3
0
Rear roof flap
3
2
Central locking
3
3
Alarm
34
Rear windows
3
5
Electric windows
3
5Steering wheel adjustment
3
7
Mirrors
37
Surveillance mirror
3
8
Front seats
3
8
Individual passenger seat
4
0
Multi-Flex bench seat
4
0
Rear bench seat
4
2
Rear seats (5 seats) 4 3
Rear seats (7 seats) 4 6
Crew cab
5
0
Seat modularity and configurations
5
2
Front fittings
5
4
Seating area fittings
5
5
Zenith
56
Fragrance diffuser
5
7
Courtesy lamps
5
9
Rear fittings (5 seats)
6
0
Rear fittings (7 seats)
6
1
Load space layout
6
4
Heating/Manual air conditioning
6
6
Dual-zone automatic air conditioning
6
7
Recommendations for ventilation
and air conditioning
6
9
Demisting and defrosting
7
0Lighting control stalk
7
1
Automatic illumination of headlamps
7
2
LED daytime running lamps
7
2
Guide-me-home lighting
7
2
Cornering lighting
7
3
Direction indicators
7
3
Headlamp beam
7
3
Wiper control stalk 7 3
General safety recommendations
7
6
Hazard warning lamps
7
7
Horn
77
Emergency or assistance call
7
7
Anti-lock braking system (ABS/EBFD)
7
9
Emergency braking assistance (EBA)
7
9
Anti-slip regulation (ASR) and electronic
stability control (ESC)
7
9
Grip control
8
0
Seat belts
8
2
Airbags
85
Child seats
8
9
Deactivating the passenger's front airbag
9
0
Reactivating the passenger's front airbag
9
1
Recommended child seats
9
4
Locations for child seats secured using
a seat belt
9
5
ISOFIX mountings and child seats
9
8
Instructions for child seats
1
01
Child lock
1
02
Over view
Instruments
Access Ease of use and comfort
Safety
Lighting and visibility
Eco-driving
Contents
Page 6 of 216

4
Instruments and controls1.Lighting and direction indicator control
stalk.
2. Instrument panel with display.
3. Wiper/screenwash/trip computer control
stalk.
4. Ignition.
5. Audio system controls.
6. Driver's front airbag/horn.
7. Steering wheel height and reach
adjustment.
8. Cruise control/speed limiter controls.
9. Control panel: parking sensors, headlamp
beam adjustment, ESC, Stop & Start,
alarm (depending on country of sale).
10. Bonnet release.
11. Electric door mirror adjustment controls.
12 . Front window controls.
13. Switch panel: hazard warning lamps,
central locking, child lock (depending on
ve r s i o n).
14 . Cigarette lighter.
15. Heating/ventilation controls.
16. Electronic gearbox or Grip control
control.
17. Touch screen.
18. USB port (with electronic gearbox).
19. USB port (with manual gearbox).
Over view
Page 10 of 216

8
Warning and indicator lamps
Visual indicators informing the driver that
a system is in operation, switched off (on/
off indicator lamps) or has developed a fault
(warning lamps).
When the ignition is switched on
Certain warning lamps come on for a few
seconds when the vehicle's ignition is switched
on.
When the engine is started, these same
warning lamps should go off.
If they remain on, before driving refer to the
information on the warning lamp concerned.
Associated warnings
Certain lamps may come on in one of two
modes: fixed (continuous) or flashing.
Only by relating the type of lighting to the
operating status of the vehicle can it be
ascertained whether the situation is normal or
whether a fault has occurred.
In the event of a fault, the illumination of the
lamp may be accompanied by an audible signal
and/or a message.
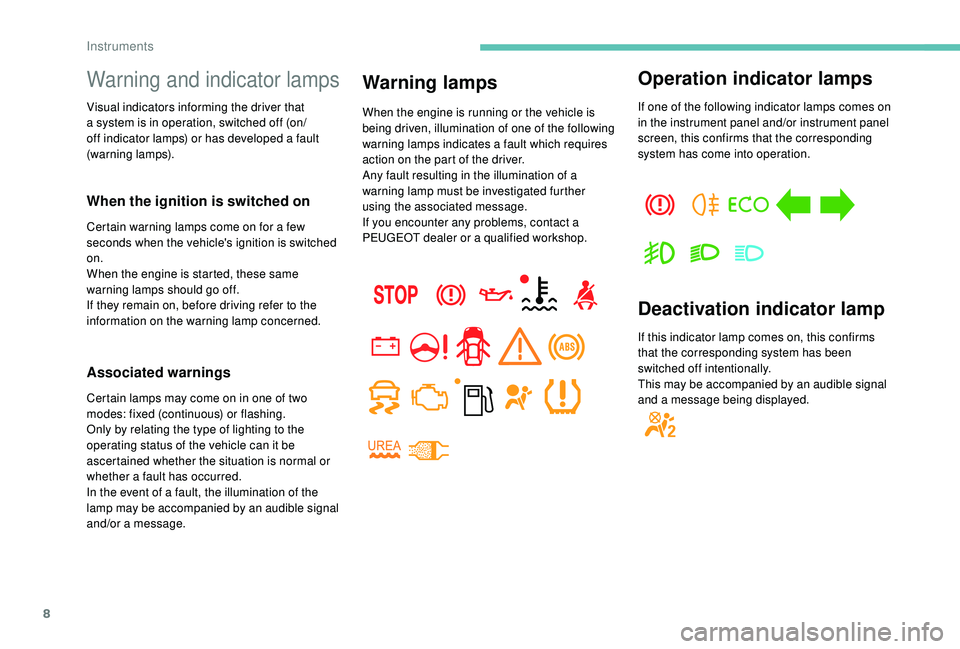
Warning lamps
When the engine is running or the vehicle is
being driven, illumination of one of the following
warning lamps indicates a fault which requires
action on the part of the driver.
Any fault resulting in the illumination of a
warning lamp must be investigated further
using the associated message.
If you encounter any problems, contact a
PEUGEOT dealer or a qualified workshop.
Operation indicator lamps
If one of the following indicator lamps comes on
in the instrument panel and/or instrument panel
screen, this confirms that the corresponding
system has come into operation.
Deactivation indicator lamp
If this indicator lamp comes on, this confirms
that the corresponding system has been
switched off intentionally.
This may be accompanied by an audible signal
and a message being displayed.
Instruments
Page 17 of 216

15
Warning/indicator lampStateCause Action/Observations
Rear foglamps Fixed. A manual selection. The lamps only operate when the sidelamps or dipped
beam headlamps are on.
In normal visibility, please switch them off to avoid
being cautioned.
This lamp is dazzling red.
Green warning/indicator lamps
ECOFixed. When the vehicle stops (red
lights, stop sign, traffic jams, etc.)
the Stop & Start puts the engine
into STOP mode. The indicator lamp goes off and the engine restarts
automatically in START mode, as soon as you want to
move off.
Flashes for a few
seconds, then goes
of f. STOP mode is temporarily
unavailable.
or
START mode is triggered
automatically. For more information on Stop & Star t
, refer to the
corresponding section.
Left-hand direction
indicator Flashing with buzzer. A change of direction signalled
using the lighting control stalk. Move the stalk down.
Right-hand
direction indicator Flashing with buzzer. A change of direction signalled
using the lighting control stalk. Move the stalk up.
Front foglamps Fixed. A manual selection. The lamps only operate when the sidelamps or dipped
beam headlamps are on.
1
Instruments
Page 18 of 216

16
Warning/indicator lampStateIndicates Action/Observations
Dipped beam
headlamps/daytime
running lamps Fixed.
A manual selection or automatic
illumination. Rotate the lighting control stalk ring to the second
position.
Activation of the dipped beam
headlamps on switching on the
ignition: daytime running lamps
(depending on country of sale).
Blue warning/indicator lamps
Main beam
headlamps Fixed.
The lighting control stalk has
been pulled towards you. Pull the stalk to return to dipped beam headlamps.
Warning/indicator lamp in
the display screen State
Indicates Action/Observations
Cruise control Fixed. Cruise control is selected. Manual selection.
For more information on the Cruise control , refer to
the corresponding section.
Speed limiter Fixed. The limiter is selected. Manual selection.
For more information on the Speed limiter , refer to
the corresponding section.
Gear shift
indicator Fixed.
A recommendation which does
not take into account the road
configuration and the traffic
density. To reduce fuel consumption with a manual gearbox,
engage the appropriate gear. The driver remains
responsible for deciding whether or not to follow this
advice.
Instruments
Page 21 of 216

19
Following this operation, if you wish to
disconnect the battery, lock the vehicle
and wait at least five minutes for the reset
to be taken into account.
Engine oil level indicator
Depending on your vehicle’s engine, when the
ignition is switched on, the engine oil level is
indicated for a few seconds after the ser vice
information.
Oil level correctLow oil level
Oil level gauge fault
The level read will only be correct if the
vehicle is on level ground and the engine
has been stopped for more than thirty
minutes.
For more information on Checking the
levels
and, in particular, the oil level, refer
to the corresponding section.
The flashing of OIL- -
indicates a malfunction
of the engine oil level gauge. Contact a
PEUGEOT dealer or a qualified workshop. The flashing of OIL , together with the Ser vice
warning lamp, accompanied by an audible
signal and a message on the screen, indicates
a low oil level which could damage the engine.
If the low oil level is confirmed by checking with
the dipstick, the level must be topped up.
F
p
ress the trip distance recorder reset button
and keep it pressed,
F
s
witch on the ignition.
The distance recorder display begins a
countdown.
When the display indicates " =0", release the
button; the spanner disappears.
Trip recorder reset button
F With the ignition on, press the button until zeros
appear.
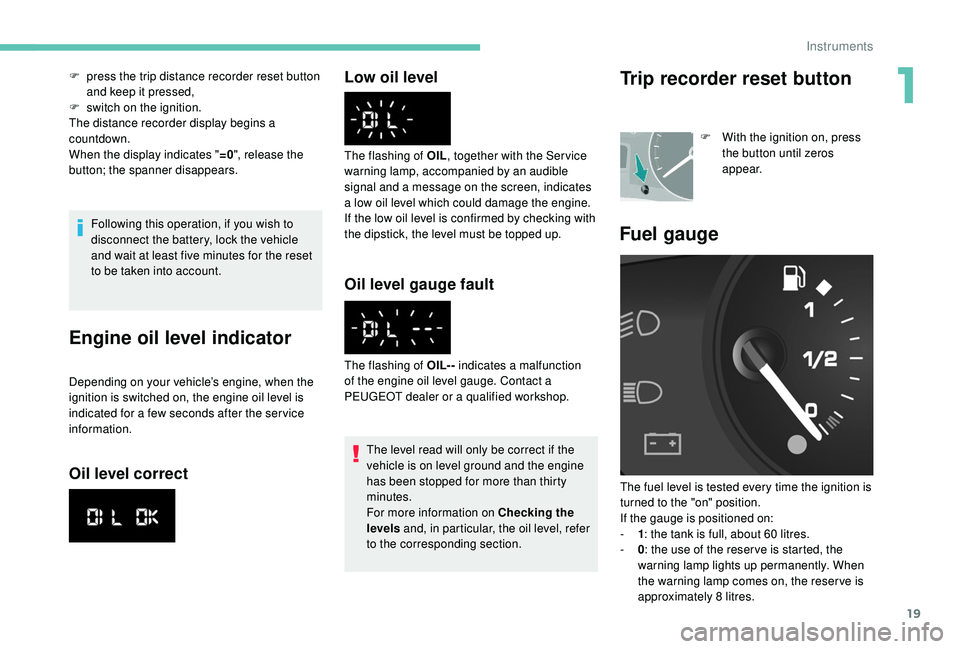
Fuel gauge
The fuel level is tested every time the ignition is
turned to the "on" position.
If the gauge is positioned on:
-
1 : t
he tank is full, about 60 litres.
-
0 : t
he use of the reser ve is started, the
warning lamp lights up permanently. When
the warning lamp comes on, the reser ve is
approximately 8
litres.
1
Instruments
Page 22 of 216

20
For more information on Fuel, refer to the
corresponding section.
Coolant temperature
If the needle is positioned before the red
zone: normal operation.
In arduous conditions of use or hot climatic
conditions, the needle may move close to the
red graduations.
What to do if the needle goes into the red
zone:
F
s
low down the vehicle or let the engine idle. What to do if the warning lamp lights up:
F
s
top immediately, switch off the ignition. The
fan may continue to operate for a certain
time up to approximately ten minutes,
F
w
ait for the engine to cool down in order
to check the coolant level and top it up if
necessary.
Since the cooling system is under pressure,
follow these instructions to avoid any risk of
burns:
F
w
ait at least one hour after the engine stops
to intervene,
F
u
nscrew the cap by 1/4 of a turn to allow the
pressure to drop,
F
w
hen the pressure has dropped, check the
level in the expansion bottle,
F
i
f necessary, remove the cap to top up.
If the needle remains in the red zone, have
it checked by a PEUGEOT dealer or by a
qualified workshop.
For more information on Levels , refer to
the corresponding section.
AdBlue® fluid range
indicators
Alert settings and display
Different levels of alert are triggered according
to the remaining driving range threshold.
You will be informed as each mileage threshold
is reached and the alerts will change from
temporary to permanent.
-
T
he 1
st alert is triggered at a remaining
driving range of 1,500 miles (2,400 km).
-
T
he 2
nd alert is triggered at a remaining
driving range of 375 miles (600 km).
Up to 0
miles, at which point it will be
impossible to restart the engine after a stop.
Driving range
F Press this button to display the information.
With the touch screen: F
s
elect the "Driving assistance"
menu,
F
s
elect "Diagnostic",
F
s
elect CHECK.
Above 3,000
miles (5,000 km), the value is not
defined.
Instruments
Page 24 of 216

22
Trip computer
In the event of the detection of a faultIf it is a temporary fault, the alert
disappears during the next journey,
after self-diagnostic checks of the SCR
emissions control system.
These warning lamps come on, accompanied
by an audible signal and the display of the
"Emissions fault" message.
The alert is triggered while driving as soon
as the fault is detected for the first time, then
when switching on the ignition for subsequent
journeys, while the fault persists.
During the permitted driving phase (between
685 and 0
miles (1,100 and 0 km))If a fault with the SCR system is confirmed (after
31
miles (50 km) covered with the permanent
display of the message signalling a fault), these
warning lamps come on and the UREA warning
lamp flashes, accompanied by an audible
signal and the display of a message indicating
the remaining range expressed in miles or
kilometres.
While driving, the message is displayed every
30 seconds while the fault with the SCR
emission control system persists.
The alert is repeated when switching on the
ignition.
You should go to a PEUGEOT dealer or a
qualified workshop as soon as possible.
Other wise you will not be able to restart the
vehicle.
Starting prevented
Each time the ignition is switched on, these
warning lamps come on and the UREA
warning lamp flashes, accompanied by an
audible signal and the display of the message
"Emissions fault: Starting prevented". You have exceeded the authorised driving
limit: the starting inhibition system does
not allow the engine to be started.
To be able to restart the engine, you must call
on a PEUGEOT dealer or a qualified workshop.Lighting dimmer
F With the lighting on, press the button to adjust
the brightness of the
instruments and controls.
When the lighting reaches
the minimum (or maximum)
setting, release this
button, then press again to
increase (or decrease) it.
Release the button when the desired level is
reached.
Instruments
Page 73 of 216

71
Lighting control stalk
Front and rear lamps
Lamps off
Lamps with automatic illumination
Sidelamps
Dipped headlamps (green)
Main beam (blue)
Switching between dipped and
main beam
F Pull the stalk fully towards you.
Reminder, lamps on
When switching off the ignition, all of the lamps
turn off, except for dipped beam if the guide-
me-home lighting is activated.
F
T
o activate the lighting control stalk, set the
ring to position 0 (lamps off), then to the
desired position.
When the driver's door is opened, if the lamps
are on, an audible signal will sound.
To avoid discharging the battery, the Economy
mode is triggered after thirty minutes without
any action by the user. The functions are put on
standby and the battery warning lamp flashes.
The sidelamps are not affected by the
Economy mode.
For more information on the Economy
mode , refer to the corresponding section.
Front and rear foglamps
These work with the sidelamps and dipped
headlamps.
They are selected by rotating the ring for wards to
switch on and to the rear to switch off.
The state is indicated by the indicator lamp in the
instrument panel.
Front foglamps (green, the ring is
turned forwards once).
Rear foglamps (amber, the ring is
turned for wards twice).
To turn the rear and front foglamps off, turn the
ring twice to the rear.
In clear weather or in rain, both day and
night, rear foglamps dazzle and their use
is prohibited.
Do not forget to switch them off when they
are no longer necessary.
Automatic illumination of headlamps
switches the rear foglamps off, but the
front foglamps stay on.
Selection is made by rotating this ring.
4
Lighting and visibility
Page 74 of 216

72
Automatic illumination of
headlamps
The sidelamps and dipped beam headlamps
switch on automatically if the light is poor or
during operation of the windscreen wipers.
They switch off again as soon as the ambient
light becomes bright enough or the windscreen
wipers stop.
This function is not compatible with daytime
running lamps.In fog or snow, the sunshine sensor may
detect sufficient light.
As a result, the lighting will not come on
automatically. If necessary, you must
switch on the dipped beam headlamps
manually.
Do not cover the sunshine sensor located
on the windscreen behind the rear view
mirror. It is used for automatic illumination
of the headlamps and for the automatic
rain sensitive wipers.
Activation
F Turn the ring to the AUTO position. The activation of the
function is accompanied by a
message on the screen.
Deactivation
F Turn the ring for wards or rear wards. The deactivation of the function is accompanied
by a message on the screen.
The function is switched off temporarily off
when the manual lighting control stalk is used.
In the event of a malfunction of
the sunshine sensor , the lamps
come on, accompanied by the
illumination of the Ser vice warning
lamp, an audible signal and a
message on the screen.
Contact a PEUGEOT dealer or a qualified
workshop.
LED daytime running lamps
On starting the vehicle, in daylight the daytime
running lamps come on automatically.
If the sidelamps, dipped or main headlamps
are switched on manually or automatically, the
daytime running lamps switch off.
Programming
For countries where exterior lighting by day is
not a legal requirement, you can activate or
deactivate the function via the configuration
menu.
Guide-me-home lighting
Keeping the dipped beam headlamps on
temporarily after switching the ignition off makes
the driver's exit easier when the light is poor.
Manual operation
F With the ignition off, "flash" the headlamps
within one minute after switching off the
ignition.
Manual guide-me-home lighting goes off
automatically after a certain period of time.
Automatic operation
F This function is activated via the vehicle configuration menu.
For more information on the Audio and
Telematics , refer to the corresponding
section.
Lighting and visibility