battery PONTIAC BONNEVILLE 2003 Owners Manual
[x] Cancel search | Manufacturer: PONTIAC, Model Year: 2003, Model line: BONNEVILLE, Model: PONTIAC BONNEVILLE 2003Pages: 418, PDF Size: 20.24 MB
Page 6 of 418
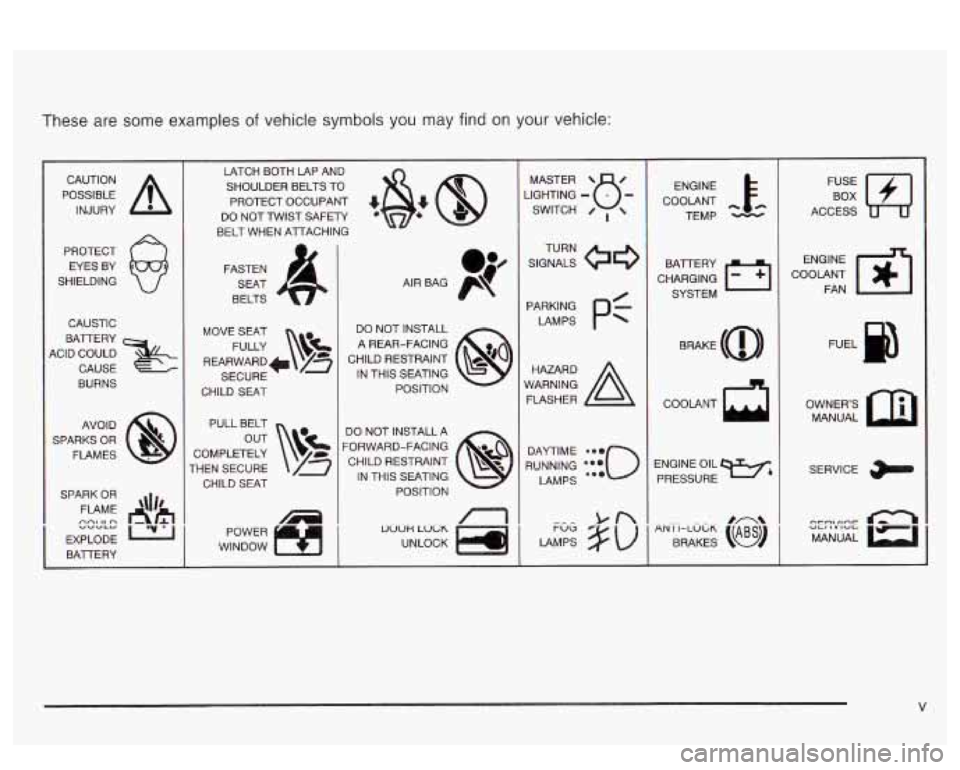
These are some examples of vehicle symbols you may find on your vehicle:
POSSIBLE A
CAUTION
INJURY
PROTECT EYES BY
SHIELDING
CAUSTIC
KID COULD
&
BATTERY
CAUSE
BURNS
AVO ID
SPARKS OR
FLAMES
SPARK OR
FLAME '\I/'
EXPLODE L22
BAlTERY
nnl It n "VVLY
1
LATCH BOTH LAP AND
SHOULDER BELTS TO
PROTECT OCCUPANT
*@? @
DO NOT TWIST SAFETY
BELT WHEN ATTACHING
FASTEN
SEAT
BELTS
MOVE SEAT
FULLY
\!&
REARWARD+ /z
SECURE
CHILD
SEAT
PULL BELT
COMPLETELY
THEN SECURE CHILD SEAT
WINDOW POWER
1
I
f
1
DO NOT INSTALL
A REAR-FACING
CHILD RESTRAINT IN THIS SEATING
POSITION
DO NOT INSTALL A
'ORWARD-FACING CHILD RESTRAINT
IN THIS SEATING
POSITION
uoon LOCK
UNLOCK
/17
I
1
JGHTING - MASTER SWITCH 8- 0 ,
RUNNING ***o
DAYTIME e-.
LAMPS ...
ENGINE
COOLANT TEMP
CHARGING
L-1
BAlTERY SYSTEM
BRAKE
(@)
COOLANT
ENGINE OIL
PRESSURE
w4
l.fJ
ACCESS
ENGINE
COOLANT FAN
OWNERS MANUAL
SERVICE
Page 60 of 418
But the frontal air bags would not help you in many
types of collisions, including rollovers, rear impacts, and
many side impacts, primarily because an occupant’s
motion is not toward the air bag. Side impact air bags
would not help you in many types of collisions,
including frontal or near frontal collisions, rollovers, and
rear impacts, primarily because an occupant’s motion
is not toward those air bags. Air bags should never
be regarded as anything more than a supplement to
safety belts, and then only in moderate to severe frontal
or near-frontal collisions for the driver’s and right front
passenger’s frontal air bags, and only in moderate
to severe side collisions for vehicle’s with a driver’s and
right front passenger‘s side impact air bag.
What Will You See After an Air Bag
Inflates?
After the air bag inflates, it quickly deflates, so quickly
that some people may not even realize the air bag
inflated. Some components of the air bag module will be
hot for a short time. These components include the
steering wheel hub for the driver’s frontal air bag and the
instrument panel for the right front passenger’s frontal
air bag. For vehicles with side impact air bags, the side
of the seatback closest to the driver’s and/or right
front passenger’s
door will be hot. The parts of the bag
that come into contact with you may be warm, but
not too hot
to touch. There will be some smoke and dust coming
from the vents in the deflated air bags. Air bag
inflation doesn’t prevent the driver from seeing or
being able to steer the vehicle, nor does it stop people
from leaving the vehicle.
When an air bag inflates, there is dust in the
air. This dust could cause breathing problems
for people with a history of asthma or other
breathing trouble.
To avoid this, everyone in
the vehicle should get out as soon as it is safe
to do
so. If you have breathing problems but
can’t get out
of the vehicle after an air bag
inflates, then get fresh air by opening a
window or a door.
If you experience breathing
problems following an air bag deployment, you
should seek medical attention.
Your vehicle has a feature that will automatically unlock
the doors and turn the interior lamps on when the air
bags inflate (if battery power is available). You can lock
the doors again and turn the interior lamps
off by
using the door Imk and interior !amp contro!s.
1-53
Page 62 of 418
Servicing Your Air Bag-Equipped
Vehicle
Air bags affect how your vehicle should be serviced.
There are parts
of the air bag systems in several places
around your vehicle. Your dealer and the service
manual have information about servicing your vehicle
and the air bag systems. To purchase a service manual,
see
Service Publications Ordering lnformation on
page
7-9.
For up to 10 seconds after the ignition key is
turned
off and the battery is disconnected, an
air bag can still inflate during improper service. You can be injured if you are close to
an air bag when it inflates. Avoid yellow
connectors. They are probably part of the air
bag system. Be sure to follow proper service
procedures, and make sure
the person
performing work for you is qualified to do
so.
The air bag systems do not need regular maintenance.
1-55
Page 70 of 418
Remote Keyless Entry System
If equipped, the keyless entry system operates on a
radio frequency subject to Federal Communications
Commission (FCC) Rules and with Industry Canada.
This device complies with Part 15 of the FCC Rules.
Operation is subject to the following two conditions:
1. This device may not cause interference, and
2. This device must accept any interference received,
including interference that may cause undesired
operation of the device.
This device complies with RSS-210 of Industry Canada.
Operation is subject to the following two conditions:
1. This device may not cause interference, and
2. This device must accept any interference received,
including interference that may cause undesired
operation of the device. Changes
or modifications to this system by other than
an authorized service facility could void authorization to
use this equipment.
At times you may notice a decrease in range. This is
normal for any remote keyless entry system.
If the
transmitter does not work or
if you have to stand closer
to your vehicle for the transmitter to work, try this:
e
e
Check the distance. You may be too far from your
vehicle. You may need to stand closer during
rainy or snowy weather.
Check the location. Other vehicles or objects may
be blocking the signal. Take a few steps to the
left or right, hold the transmitter higher, and
try again.
Check to determine if battery replacement is
necessary. See
“Battery Replacement” under
Remote Keyless Entry System Operation on
page
2-6.
If you are still having trouble, see your dealer or a
q~Ia!ified technician for service.
2-5
Page 74 of 418
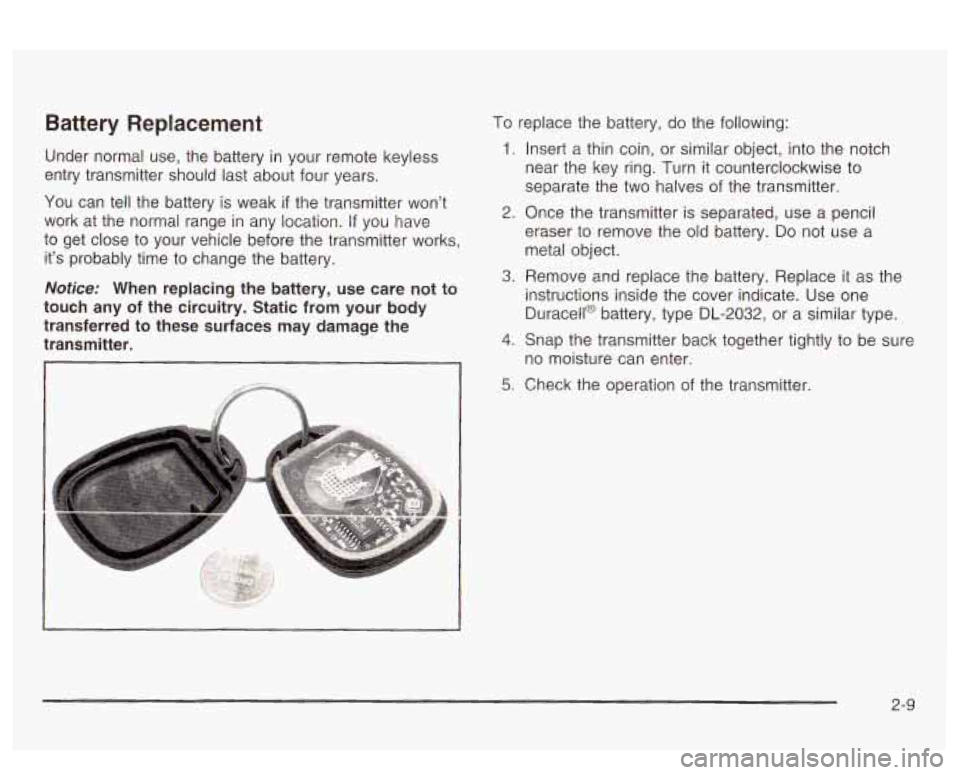
Battery Replacement
Under normal use, the battery in your remote keyless
entry transmitter should last about four years.
You can tell the battery is weak
if the transmitter won't
work at the normal range in any location.
If you have
to get close to your vehicle before the transmitter works,
it's probably time to change the battery.
Notice: When replacing the battery, use care not to
touch any of the circuitry. Static from your body
transferred to these surfaces may damage the
transmitter.
To replace the battery, do the following:
1. Insert a thin coin, or similar object, into the notch
near the key ring. Turn
it counterclockwise to
separate the two halves of the transmitter.
2. Once the transmitter is separated, use a pencil
eraser to remove the old battery.
Do not use a
metal object.
A. Remove and replace the battery. Replace it as the
instructions inside the cover indicate. Use one
Duracell@ battery, type DL-2032, or a similar type.
4. Snap the transmitter back together tightly to be sure
no moisture can enter.
5; Check the operation of the transmitter.
2-9
Page 86 of 418
Theft-Deterrent Systems
Vehicle theft is big business, especially in some cities.
Although your vehicle has a number of theft-deterrent
features, we know that nothing we put on it can make it
impossible to steal.
Universal Theft-Deterrent
If your vehicle has this feature, it has a theft-deterrent
alarm system. With this system, the SECURITY light will
flash
as you open the door if your ignition is in OFF.
SECURITY
This light on the instrument
panei cluster reminds
you
to activate the
theft-deterrent system when leaving your vehicle.
To activate the system, do the following:
1. Open the door.
2. Lock the door with the power door lock switch while
the door is open, or use the remote keyless entry
transmitter
(if equipped). The SECURITY light
should come on and stay on.
3. Close all doors. The SECURITY light should go off
after about 30 seconds and the system will then be
armed.
If the SECURITY light comes on for one minute and
then shuts
off while the ignition is on, the security
system has detected a problem. See your dealer for
service.
If a door is opened without the key or remote keyless
entry transmitter, or
if the door key cylinders are
damaged, the alarm will go
off. The exterior lamps will
flash and the horn will sound for
30 seconds, then will go
off in order to save battery power.
Remember, the theft-deterrent system won’t activate
if
YQL! !ock the doors with a key or manual door lock.
It activates only
if you use a power door lock switch
while the door is open, or the remote keyless entry
transmitter.
Avoid setting
off the alarm by accident.
Always unlock a door with a key, or use the remote
keyless entry transmitter. Unlocking a door any
other way will set
off the alarm.
If you set off the alarm by accident, unlock the driver’s
door with your key. You can also turn
off the alarm
by pressing the button with the unlock symbol on the
remote keyless entry transmitter. The alarm won’t stop
if
you try to uniock a door any other Way.
2-2 1
Page 91 of 418
OFF: This is the only position from which you can
remove the key. This position locks your ignition and
transaxle. It’s a theft-deterrent feature.
ACC (Accessory): In this position you can operate
your electrical accessories such as power windows,
sunroof (option), audio system and windshield wipers.
ON: This is the position the switch returns to after
you start your engine and release the switch. Even when
the engine is not running, you can use ON
to operate
your electrical accessories and to display some
instrument panel cluster warning lights. This is the
position for driving your vehicle.
START: This position starts the engine. When the
engine starts, release the key. The ignition switch will
return to
ON for normal driving.
Even
if the engine is not running, ACC and ON are
positions that allow you to operate your electrical
accessories.
Key Reminder Warning
If you leave your key in OFF you will hear a warning
tone when you open the driver’s door.
Retained Accessory Power (RAP)
After you turn the ignition off and remove the key, you
will still have power to such accessories as the
radio, sunroof (option) and power windows for up to
10 minutes. Power is turned off if you open a door.
Always leave your key in
OFF. If you leave your key in
any position other than
OFF, your battery will
discharge prematurely.
Starting Your Engine
Move your shift lever to PARK (P) or NEUTRAL (N).
Your engine won’t start in any other position - that’s a
safety feature. To restart when you’re already moving,
use NEUTRAL
(N) only.
Notice: Don’t try to shift to PARK (P) if your
vehicle
is moving. If you do, you could damage the
transaxle. Shift
to PARK (P) only when your
vehicle
is stopped.
1. With your foot off the accelerator pedal, turn your
ignition key to START. When the engine starts, let
go of the key. The idle speed will go down as
your engine gets warm.
2-26
Page 92 of 418
Notice: Holding your key in START for longer than
15 seconds at a time will cause your battery to
be drained much sooner. And the excessive heat
can damage your starter motor. Wait about
15
seconds between each try to help avoid draining
your battery
or damaging your starter.
2. If it doesn’t start within 10 seconds, hold your key in
START for about
10 seconds at a time until your
engine starts. Wait about 15 seconds between
each try.
stops), it could be flooded with too much gasoline.
Try pushing your accelerator pedal all the way to the
floor and holding it there as you hold the key
in
START for about three seconds. If the vehicle starts
briefly but then stops again, do the same thing.
This time keep the pedal down for five or six
seconds to clear the extra gasoline from the engine.
After waiting about 15 seconds, repeat the normal
starting procedure.
3. If your engine still won’t start (or starts but then
Notice: Your engine is designed to work with the
electronics
in your vehicle. If you add electrical
parts or accessories, you could change the way the
engine operates. Before adding electrical equipment,
check with your dealer. If you don’t, your engine might not perform properly.
Engine Coolant Heater
If your vehicle has this feature, in very cold weather,
0°F (-18°C) or colder, the engine coolant heater
can help. You’ll get easier starting and better fuel
economy during engine warm-up. Usually, the coolant
heater should be plugged in a minimum of four
hours prior to starting your vehicle. At temperatures
above
32°F (OOC), use of the coolant heater is not
required.
2-27
Page 108 of 418
Programming the HomeLinkB
Transmitter
Do not use the HomeLink@ Transmitter with any garage
door opener that does not have the “stop and reverse”
feature. This includes any garage door opener model
manufactured before April
1, 1982.
Keep the original transmitter for use in other vehicles as
well as for future HomeLink@ programming. It is also
recommended that upon the sale of the vehicle,
the programmed HomeLink@ buttons should be erased
for security purposes. Refer to “Erasing HomeLink@
Buttons” or, for assistance, contact HomeLink@ on the
internet at: www.homelink.com or by calling
1 -800-355-351 5.
Be sure that people and objects are clear of the garage
door or gate operator you are programming. When
programming a garage door, it is advised to park outside
of the garage.
It is recommended that a new battery be installed in
your hand-held transmitter for quicker and more
accurate transmission of the radio frequency. Your vehicle’s engine should
be turned
off while
programming the transmitter. Follow these steps to
program up to three channels:
1. Press and hold down the two outside buttons,
releasing only when the indicator light begins to
flash, after
20 seconds. Do not hold down the
buttons for longer than
30 seconds and do not
repeat this step to program
a second and/or third
transmitter to the remaining two HomeLink@ buttons.
2. Position the end of your hand-held transmitter about
1 to 3 inches (3 to 8 cm) away from the HomeLink@
buttons while keeping the indicator light in view.
3. Simultaneously press and hold both the desired
button on HomeLink@ and the hand-held transmitter
button.
Do not release the buttons until Step 4
has been completed.
Some entry gates and garage door openers may
require you to substitute Step
3 with the procedure
noted in “Gate Operator and Canadian
Programming” later in this section.
4. The indicator light wiii tiasn siowiy at iirsi and iilerl
rapidly after HomeLink@ successfully receives the
frequency signal from the hand-held transmitter.
Release both buttons.
2-43
Page 116 of 418
Section 3 Instrument Panel
Instrument Panel Overview ............................... 3.4
Hazard Warning Flashers
................................ 3.5
Other Warning Devises
................................... 3.6
Horn
............................................................. 3.6
Tilt Wheel
..................................................... 3.6
Turn SignaVMultifunction Lever
......................... 3.7
Exterior Lamps
............................................. 3.13
Interior Lamps
.............................................. 3.16
Head-Up Display (HUD)
................................. 3-21
Accessory Power Outlets
............................... 3.23
Ashtrays and Cigarette Lighter
........................ 3.24
Ciimate Controls ............................................ 3.25
Climate Control System ................................. 3.25
Automatic Climate Control System
................... 3.28
Outlet Adjustment
......................................... 3.32
Climate Controls Personalization
..................... 3.33
Warning Lights, Gages and Indicators ............. 3.34
Instrument Panel Cluster
................................ 3-35
Speedometer and Odometer
-8-38
Tachometer ................................................. 3.39
Safety Belt Reminder Light
............................. 3.39
. -- ..........................
Air Bag Readiness Light ............................. 3.40
Battery Warning bight
.................................... 3-41
Voltmeter Gage
............................................ 3-41
Brake System Warning Light
.......................... 3-42
Warning Light
........................................... 3-43
Traction Control System (TCS) Warning Light
...... 3-43
Low Traction Active Light ............................... 3-44
Engine Coolant Temperature Gage
.................. 3-45
Tire Pressure Light
....................................... 3-46
Anti-Lock
Brake System
Malfunction Indicator Lamp
....... ............... 3-46
Oil Pressure Gage
.................. ............... 3-49
Check Oil Level Light
J-50
Low Washer Fluid Warning Light ..................... 3-51
n ....................................
Security Light ............................................... 3-51
Check Gages Warning Light
........................... 3-51
Door Ajar Light
............................................. 3-52
Trunk Ajar Light
............................................ 3-52
............... 3-53
Fuel Gage
............................. ............... 3-53
Boost Gage
....................... ................... 3-54
Cnnrirn vu, Y . "1 \!nhirlo I . ..-.- Snnn - - - . lizht . ~
3- 1