parking brake PONTIAC G5 2010 Owner's Manual
[x] Cancel search | Manufacturer: PONTIAC, Model Year: 2010, Model line: G5, Model: PONTIAC G5 2010Pages: 422, PDF Size: 2.22 MB
Page 263 of 422

If parking the rig on a hill:1. Press the brake pedal, but do not shift into P (Park) yet for an automatic transmission, or into gear for a
manual transmission. Turn the wheels into the
curb if facing downhill or into traffic if facing uphill.
2. Have someone place chocks under the trailer wheels.
3. When the wheel chocks are in place, release the regular brakes until the chocks absorb the load.
4. Reapply the regular brakes. Then apply the parking brake, and then shift into P (Park) for an automatic
transmission or R (Reverse) for a manual
transmission.
5. Release the brake pedal.
Leaving After Parking on a Hill
1. Apply the regular brakes and hold the pedal down while you:
•Start the engine.
•Shift into a gear.
•Release the parking brake.
2. Let up on the brake pedal.
3. Drive slowly until the trailer is clear of the chocks.
4. Stop and have someone pick up and store the chocks.
Maintenance When Trailer Towing
The vehicle needs service more often when pulling a
trailer. See Scheduled Maintenance on page 7-3
for more on this. Things that are especially important in
trailer operation are automatic transmission fluid (do
not overfill), engine oil, drive belt, cooling system
and brake system.
Each of these is covered in this manual, and the Index
will help to find them quickly. When trailering, it is a good
idea to review this information before starting the trip.
Check periodically to see that all hitch nuts and bolts are
tight.
Engine Cooling When Trailer Towing
The cooling system may temporarily overheat during
severe operating conditions. See Engine Overheating on
page 6-27.
Towing a Trailer (Manual
Transmission)
Do not tow a trailer if the vehicle is equipped with a
manual transmission.
5-39
Page 265 of 422

Service........................................................... .6-3
Accessories and Modifications ..........................6-3
California Proposition 65 Warning .....................6-4
California Perchlorate Materials Requirements .....6-4
Doing Your Own Service Work .........................6-4
Adding Equipment to the Outside of the Vehicle ..................................................... .6-5
Fuel ............................................................... .6-5
Gasoline Octane ........................................... .6-6
Gasoline Specifications ................................... .6-6
California Fuel .............................................. .6-6
Additives ...................................................... .6-6
Fuels in Foreign Countries ...............................6-7
Filling the Tank ............................................. .6-8
Filling a Portable Fuel Container .....................6-10
Checking Things Under the Hood ....................6-10
Hood Release ............................................. .6-11
Engine Compartment Overview .......................6-12
Engine Oil .................................................. .6-13
Engine Oil Life System ................................. .6-16
Engine Air Cleaner/Filter ................................6-18
Automatic Transmission Fluid .........................6-19
Hydraulic Clutch .......................................... .6-19
Cooling System ........................................... .6-20
Engine Coolant ............................................ .6-24
Engine Overheating ...................................... .6-27Windshield Washer Fluid
................................6-28
Brakes ....................................................... .6-29
Battery ....................................................... .6-33
Jump Starting .............................................. .6-34
Headlamp Aiming .......................................... .6-38
Bulb Replacement ......................................... .6-41
Halogen Bulbs ............................................. .6-41
Headlamps, Front Turn Signal, Sidemarker, and Parking Lamps ................................... .6-42
Center High-Mounted Stoplamp (CHMSL) .........6-43
Taillamps
and Turn Signal Lamps (Coupe) .......6-44
Taillamps, Turn Signal, Stoplamps and Back-up Lamps (Sedan) .............................6-44
Back-Up Lamps (Coupe) ................................6-45
License Plate Lamp ..................................... .6-46
Replacement Bulbs ...................................... .6-47
Windshield Wiper Blade Replacement ..............6-47
Tires ............................................................. .6-48
Tire Sidewall Labeling .................................. .6-49
Tire Terminology and Definitions .....................6-52
Inflation - Tire Pressure .................................6-55
Tire Pressure Monitor System .........................6-56
Tire Pressure Monitor Operation .....................6-58
Tire Inspection and Rotation ...........................6-62
When It Is Time for New Tires .......................6-64
Section 6 Service and Appearance Care
6-1
Page 298 of 422

Jump Starting
If the vehicle’s battery has run down, you may want to
use another vehicle and some jumper cables to start the
vehicle. Be sure to use the following steps to do it
safely.
{WARNING:
Batteries can hurt you. They can be dangerous
because:
•They contain acid that can burn you.
•They contain gas that can explode or ignite.
•They contain enough electricity to burn you.
If you do not follow these steps exactly, some or
all of these things can hurt you. Notice:
Ignoring these steps could result in costly
damage to the vehicle that would not be covered
by the warranty.
Trying to start the vehicle by pushing or pulling it
will not work, and it could damage the vehicle.
1. Check the other vehicle. It must have a 12-volt battery with a negative ground system.
Notice: If the other vehicle’s system is not a 12-volt
system with a negative ground, both vehicles can
be damaged. Only use vehicles with 12-volt systems
with negative grounds to jump start your vehicle.
2. Get the vehicles close enough so the jumper cables can reach, but be sure the vehicles are not touching
each other. If they are, it could cause a ground
connection you do not want. You would not be able
to start the vehicle, and the bad grounding could
damage the electrical systems.
To avoid the possibility of the vehicles rolling, set
the parking brake firmly on both vehicles involved in
the jump start procedure. Put an automatic
transmission in P (Park) or a manual transmission
in N (Neutral) before setting the parking brake.
6-34
Page 324 of 422

TPMS Sensor Matching Process
Each TPMS sensor has a unique identification code.
Any time you replace one or more of the TPMS sensors
or rotate the vehicle’s tires, the identification codes need
to be matched to the new tire/wheel location. The sensors
are matched, to the tire/wheel locations, in the following
order: driver side front tire, passenger side front tire,
passenger side rear tire, and driver side rear tire using a
TPMS diagnostic tool. See your dealer/retailer for
service.
The TPMS sensors can also be matched to each
tire/wheel position by increasing or decreasing the tire’s
air pressure. When increasing the tire’s pressure, do
not exceed the maximum inflation pressure indicated on
the tire’s sidewall. To decrease the tire’s air-pressure
use the pointed end of the valve cap, a pencil-style
air pressure gage, or a key.
You have two minutes to match each tire and wheel
position. If it takes longer than two minutes to match any
tire and wheel position, the matching process stops
and you need to start over.
TPMS Matching Process for Vehicles
with Remote Keyless Entry (RKE)
1. Set the parking brake.
2. Turn the ignition switch to ON/RUN with theengine off.
3. Press and hold the Remote Keyless Entry (RKE) transmitter’s lock and unlock buttons, at the same
time, for about five seconds to start the TPMS learn
mode. The horn sounds twice indicating the
TPMS receiver is ready and in learn mode.
4. Start with the driver side front tire. The driver side front turn signal also comes on to indicate that
corner’s sensor is ready to be learned.
5. Remove the valve cap from the tire’s valve stem. Activate the TPMS sensor by increasing or
decreasing the tire’s air pressure for about
eight seconds. The horn chirp, can take up to
30 seconds to sound. It chirps one time and then all
the turn signals flash one time to confirm the sensor
identification code has been matched to the tire/
wheel position.
6. The passenger side front turn signal comes on to indicate that corner sensor is ready to be learned.
Proceed to the passenger side front tire and
repeat the procedure in Step 5.
6-60
Page 325 of 422

7. The passenger side rear turn signal comes on toindicate that corner sensor is ready to be learned.
Proceed to the passenger side rear tire and
repeat the procedure in Step 5.
8. The driver side rear turn signal comes on to indicate that corner sensor is ready to be learned.
Proceed to the driver side rear tire, and repeat
the procedure in Step 5.
9. After hearing the single horn chirp for the driver side rear tire, two additional horn chirps sound to
indicate the tire learning process is done. Turn
the ignition switch to LOCK/OFF.
If no tires are learned after entering the TPMS learn
mode, or if communication with the receiver
stops, or if the time limit has expired, turn the
ignition switch to LOCK/OFF and start over
beginning with Step 2.
10. Set all four tires to the recommended air pressure level as indicated on the Tire and Loading
Information label.
11. Put the valve caps back on the valve stems.TPMS Matching Process for Vehicles
without Remote Keyless Entry (RKE)
1. Set the parking brake.
2. Turn the ignition switch to ON/RUN with the engine off.
3. Using the Driver Information Center (DIC), press the INFO and Set/Reset buttons at the same time
for about one second. Then press and release
the INFO button until the TIRE LEARN? message
displays.
4. Press and hold the Set/Reset DIC button for approximately three seconds to start the TPMS
learn mode. The horn sounds twice to indicate the
TPMS receiver is ready and the TIRE LEARN
ON message displays. The driver side front turn
signal also comes on to indicate that corner sensor
is ready to be learned.
5. Start with the driver side front tire.
6. Remove the valve cap from the tire’s valve stem. Activate the TPMS sensor by increasing or
decreasing the tire’s air pressure for about
eight seconds. The horn chirp, can take up to
30 seconds to sound. It chirps one time and then all
the turn signals flash one time to confirm the sensor
identification code has been matched to the tire/
wheel position.
6-61
Page 335 of 422

A rear blowout, particularly on a curve, acts much like a
skid and may require the same correction you would
use in a skid. In any rear blowout, remove your foot from
the accelerator pedal. Get the vehicle under control
by steering the way you want the vehicle to go. It may
be very bumpy and noisy, but you can still steer. Gently
brake to a stop, well off the road if possible.
If a tire goes flat, avoid further tire and wheel damage
by driving slowly to a level place and stopping.1. Turn on the hazard warning flashers. See Hazard
Warning Flashers on page 4-3 .
2. Park the vehicle. Set the parking brake firmly and put the shift lever in P (Park).
3. Turn off the engine.
4. Inspect the flat tire.
{WARNING:
Lifting a vehicle and getting under it to do
maintenance or repairs is dangerous without the
appropriate safety equipment and training. If a jack
is provided with the vehicle, it is designed only for
changing a flat tire. If it is used for anything else,
you or others could be badly injured or killed if the
vehicle slips off the jack. If a jack is provided with
the vehicle, only use it for changing a flat tire.
This vehicle may come with a jack and spare tire or a
tire sealant and compressor kit. To use the jack and
spare tire, see Changing a Flat Tire on page 6-80 .To
use the tire sealant and compressor kit, see Tire Sealant
and Compressor Kit on page 6-72 .
6-71
Page 344 of 422

3. Remove the retainer that holds the tire sealant andcompressor kit.
4. Remove the kit from the foam container.
To store the tire sealant and compressor kit, reverse the
steps.
Changing a Flat Tire
If a tire goes flat, avoid further tire and wheel damage
by driving slowly to a level place. Turn on the hazard
warning flashers. See Hazard Warning Flashers
on page 4-3.
{WARNING:
Changing a tire can be dangerous. The vehicle
can slip off the jack and roll over or fall on you or
other people. You and they could be badly injured
or even killed. Find a level place to change your
tire. To help prevent the vehicle from moving:
1. Set the parking brake firmly.
2. Put an automatic transmission shift lever in P (Park), or shift a manual transmission to
1 (First) or R (Reverse).
3. Turn off the engine and do not restart while the vehicle is raised.
4. Do not allow passengers to remain in the vehicle.
To be even more certain the vehicle will not move,
you should put blocks at the front and rear of the
tire farthest away from the one being changed.
That would be the tire on the other side, at the
opposite end of the vehicle.
6-80
Page 371 of 422

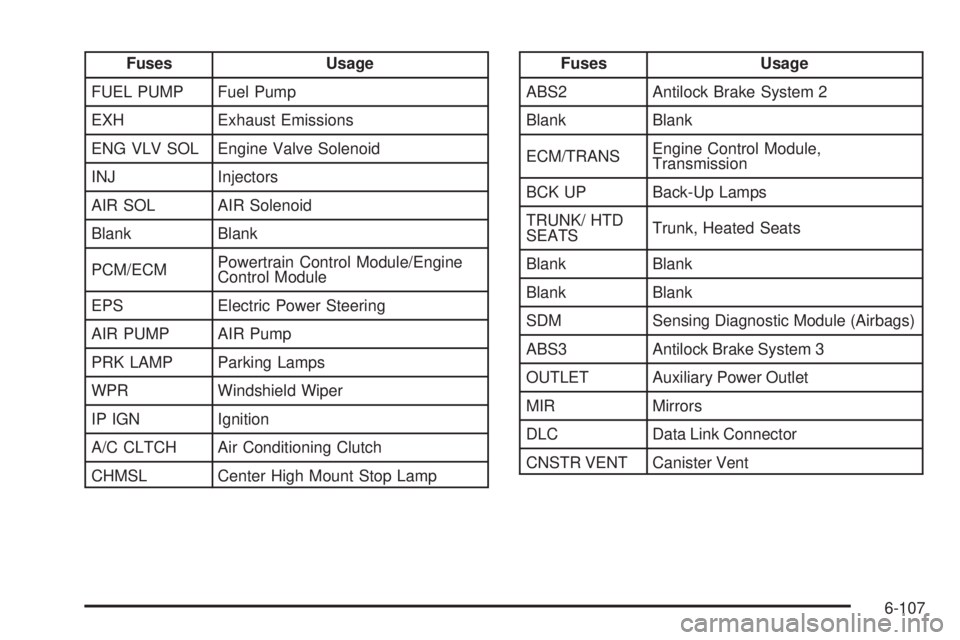
FusesUsage
FUEL PUMP Fuel Pump
EXH Exhaust Emissions
ENG VLV SOL Engine Valve Solenoid
INJ Injectors
AIR SOL AIR Solenoid
Blank Blank
PCM/ECM Powertrain Control Module/Engine
Control Module
EPS Electric Power Steering
AIR PUMP AIR Pump
PRK LAMP Parking Lamps
WPR Windshield Wiper
IP IGN Ignition
A/C CLTCH Air Conditioning Clutch
CHMSL Center High Mount Stop LampFuses Usage
ABS2 Antilock Brake System 2
Blank Blank
ECM/TRANS Engine Control Module,
Transmission
BCK UP Back-Up Lamps
TRUNK/ HTD
SEATS Trunk, Heated Seats
Blank Blank
Blank Blank
SDM Sensing Diagnostic Module (Airbags)
ABS3 Antilock Brake System 3
OUTLET Auxiliary Power Outlet
MIR Mirrors
DLC Data Link Connector
CNSTR VENT Canister Vent
6-107
Page 379 of 422

Additional Required Services
At Each Fuel Stop•
Engine oil level check. See Engine Oil on page 6-13.
•Engine coolant level check. See Engine Coolant on
page 6-24.
•Windshield washer fluid level check. See Windshield
Washer Fluid on page 6-28 .
Once a Month
•
Tire inflation check. See In�ation - Tire Pressure on
page 6-55.
•Tire wear inspection. See Tire Inspection and
Rotation on page 6-62 .
Once a Year
•
Starter switch check. See Owner Checks and
Services on page 7-8 .
•Parking brake and automatic transmission P (Park)
mechanism check. See Owner Checks and
Services on page 7-8 .
•Automatic transmission shiftlock control system
check. SeeOwner Checks and Services on
page 7-8.
•Ignition transmission lock check. See Owner
Checks and Services on page 7-8 .
•Engine cooling system and pressure cap pressure
check. Radiator and air conditioning condenser
outside cleaning. SeeCooling System on
page 6-20.
•Exhaust system and nearby heat shields inspection
for loose or damaged components.
•Throttle system inspection for interference, binding
or for damaged or missing parts. Replace parts as
needed. Replace any components that have
high effort or excessive wear. Do not lubricate
accelerator or cruise control cables.
•If the vehicle has a Tire Sealant and Compressor
Kit, check the sealant expiration date printed on
the instruction label of the kit. See Tire Sealant and
Compressor Kit on page 6-72 .
First Engine Oil Change After Every
40 000 km/25,000 Miles
•
Fuel system inspection for damage or leaks.
7-5
Page 382 of 422

Owner Checks and Services
Starter Switch Check
{WARNING:
When you are doing this inspection, the vehicle
could move suddenly. If the vehicle moves, you or
others could be injured.
1. Before starting this check, be sure there is enough room around the vehicle.
2. Firmly apply both the parking brake and the regular brake. See Parking Brake on page 3-29 .
Do not use the accelerator pedal, and be ready to
turn off the engine immediately if it starts.
3. For automatic transmission vehicles, try to start the engine in each gear. The starter should work only
in P (Park) or N (Neutral). If the starter works in any
other position, your vehicle needs service.
For manual transmission vehicles, put the shift lever
in Neutral, push the clutch pedal down halfway, and
try to start the engine. The starter should work only
when the clutch pedal is pushed down all the way to
the floor. If the starter works when the clutch pedal is
not pushed all the way down, your vehicle needs
service.
Automatic Transmission Shift Lock
Control System Check
{WARNING:
When you are doing this inspection, the vehicle
could move suddenly. If the vehicle moves, you or
others could be injured.
1. Before starting this check, be sure there is enough room around the vehicle. It should be parked on a
level surface.
2. Firmly apply the parking brake. See Parking Brake
on page 3-29.
Be ready to apply the regular brake immediately if
the vehicle begins to move.
3. With the engine off, turn the ignition to ON/RUN, but do not start the engine. Without applying the
regular brake, try to move the shift lever out
of P (Park) with normal effort. If the shift lever
moves out of P (Park), contact your dealer/retailer
for service.
7-8