flat tire PONTIAC G8 2009 Owners Manual
[x] Cancel search | Manufacturer: PONTIAC, Model Year: 2009, Model line: G8, Model: PONTIAC G8 2009Pages: 356, PDF Size: 1.83 MB
Page 206 of 356
Uniform Tire Quality
Grading...........................9-62
Wheel Alignment and
Tire Balance....................9-64
Wheel Replacement..........9-64
Tire Chains.......................9-65
Tire Changing
If a Tire Goes Flat............9-66
Tire Sealant and
Compressor Kit
(V8 Engine)
.....................9-67
Changing a Flat Tire.........9-75
Removing the Spare
Tire and Tools.................9-76
Removing the Flat Tire
and Installing the
Spare Tire
.......................9-77
Storing a Flat or Spare
Tire and Tools.................9-82
Compact Spare Tire..........9-83
Jump Starting
Jump Starting...................9-84
Towing
Towing Your Vehicle.........9-88
Shift Lock Manual
Release...........................9-88
Recreational Vehicle
Towing............................9-89
Towing a Trailer................9-89
Appearance Care
Interior Cleaning................9-95
Exterior Cleaning..............9-98
Sheet Metal Damage.......9-102
Finish Damage................9-102
Underbody Maintenance. . .9-102
Chemical Paint
Spotting.........................9-102
Service
For service and parts needs, visit
your dealer/retailer. You will receive
genuine GM parts and GM-trained
and supported service people.
Genuine GM parts have one
of these marks:
9-2 Vehicle Service and Care
Page 248 of 356
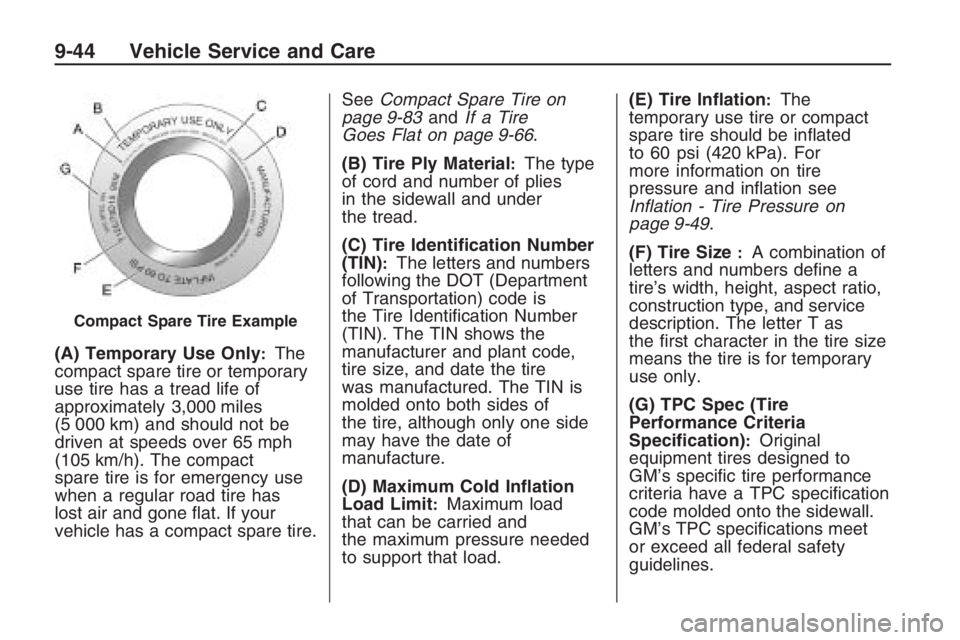
(A) Temporary Use Only:The
compact spare tire or temporary
use tire has a tread life of
approximately 3,000 miles
(5 000 km) and should not be
driven at speeds over 65 mph
(105 km/h). The compact
spare tire is for emergency use
when a regular road tire has
lost air and gone �at. If your
vehicle has a compact spare tire.SeeCompact Spare Tire on
page 9-83andIf a Tire
Goes Flat on page 9-66.
(B) Tire Ply Material
:The type
of cord and number of plies
in the sidewall and under
the tread.
(C) Tire Identi�cation Number
(TIN)
:The letters and numbers
following the DOT (Department
of Transportation) code is
the Tire Identi�cation Number
(TIN). The TIN shows the
manufacturer and plant code,
tire size, and date the tire
was manufactured. The TIN is
molded onto both sides of
the tire, although only one side
may have the date of
manufacture.
(D) Maximum Cold In�ation
Load Limit
:Maximum load
that can be carried and
the maximum pressure needed
to support that load.(E) Tire In�ation
:The
temporary use tire or compact
spare tire should be in�ated
to 60 psi (420 kPa). For
more information on tire
pressure and in�ation see
Inflation - Tire Pressure on
page 9-49.
(F) Tire Size
:A combination of
letters and numbers de�ne a
tire’s width, height, aspect ratio,
construction type, and service
description. The letter T as
the �rst character in the tire size
means the tire is for temporary
use only.
(G) TPC Spec (Tire
Performance Criteria
Speci�cation)
:Original
equipment tires designed to
GM’s speci�c tire performance
criteria have a TPC speci�cation
code molded onto the sidewall.
GM’s TPC speci�cations meet
or exceed all federal safety
guidelines.
Compact Spare Tire Example
9-44 Vehicle Service and Care
Page 262 of 356
Any time you notice unusual
wear, rotate the tires as soon
as possible and check wheel
alignment. Also check for
damaged tires or wheels.
SeeWhen It Is Time for New
Tires on page 9-59andWheel
Replacement on page 9-64.
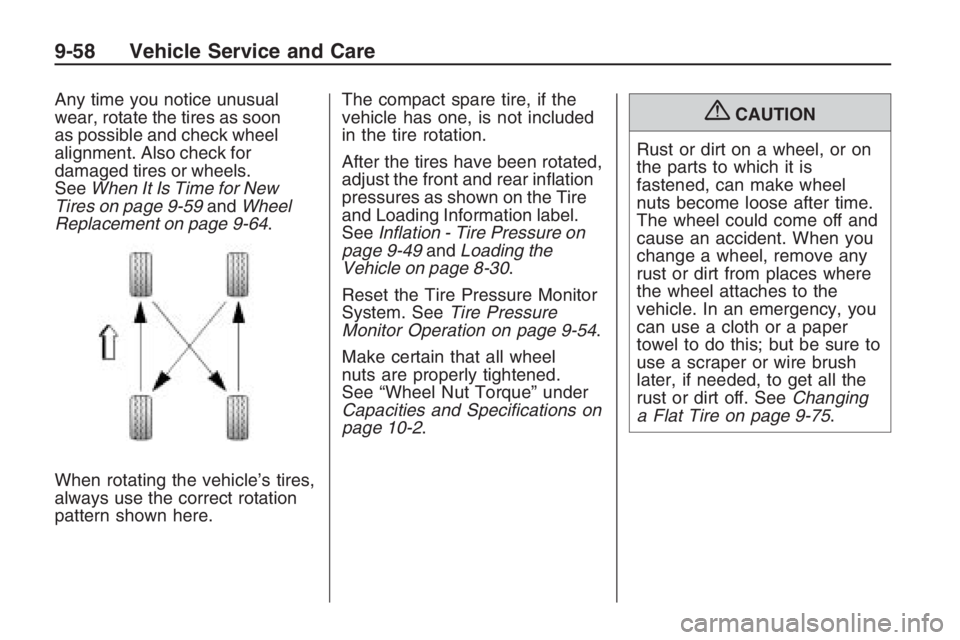
When rotating the vehicle’s tires,
always use the correct rotation
pattern shown here.The compact spare tire, if the
vehicle has one, is not included
in the tire rotation.
After the tires have been rotated,
adjust the front and rear in�ation
pressures as shown on the Tire
and Loading Information label.
SeeInflation - Tire Pressure on
page 9-49andLoading the
Vehicle on page 8-30.
Reset the Tire Pressure Monitor
System. SeeTire Pressure
Monitor Operation on page 9-54.
Make certain that all wheel
nuts are properly tightened.
See “Wheel Nut Torque” under
Capacities and Specifications on
page 10-2.{CAUTION
Rust or dirt on a wheel, or on
the parts to which it is
fastened, can make wheel
nuts become loose after time.
The wheel could come off and
cause an accident. When you
change a wheel, remove any
rust or dirt from places where
the wheel attaches to the
vehicle. In an emergency, you
can use a cloth or a paper
towel to do this; but be sure to
use a scraper or wire brush
later, if needed, to get all the
rust or dirt off. SeeChanging
a Flat Tire on page 9-75.
9-58 Vehicle Service and Care
Page 268 of 356
Wheel Alignment and
Tire Balance
The tires and wheels on your vehicle
were aligned and balanced carefully
at the factory to give you the longest
tire life and best overall performance.
Adjustments to wheel alignment and
tire balancing will not be necessary
on a regular basis. However, if you
notice unusual tire wear or your
vehicle pulling to one side or the
other, the alignment might need to be
checked. If you notice your vehicle
vibrating when driving on a smooth
road, the tires and wheels might
need to be rebalanced. See your
dealer/retailer for proper diagnosis.
Wheel Replacement
Replace any wheel that is bent,
cracked or badly rusted or corroded.
If wheel nuts keep coming loose, the
wheel, wheel bolts and wheel nuts
should be replaced. If the wheel
leaks air, replace it (except some
aluminum wheels, which can
sometimes be repaired). See your
dealer/retailer if any of these
conditions exist.
Your dealer/retailer will know the
kind of wheel you need.
Each new wheel should have
the same load-carrying capacity,
diameter, width, offset and be
mounted the same way as the
one it replaces.
If you need to replace any of the
wheels, wheel bolts or wheel
nuts, replace them only with new
GM original equipment parts.
This way, you will be sure to have
the right wheel, wheel bolts and
wheel nuts for the vehicle.{CAUTION
Using the wrong replacement
wheels, wheel bolts, or wheel nuts
on your vehicle can be dangerous.
It could affect the braking and
handling of your vehicle, make
your tires lose air and make you
lose control. You could have a
collision in which you or others
could be injured. Always use the
correct wheel, wheel bolts, and
wheel nuts for replacement.
Notice:The wrong wheel can
also cause problems with bearing
life, brake cooling, speedometer
or odometer calibration, headlamp
aim, bumper height, vehicle
ground clearance, and tire or tire
chain clearance to the body and
chassis.
SeeChanging a Flat Tire on
page 9-75for more information.
9-64 Vehicle Service and Care
Page 270 of 356
Tire Changing
If a Tire Goes Flat
It is unusual for a tire to blowout
while you are driving, especially if
you maintain your tires properly. See
Tires on page 9-42. If air goes out of
a tire, It is much more likely to leak
out slowly. But if you should ever
have a blowout, here are a few tips
about what to expect and what to do:
If a front tire fails, the �at tire will
create a drag that pulls the vehicle
toward that side. Take your foot off
the accelerator pedal and grip the
steering wheel �rmly. Steer to
maintain lane position, and then
gently brake to a stop well out of the
traffic lane.A rear blowout, particularly on a
curve, acts much like a skid
and may require the same correction
you would use in a skid. In any
rear blowout, remove your foot from
the accelerator pedal. Get the
vehicle under control by steering the
way you want the vehicle to go. It
may be very bumpy and noisy,
but you can still steer. Gently brake
to a stop, well off the road if
possible.
If a tire goes �at, and your vehicle
has a compact spare tire, see
Changing a Flat Tire on page 9-75.
This information shows you how
to use the vehicle’s tire changing
equipment and how to change a �at
tire safely.
{CAUTION
Lifting a vehicle and getting under
it to do maintenance or repairs is
dangerous without the appropriate
safety equipment and training. If a
jack is provided with the vehicle, it
is designed only for changing a
�at tire. If it is used for anything
else, you or others could be badly
injured or killed if the vehicle slips
off the jack. If a jack is provided
with the vehicle, only use it for
changing a �at tire.
9-66 Vehicle Service and Care
Page 273 of 356
Do a safety check before
proceeding. SeeIf a Tire
Goes Flat on page 9-66.
Inspect the damaged tire.
The sealant cannot seal sidewall
damage, large punctures, or a
tire that has unseated from
the wheel. SeeRoadside Assistance
Program on page 12-6.
Do not remove any objects that
have penetrated the tire.
1. Place the tire sealant and
compressor kit on the ground and
unwrap the sealant/air hose (E)
from the side of the compressor.
2. Remove the air compressor
accessory plug (B) from the unit.
Do not plug the plug in yet.3. Turn the tire valve stem cap
counterclockwise to remove.
4. Attach the sealant/air hose (E)
onto the tire valve stem.
Turn it clockwise until tight.
5. Make sure the sealant and
compressor kit on/off switch (A)
is in the O (off) position.
Plug the air compressor
accessory plug (B) into an
accessory power outlet in the
vehicle. SeeAccessory Power
Outlet(s) on page 4-9for
more information.
Do not slam door or close
window on the compressor
accessory plug cord.
{CAUTION
Idling the engine in a closed-in
place or with the climate control
system off can cause deadly
carbon monoxide (CO). See
Engine Exhaust on page 8-14.6. Start the vehicle. The vehicle
must be running while using
the air compressor.
{CAUTION
Overin�ation could cause the tire
to rupture, and you or others
could be injured. Be sure to read
the in�ator instructions, and in�ate
the tire to its recommended
pressure. Do not exceed 36 psi
(248 kPa).
7. Push the On/Off switch (A) to the
I (on) position.
The kit will begin to inject sealant
into the tire. Sealant could leak
from the puncture hole until
the vehicle is driven and the hole
has sealed.
Vehicle Service and Care 9-69
Page 276 of 356
19. Wipe off any sealant from the
wheel, tire or vehicle.
20. Dispose of the used sealant
canister at a local dealer/retailer
or in accordance with local
state codes and practices.
After using the sealant canister,
replace it with a new canister
available from your
dealer/retailer.
This is a temporary repair. Take
the vehicle to your
dealer/retailer to have the tire
repaired or replaced as soon as
possible.Using the Air Compressor
without Sealant to In�ate an
Underin�ated Tire
To use the air compressor to in�ate
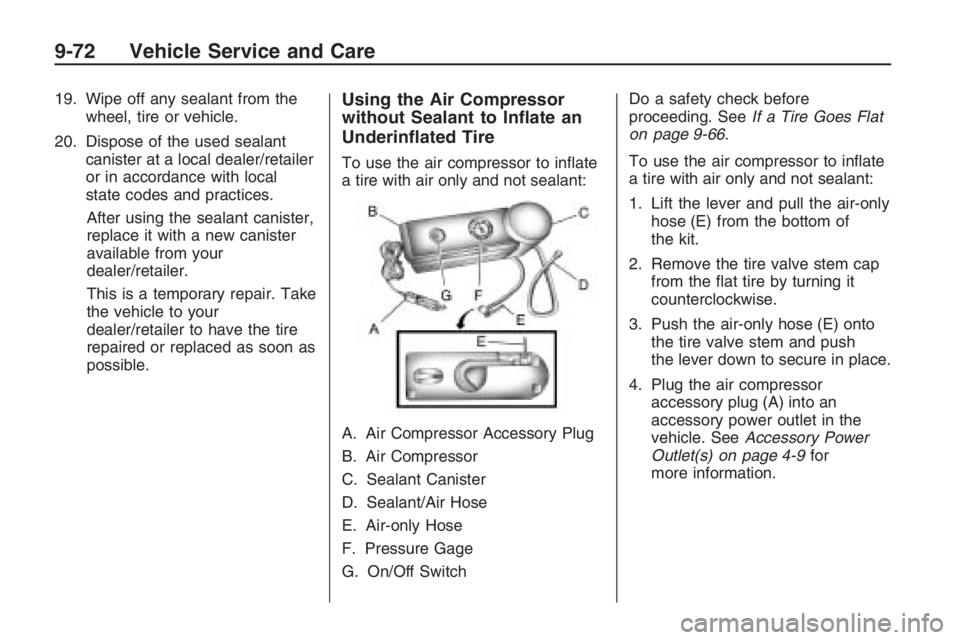
a tire with air only and not sealant:
A. Air Compressor Accessory Plug
B. Air Compressor
C. Sealant Canister
D. Sealant/Air Hose
E. Air-only Hose
F. Pressure Gage
G. On/Off SwitchDo a safety check before
proceeding. SeeIf a Tire Goes Flat
on page 9-66.
To use the air compressor to in�ate
a tire with air only and not sealant:
1. Lift the lever and pull the air-only
hose (E) from the bottom of
the kit.
2. Remove the tire valve stem cap
from the �at tire by turning it
counterclockwise.
3. Push the air-only hose (E) onto
the tire valve stem and push
the lever down to secure in place.
4. Plug the air compressor
accessory plug (A) into an
accessory power outlet in the
vehicle. SeeAccessory Power
Outlet(s) on page 4-9for
more information.
9-72 Vehicle Service and Care
Page 279 of 356
Changing a Flat Tire
If a tire goes �at, avoid further tire
and wheel damage by driving slowly
to a level place. Turn on the
hazard warning �ashers.
{CAUTION
Changing a tire can be dangerous.
The vehicle can slip off the jack
and roll over or fall on you or other
people. You and they could be
badly injured or even killed. Find a
level place to change your tire.
To help prevent the vehicle from
moving:
1. Set the parking brake �rmly.
2. Put an automatic
transmission shift lever in
P (Park), or shift a manual
transmission to 1 (First) or
R (Reverse).
(Continued)
CAUTION (Continued)
3. Turn off the engine and do
not restart while the vehicle
is raised.
4. Do not allow passengers to
remain in the vehicle.
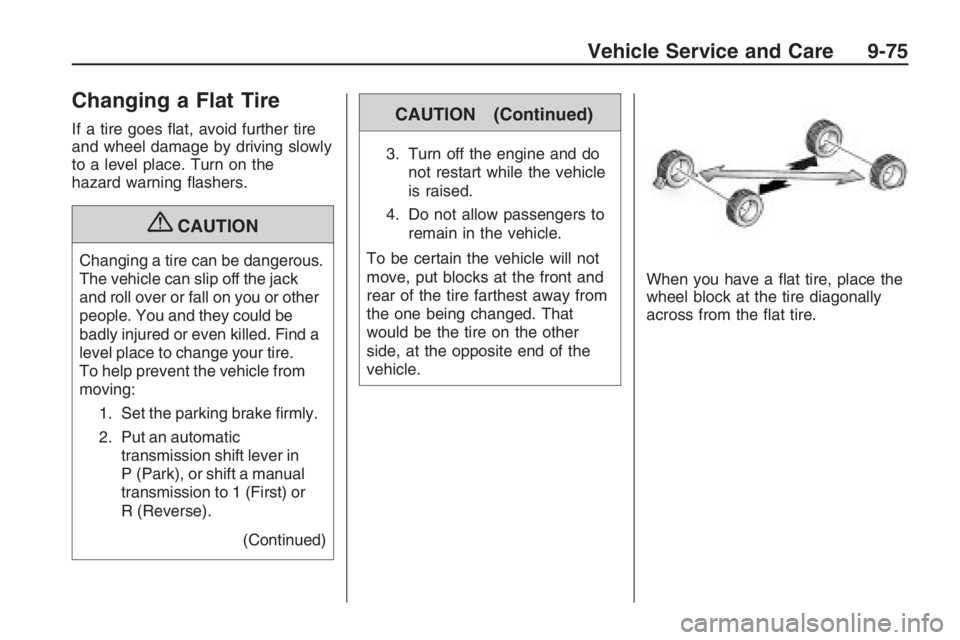
To be certain the vehicle will not
move, put blocks at the front and
rear of the tire farthest away from
the one being changed. That
would be the tire on the other
side, at the opposite end of the
vehicle.When you have a �at tire, place the
wheel block at the tire diagonally
across from the �at tire.
Vehicle Service and Care 9-75
Page 281 of 356
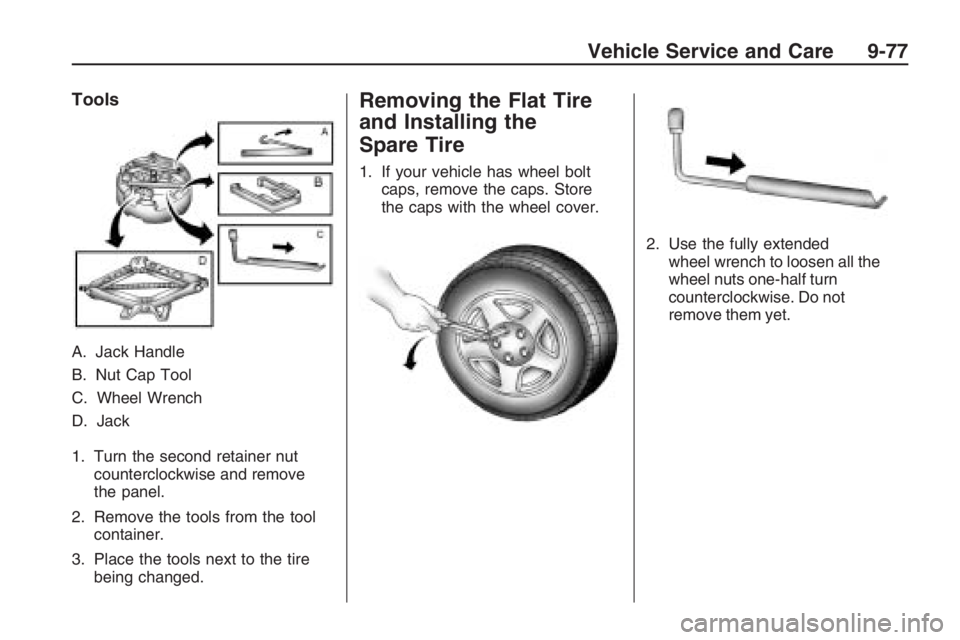
Tools
A. Jack Handle
B. Nut Cap Tool
C. Wheel Wrench
D. Jack
1. Turn the second retainer nut
counterclockwise and remove
the panel.
2. Remove the tools from the tool
container.
3. Place the tools next to the tire
being changed.
Removing the Flat Tire
and Installing the
Spare Tire
1. If your vehicle has wheel bolt
caps, remove the caps. Store
the caps with the wheel cover.
2. Use the fully extended
wheel wrench to loosen all the
wheel nuts one-half turn
counterclockwise. Do not
remove them yet.
Vehicle Service and Care 9-77
Page 284 of 356
{CAUTION
Rust or dirt on a wheel, or on the
parts to which it is fastened, can
make wheel nuts become loose
after time. The wheel could come
off and cause an accident. When
you change a wheel, remove any
rust or dirt from places where the
wheel attaches to the vehicle. In an
emergency, you can use a cloth or
a paper towel to do this; but be
sure to use a scraper or wire brush
later, if needed, to get all the rust
or dirt off. SeeChanging a Flat Tire
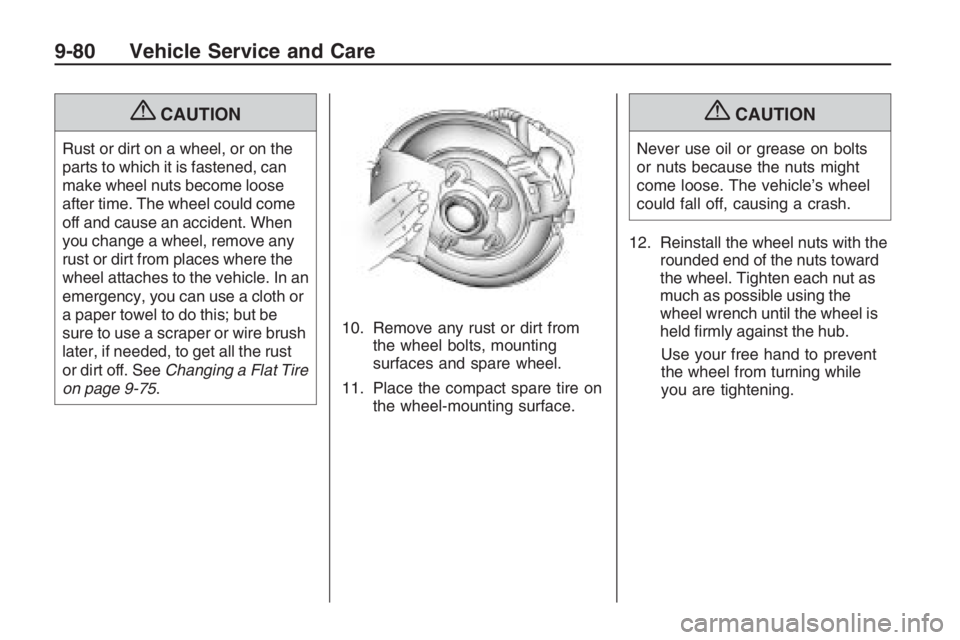
on page 9-75.10. Remove any rust or dirt from
the wheel bolts, mounting
surfaces and spare wheel.
11. Place the compact spare tire on
the wheel-mounting surface.
{CAUTION
Never use oil or grease on bolts
or nuts because the nuts might
come loose. The vehicle’s wheel
could fall off, causing a crash.
12. Reinstall the wheel nuts with the
rounded end of the nuts toward
the wheel. Tighten each nut as
much as possible using the
wheel wrench until the wheel is
held �rmly against the hub.
Use your free hand to prevent
the wheel from turning while
you are tightening.
9-80 Vehicle Service and Care