spare wheel PONTIAC GTO 2005 Owners Manual
[x] Cancel search | Manufacturer: PONTIAC, Model Year: 2005, Model line: GTO, Model: PONTIAC GTO 2005Pages: 318, PDF Size: 2.06 MB
Page 188 of 318
Tire Chains..................................................5-67
If a Tire Goes Flat........................................5-68
Changing a Flat Tire.....................................5-68
Removing the Spare Tire and Tools................5-70
Removing the Flat Tire and Installing
the Spare Tire..........................................5-71
Storing a Flat or Spare Tire and Tools............5-75
Compact Spare Tire......................................5-76
Appearance Care............................................5-76
Fabric/Carpet...............................................5-77
Vinyl...........................................................5-78
Leather.......................................................5-79
Instrument Panel..........................................5-79
Interior Plastic Components............................5-79
Glass Surfaces.............................................5-79
Care of Safety Belts......................................5-79
Weatherstrips...............................................5-80
Washing Your Vehicle...................................5-80
Cleaning Exterior Lamps/Lenses.....................5-80Finish Care..................................................5-80
Windshield and Wiper Blades.........................5-81
Aluminum Wheels.........................................5-81
Tires...........................................................5-82
Sheet Metal Damage.....................................5-82
Finish Damage.............................................5-82
Underbody Maintenance................................5-83
Chemical Paint Spotting.................................5-83
Vehicle Care/Appearance Materials..................5-84
Vehicle Identication......................................5-85
Vehicle Identification Number (VIN).................5-85
Service Parts Identification Label.....................5-85
Electrical System............................................5-85
Add-On Electrical Equipment..........................5-85
Fuses and Circuit Breakers............................5-86
Instrument Panel Fuse Block..........................5-86
Engine Compartment Fuse Block....................5-88
Capacities and Specications..........................5-90
Section 5 Service and Appearance Care
5-2
Page 248 of 318

Tire Inspection and Rotation
Tires should be rotated every 5,000 to 8,000 miles
(8 000 to 13 000 km).
Any time you notice unusual wear, rotate your tires as
soon as possible and check wheel alignment. Also
check for damaged tires or wheels. SeeWhen It Is Time
for New Tires on page 5-63andWheel Replacement
on page 5-66for more information.
The purpose of regular rotation is to achieve more
uniform wear for all tires on the vehicle. The first rotation
is the most important. SeeScheduled Maintenance
on page 6-4.
When rotating non-directional tires, always use the
correct rotation pattern shown here.If your vehicle has 235/40ZR18 tires, they must roll in a
certain direction for the best overall performance.
The direction is shown by an arrow on the tire sidewall.
Because these tires are uni-directional, they should
be rotated as shown here. These tires should only be
moved from front to rear and rear to front on the
same side of the vehicle.
Don’t include the compact spare tire in your tire rotation.
5-62
Page 250 of 318
Buying New Tires
To find out what kind and size of tires you need, look at
the Tire and Loading Information label. For more
information about this label and where to find it, see
Loading Your Vehicle on page 4-29.
Make sure the replacements are the same size, load
capacity, speed rating and construction type (bias,
bias-belted or radial) as your original tires.
{CAUTION:
Mixing tires could cause you to lose control
while driving. If you mix tires of different sizes
or types (radial and bias-belted tires), the
vehicle may not handle properly, and you
could have a crash. Using tires of different
sizes may also cause damage to your vehicle.
Be sure to use the same size and type tires on
all wheels. It’s all right to drive with your
compact spare temporarily, it was developed
for use on your vehicle. SeeCompact Spare
Tire on page 5-76.
{CAUTION:
If you use bias-ply tires on your vehicle, the
wheel rim anges could develop cracks after
many miles of driving. A tire and/or wheel
could fail suddenly, causing a crash. Use only
radial-ply tires with the wheels on your vehicle.
Uniform Tire Quality Grading
Quality grades can be found where applicable on the
tire sidewall between tread shoulder and maximum
section width. For example:
Treadwear 200 Traction AA Temperature A
The following information relates to the system
developed by the United States National Highway
Traffic Safety Administration, which grades tires by
treadwear, traction and temperature performance.
(This applies only to vehicles sold in the United States.)
5-64
Page 251 of 318

The grades are molded on the sidewalls of most
passenger car tires. The Uniform Tire Quality Grading
system does not apply to deep tread, winter-type
snow tires, space-saver or temporary use spare tires,
tires with nominal rim diameters of 10 to 12 inches
(25 to 30 cm), or to some limited-production tires.
While the tires available on General Motors passenger
cars and light trucks may vary with respect to these
grades, they must also conform to federal safety
requirements and additional General Motors Tire
Performance Criteria (TPC) standards.
Treadwear
The treadwear grade is a comparative rating based on
the wear rate of the tire when tested under controlled
conditions on a specified government test course.
For example, a tire graded 150 would wear one and
a half (1.5) times as well on the government course as
a tire graded 100. The relative performance of tires
depends upon the actual conditions of their use,
however, and may depart significantly from the norm
due to variations in driving habits, service practices and
differences in road characteristics and climate.
Traction – AA, A, B, C
The traction grades, from highest to lowest, are AA, A,
B, and C. Those grades represent the tire’s ability
to stop on wet pavement as measured under controlledconditions on specified government test surfaces of
asphalt and concrete. A tire marked C may have poor
traction performance. Warning: The traction grade
assigned to this tire is based on straight-ahead braking
traction tests, and does not include acceleration,
cornering, hydroplaning, or peak traction characteristics.
Temperature – A, B, C
The temperature grades are A (the highest), B, and C,
representing the tire’s resistance to the generation
of heat and its ability to dissipate heat when tested
under controlled conditions on a specified indoor
laboratory test wheel. Sustained high temperature can
cause the material of the tire to degenerate and
reduce tire life, and excessive temperature can lead to
sudden tire failure. The grade C corresponds to a
level of performance which all passenger car tires must
meet under the Federal Motor Vehicle Safety Standard
No. 109. Grades B and A represent higher levels of
performance on the laboratory test wheel than the
minimum required by law.
Warning: The temperature grade for this tire is
established for a tire that is properly inflated and not
overloaded. Excessive speed, underinflation, or
excessive loading, either separately or in combination,
can cause heat buildup and possible tire failure.
5-65
Page 256 of 318

Removing the Spare Tire and Tools
The equipment you will need is located in the trunk.
The compact spare tire is stored in a compartment,
in the trunk.
1. Open the trunk. SeeTrunk on page 2-8for more
information.
2. Lift the cover to access the compact spare tire
and tools.3. Turn the wing nut on the compact spare tire
counterclockwise and remove it. Then lift the
compact spare tire out of the vehicle. SeeCompact
Spare Tire on page 5-76for more information.
4. Remove the jack, wheel wrench, and nut cap
removal tool from storage. They are stored in a
container in the trunk, under the compact spare tire.
5-70
Page 257 of 318
Removing the Flat Tire and
Installing the Spare Tire
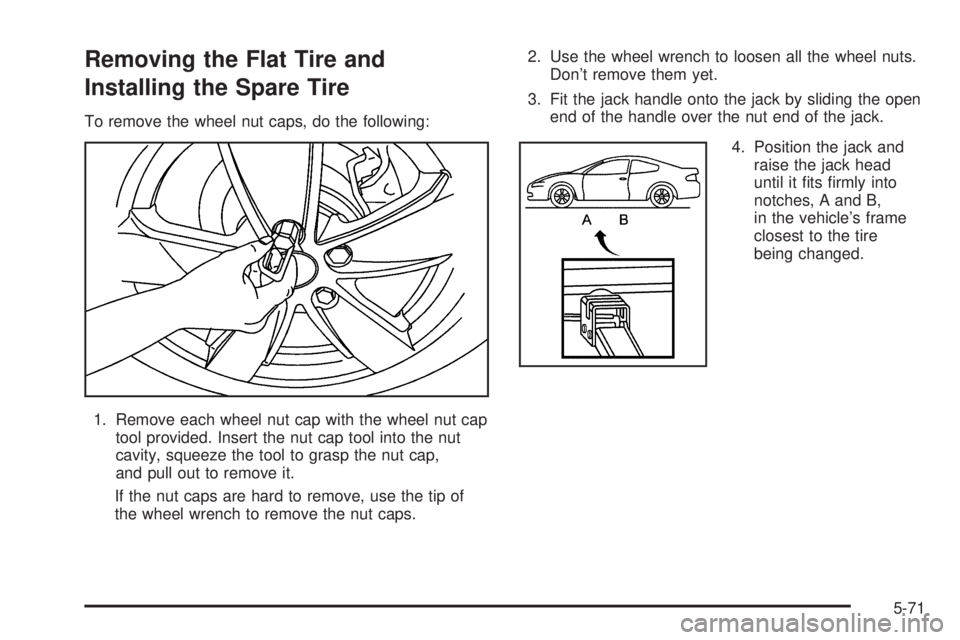
To remove the wheel nut caps, do the following:
1. Remove each wheel nut cap with the wheel nut cap
tool provided. Insert the nut cap tool into the nut
cavity, squeeze the tool to grasp the nut cap,
and pull out to remove it.
If the nut caps are hard to remove, use the tip of
the wheel wrench to remove the nut caps.2. Use the wheel wrench to loosen all the wheel nuts.
Don’t remove them yet.
3. Fit the jack handle onto the jack by sliding the open
end of the handle over the nut end of the jack.
4. Position the jack and
raise the jack head
until it fits firmly into
notches, A and B,
in the vehicle’s frame
closest to the tire
being changed.
5-71
Page 258 of 318

5. Put the compact spare tire near you.
{CAUTION:
Getting under a vehicle when it is jacked up is
dangerous. If the vehicle slips off the jack you
could be badly injured or killed. Never get under
a vehicle when it is supported only by a jack.
{CAUTION:
Raising your vehicle with the jack improperly
positioned can damage the vehicle and even
make the vehicle fall. To help avoid personal
injury and vehicle damage, be sure to t the
jack lift head into the proper location before
raising the vehicle.6. Raise the vehicle by turning the wheel wrench
clockwise. Raise the vehicle far enough off the
ground so there is enough room for the compact
spare tire to fit underneath the wheel well.
The jack handle must be unfolded to a right angle
before it is used.
7. Remove all of the wheel nuts.
8. Remove the flat tire.
5-72
Page 259 of 318

{CAUTION:
Rust or dirt on the wheel, or on the parts to
which it is fastened, can make the wheel nuts
become loose after a time. The wheel could
come off and cause an accident. When you
change a wheel, remove any rust or dirt from
the places where the wheel attaches to the
vehicle. In an emergency, you can use a cloth
or a paper towel to do this; but be sure to use
a scraper or wire brush later, if you need to,
to get all the rust or dirt off.
9. Remove any rust or dirt
from the wheel bolts,
mounting surfaces, and
spare tire.10. Install the compact spare tire.{CAUTION:
Never use oil or grease on studs or nuts. If you
do, the nuts might come loose. Your wheel
could fall off, causing a serious accident.
11. Put the wheel nuts back on with the rounded end of
the nuts toward the wheel. Tighten each nut by
hand until the wheel is held against the hub.
5-73
Page 260 of 318

12. Lower the vehicle by turning the wheel wrench
counterclockwise. Lower the jack completely.
{CAUTION:
Incorrect wheel nuts or improperly tightened
wheel nuts can cause the wheel to come loose
and even come off. This could lead to an
accident. Be sure to use the correct wheel
nuts. If you have to replace them, be sure to
get new GM original equipment wheel nuts.
Stop somewhere as soon as you can and have
the nuts tightened with a torque wrench to the
proper torque specication. SeeCapacities
and Specifications on page 5-90for wheel nut
torque specication.
Notice:Improperly tightened wheel nuts can lead
to brake pulsation and rotor damage. To avoid
expensive brake repairs, evenly tighten the wheel
nuts in the proper sequence and to the proper
torque specication. SeeCapacities and
Specifications on page 5-90for the wheel nut
torque specication.13. Tighten the wheel nuts
firmly in a crisscross
sequence, as shown.
Notice:Wheel covers will not t on your compact
spare. If you try to put a wheel cover on the compact
spare, you could damage the cover or the spare.
Do not try to put a wheel cover on your compact spare
tire. It will not fit. Store a wheel cover in the trunk
until you have the flat tire repaired or replaced.
5-74
Page 262 of 318
Compact Spare Tire
Although the compact spare tire was fully inflated when
the vehicle was new, it can lose air after a time.
Check the inflation pressure regularly. It should be
60 psi (420 kPa).
After installing the compact spare on the vehicle, stop
as soon as possible and make sure the spare tire
is correctly inflated. The compact spare is made to
perform well at speeds up to 65 mph (105 km/h)
for distances up to 3,000 miles (5 000 km), so you can
finish your trip and have the full-size tire repaired or
replaced at your convenience. Of course, it is best
to replace the spare with a full-size tire as soon as
possible. The spare tire will last longer and be in good
shape in case it is needed again.
Notice:When the compact spare is installed, do
not take your vehicle through an automatic car wash
with guide rails. The compact spare can get
caught on the rails. That can damage the tire and
wheel, and maybe other parts of your vehicle.
Do not use the compact spare on other vehicles.
And do not mix the compact spare tire or wheel with
other wheels or tires. They will not fit. Keep the
spare tire and its wheel together.
Notice:Tire chains will not t your compact spare.
Using them can damage your vehicle and can
damage the chains too. Do not use tire chains on
your compact spare.
Appearance Care
Cleaning products can be hazardous. Some are toxic.
Other cleaning products can burst into flames if a match
is struck near them or if they get on a hot part of the
vehicle. Some are dangerous if their fumes are inhaled
in an enclosed space. When anything from a container
is used to clean the vehicle, be sure to follow the
manufacturer’s warnings and instructions. Always open
the doors or windows of the vehicle when cleaning
the inside.
Never use these to clean the vehicle:
•Gasoline
•Benzene
•Naphtha
•Carbon Tetrachloride
•Acetone
•Paint Thinner
•Turpentine
•Lacquer Thinner
•Nail Polish Remover
5-76