PORSCHE 911 CARRERA 2005 5.G Owner's Guide
Manufacturer: PORSCHE, Model Year: 2005, Model line: 911 CARRERA, Model: PORSCHE 911 CARRERA 2005 5.GPages: 282, PDF Size: 4.34 MB
Page 31 of 282
Controls, Instruments
31
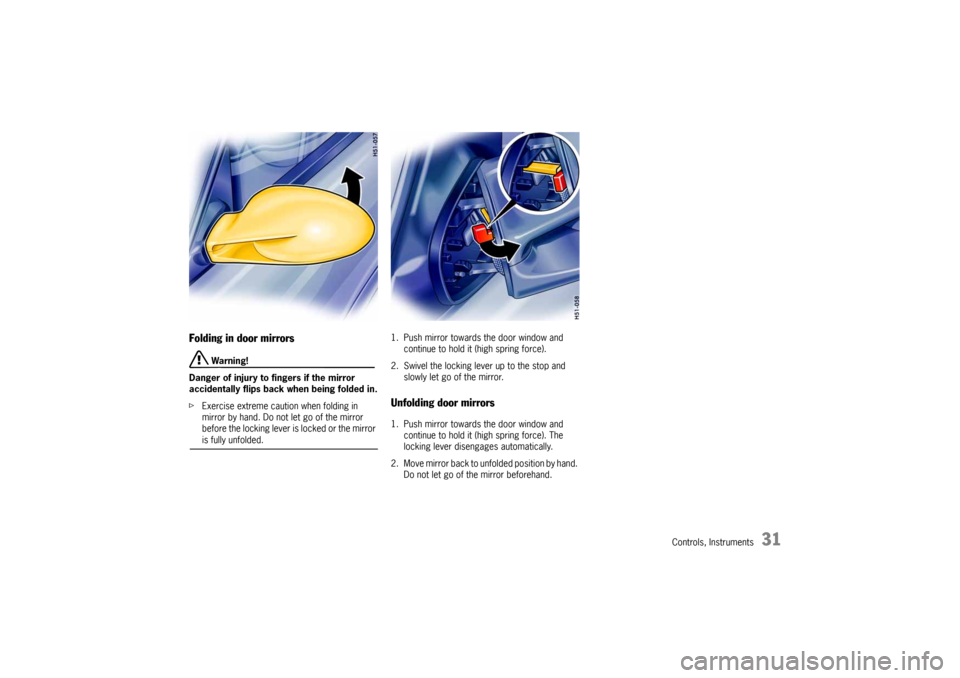
Folding in door mirrors
Warning!
Danger of injury to fingers if the mirror
accidentally flips back when being folded in.
fExercise extreme caution when folding in
mirror by hand. Do not let go of the mirror
before the locking lever is locked or the mirror is fully unfolded.1. Push mirror towards the door window and
continue to hold it (high spring force).
2. Swivel the locking lever up to the stop and
slowly let go of the mirror.
Unfolding door mirrors1. Push mirror towards the door window and
continue to hold it (high spring force). The
locking lever disengages automatically.
2. Move mirror back to unfolded position by hand.
Do not let go of the mirror beforehand.
Page 32 of 282
32
Controls, Instruments
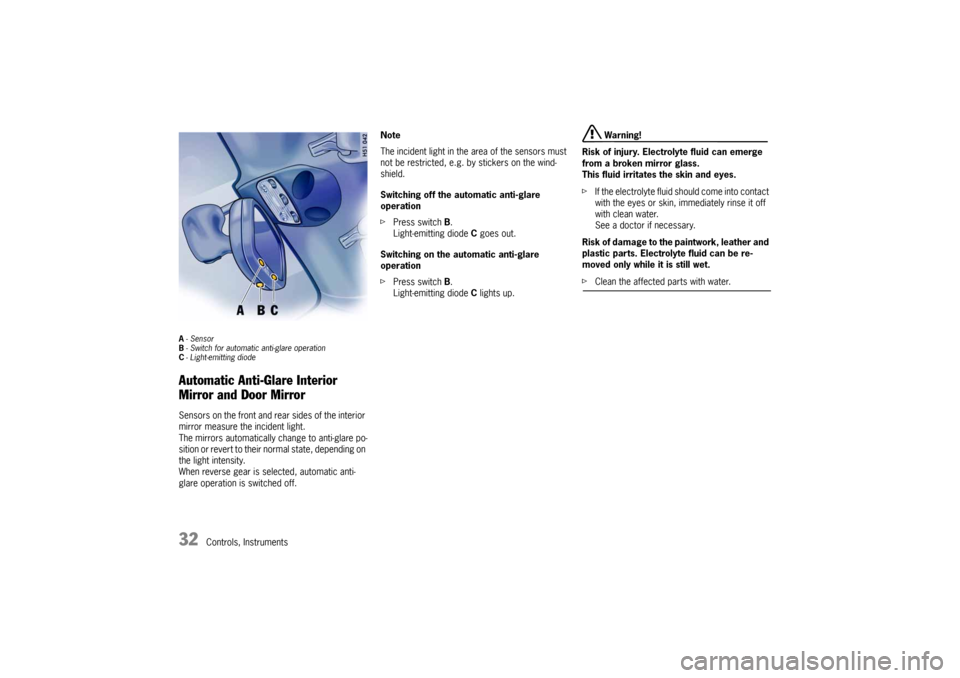
A-Sensor
B- Switch for automatic anti-glare operation
C- Light-emitting diode Automatic Anti-Glare Interior
Mirror and Door Mirror Sensors on the front and rear sides of the interior
mirror measure the incident light.
The mirrors automatically change to anti-glare po-
sition or revert to their normal state, depending on
the light intensity.
When reverse gear is selected, automatic anti-
glare operation is switched off. Note
The incident light in the area of the sensors must
not be restricted, e.g. by stickers on the wind-
shield.
Switching off the automatic anti-glare
operation
fPress switch B.
Light-emitting diode C goes out.
Switching on the automatic anti-glare
operation
fPress switch B.
Light-emitting diode C lights up.
Warning!
Risk of injury. Electrolyte fluid can emerge
from a broken mirror glass.
This fluid irritates the skin and eyes.
fIf the electrolyte fluid should come into contact
with the eyes or skin, immediately rinse it off
with clean water.
See a doctor if necessary.
Risk of damage to the paintwork, leather and
plastic parts. Electrolyte fluid can be re-
moved only while it is still wet.
fClean the affected parts with water.
Page 33 of 282
Controls, Instruments
33
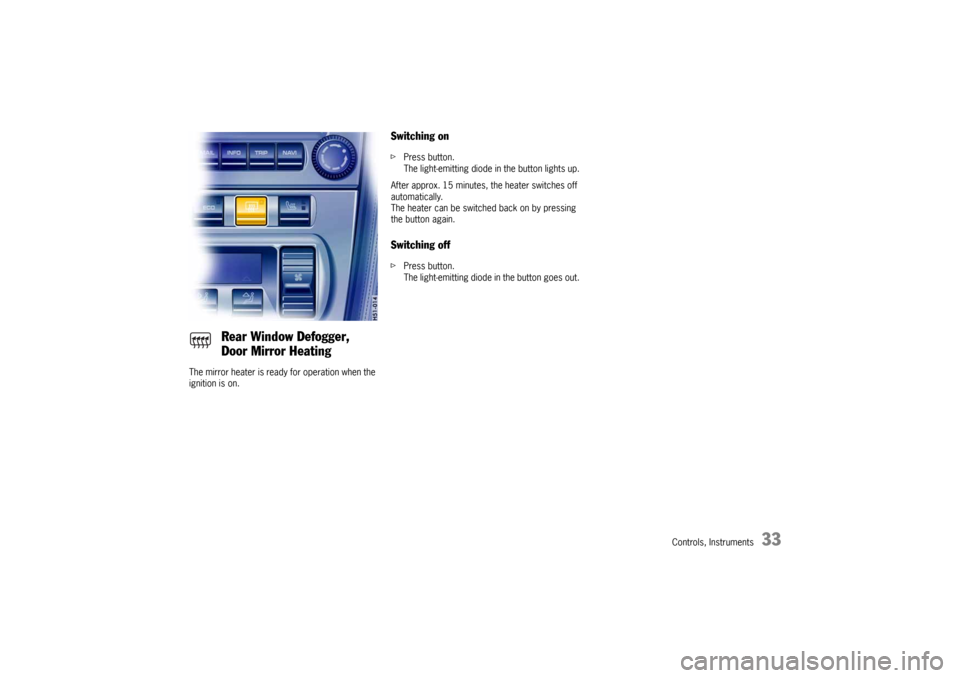
The mirror heater is ready for operation when the
ignition is on.
Switching on fPress button.
The light-emitting diode in the button lights up.
After approx. 15 minutes, the heater switches off
automatically.
The heater can be switched back on by pressing
the button again.Switching off fPress button.
The light-emitting diode in the button goes out.
Rear Window Defogger,
Door Mirror Heating
Page 34 of 282
34
Controls, Instruments
Seat Adjustment
Warning!
The seat may move unexpectedly if you
attempt to adjust while driving. This could
cause sudden loss of control or personal in-
jury.
fDo not adjust seats while the vehicle is in mo-
tion.
The backrest locks must be engaged at all
times while the vehicle is in motion.
Safety belts only offer protection when the
backrest is upright and the belts are properly
positioned on the body.
Improperly positioned safety belts or safety
belts worn by passengers in an excessively
reclined position can cause serious personal
injury in an accident.
fDo not operate the car with the driver or
passenger backrests excessively reclined
(see “Seat position”).
In the cabriolet, the windstop may be
damaged during seat adjustment and when
folding back the front-seat backrest.
fAdjust seat so that the seat backrest does not touch the windstop.
Seat position An ergonomically correct sitting position is
important for safe and fatigue-free driving.
We recommend the following procedure for adjust-
ing the driver’s seat to suit individual
requirements:
1. Vehicles with manual transmission:
Adjust the seat until, with the clutch pedal fully
depressed, your leg remains at a slight angle.
Vehicles with Tiptronic S:
Adjust the seat until, with your left foot on the
footrest, your left leg remains at a slight angle.2. Rest your outstretched arm on the steering
wheel.
Set the backrest angle and the steering-wheel
position so that your wrist rests on the outer
rim of the steering wheel. At the same time,
the shoulders must still be in noticeable
contact with the backrest.
3. Adjust the seat height to give yourself enough
headroom and a good overview of the vehicle.
4. Electrically adjustable seat:
Adjust the seat angle until your thighs rest
lightly on the seat cushion.
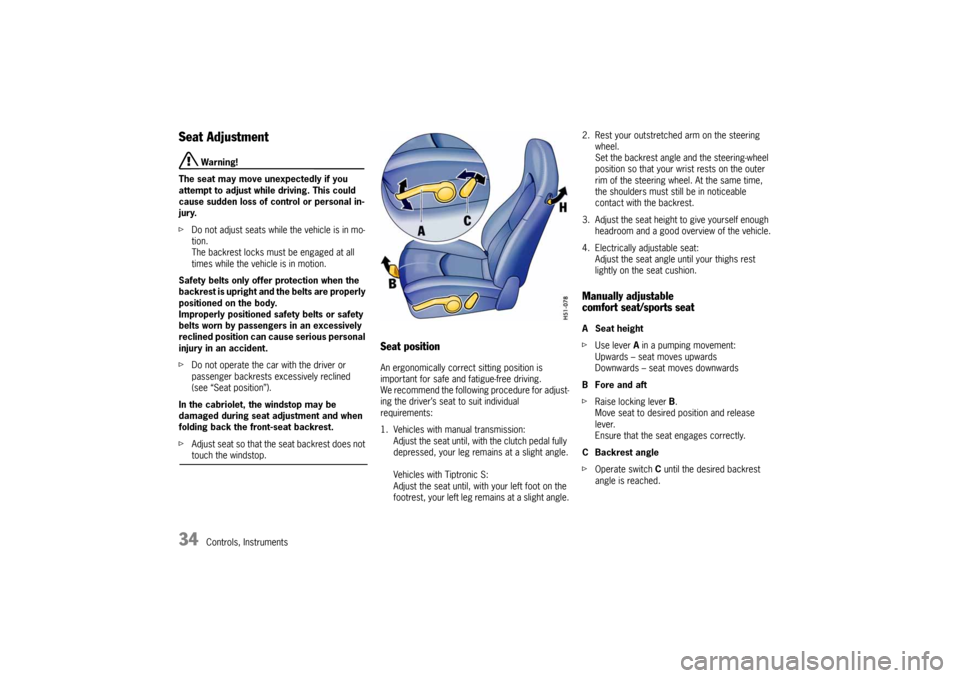
Manually adjustable
comfort seat/sports seatA Seat height
fUse lever A in a pumping movement:
Upwards – seat moves upwards
Downwards – seat moves downwards
B Fore and aft
fRaise locking lever B.
Move seat to desired position and release
lever.
Ensure that the seat engages correctly.
CBackrest angle
fOperate switch C until the desired backrest
angle is reached.
Page 35 of 282
Controls, Instruments
35
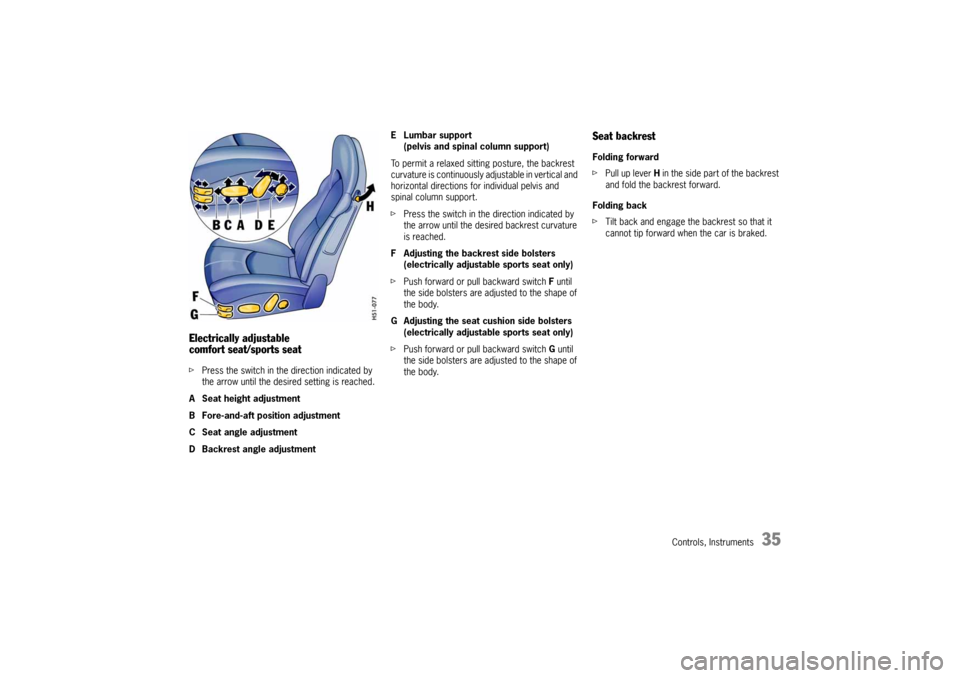
Electrically adjustable
comfort seat/sports seatfPress the switch in the direction indicated by
the arrow until the desired setting is reached.
A Seat height adjustment
B Fore-and-aft position adjustment
C Seat angle adjustment
D Backrest angle adjustmentE Lumbar support
(pelvis and spinal column support)
To permit a relaxed sitting posture, the backrest
curvature is continuously adjustable in vertical and
horizontal directions for individual pelvis and
spinal column support.
fPress the switch in the direction indicated by
the arrow until the desired backrest curvature
is reached.
F Adjusting the backrest side bolsters
(electrically adjustable sports seat only)
fPush forward or pull backward switch F until
the side bolsters are adjusted to the shape of
the body.
G Adjusting the seat cushion side bolsters
(electrically adjustable sports seat only)
fPush forward or pull backward switch G until
the side bolsters are adjusted to the shape of
the body.
Seat backrestFolding forward
fPull up lever H in the side part of the backrest
and fold the backrest forward.
Folding back
fTilt back and engage the backrest so that it
cannot tip forward when the car is braked.
Page 36 of 282
36
Controls, Instruments
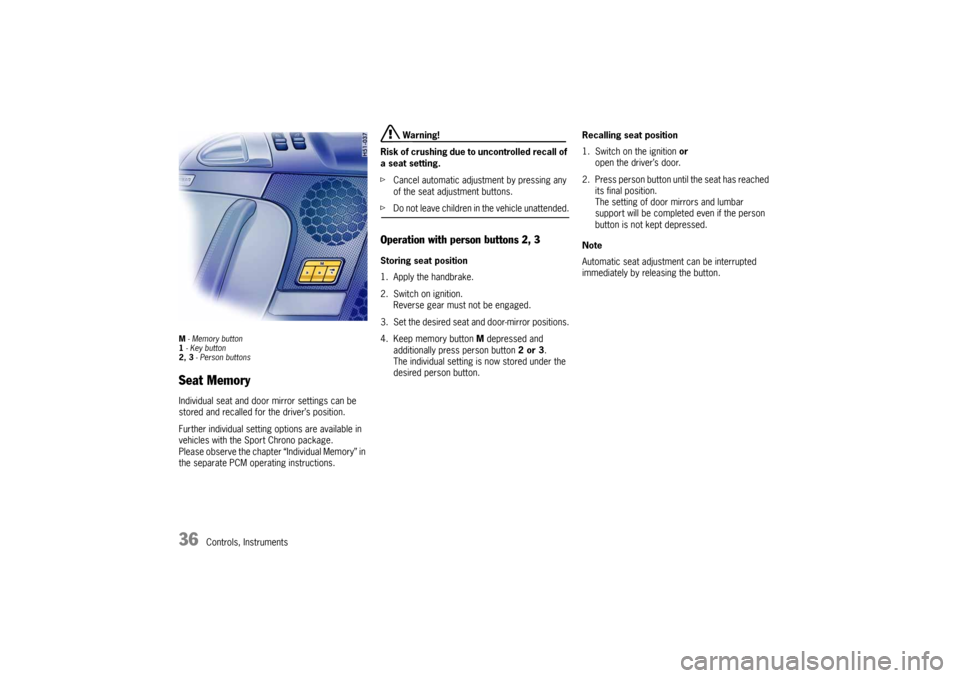
M - Memory button
1 - Key button
2, 3 - Person buttonsSeat MemoryIndividual seat and door mirror settings can be
stored and recalled for the driver’s position.
Further individual setting options are available in
vehicles with the Sport Chrono package.
Please observe the chapter “Individual Memory” in
the separate PCM operating instructions.
Warning!
Risk of crushing due to uncontrolled recall of
a seat setting.
fCancel automatic adjustment by pressing any
of the seat adjustment buttons.
fDo not leave children in the vehicle unattended.Operation with person buttons 2, 3Storing seat position
1. Apply the handbrake.
2. Switch on ignition.
Reverse gear must not be engaged.
3. Set the desired seat and door-mirror positions.
4. Keep memory button M depressed and
additionally press person button 2 or 3.
The individual setting is now stored under the
desired person button.Recalling seat position
1. Switch on the ignition or
open the driver’s door.
2. Press person button until the seat has reached
its final position.
The setting of door mirrors and lumbar
support will be completed even if the person
button is not kept depressed.
Note
Automatic seat adjustment can be interrupted
immediately by releasing the button.
Page 37 of 282

Controls, Instruments
37
Operating with the remote control of the
vehicle keyEach remote control (up to six) can be assigned an
individual seat and door mirror position.
The stored seat and door mirror position is set au-
tomatically when the vehicle is unlocked using the
corresponding remote control.
Storing seat position
1. Apply the handbrake.
2. Switch the ignition on with the desired vehicle
key.
Reverse gear must not be engaged.
3. Set the desired seat and door-mirror positions.
4. Keep memory button M depressed and
additionally press key button 1.
The individual setting is now assigned to this
remote control and to the key button.Storing individual lowered position of the
passenger’s door mirror as a parking aid
Once the driver's seat setting has been stored, an
individual lowered position of the passenger's
door mirror may be stored for driving in reverse:
1. Apply the handbrake.
2. Switch the ignition on with the desired vehicle
key.
3. Engage reverse gear.
4. Select passenger side with mirror switch.
The passenger’s mirror swivels downwards.
5. Set passenger’s door mirror to desired final
position.
6. Keep memory button M depressed and
additionally press key button 1.
The individual setting is now assigned to this
remote control and to the key button.Recalling seat position
fUnlock the locked vehicle or the luggage
compartment with the remote control.
The stored seat position is automatically set.
The seat position assigned to a remote control
can also be recalled with the key button 1 if the
corresponding key was used to switch on the
ignition.
If no seat position has been assigned to a remote
control, the key button will not work.
Note on operation
Automatic seat adjustment can be interrupted
immediately:
– by switching on the ignition,
– by pressing the central locking button,
– by pressing any memory or seat adjustment
button.
Clearing the stored seat position
1. Switch the ignition on with the desired vehicle
key.
2. Press memory button twice and key button 1
once consecutively.
Page 38 of 282
38
Controls, Instruments
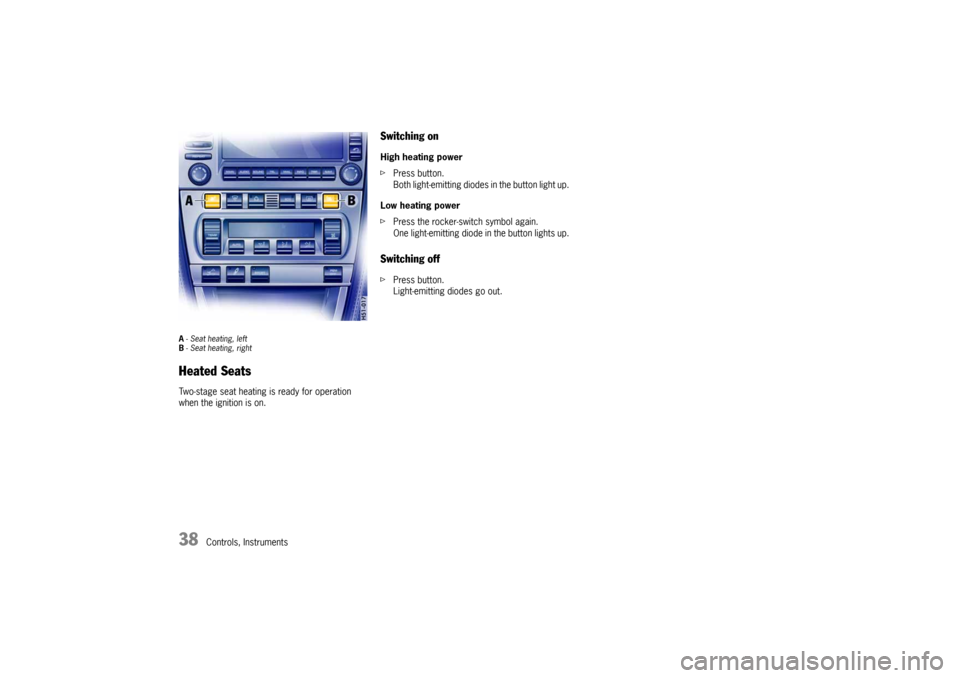
A- Seat heating, left
B- Seat heating, rightHeated SeatsTwo-stage seat heating is ready for operation
when the ignition is on.
Switching onHigh heating power
fPress button.
Both light-emitting diodes in the button light up.
Low heating power
fPress the rocker-switch symbol again.
One light-emitting diode in the button lights up.Switching offfPress button.
Light-emitting diodes go out.
Page 39 of 282
Controls, Instruments
39
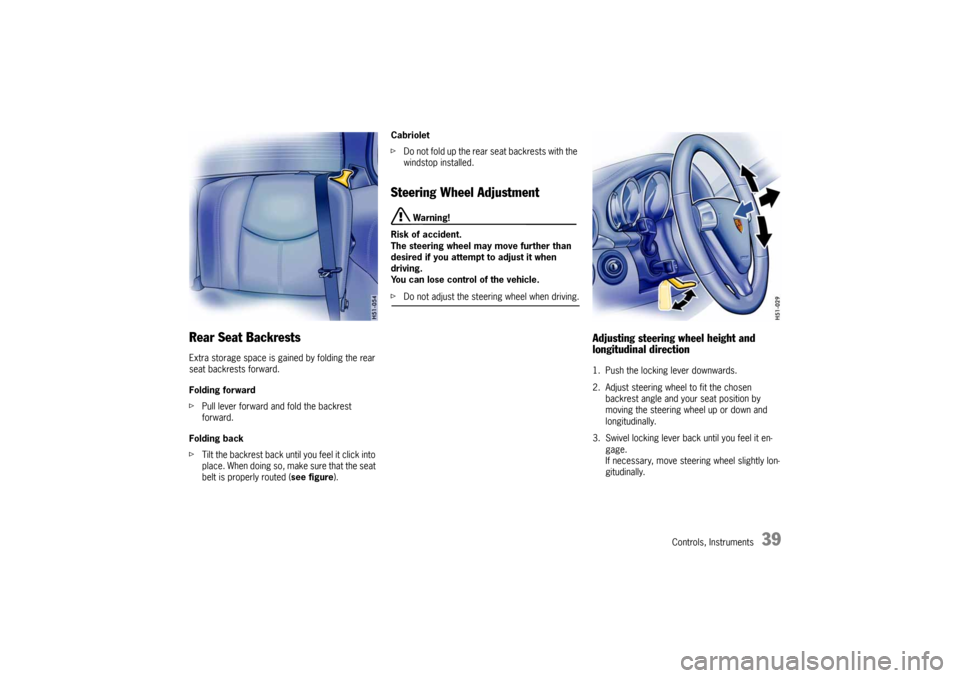
Rear Seat BackrestsExtra storage space is gained by folding the rear
seat backrests forward.
Folding forward
fPull lever forward and fold the backrest
forward.
Folding back
fTilt the backrest back until you feel it click into
place. When doing so, make sure that the seat
belt is properly routed (see figure).Cabriolet
fDo not fold up the rear seat backrests with the
windstop installed.
Steering Wheel Adjustment
Warning!
Risk of accident.
The steering wheel may move further than
desired if you attempt to adjust it when
driving.
You can lose control of the vehicle.
fDo not adjust the steering wheel when driving.
Adjusting steering wheel height and
longitudinal direction1. Push the locking lever downwards.
2. Adjust steering wheel to fit the chosen
backrest angle and your seat position by
moving the steering wheel up or down and
longitudinally.
3. Swivel locking lever back until you feel it en-
gage.
If necessary, move steering wheel slightly lon-
gitudinally.
Page 40 of 282
40
Controls, Instruments
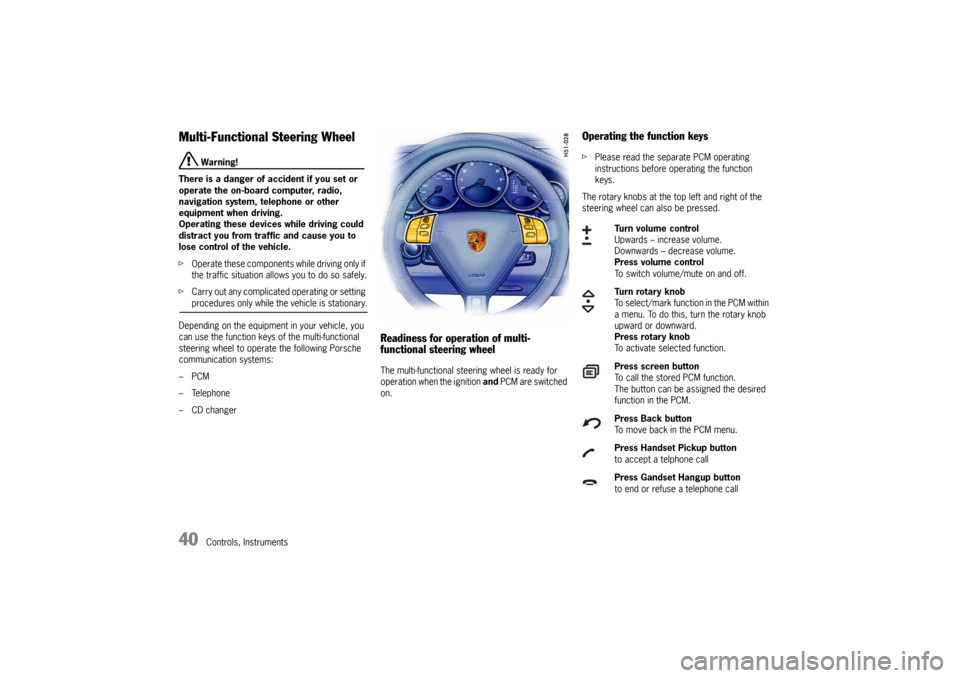
Multi-Functional Steering Wheel
Warning!
There is a danger of accident if you set or
operate the on-board computer, radio,
navigation system, telephone or other
equipment when driving.
Operating these devices while driving could
distract you from traffic and cause you to
lose control of the vehicle.
fOperate these components while driving only if
the traffic situation allows you to do so safely.
fCarry out any complicated operating or setting procedures only while the vehicle is stationary.
Depending on the equipment in your vehicle, you
can use the function keys of the multi-functional
steering wheel to operate the following Porsche
communication systems:
–PCM
– Telephone
– CD changer
Readiness for operation of multi-
functional steering wheelThe multi-functional steering wheel is ready for
operation when the ignition and PCM are switched
on.
Operating the function keysfPlease read the separate PCM operating
instructions before operating the function
keys.
The rotary knobs at the top left and right of the
steering wheel can also be pressed.
Turn volume control
Upwards – increase volume.
Downwards – decrease volume.
Press volume control
To switch volume/mute on and off.
Turn rotary knob
To select/mark function in the PCM within
a menu. To do this, turn the rotary knob
upward or downward.
Press rotary knob
To activate selected function.
Press screen button
To call the stored PCM function.
The button can be assigned the desired
function in the PCM.
Press Back button
To move back in the PCM menu.
Press Handset Pickup button
to accept a telphone call
Press Gandset Hangup button
to end or refuse a telephone call