steering PORSCHE 911 CARRERA 2006 5.G Owner's Manual
[x] Cancel search | Manufacturer: PORSCHE, Model Year: 2006, Model line: 911 CARRERA, Model: PORSCHE 911 CARRERA 2006 5.GPages: 308, PDF Size: 3.69 MB
Page 96 of 308
96
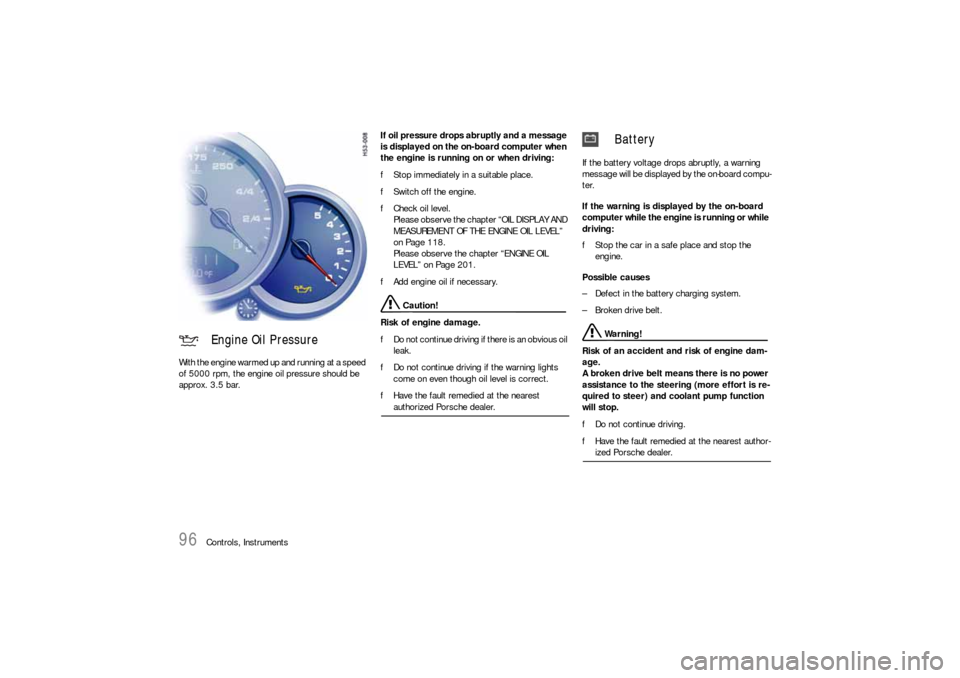
Controls, Instruments With the engine warmed up and running at a speed
of 5000 rpm, the engine oil pressure should be
approx. 3.5 bar.If oil pressure drops abruptly and a message
is displayed on the on-board computer when
the engine is running on or when driving:
fStop immediately in a suitable place.
fSwitch off the engine.
fCheck oil level.
Please observe the chapter “OIL DISPLAY AND
MEASUREMENT OF THE ENGINE OIL LEVEL”
on Page 118.
Please observe the chapter “ENGINE OIL
LEVEL” on Page 201.
fAdd engine oil if necessary.
Caution!
Risk of engine damage.
fDo not continue driving if there is an obvious oil
leak.
fDo not continue driving if the warning lights
come on even though oil level is correct.
fHave the fault remedied at the nearest authorized Porsche dealer.If the battery voltage drops abruptly, a warning
message will be displayed by the on-board compu-
ter.
If the warning is displayed by the on-board
computer while the engine is running or while
driving:
fStop the car in a safe place and stop the
engine.
Possible causes
– Defect in the battery charging system.
– Broken drive belt.
Warning!
Risk of an accident and risk of engine dam-
age.
A broken drive belt means there is no power
assistance to the steering (more effort is re-
quired to steer) and coolant pump function
will stop.
fDo not continue driving.
fHave the fault remedied at the nearest author-ized Porsche dealer.
Engine Oil Pressure
Battery
Page 98 of 308
98
Controls, Instruments
On-Board Computer (BC)Display fieldThe display field is beneath the tachometer.Readiness for operation– With ignition switched on,
– with engine running.
Operation, controlsIt is not possible to describe all details of the on-
board computer functions in this Owner’s Manual.
However, the examples will quickly familiarize you
with the operational principle and help you to
navigate through the menu structure.
You can restore the factory default settings at any
time by using the “SET” menu.
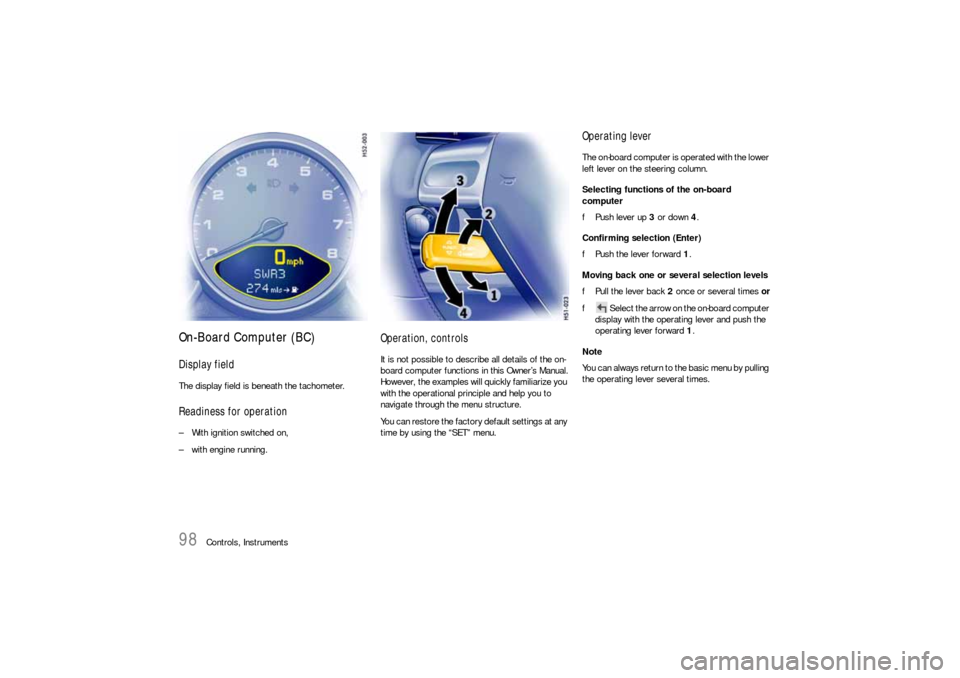
Operating leverThe on-board computer is operated with the lower
left lever on the steering column.
Selecting functions of the on-board
computer
fPush lever up 3 or down 4.
Confirming selection (Enter)
fPush the lever forward 1.
Moving back one or several selection levels
fPull the lever back 2 once or several times or
fSelect the arrow on the on-board computer
display with the operating lever and push the
operating lever forward 1.
Note
You can always return to the basic menu by pulling
the operating lever several times.
Page 122 of 308

122
Controls, Instruments
Warnings on the instrument panel and the on-board computerIf a warning message appears, always refer to the corresponding chapters in the Owner’s Manual.
Warning messages are issued only if all measurement preconditions are met. Therefore, check all fluid levels regularly –
in particular, always check the engine oil level after refuelling.
Instrument
panelOn-board
computerText display on on-board
computerMeaning/measure
Seat belt Driver and passengers must fasten their seat
belts.
Handbrake Handbrake is still on.
Ignition key
not removed
Replace battery
in ignition keyReplace the remote-control battery.
Ignition lock faulty,
please go to workshopHave the fault remedied at an authorized
Porsche dealer.
Ignition lock faulty,
visit workshop nowHave the fault remedied at an authorized
Porsche dealer.
Relieve steering Relieve the steering l o c k b y m o v i n g t h e s t e e r i n g
wheel to the left or right.
Steering locked The steering wheel lock remains engaged.
Have the fault remedied at an authorized
Porsche dealer.
Lights on
Parking light on
Page 132 of 308
132
Controls, Instruments
Automatic Headlight Beam
Adjustment Vehicles with Bi-Xenon headlights feature
automatic headlight beam adjustment.
When the ignition is switched on, the level of the
headlight beam automatically changes in accord-
ance with the vehicle load.
The level of the headlight beam is automatically
kept constant during acceleration and braking. Checking operation 1. Switch the low beam on.
2. Insert ignition key and switch ignition on.
The light beam first dips all the way down and
is then adapted to the vehicle load.
If this test item is not met, the headlight beam
adjustment system must be checked by an author-
ized Porsche dealer.
Turn Signal / Headlight Dimmer /
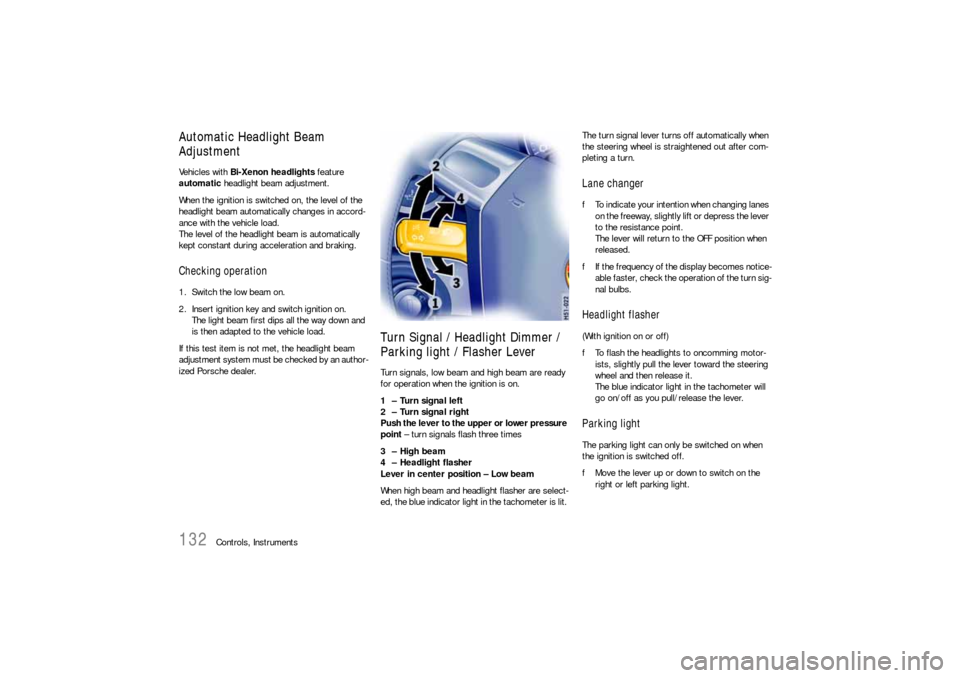
Parking light / Flasher Lever Turn signals, low beam and high beam are ready
for operation when the ignition is on.
1 – Turn signal left
2 – Turn signal right
Push the lever to the upper or lower pressure
point – turn signals flash three times
3 – High beam
4 – Headlight flasher
Lever in center position – Low beam
When high beam and headlight flasher are select-
ed, the blue indicator light in the tachometer is lit. The turn signal lever turns off automatically when
the steering wheel is straightened out after com-
pleting a turn.
Lane changer fTo indicate your intention when changing lanes
on the freeway, slightly lift or depress the lever
to the resistance point.
The lever will return to the OFF position when
released.
fIf the frequency of the display becomes notice-
able faster, check the operation of the turn sig-
nal bulbs. Headlight flasher (With ignition on or off)
fTo flash the headlights to oncomming motor-
ists, slightly pull the lever toward the steering
wheel and then release it.
The blue indicator light in the tachometer will
go on/off as you pull/release the lever. Parking lightThe parking light can only be switched on when
the ignition is switched off.
fMove the lever up or down to switch on the
right or left parking light.
Page 133 of 308
Controls, Instruments
133
Windshield Wiper / Washer Lever
Warning!
Danger of injury when the windshield wipers
operate unintentionally.
Risk of damage to the windshield and wiper
system.
fAvoid running the wiper blades over a dry wind-
shield to prevent scratching the glass. Spray
washer fluid on the windshield first.
A scratched windshield will reduce visibility.
fAlways loosen wiper blades from frozen glass
before operating wipers to prevent damage to
the wiper motor or blades. fAlways switch off windshield wipers in car
wash to prevent them wiping unintentionally
(intermittent or sensor operation).
fAlways switch off windshield wipers before
cleaning the windshield to avoid unintentional
operation (intermittent or sensor operation).
fDo not operate the headlight washer in car
washes.
fDo not operate headlight washer when it is
frozen.
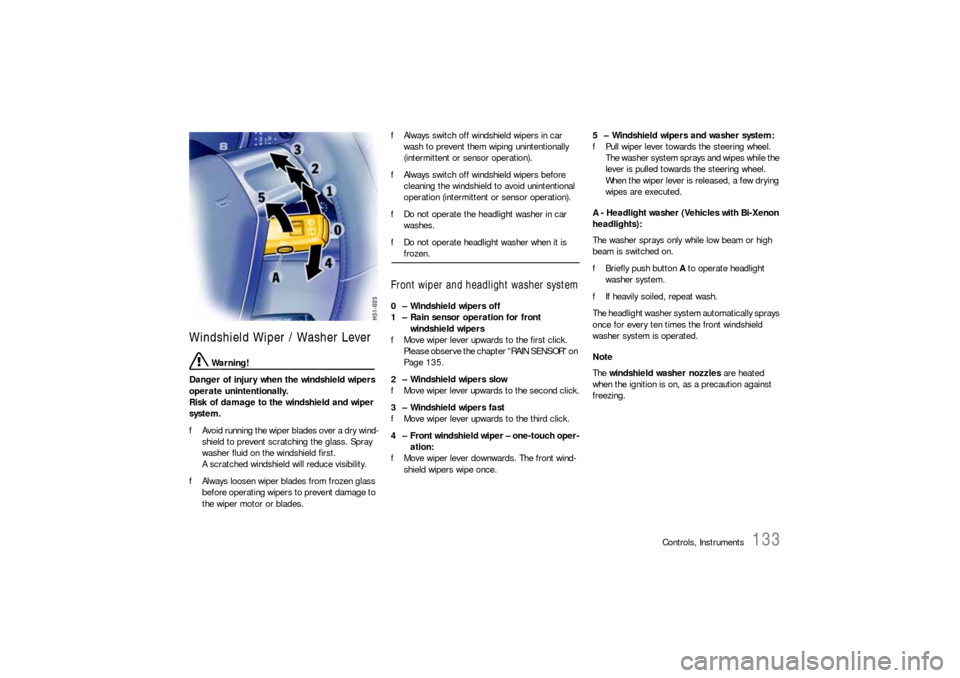
Front wiper and headlight washer system0 – Windshield wipers off
1 – Rain sensor operation for front
windshield wipers
fMove wiper lever upwards to the first click.
Please observe the chapter “RAIN SENSOR” on
Page 135.
2 – Windshield wipers slow
fMove wiper lever upwards to the second click.
3 – Windshield wipers fast
fMove wiper lever upwards to the third click.
4 – Front windshield wiper – one-touch oper-
ation:
fMove wiper lever downwards. The front wind-
shield wipers wipe once.5 – Windshield wipers and washer system:
fPull wiper lever towards the steering wheel.
The washer system sprays and wipes while the
lever is pulled towards the steering wheel.
When the wiper lever is released, a few drying
wipes are executed.
A - Headlight washer (Vehicles with Bi-Xenon
headlights):
The washer sprays only while low beam or high
beam is switched on.
fBriefly push button A to operate headlight
washer system.
fIf heavily soiled, repeat wash.
The headlight washer system automatically sprays
once for every ten times the front windshield
washer system is operated.
Note
The windshield washer nozzles are heated
when the ignition is on, as a precaution against
freezing.
Page 136 of 308
136
Controls, Instruments
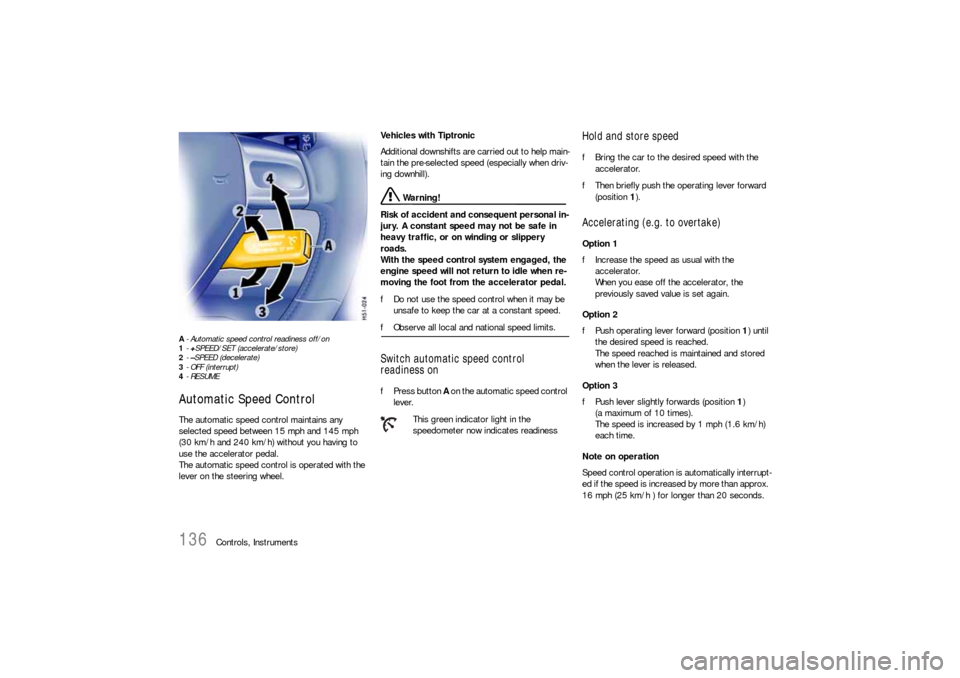
A- Automatic speed control readiness off/on
1-+SPEED/SET (accelerate/store)
2-–SPEED (decelerate)
3- OFF (interrupt)
4-RESUMEAutomatic Speed Control The automatic speed control maintains any
selected speed between 15 mph and 145 mph
(30 km/h and 240 km/h) without you having to
use the accelerator pedal.
The automatic speed control is operated with the
lever on the steering wheel. Vehicles with Tiptronic
Additional downshifts are carried out to help main-
tain the pre-selected speed (especially when driv-
ing downhill).
Warning!
Risk of accident and consequent personal in-
jury. A constant speed may not be safe in
heavy traffic, or on winding or slippery
roads.
With the speed control system engaged, the
engine speed will not return to idle when re-
moving the foot from the accelerator pedal.
fDo not use the speed control when it may be
unsafe to keep the car at a constant speed.
fObserve all local and national speed limits. Switch automatic speed control
readiness onfPress button A on the automatic speed control
lever.
Hold and store speed fBring the car to the desired speed with the
accelerator.
fThen briefly push the operating lever forward
(position 1).Accelerating (e.g. to overtake) Option 1
fIncrease the speed as usual with the
accelerator.
When you ease off the accelerator, the
previously saved value is set again.
Option 2
fPush operating lever forward (position 1) until
the desired speed is reached.
The speed reached is maintained and stored
when the lever is released.
Option 3
fPush lever slightly forwards (position 1)
(a maximum of 10 times).
The speed is increased by 1 mph (1.6 km/h)
each time.
Note on operation
Speed control operation is automatically interrupt-
ed if the speed is increased by more than approx.
16 mph (25 km/h ) for longer than 20 seconds.
This green indicator light in the
speedometer now indicates readiness
Page 137 of 308

Controls, Instruments
137
Decelerating Option 1
fPull operating lever towards the steering wheel
(position 2) until the desired speed is reached.
The speed reached is maintained and stored
when the lever is released.
Option 2
fBriefly move lever towards the steering wheel
(position 2) (a maximum of 10 times).
The speed is reduced by 1 mph (1.6 km/h)
each time.
Vehicles with Tiptronic
Additional downshifts are carried out to improve
deceleration (especially when driving downhill).
Interrupting automatic speed control
operation fPull operating lever downwards briefly
(position 3) or
fOperate brake or clutch pedal or
fSwitch Tiptronic transmission to selector lever
position N.
fPlease observe the chapter “TIPTRONIC S” on
Page 165.
The speed driven before the interruption remains
stored in the memory.
Automatic speed control operation is
interrupted automatically:
– If the set vehicle speed is exceeded by more
than approx. 16 mph (25 km/h) for longer than
20 seconds.
– If the actual vehicle speed falls to approx.
6 mph (10 km/h) below the set vehicle speed
for longer than 5 seconds (upward slopes).
– For PSM control operations.
Resuming the stored speed fBriefly push operating lever upwards
(position4).
The speed control accelerates/decelerates
the vehicle to the stored speed.
The stored speed should only be recalled when
traffic conditions and the road surface so permit.Switching automatic speed control
readiness off fPress button A on the automatic speed control
lever.
The green readiness light in the speedometer
goes off.
When the vehicle is parked and the ignition
switched off, the memory is cleared.
Important note
On upward or downward slopes, the set speed
cannot always be maintained by the automatic
speed control.
To obtain sufficient engine braking or a better en-
gine-speed range, therefore, you have to select a
lower gear.
Page 161 of 308

Controls, Instruments
161
Car Telephone and
Aftermarket Alarms Important legal and safety information
regarding the use of cellular telephones
Some states may prohibit the use of cellular tele-
phones while driving a vehicle. Check the laws and
regulations on the use of cellular telephones in the
areas where you drive.
Danger!
Risk of an accident.
Severe personal injury or death can result in
the event of an accident.
Looking away from the road or turning your
attention away from your driving can cause
an accident and serious or fatal injury.
When using your cellular telephone, you should al-
ways:
fGive full attention to your driving - pull off the
road and park before making or answering a
call if traffic conditions so require; and
fKeep both hands on the steering wheel - use
hands-free operation (if available) - pull off the
road and park before using a hand-held tele-phone. It is essential to observe the instructions of
the telephone manufacturer before putting
the telephone into operation.
Any portable telephone or radio transmitter which
is used in a Porsche must be properly installed in
accordance with the technical requirements of
Porsche.
The transmission power must not exceed
10 W.
The devices must possess a type approval for
your vehicle and have an “e” symbol.
If you should require equipment with transmission
power values greater than 10 W, please consult
your authorized Porsche dealer for this purpose.
He is familiar with the technical requirements for
installing devices of this kind.
The antennas for all radios and telephones with a
transmitting antenna must be externally mounted.
The improper installation of radios or telephones
or use of a radio or telephone with a transmitting
antenna inside the car may cause the warning
lights to come on.
Improper installation of such equipment can cre-
ate a discharged battery or excessive current
draw from added equipment.If aftermarket systems are installed by non-dealer-
ship technicians or outside the selling dealer,
problems may result. Installation of aftermarket
equipment is not covered under the New Car War-
ranty.
fConsult your authorized Porsche dealer about
the installation of non Porsche approved equip-
ment.
Reception quality
The reception quality of your car telephone will
change constantly when you are driving. Interfer-
ence caused by buildings, landscape and weather
is unavoidable. It may become particularly difficult
to hear when using the hands-free function due to
external noise such as engine and wind noise.
Automatic car-wash
fUnscrew external antennas before using an au-
tomatic car-wash.
Page 165 of 308
Shifting Gears
165
Tiptronic SThe Porsche Tiptronic is a five-speed transmission
with an “automatic” and a “manual” selection
mode.
In automatic selection mode (selector lever po-
sition D), gear changing is automatic.
You can change temporarily from automatic to
manual mode using the rocker switches on the
steering wheel.
In manual selection mode (selector lever posi-
tion M), you change gear using the rocker switch-
es on the steering wheel.
You can change between selector lever position D
and M as you wish while driving.
Note
Take care not to operate the rocker switches on
the steering wheel inadvertently in either automat-
ic or manual mode, thereby triggering undesired
gear changes.Keylock positionThe ignition key can be withdrawn only in selec-
tor lever position P.
Changing the selector lever positionThe selector lever is locked with the ignition key
withdrawn.
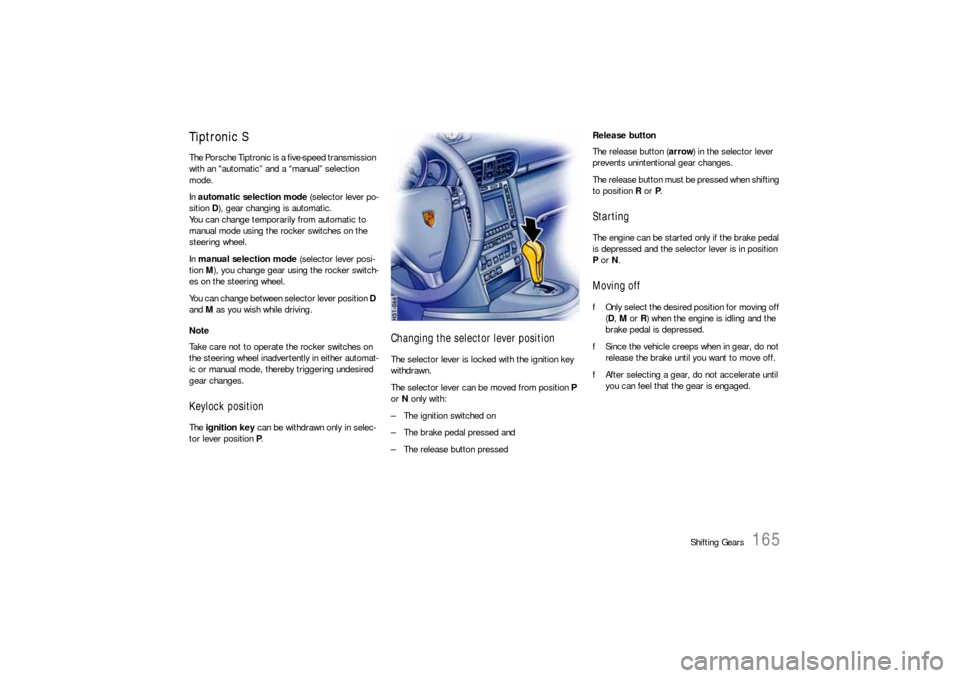
The selector lever can be moved from position P
or N only with:
– The ignition switched on
– The brake pedal pressed and
– The release button pressedRelease button
The release button (arrow) in the selector lever
prevents unintentional gear changes.
The release button must be pressed when shifting
to position R or P.
StartingThe engine can be started only if the brake pedal
is depressed and the selector lever is in position
P or N.Moving offfOnly select the desired position for moving off
(D, M or R) when the engine is idling and the
brake pedal is depressed.
fSince the vehicle creeps when in gear, do not
release the brake until you want to move off.
fAfter selecting a gear, do not accelerate until
you can feel that the gear is engaged.
Page 168 of 308
168
Shifting Gears Shifting gears on the steering wheel
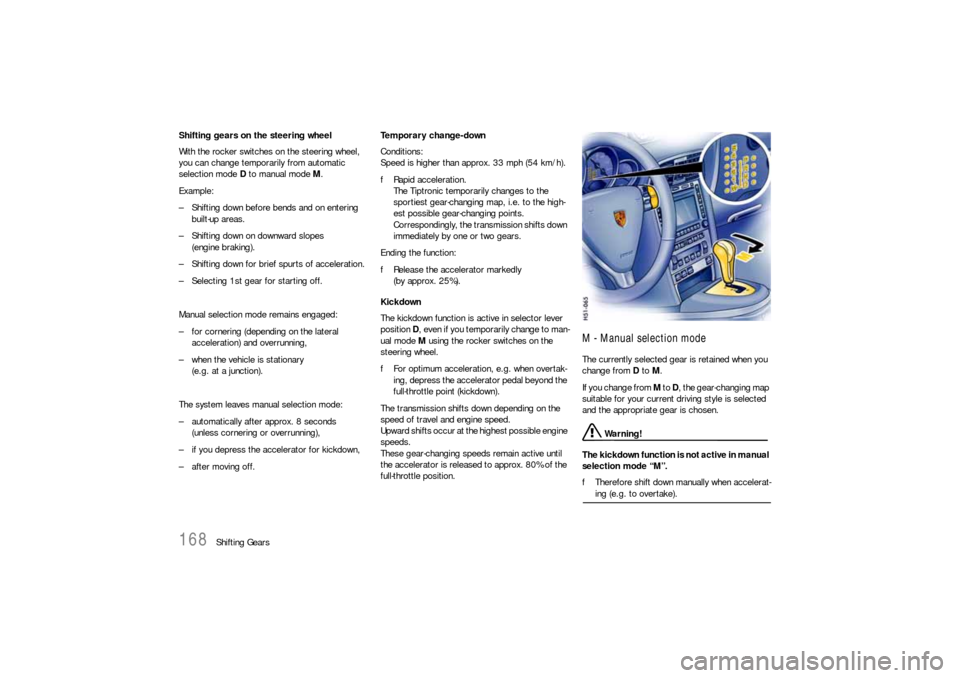
With the rocker switches on the steering wheel,
you can change temporarily from automatic
selection mode D to manual mode M.
Example:
– Shifting down before bends and on entering
built-up areas.
– Shifting down on downward slopes
(engine braking).
– Shifting down for brief spurts of acceleration.
– Selecting 1st gear for starting off.
Manual selection mode remains engaged:
– for cornering (depending on the lateral
acceleration) and overrunning,
– when the vehicle is stationary
(e.g. at a junction).
The system leaves manual selection mode:
– automatically after approx. 8 seconds
(unless cornering or overrunning),
– if you depress the accelerator for kickdown,
– after moving off.Temporary change-down
Conditions:
Speed is higher than approx. 33 mph (54 km/h).
fRapid acceleration.
The Tiptronic temporarily changes to the
sportiest gear-changing map, i.e. to the high-
est possible gear-changing points.
Correspondingly, the transmission shifts down
immediately by one or two gears.
Ending the function:
fRelease the accelerator markedly
(by approx. 25%).
Kickdown
The kickdown function is active in selector lever
position D, even if you temporarily change to man-
ual mode M using the rocker switches on the
steering wheel.
fFor optimum acceleration, e.g. when overtak-
ing, depress the accelerator pedal beyond the
full-throttle point (kickdown).
The transmission shifts down depending on the
speed of travel and engine speed.
Upward shifts occur at the highest possible engine
speeds.
These gear-changing speeds remain active until
the accelerator is released to approx. 80% of the
full-throttle position.
M - Manual selection modeThe currently selected gear is retained when you
change from D to M.
If you change from M to D, the gear-changing map
suitable for your current driving style is selected
and the appropriate gear is chosen.
Warning!
The kickdown function is not active in manual
selection mode “M”.
fTherefore shift down manually when accelerat-ing (e.g. to overtake).