tow PORSCHE 911 GT3 2004 5.G User Guide
[x] Cancel search | Manufacturer: PORSCHE, Model Year: 2004, Model line: 911 GT3, Model: PORSCHE 911 GT3 2004 5.GPages: 195, PDF Size: 16.94 MB
Page 52 of 195
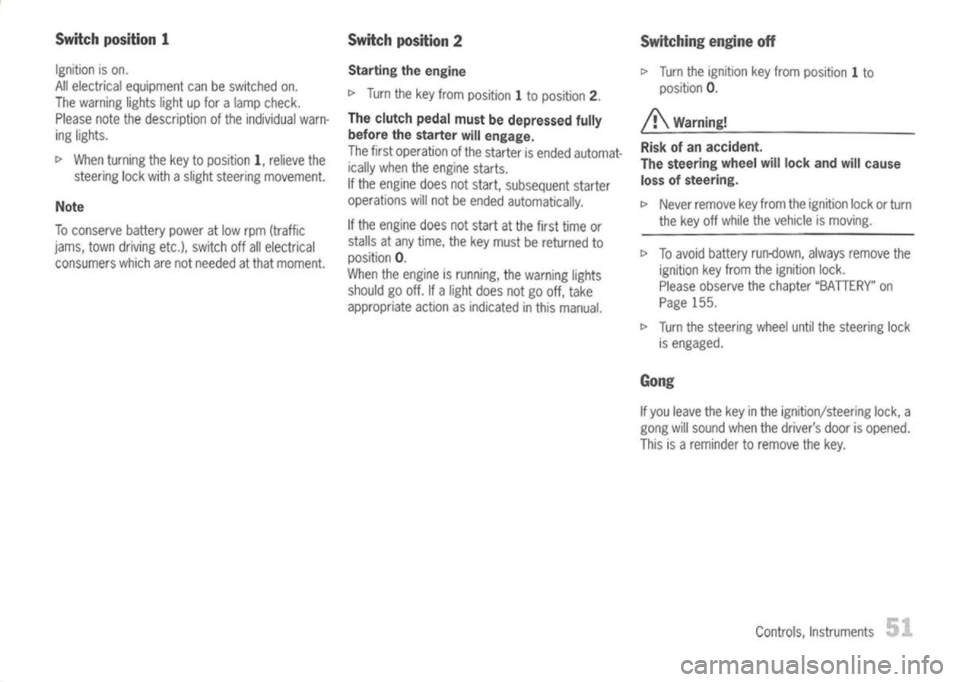
Switchposition 1
Ignition ison.
All electrical equipment canbeswitched on.
The warning lightslightupfor alamp check.
Please notethedescription ofthe individual warn-
ing lights.
I>
When turning thekey toposition 1,relieve the
steering lockwith aslight steering movement.
Note
To conserve batterypoweratlow rpm (traffic
jams, towndriving etc.),switch offallelectrical
consumers whicharenotneeded atthat moment.
Switch
position 2
Starting theengine
I>
Turn thekey from position 1to position 2.
The clutch pedalmustbedepressed fully
before thestarter willengage.
The first operation ofthe starter isended automat-
ically when theengine starts.
If the engine doesnotstart, subsequent starter
operations willnotbeended automatically.
If the engine doesnotstart atthe first time or
stalls atany time, thekey must bereturned to
position O.
When theengine isrunning, thewarning lights
should gooff. Ifa light does notgooff, take
appropriate actionasindicated inthis manual.
Switching
engineoff
I>
Turn theignition keyfrom position 1to
position O.
/!\
Warning!
Risk ofan accident.
The steering wheel
willlock
andwillcause
loss ofsteering.
I>
Never remove keyfrom theignition lockorturn
the key offwhile thevehicle ismoving.
I>
Toavoid battery run-down, alwaysremove the
ignition keyfrom theignition lock.
Please observe thechapter "SATTERY" on
Page 155.
I>
Turn thesteering wheeluntilthesteering lock
is engaged.
Gong
If you leave thekey inthe ignition/steering lock,a
gong willsound whenthedriver's doorisopened.
This isareminder toremove thekey.
Controls, Instruments
51
Page 53 of 195
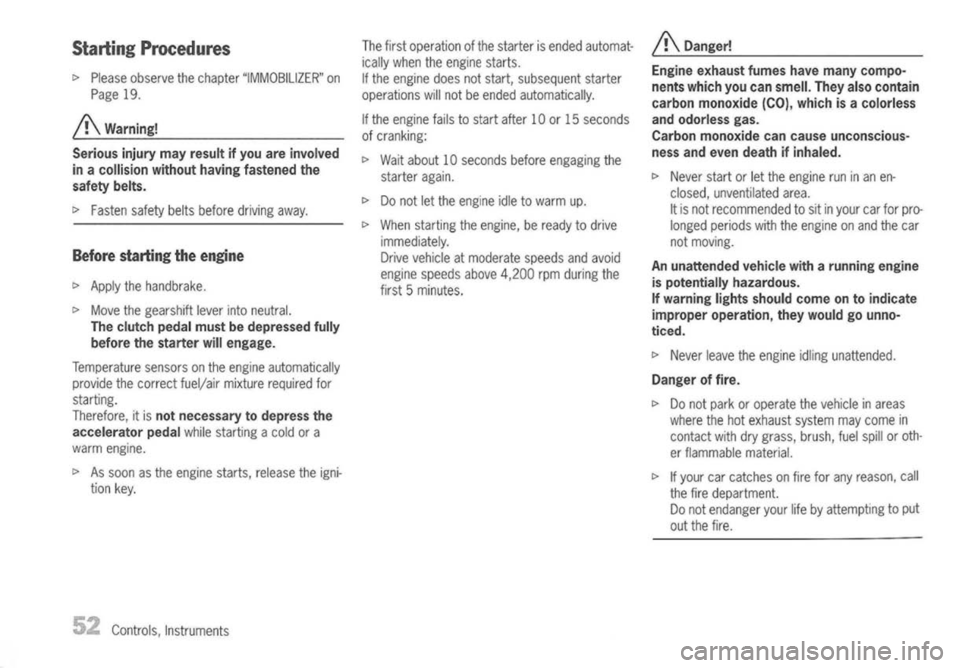
StartingProcedures
c>
Please observe thechapter "IMMOBILIZER" on
Page 19.
A
Warning!
Serious injurymayresult ifyou areinvolved
in acollision withouthavingfastened the
safety belts.
c>
Fasten safetybeltsbefore driving away.
Before starting theengine
c>
Apply thehandbrake.
c>
Move thegearshift leverintoneutral.
The clutch pedalmustbedepressed fully
before thestarter willengage.
Temperature sensorsonthe engine automatically
provide thecorrect fuel/air mixture required for
starting.
Therefore, itis
not necessary todepress the
accelerator pedal
whilestarting acold ora
warm engine.
c>
Assoon asthe engine starts,release theigni-
tion key.
52
Controls, Instruments The
first operation ofthe starter isended automat-
ically when theengine starts.
If the engine doesnotstart, subsequent starter
operations willnotbeended automatically.
If the engine failstostart after 10or15 seconds
of cranking:
c>
Wait about 10seconds beforeengaging the
starter again.
c>
Donot letthe engine idletowarm up.
c>
When starting theengine, beready todrive
immediately.
Drive vehicle atmoderate speedsandavoid
engine speeds above4,200 rpmduring the
first 5minutes.
A
Danger!
Engine exhaust fumeshavemany compo-
nents which youcan smell. Theyalsocontain
carbon monoxide (CO),which isacolorless
and odorless gas.
Carbon monoxide cancause unconscious-
ness andeven death ifinhaled.
c>
Never startorlet the engine runinan en-
closed, unventilated area.
It is not recommended tosit inyour carforpro-
longed periods withtheengine onand thecar
not moving.
An unattended vehiclewitharunning engine
is potentially hazardous.
If warning lightsshould comeontoindicate
improper operation, theywould gounno-
ticed.
c>
Never leavetheengine idlingunattended.
Danger offire.
c>
Donot park oroperate thevehicle inareas
where thehotexhaust systemmaycome in
contact withdrygrass, brush,fuelspill oroth-
er flammable material.
c>
Ifyour carcatches onfire forany reason, call
the fire department.
Do not endanger yourlifebyattempting toput
out the fire.
Page 55 of 195
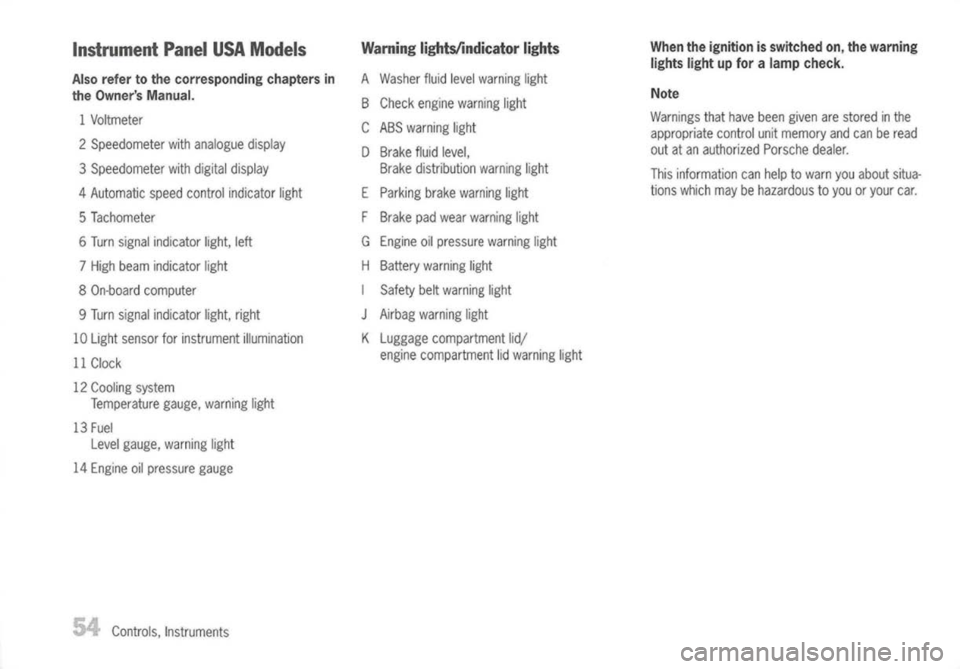
Instrument PanelUSAModels
Also refer tothe corresponding chaptersin
the Owner's Manual.
1 Voltmeter
2 Speedometer withanalogue display
3 Speedometer withdigital display
4 Automatic speedcontrol indicator light
5 Tachometer
6 Turn signal indicator light,left
7 High beam indicator light
8 On-board computer
9 Turn signal indicator light,right
10 Light sensor forinstrument illumination
11 Clock
12 Cooling system
Temperature gauge,warning light
13 Fuel
Level gauge, warning light
14 Engine oilpressure gauge
Controls, Instruments
Warning
lightslindicator lights
A Washer fluidlevel warning light
B Check engine warning light
CABS warning light
D Brake fluidlevel,
Brake distribution warninglight
E Parking brakewarning light
F Brake padwear warning light
G Engine oilpressure warninglight
H Battery warning light
I Safety beltwarning light
J
Airbag warning light
K Luggage compartment lid/
engine compartment lidwarning light
When
theignition isswitched on,the warning
lights lightupfor alamp check.
Note
Warnings thathave been given arestored inthe
appropriate controlunitmemory andcanberead
out atan authorized Porschedealer.
This information canhelp towarn youabout situa-
tions which maybehazardous toyou oryour car.
Page 57 of 195
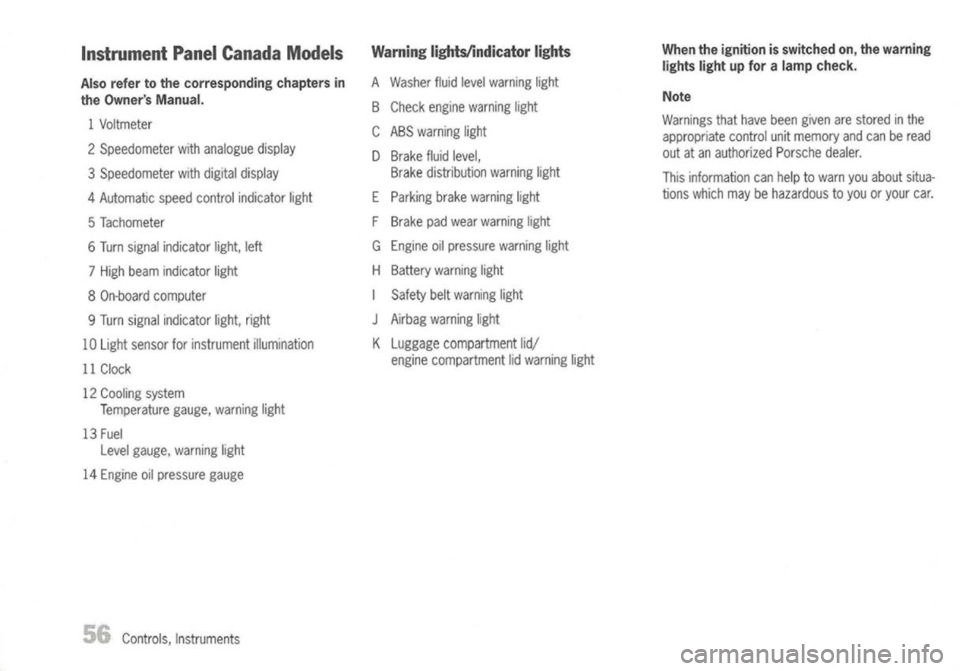
Instrument PanelCanada Models
Also refer tothe corresponding chaptersin
the Owner's Manual.
1 Voltmeter
2 Speedometer withanalogue display
3 Speedometer withdigital display
4 Automatic speedcontrol indicator light
5 Tachometer
6 Turn signal indicator light,left
7 High beam indicator light
8 On-board computer
9 Turn signal indicator light,right
10 Light sensor forinstrument illumination
11 Clock
12 Cooling system
Temperature gauge,warning light
13 Fuel
Level gauge, warning light
14 Engine oilpressure gauge
Controls, Instruments
Warning
Iights/indicator lights
A Washer fluidlevel warning light
B Check engine warning light
CABS warning light
o
Brake fluidlevel,
Brake distribution warninglight
E Parking brakewarning light
F Brake padwear warning light
G Engine oilpressure warninglight
H Battery warning light
I Safety beltwarning light
J
Airbag warning light
K Luggage compartment lid/
engine compartment lidwarning light
When
theignition isswitched on,the warning
lights lightupfor alamp check.
Note
Warnings thathave been given arestored inthe
appropriate controlunitmemory andcanberead
out atan authorized Porschedealer.
This information canhelp towarn youabout situa-
tions which maybehazardous toyou oryour car.
Page 67 of 195
CheckEngine
Warning Light
The warning lightinthe instrument panelcomes
on when theignition isfirst turned onand remains
on briefly asabulb check. Ifthe light does not
come on,have thebulb replaced promptly.
If the warning lightsinthe instrument panelandon-
board computer comeonand remain onwhile
driving, itsuggests:
- apotential enginecontrol problem andthe
need forsystem serviceor
- animproperly fastenedtankcapor
- refuelling withengine running.
Although thevehicle isusually driveable andwill
not require towing, seeyour dealer forservice as
soon aspossible.
Controls, Instruments
A
Caution!
If the Check engine lightinthe instrument
panel isflashing, severecatalytic converter
damage andpower losswillsoon occur.
Prolonged drivingwiththeCheck engine
light oncould cause damage tothe emission
control system. Italso could affect fuelecon-
omy anddriveability.
I>
Have thefault remedied atthe nearest autho-
rized Porsche dealerimmediately.
Page 84 of 195
TurnSignal /
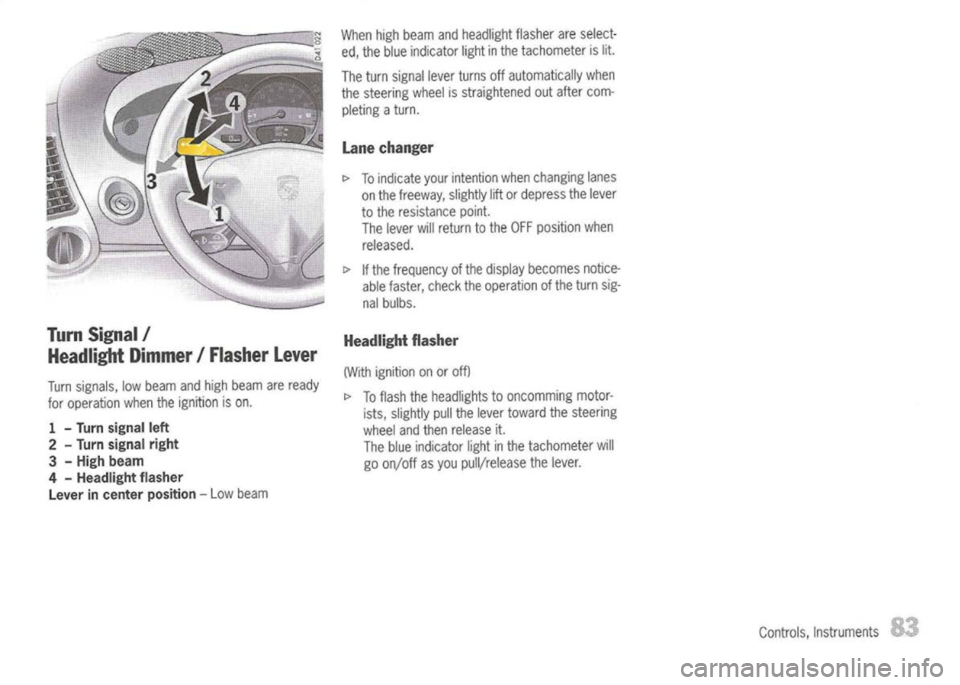
Headlight Dimmer/Flasher Lever
Turn signals, lowbeam andhigh beam areready
for operation whentheignition ison.
1 -
Turn
signal left
2 -
Turn signal right
3 -
High beam
4 -
Headlight flasher
Lever incenter position -
Low beam When
highbeam andheadlight flasherareselect-
ed, the blue indicator lightinthe tachometer islit.
The turn signal leverturns offautomatically when
the steering wheelisstraightened outafter com-
pleting aturn.
Lane changer
[>
Toindicate yourintention whenchanging lanes
on the freeway, slightlyliftordepress thelever
to the resistance point.
The lever willreturn tothe OFF position when
released.
[>
Ifthe frequency ofthe display becomes notice-
able faster, checktheoperation ofthe turn sig-
nal bulbs.
Headlight flasher
(With ignition onoroff)
[>
Toflash theheadlights tooncomming motor-
ists, slightly pullthelever toward thesteering
wheel andthen release it.
The blue indicator lightinthe tachometer will
go on/off asyou pull/release thelever.
Controls,Instruments
Page 85 of 195
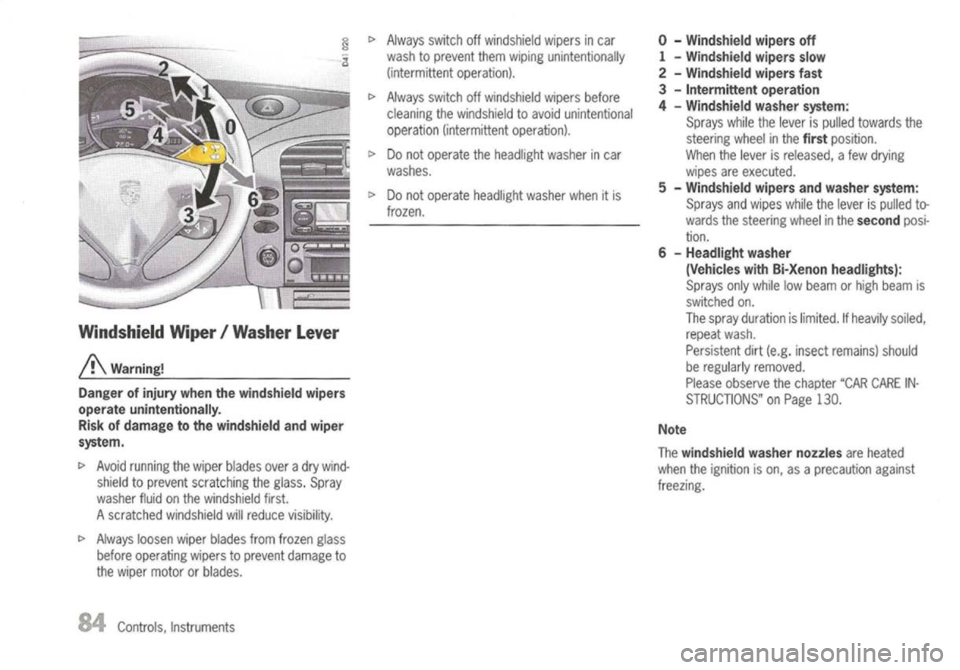
Windshield Wiper/Washer Lever
A
Warning!
Danger ofinjury whenthewindshield wipers
operate unintentionally.
Risk ofdamage tothe windshield andwiper
system.
I>
Avoid running thewiper blades overadry wind-
shield toprevent scratching theglass. Spray
washer fluidonthe windshield first.
A scratched windshield willreduce visibility.
I>
Always loosenwiperblades fromfrozen glass
before operating wiperstoprevent damage to
the wiper motor orblades.
84
Controls. Instruments
I>
Always switchoffwindshield wipersincar
wash toprevent themwiping unintentionally
(intermittent operation).
I>
Always switchoffwindshield wipersbefore
cleaning thewindshield toavoid unintentional
operation (intermittent operation).
I>
Donot operate theheadlight washerincar
washes.
I>
Donot operate headlight washerwhenitis
frozen.
o
-
Windshield wipersoff
1 -
Windshield wipersslow
2 -
Windshield wipersfast
3 -
Intermittent operation
4 -
Windshield washersystem:
Sprays whilethelever ispulled towards the
steering wheelinthe
first
position.
When thelever isreleased. afew drying
wipes areexecuted.
5 -
Windshield wipersandwasher system:
Sprays andwipes whilethelever ispulled to-
wards thesteering wheelinthe
second
posi-
tion.
G -
Headlight washer
(Vehicles withBi-Xenon headlights):
Sprays onlywhile lowbeam orhigh beam is
switched on.
The spray duration islimited. IfIleavily soiled.
repeat wash.
Persistent dirt(e.g. insect remains) should
be regularly removed.
Please observe thechapter "CARCARE IN-
STRUCTIONS" onPage 130.
Note
The
windshield washernozzles
areheated
when theignition ison. asaprecaution against
freezi ng.
Page 88 of 195
Decelerating
c>
Press operating leverdown 2until thedesired
speed isreached.
The speed reached ismaintained andstored
when thelever isreleased.
Speed canbecorrected insteps of2km/h (ap-
prox. 1mph) by
briefly
pushing thelever forward
or down (upto10 times).
Interrupting automaticspeedcontrol
operation
c>
Pull operating leverbriefly towards thesteer-
ing wheel
3
or:
c>
Operate brakeorclutch pedal.
The speed driven before theinterruption
remains storedinthe memory.
Automatic speedcontrol operation is
interrupted automatically:
- Ifthe setspeed isexceeded bymore than
16 mph (25kmjhl forlonger than20seconds,
- ifthe actual speedfallsto6mph (10kmjhl be-
low the setvehicle speedforlonger than5sec-
onds (upward slopes).
Resuming
thestored speed
c>
Press operating leverbriefly down2.
The stored speedshould onlybecalled upwhen
traffic conditions andtheroad surface sopermit.
Switching automatic speedcontrol
readiness off
c>
Press button Aon the automatic speedcontrol
lever.
The green readiness lightinthe speedometer
goes off.
When thevehicle isparked andtheignition
switched off,thememory iscleared.
Important
note
On upward ordownward slopes,thesetspeed
cannot alwaysbemaintained bythe automatic
speed control.
To obtain sufficient enginebraking orabetter en-
gine-speed range,therefore, youhave toselect a
lower gear.
Controls,Instruments
Page 89 of 195
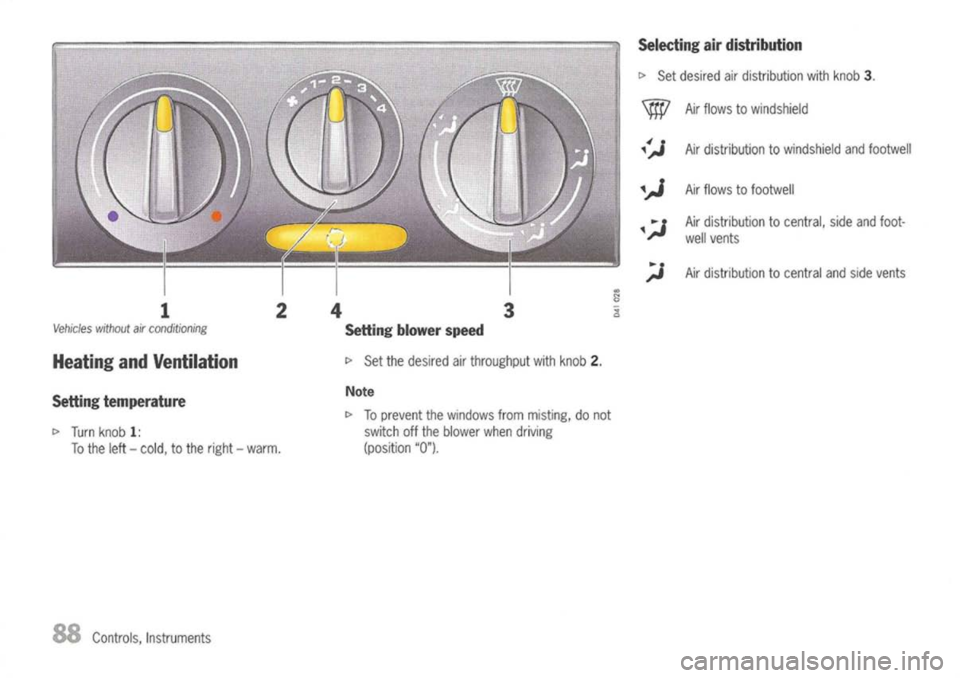
Selectingairdistribution
c>
Set desired airdistribution withknob
3.
Air flows tofootwell
Air distribution tocentral, sideandfoot-
well vents
Air
distribution towindshield andfootwell
Air distribution tocentral andside vents
Air
flows towindshield
;.;
Vehicfes withoutairconditioning
Settingblowerspeed
Heating andVentilation
c>
Set thedesired airthroughput withknob
2.
Setting temperature
c>
Turn knob
1:
To the left-cold, tothe right -warm.
Note
c>
Toprevent thewindows frommisting, donot
switch offthe blower whendriving
(position "0").
88
Controls, Instruments
Page 90 of 195
Example ofsetting:
Defrosting windshield anddoor windows
t>
Set blower stage4
t>
Turn temperature knobtothe right asfar as
the stop
t>
Air distribution towindshield only
t>
Close central vent
t>
Open sidevents anddirect vanes atthe door
windows
Switching
circulating-air settingonoroff
t>
Press circulating-air button
4.
The outside-air supplyisinterrupted andonly the
inside airiscirculated.
j!\warning! Risk ofaccident duetohampered vision.
In circulating-air setting,thewindows can
mist up.
I>
Only select circulating-air settingforshort
periods.
I>
Ifwindows mistup,end circulating-air setting
by pressing thecirculating-air buttonagain,
direct airdistribution tothe windshield andse-
lect blower stage4.
Controls,Instruments
89