clock PORSCHE 911 GT3 2004 5.G Owners Manual
[x] Cancel search | Manufacturer: PORSCHE, Model Year: 2004, Model line: 911 GT3, Model: PORSCHE 911 GT3 2004 5.GPages: 195, PDF Size: 16.94 MB
Page 55 of 195
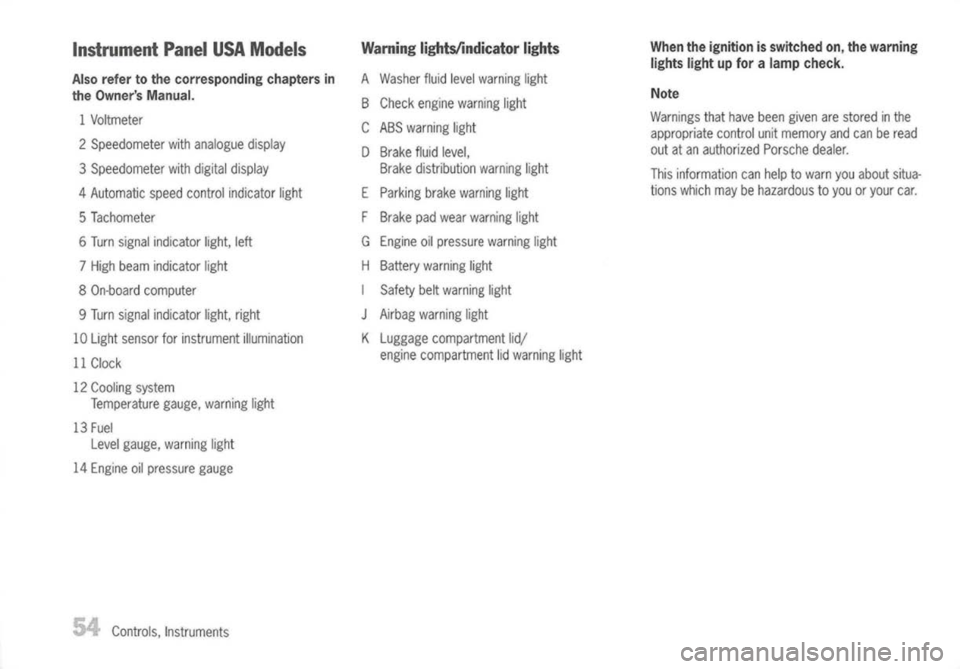
Instrument PanelUSAModels
Also refer tothe corresponding chaptersin
the Owner's Manual.
1 Voltmeter
2 Speedometer withanalogue display
3 Speedometer withdigital display
4 Automatic speedcontrol indicator light
5 Tachometer
6 Turn signal indicator light,left
7 High beam indicator light
8 On-board computer
9 Turn signal indicator light,right
10 Light sensor forinstrument illumination
11 Clock
12 Cooling system
Temperature gauge,warning light
13 Fuel
Level gauge, warning light
14 Engine oilpressure gauge
Controls, Instruments
Warning
lightslindicator lights
A Washer fluidlevel warning light
B Check engine warning light
CABS warning light
D Brake fluidlevel,
Brake distribution warninglight
E Parking brakewarning light
F Brake padwear warning light
G Engine oilpressure warninglight
H Battery warning light
I Safety beltwarning light
J
Airbag warning light
K Luggage compartment lid/
engine compartment lidwarning light
When
theignition isswitched on,the warning
lights lightupfor alamp check.
Note
Warnings thathave been given arestored inthe
appropriate controlunitmemory andcanberead
out atan authorized Porschedealer.
This information canhelp towarn youabout situa-
tions which maybehazardous toyou oryour car.
Page 57 of 195
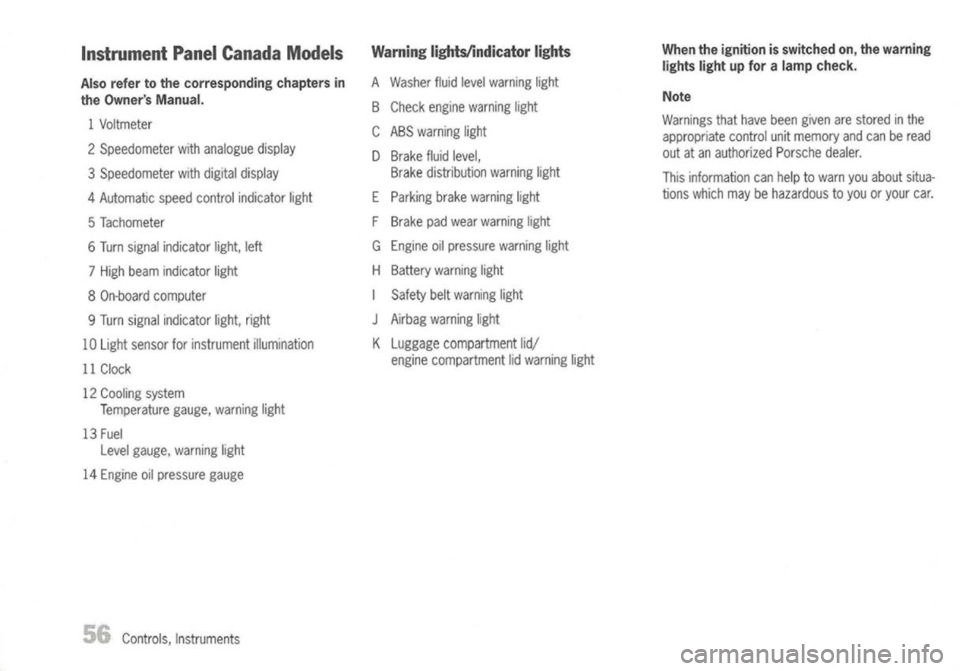
Instrument PanelCanada Models
Also refer tothe corresponding chaptersin
the Owner's Manual.
1 Voltmeter
2 Speedometer withanalogue display
3 Speedometer withdigital display
4 Automatic speedcontrol indicator light
5 Tachometer
6 Turn signal indicator light,left
7 High beam indicator light
8 On-board computer
9 Turn signal indicator light,right
10 Light sensor forinstrument illumination
11 Clock
12 Cooling system
Temperature gauge,warning light
13 Fuel
Level gauge, warning light
14 Engine oilpressure gauge
Controls, Instruments
Warning
Iights/indicator lights
A Washer fluidlevel warning light
B Check engine warning light
CABS warning light
o
Brake fluidlevel,
Brake distribution warninglight
E Parking brakewarning light
F Brake padwear warning light
G Engine oilpressure warninglight
H Battery warning light
I Safety beltwarning light
J
Airbag warning light
K Luggage compartment lid/
engine compartment lidwarning light
When
theignition isswitched on,the warning
lights lightupfor alamp check.
Note
Warnings thathave been given arestored inthe
appropriate controlunitmemory andcanberead
out atan authorized Porschedealer.
This information canhelp towarn youabout situa-
tions which maybehazardous toyou oryour car.
Page 65 of 195
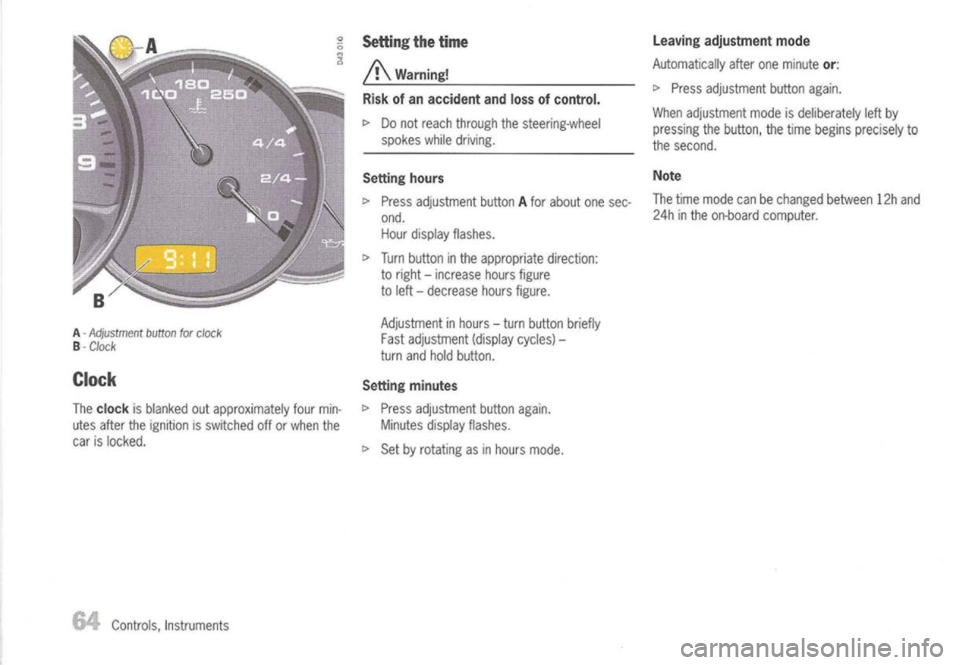
A-
Adjustment buttonforclock
B -
Clock
Clock
The
clock
isblanked outapproximately fourmin-
utes after theignition isswitched offorwhen the
car islocked.
Controls, Instruments
Setting
thetime
/!\
Warning!
Risk ofan accident andlossofcontrol.
c>
Donot reach through thesteering-wheel
spokes whiledriving.
Setting hours
c>
Press adjustment buttonAfor about onesec-
ond. Hour display flashes.
c>
Turn button inthe appropriate direction:
to right -increase hoursfigure
to left -decrease hoursfigure.
Adjustment inhours -turn button briefly
Fast adjustment (displaycycles)-
turn andhold button.
Setting minutes
c>
Press adjustment buttonagain.
Minutes displayflashes.
c>
Set byrotating asinhours mode.
Leaving
adjustment mode
Automatically afteroneminute
or:
c>
Press adjustment buttonagain.
When adjustment modeisdeliberately leftby
pressing thebutton, thetime begins precisely to
the second.
Note
The time mode canbechanged between12hand
24h inthe on-board computer.
Page 86 of 195
\\=I
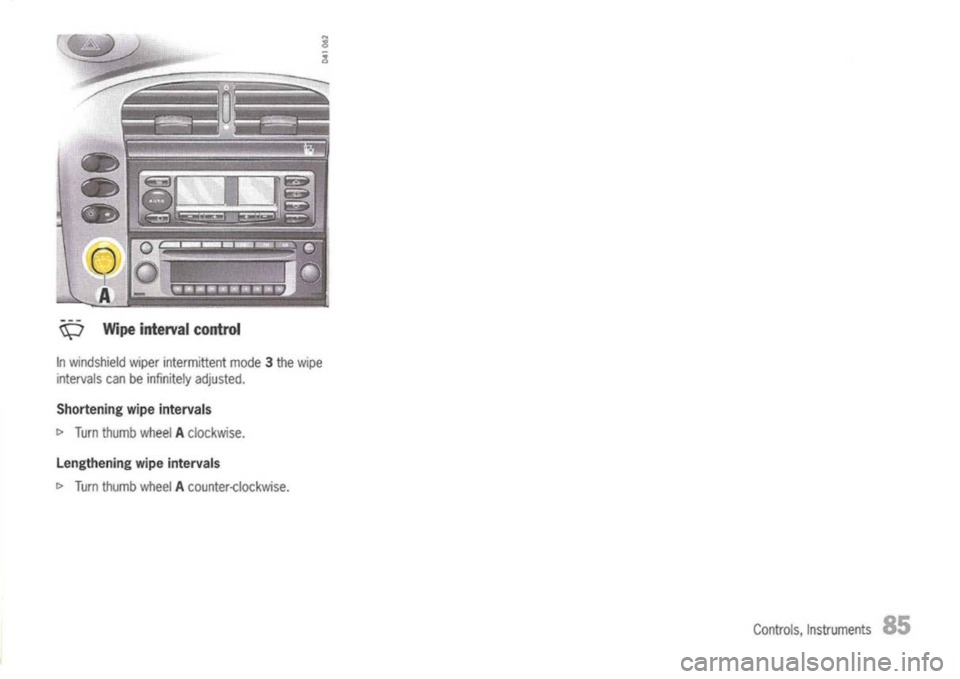
Wipeinterval control
In windshield wiperintermittent mode3the wipe
intervals canbeinfinitely adjusted.
Shortening wipeintervals
c>
Turn thumb wheelAclockwise.
Lengthening wipeintervals
c>
Turn thumb wheelAcounter-clockwise.
Controls,Instruments
85
Page 167 of 195
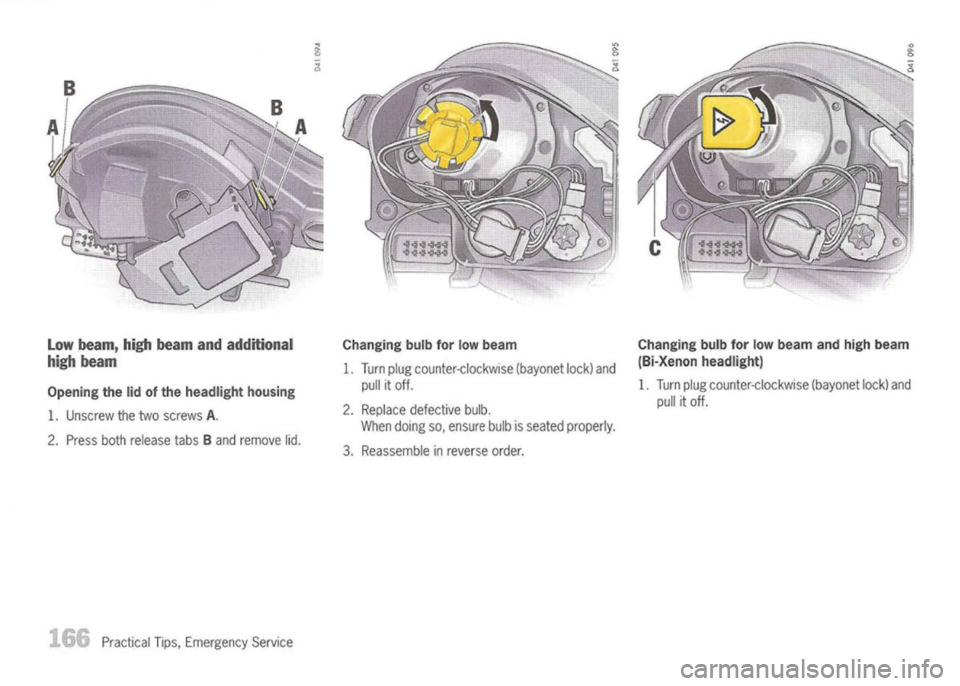
Lowbeam, highbeam andadditional
high beam
Opening thelidofthe headlight housing
1. Unscrew thetwo screws
A.
2. Press bothrelease tabsBand remove lid.
Practical Tips,Emergency Service
Changing
bulbforlow beam
1. Turn plugcounter-clockwise (bayonetlock)and
pull itoff.
2. Replace defective bulb.
When doing so,ensure bulbisseated properly.
3. Reassemble inreverse order.
Changing
bulbforlow beam andhigh beam
(Bi-Xenon headlight)
1. Turn plugcounter-clockwise (bayonetlock)and
pull itoff.
Page 168 of 195
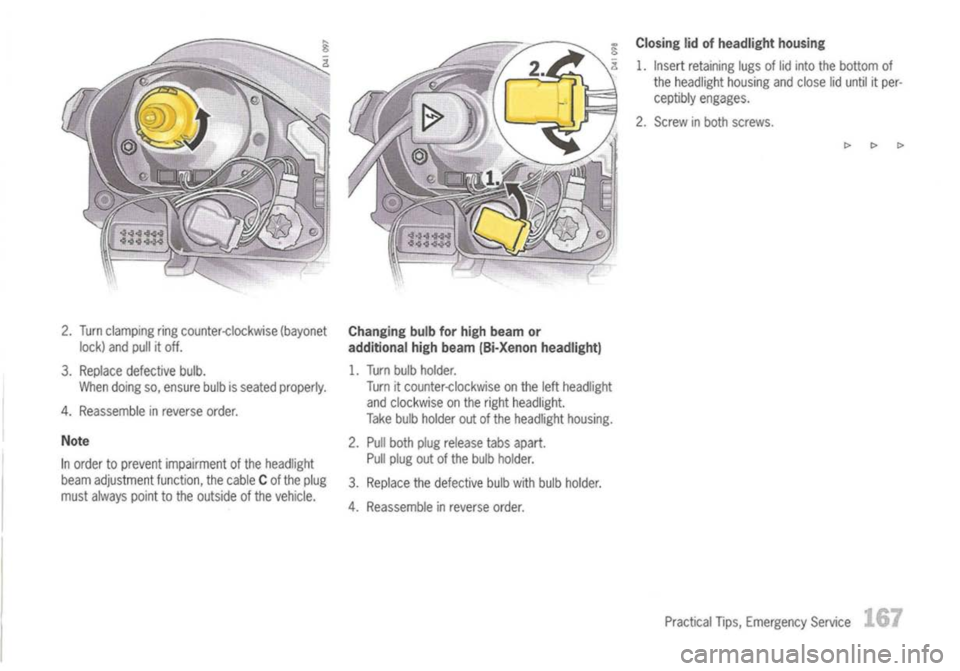
2.Turn clamping ringcounter-clockwise (bayonet
lock) andpullitoff.
3. Replace defective bulb.
When doing so,ensure bulbisseated properly.
4. Reassemble inreverse order.
Note
In order toprevent impairment ofthe headlight
beam adjustment function,thecable Cof the plug
must always pointtothe outside ofthe vehicle.
Changing
bulbforhigh beam or
additional highbeam (Bi-Xenon headlight)
1. Turn bulbholder.
Turn itcounter-clockwise onthe leftheadlight
and clockwise onthe right headlight.
Take bulbholder outofthe headlight housing.
2. Pull both plugrelease tabsapart.
Pull plug outofthe bulb holder.
3. Replace thedefective bulbwith bulb holder.
4. Reassemble inreverse order.
Closing
lidofheadlight housing
1. Insert retaining lugsoflid into thebottom of
the headlight housingandclose liduntil itper-
ceptibly engages.
2. Screw inboth screws.
[>[>[>
Practical Tips,Emergency Service
.1.67
Page 169 of 195
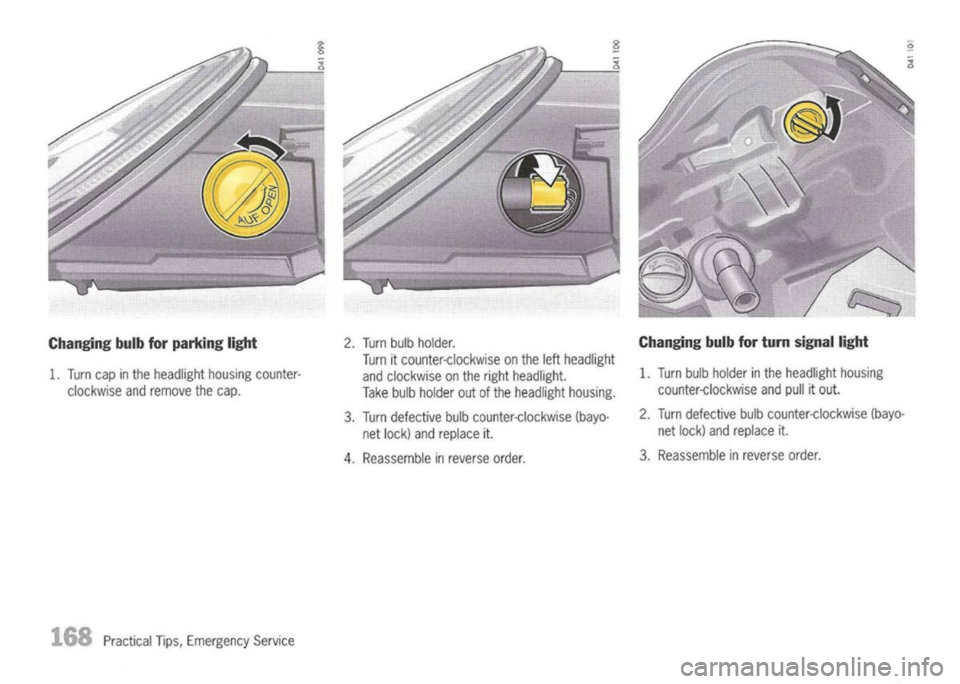
Changing bulbforparking light
1. Turn capinthe headlight housingcounter-
clockwise andremove thecap.
168
PracticalTips,Emergency Service 2
. Turn bulbholder.
Turn itcounter-clockwise onthe leftheadlight
and clockwise onthe right headlight.
Take bulbholder outofthe headlight housing.
3. Turn defective bulbcounter-clockwise (bayo-
net lock) andreplace it.
4. Reassemble inreverse order. Changing
bulbforturn
signal light
1. Turn bulbholder inthe headlight housing
counter-clockwise andpullitout.
2. Turn defective bulbcounter-clockwise (bayo-
net lock) andreplace it.
3. Reassemble inreverse order.
Page 170 of 195
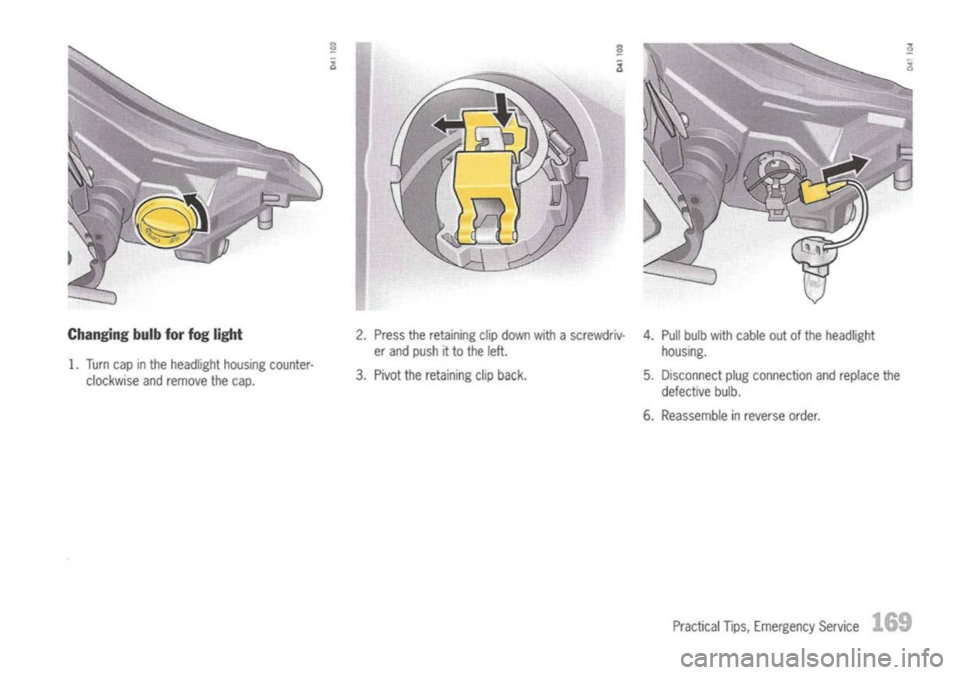
Changingbulbforfog light
1. Turn capinthe headlight housingcounter-
clockwise andremove thecap. 2.
Press theretaining clipdown withascrewdriv-
er and push itto the left.
3. Pivot theretaining clipback. 4.
Pull bulb withcable outofthe headlight
housing.
5. Disconnect plugconnection andreplace the
defective bulb.
6. Reassemble inreverse order.
Practical Tips,Emergency Service
169
Page 172 of 195
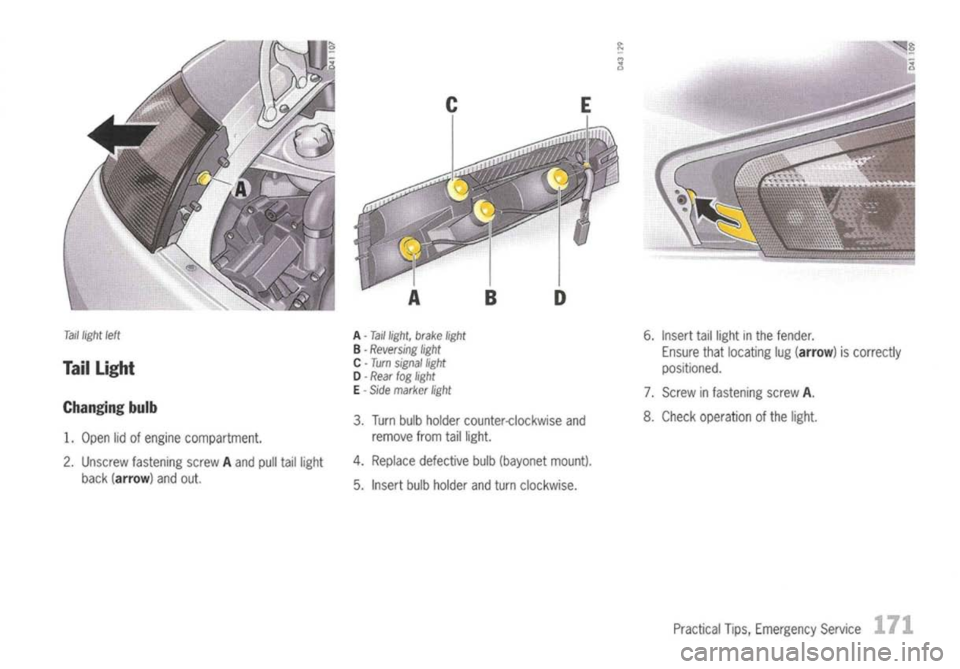
Tail
light
left
Taillight
Changing bulb
1. Open lidofengine compartment.
2. Unscrew fastening screwAand pulltaillight
back (arrow) andout.
A
-Taillight, brakelight
B -
Reversing light
C -Turn signal light
o -Rear
foglight
E -
Side marker light
3. Turn bulbholder counter-clockwise and
remove fromtaillight.
4. Replace defective bulb(bayonet mount).
5. Insert bulbholder andturn clockwise. 6.
Insert taillight inthe fender.
Ensure thatlocating lug(arrow) iscorrectly
positioned.
7. Screw infastening screwA.
8. Check operation ofthe light.
Practical Tips,Emergency Service
171
Page 174 of 195
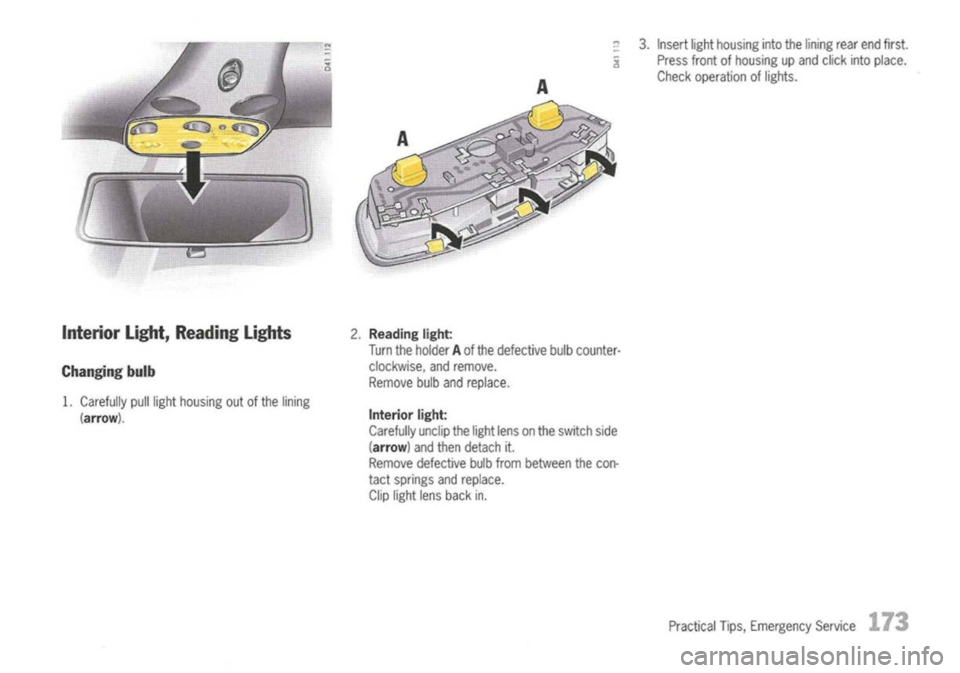
Interior Light,Reading Lights
Changing bulb
1. Carefully pulllight housing outofthe lining
(arrow).
2.
Reading light:
Turn theholder Aof the defective bulbcounter-
clockwise, andremove.
Remove bulbandreplace.
Interior light:
Carefully unclipthelight lensonthe switch side
(arrow)
andthen detach it.
Remove defective bulbfrom between thecon-
tact springs andreplace.
Clip light lensback in. 3.
Insert lighthousing intothelining rearendfirst.
Press frontofhousing upand click intoplace.
Check operation oflights.
Practical Tips,Emergency Service
173