PORSCHE 911 GT3 2010 5.G Owners Manual
Manufacturer: PORSCHE, Model Year: 2010, Model line: 911 GT3, Model: PORSCHE 911 GT3 2010 5.GPages: 251, PDF Size: 14.33 MB
Page 191 of 251

190
Practical Tips, Emergency Service
Parking at the curb
Warning!
Hard impacts against curbs (or traffic
islands) are dangerous and may cause
hidden tire damage which is not noticeable
until later. Such damage can result in
accidents at high speeds causing serious
personal injury or death.
Depending on the force of impact, the edge
of the rim can also be damaged.
fIf you are in doubt, have the wheel checked by
an expert, particularly if you suspect damage
on the inside.
fIf you must drive over a curb or other obstacle,
drive slowly and at an obtuse angle. Exercise care when parking along curbs.
Wheel alignment, wheel balancing As a precaution, have wheels with summer tires
balanced in the spring, and those with mud and
snow tires before winter.
Unbalanced wheels may affect car handling and
tire life.
Only the specified weights may be used for wheel
balancing.
Self-adhesive weights must not come into contact
with cleaning agents, since they could drop off.
Uneven tread wear indicates wheel imbalance. In
this event, the vehicle should be checked at an
authorized Porsche dealer.
Warning!
If, during a trip, uneven running or vibrations
occur that could be caused by damage to
tires or the car, the speed must be reduced
immediately, but without braking sharply.
If you continue your trip without having the
cause of the fault remedied, you might lose
control of your vehicle which could cause
serious personal injury or death.
fStop the vehicle and check the tires.
fIf no cause for the fault can be found, drive
carefully to the nearest authorized Porsche dealer.
Wheels with Tire Pressure Monitoring
(TPM) sensorsBefore changing wheels, make sure that the
wheels are compatible with your vehicle's TPM.
fCheck this with your authorized Porsche
dealer.
10_GT3_21.book Seite 190 Donnerstag, 4. Juni 2009 12:48 12
Page 192 of 251

Practical Tips, Emergency Service
191
Removing and storing tires fAfter changing, adjust tire pressure and torque
wheel bolts diagonally to 370 ftlb (500 Nm).
Tires must always remain on the same side of
the vehicle.
When wheels are removed, the direction of
rotation and position of each wheel should be
marked.
Example
FR (front right), FL, RR and RL.
Wheels must always be fitted in accordance with
their marking.
The perception that tire durability and perfor-
mance are immune to the effects of storage and
age is unfounded.
Chemical additives, which make the rubber
elastic, lose their effectiveness in the course of
time and the rubber becomes brittle and cracks.
Therefore, the tires should be inspected from
time to time. Note
Under no circumstances should tires older than
6 years be used on your Porsche.
The age of the tire can be obtained from the “DOT”
code number. If, for example, the last four
numbers read 1209, then the tire was produced in
the 12th week of 2009.
fStore tires in a cool and dry place.
Snow tires For a better grip on snow and ice, use radial M+S
tires with studs.
Check with your local Motor Vehicle Bureau for
possible restrictions.
Danger!
Risk of loss of control and damage to the
vehicle as well as serious personal injury or
death.
The standard tires profile and rubber mixture
are optimized for wet and dry driving condi-
tions, and may not prove favorable for snow
conditions.
fTherefore install M+S tires before driving in such conditions. Before mounting snow tires, consult with
your Porsche dealer. He has the technical
information necessary to advise you on
wheel and tire compatibility.
Snow tires should have the same load capacity as
original equipment tires and should be mounted on
all four wheels.
Snow tires with studs should be run at moderate
speeds when new in order to give the studs time
to settle.
Danger!
Tires with badly worn treads and studs are
very dangerous and could cause accidents
resulting in serious personal injuries or
death.
fMake sure they are replaced immediately.
fDo not drive a vehicle equipped with snow tires
at prolonged high speed.
Snow tires do not have the same degree of
traction on dry, wet or snowfree roads as a
normal tire.
Furthermore, snow tires wear rapidly under
these conditions.
Comply with all state and local laws
governing snow tire and tread depth require-
ments.
10_GT3_21.book Seite 191 Donnerstag, 4. Juni 2009 12:48 12
Page 193 of 251

192
Practical Tips, Emergency Service
Danger!
Risk of accident and serious personal injury
or death due to excessive speed.
fAlways check the maximum speed rating on
the tire sidewall on any tire on the vehicle.
fNever exceed the maximum speed rating of the tires.
fFit winter tires to both axles well before the
cold season begins.
Your authorized Porsche dealer will be pleased
to advise you.
Maintenance note
We recommend fitting snow tires on the vehicle at
temperatures below 45 °F (7 °C) since the driving
performance of summer tires is reduced at low
temperatures. Summer tires may be permanently
damaged at extremely low temperatures.
Winter tires lose their traction capability when their
tread depth falls below 5/32 in. (4 mm).
Snow chains
Caution!
Risk of damage to body, axle or brake
components.
fFit snow chains only to the rear wheels, and
only with the tire/rim combination listed in the
Technical Data.
To ensure adequate clearance between chain
and body, Porsche recommends only the use
of fine-link chains such as those approved by
Porsche.
fFollow instructions issued by the supplier of the chains.
In order to mount snow chains the vehicle must be
jacked up at the rear.
Different states and countries have varying statu-
tory requirements regarding maximum speed.
Check with local authorities for possible restric-
tions.
fRemove chains as soon as the roads are free
of ice and snow.
Tire designations Due to new speed and load ratings for radial tires,
new designations have come into force for snow
tires for your Porsche.
The designation to be used for ZR tires is e.g.,
265/40 ZR 18 (Z = code letter for radial tires for
speeds above 150 mph / 240 km/h).
10_GT3_21.book Seite 192 Donnerstag, 4. Juni 2009 12:48 12
Page 194 of 251
Practical Tips, Emergency Service
193
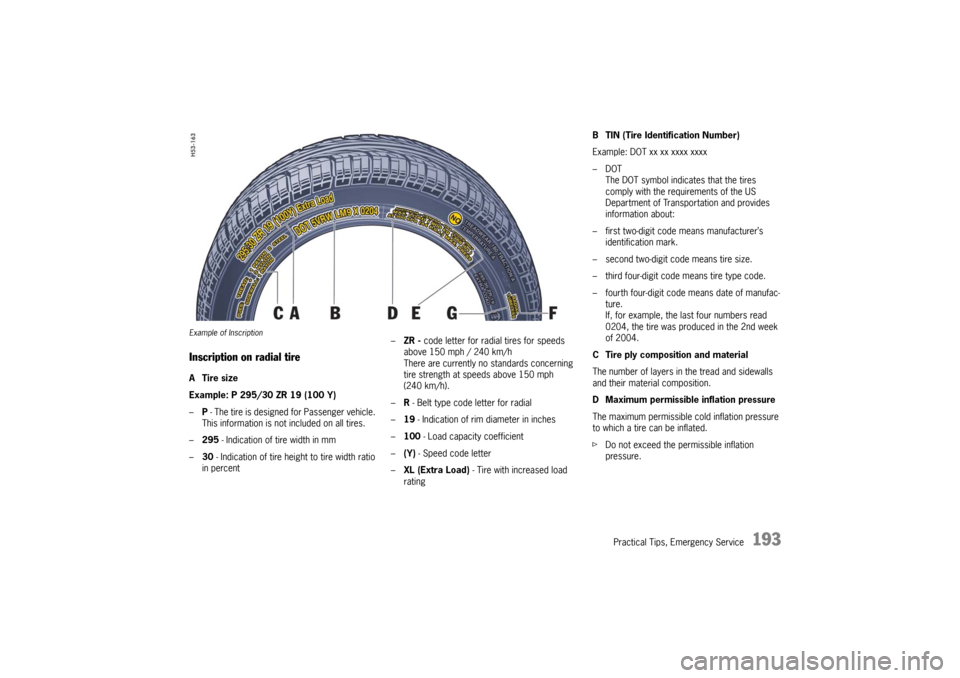
Example of InscriptionInscription on radial tireATire size
Example: P 295/30 ZR 19 (100 Y)
–P - The tire is designed for Passenger vehicle.
This information is not included on all tires.
–295 - Indication of tire width in mm
–30 - Indication of tire height to tire width ratio
in percent–ZR - code letter for radial tires for speeds
above 150 mph / 240 km/h
There are currently no standards concerning
tire strength at speeds above 150 mph
(240 km/h).
–R - Belt type code letter for radial
–19 - Indication of rim diameter in inches
–100 - Load capacity coefficient
–(Y) - Speed code letter
–XL (Extra Load) - Tire with increased load
rating
B TIN (Tire Identification Number)
Example: DOT xx xx xxxx xxxx
–DOT
The DOT symbol indicates that the tires
comply with the requirements of the US
Department of Transportation and provides
information about:
– first two-digit code means manufacturer’s
identification mark.
– second two-digit code means tire size.
– third four-digit code means tire type code.
– fourth four-digit code means date of manufac-
ture.
If, for example, the last four numbers read
0204, the tire was produced in the 2nd week
of 2004.
C Tire ply composition and material
The number of layers in the tread and sidewalls
and their material composition.
D Maximum permissible inflation pressure
The maximum permissible cold inflation pressure
to which a tire can be inflated.
fDo not exceed the permissible inflation
pressure.
10_GT3_21.book Seite 193 Donnerstag, 4. Juni 2009 12:48 12
Page 195 of 251
194
Practical Tips, Emergency Service E Maximum Load rating
The maximum load in kilograms and pounds can
be carried by the tire. If you replace tires always
use a tire that has the same maximum load rating
as the factory installed tire.
FRadial
The identification indicates if the tire has radial
structure.
G Term of tubeless or tube tire
Identification for tubeless tires.
Speed code letterThe speed code letter indicates the maximum
permissible speed for the tire.
This code letter is shown on the tire sidewall.Tip on driving
Tires with a maximum speed rating that is lower
than the specified maximum vehicle speed may be
mounted only if they bear an M+S identification on
the tire sidewall.
fPlease note that in addition to the winter tires,
all-season and all-terrain tires are also subject
to speed limits and bear this identification.
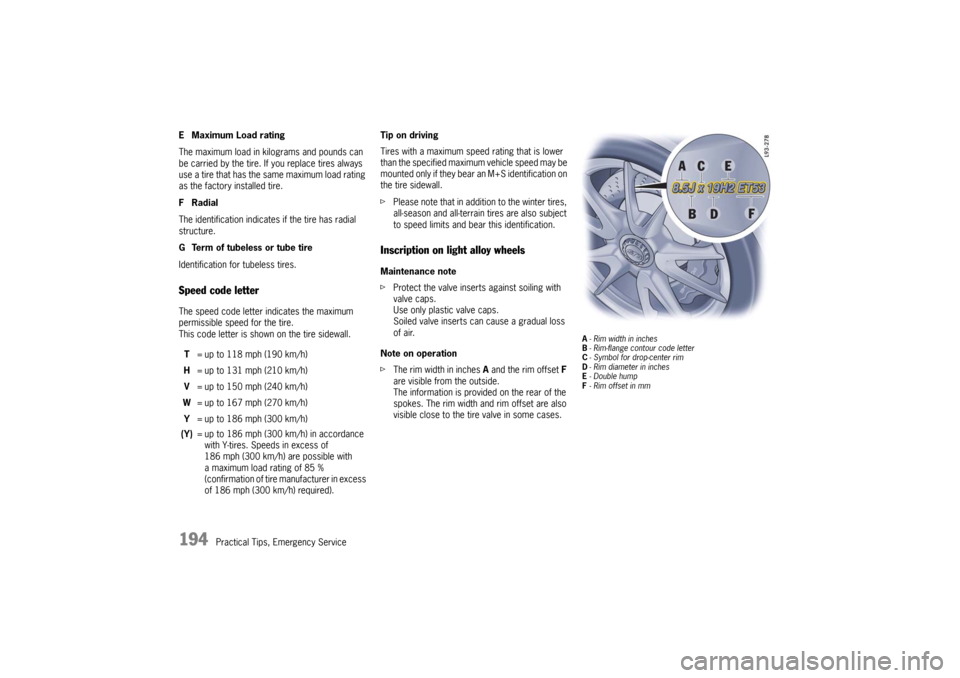
Inscription on light alloy wheelsMaintenance note
fProtect the valve inserts against soiling with
valve caps.
Use only plastic valve caps.
Soiled valve inserts can cause a gradual loss
of air.
Note on operation
fThe rim width in inches A and the rim offset F
are visible from the outside.
The information is provided on the rear of the
spokes. The rim width and rim offset are also
visible close to the tire valve in some cases.
A- Rim width in inches
B- Rim-flange contour code letter
C- Symbol for drop-center rim
D- Rim diameter in inches
E-Double hump
F- Rim offset in mm
T= up to 118 mph (190 km/h)
H= up to 131 mph (210 km/h)
V= up to 150 mph (240 km/h)
W= up to 167 mph (270 km/h)
Y= up to 186 mph (300 km/h)
(Y)= up to 186 mph (300 km/h) in accordance
with Y-tires. Speeds in excess of
186 mph (300 km/h) are possible with
a maximum load rating of 85 %
(confirmation of tire manufacturer in excess
of 186 mph (300 km/h) required).
10_GT3_21.book Seite 194 Donnerstag, 4. Juni 2009 12:48 12
Page 196 of 251

Practical Tips, Emergency Service
195
Loading InformationDefinitionsThe Curb weight - actual weight of your vehicle -
vehicle weight including standard and optional
equipment, fluids and emergency tools. This
weight does not include passengers and cargo.
The Gross Vehicle Weight is sum of the curb
weight and the weight of passengers and cargo
combined.
The Gross Vehicle Weight Rating is the
maximum total weight of vehicle, passengers,
luggage and optional equipment.
The Gross Axle Weight Rating is the maximum
load limit for the front or the rear axle. This infor-
mation is located on the safety compliance sticker
located in the driver’s side door jamb.
For determining the compatibility of the tire and
vehicle load capabilities:
fPlease see the chapter “TECHNICAL DATA” on
Page 236.
The load capacity coefficient (e.g. “102”) is a
minimum requirement.The Gross Combined Weight Rating is the
maximum total weight rating of vehicle, passen-
gers and cargo.
The Vehicle Capacity Weight - Load Limit - is
the maximum total weight limit specified of the
load (passengers and cargo) for the vehicle. This
is the maximum weight of passengers and cargo
that can be loaded into the vehicle. This informa-
tion can be found on the tire pressure plate.
The maximum loaded vehicle weight is the
sum of curb weight, accessory weight, vehicle
capacity weight and production options weight.
The load rating is the maximum load that a tire
is rated to carry for a given inflation pressure.
The maximum load rating is the load rating for
a tire at the maximum permissble inflation
pressure.
The cargo capacity is the permissible weight of
cargo, the substracted weight of passengers from
the load limit.
fNever exceed the permissible limits.
Danger!
Risk of loss of control, damage to the vehicle
and serious personal injury or death.
fNever exceed the specified axle loads.
Overloading can shorten the service life of the
tires and car, as well as lead to dangerous
vehicle reactions and long braking distances.
Damage due to overloading is not covered by the vehicle warranty.
10_GT3_21.book Seite 195 Donnerstag, 4. Juni 2009 12:48 12
Page 197 of 251
196
Practical Tips, Emergency Service
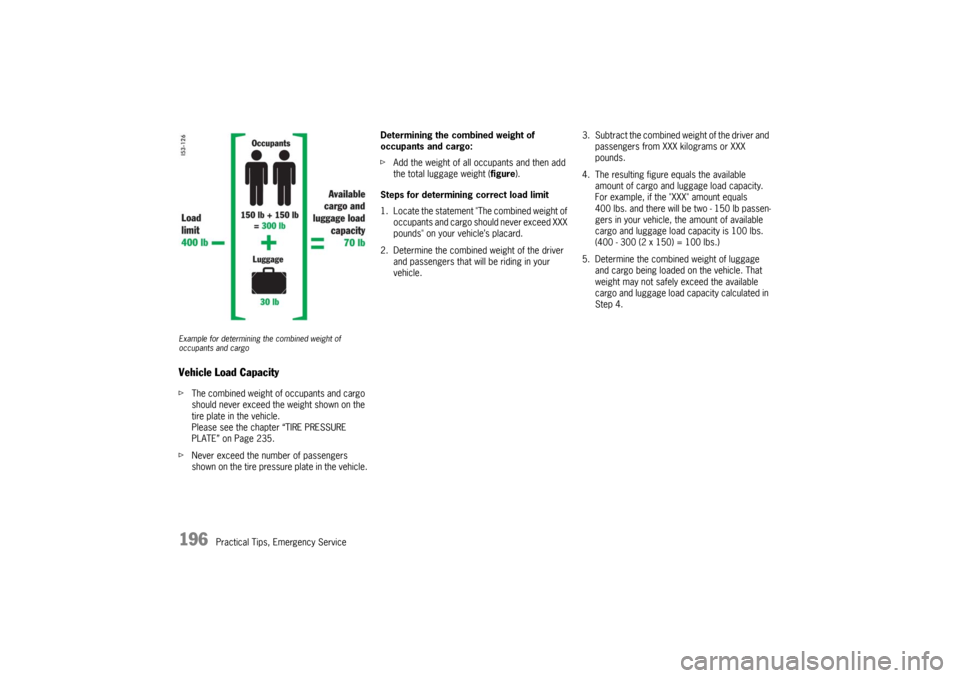
Example for determining the combined weight of
occupants and cargoVehicle Load CapacityfThe combined weight of occupants and cargo
should never exceed the weight shown on the
tire plate in the vehicle.
Please see the chapter “TIRE PRESSURE
PLATE” on Page 235.
fNever exceed the number of passengers
shown on the tire pressure plate in the vehicle.Determining the combined weight of
occupants and cargo:
fAdd the weight of all occupants and then add
the total luggage weight (figure).
Steps for determining correct load limit
1. Locate the statement "The combined weight of
occupants and cargo should never exceed XXX
pounds" on your vehicle’s placard.
2. Determine the combined weight of the driver
and passengers that will be riding in your
vehicle. 3. Subtract the combined weight of the driver and
passengers from XXX kilograms or XXX
pounds.
4. The resulting figure equals the available
amount of cargo and luggage load capacity.
For example, if the "XXX" amount equals
400 lbs. and there will be two - 150 lb passen-
gers in your vehicle, the amount of available
cargo and luggage load capacity is 100 lbs.
(400 - 300 (2 x 150) = 100 lbs.)
5. Determine the combined weight of luggage
and cargo being loaded on the vehicle. That
weight may not safely exceed the available
cargo and luggage load capacity calculated in
Step 4.10_GT3_21.book Seite 196 Donnerstag, 4. Juni 2009 12:48 12
Page 198 of 251

Practical Tips, Emergency Service
197
Wheels with Central LockingWheels with central locking are perfectly normal in
motor sport, but on normal roads they are not
common. Your GT3 is fitted with central locking
wheels as standard.
Instead of the central lock nuts conventionally
used in motor sport, the GT3 wheel has a central
bolt, with which it is fastened to the wheel carrier.
Its anti-rotation device consists of an element
inserted into the wheel hub with spring-mounted
locking bolt.
Central BoltsThe central bolt and the lock are safety-related
components. Therefore, always check them for
signs of damage.
fThe conical surface, trapezoidal thread and
internal toothing of the central bolt must not
exhibit any scratches or cracks.
fReplace damaged central bolts.
Only use the genuine Porsche central bolts
allocated specifically to this vehicle model.
fThe conical surface and trapezoidal thread
on the central bolt must be free of any
contamination.
fThe central bolt must not contain any grease
except on the trapezoidal thread.Tightening torque6. Tightening torque for central bolts: 370 ftlb.
(500 Nm).
10_GT3_21.book Seite 197 Donnerstag, 4. Juni 2009 12:48 12
Page 199 of 251
198
Practical Tips, Emergency Service
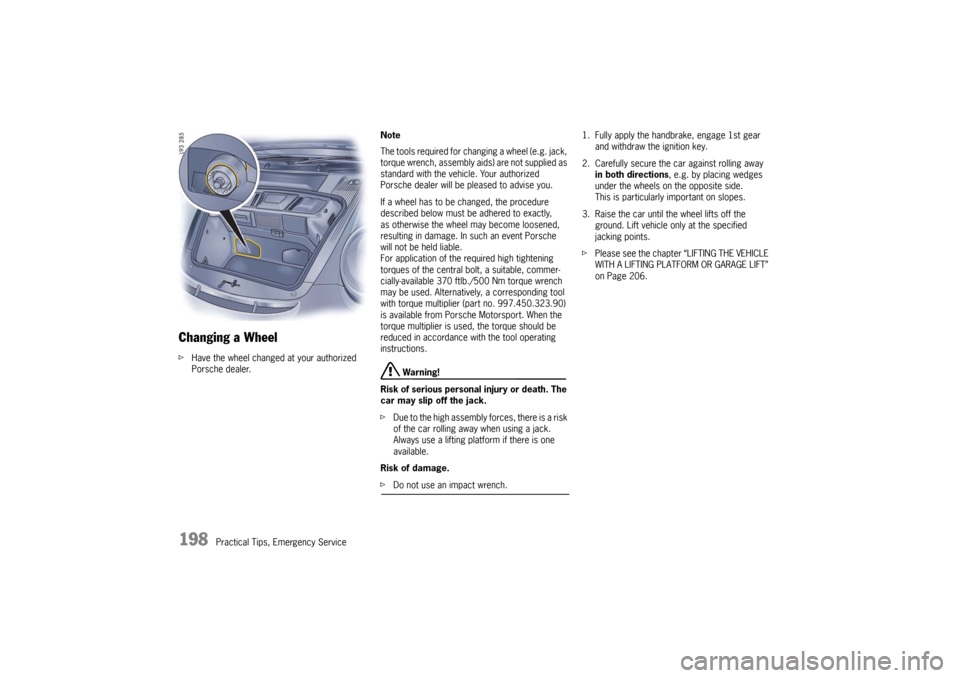
Changing a WheelfHave the wheel changed at your authorized
Porsche dealer.Note
The tools required for changing a wheel (e.g. jack,
torque wrench, assembly aids) are not supplied as
standard with the vehicle. Your authorized
Porsche dealer will be pleased to advise you.
If a wheel has to be changed, the procedure
described below must be adhered to exactly,
as otherwise the wheel may become loosened,
resulting in damage. In such an event Porsche
will not be held liable.
For application of the required high tightening
torques of the central bolt, a suitable, commer-
cially-available 370 ftlb./500 Nm torque wrench
may be used. Alternatively, a corresponding tool
with torque multiplier (part no. 997.450.323.90)
is available from Porsche Motorsport. When the
torque multiplier is used, the torque should be
reduced in accordance with the tool operating
instructions.
Warning!
Risk of serious personal injury or death. The
car may slip off the jack.
fDue to the high assembly forces, there is a risk
of the car rolling away when using a jack.
Always use a lifting platform if there is one
available.
Risk of damage.
fDo not use an impact wrench.1. Fully apply the handbrake, engage 1st gear
and withdraw the ignition key.
2. Carefully secure the car against rolling away
in both directions, e.g. by placing wedges
under the wheels on the opposite side.
This is particularly important on slopes.
3. Raise the car until the wheel lifts off the
ground. Lift vehicle only at the specified
jacking points.
fPlease see the chapter “LIFTING THE VEHICLE
WITH A LIFTING PLATFORM OR GARAGE LIFT”
on Page 206.
10_GT3_21.book Seite 198 Donnerstag, 4. Juni 2009 12:48 12
Page 200 of 251
Practical Tips, Emergency Service
199
Caution!
Risk of damage due to scratches.
fBe careful when removing the wheel-hub cap.
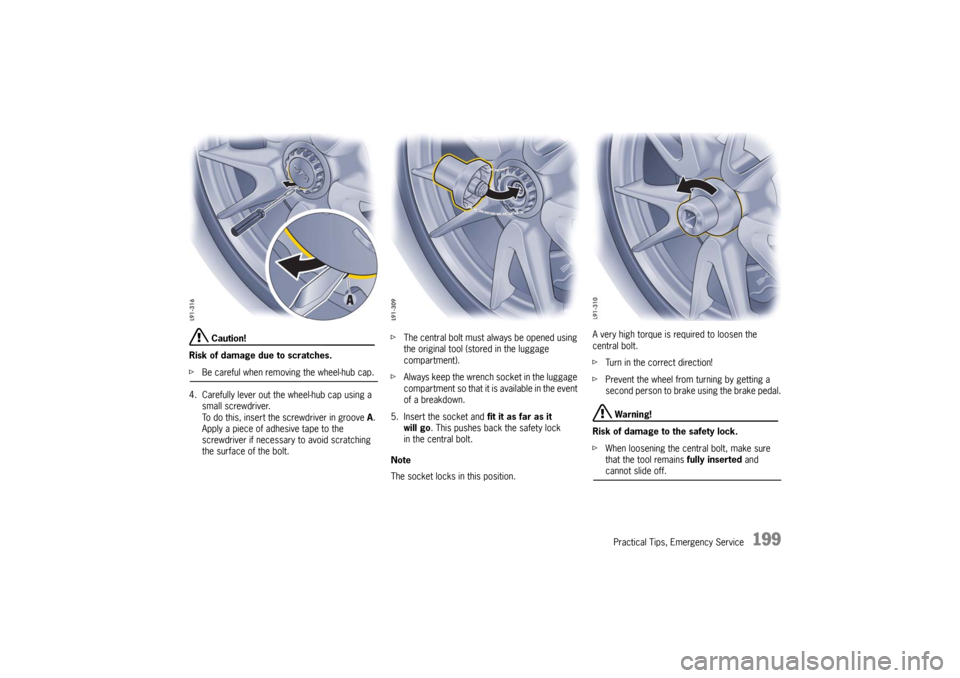
4. Carefully lever out the wheel-hub cap using a
small screwdriver.
To do this, insert the screwdriver in groove A.
Apply a piece of adhesive tape to the
screwdriver if necessary to avoid scratching
the surface of the bolt.fThe central bolt must always be opened using
the original tool (stored in the luggage
compartment).
fAlways keep the wrench socket in the luggage
compartment so that it is available in the event
of a breakdown.
5. Insert the socket and fit it as far as it
will go. This pushes back the safety lock
in the central bolt.
Note
The socket locks in this position.A very high torque is required to loosen the
central bolt.
fTurn in the correct direction!
fPrevent the wheel from turning by getting a
second person to brake using the brake pedal.
Warning!
Risk of damage to the safety lock.
fWhen loosening the central bolt, make sure
that the tool remains fully inserted and cannot slide off.
10_GT3_21.book Seite 199 Donnerstag, 4. Juni 2009 12:48 12