cooling PORSCHE 911 GT3 2010 5.G Owners Manual
[x] Cancel search | Manufacturer: PORSCHE, Model Year: 2010, Model line: 911 GT3, Model: PORSCHE 911 GT3 2010 5.GPages: 251, PDF Size: 14.33 MB
Page 7 of 251

6Service brakeBoth the standard brake system with composite
brake discs and the Porsche Ceramic Composite
Brake (PCCB) are high-performance brake
systems, designed specifically for driving on race
circuits.
Certain speeds, braking forces and ambient condi-
tions (e. g. temperature and humidity) therefore
might cause brake noises. This also applies after
completion of the running-in phase required for the
new brake components.
Wear on the different components of the braking
system, such as brake pads and brake discs,
depends to a great extent on the individual driving
style and the conditions of use and therefore
cannot be expressed in actual miles on the road.
The values communicated by Porsche are based
on normal operation adapted to traffic. Wear incre-
ases considerably when the vehicle is driven on
race tracks or through an aggressive driving style.
fPlease consult an authorized Porsche dealer
about the current guidelines in effect before
such use of your vehicle.
Aerodynamic componentsTo benefit from the high driving performance
without impairing the driving safety or the service
life of the vehicle components, certain vehicle
parts must be always fully operational while
driving.
fRegularly check your vehicle for signs of
damage.
Damaged, worn or missing aerodynamic
components such as spoilers or underside
panels affect driving behaviour and must there-
fore be replaced immediately.
To optimize the cooling of the brake discs, air
brake spoilers are fitted to the front and rear
running gear control arms as well as special air
brake ducts on the rear axle.
If these air-brake spoilers or air-brake ducts are
not fitted and there is a high thermal demand on
the braking system, the service life of the brake
discs could be reduced.
Brake wear expectations are based on normal
operations in street traffic. Wear increases consi-
derably when the vehicle is driven on race tracks
or with an aggressive driving style. Wear will also
increase considerably if the brakes are not
warmed up before being raced.
The aerodynamic stability of the vehicle is influ-
enced considerably at high speeds by the front lip.Due to the reduced ground clearance required for
optimization of road handling, the front lip and the
air-brake spoilers have to be placed in exposed
positions to fulfil their function. They can be
damaged, for example by ground or curbstone
contact.
SeatingYour car has two seats.
The area behind the seats is not intended for
passengers.
Danger!
In the event of an accident, serious personal
injury or death can result.
fNever allow anyone to sit in the area behind the
seats.
Persons occupying the area to the rear of the
two seats will not have a safety belt or airbag
protection, and in the event of an accident,
would be thrown around within or to the
outside of the vehicle compartment with
probable serious personal injury or death as the result.
10_GT3_21.book Seite 6 Donnerstag, 4. Juni 2009 12:48 12
Page 10 of 251

Table of Contents
9 Table of Contents
Engine Exhaust ............................................... 8
Dear Porsche Owner ..................................... 11
Before driving off... ....................................... 11
In the driver’s seat... ..................................... 12
On the road... ............................................... 12
Break in hints for the first
2,000 miles/3,000 kilometers ....................... 13
Never invite car theft! .................................... 17
Keys ............................................................ 18
Key with Radio Remote Control ...................... 19
Doors .......................................................... 21
Central Locking ............................................ 22
Alarm System,
Passenger Compartment Monitoring .............. 26
Power Windows ............................................ 28
Door mirrors ................................................ 30
Inside mirror ................................................. 31
Automatic Anti-Glare Interior Mirror and Door
Mirror .......................................................... 31
Rear Window Defogger, Door Mirror Heating ... 32
Seat Adjustment and Head Restraints ............. 33
Heated Seats ............................................... 36
Steering Wheel Adjustment ............................ 36
Sun Visors.................................................... 37
Safety Belts.................................................. 38
Airbag Systems ............................................ 41
Child Restraint Systems ................................ 47
LATCH System
Child seat bracket on the passenger’s seat ..... 51
Child Restraint Anchorages ............................ 52
Clutch Pedal ................................................. 53
Parking Brake ............................................... 53Brakes ......................................................... 54
ABS Brake System
(Antilock Brake System)................................. 57
Porsche Stability Management (PSM).............. 59
Sport mode .................................................. 62
Porsche Active Suspension Management
(PASM) ......................................................... 63
Dynamic Engine Mounting (PADM) .................. 63
Front Axle Lift System ................................... 64
Interior Lights ............................................... 66
Ignition/Starter Switch with
anti-theft Steering Lock ................................. 67
Starting Procedures ...................................... 70
Stopping Engine ........................................... 71
Emergency Flasher Switch............................. 72
Light Switch ................................................. 73
Dynamic Cornering Light ............................... 74
Individual Light Functions ............................... 74
Welcome Home Lighting ................................ 74
Automatic Headlight Beam Adjustment ........... 74
Turn Signal / Headlight Dimmer /
Parking light / Flasher Lever .......................... 75
Windshield Wiper / Washer Lever ................... 76
Automatic Speed Control ............................... 78
Cupholder .................................................... 80
Ashtray ........................................................ 81
Cigarette Lighter........................................... 82
Storage in the Passenger Compartment ......... 83
Luggage Compartment Lid and Engine
Compartment Lid .......................................... 85
Luggage Compartment ................................. 86
Trunk Entrapment ......................................... 88Porsche Communication Management (PCM)... 89
Car Telephone and Aftermarket Alarms........... 91
iPod, USB and AUX ....................................... 93
Fire Extinguisher ........................................... 94
HomeLink ..................................................... 95
Automatic Air Conditioning System .................98
Central and Side Vents ................................ 101
Fresh-air Intake ........................................... 101
Heated Rear Window/Door Mirror Heating..... 102
Instrument Panel USA Models ...................... 104
Instrument Panel Canada Models.................. 106
Engine Oil Temperature ............................... 108
Automatic Speed Control Indicator light ........ 108
Instrument Illumination................................. 108
Trip Odometer ............................................ 109
Speedometer ............................................. 110
Changing over between Miles / Kilometers.... 110
Tachometer ................................................ 111
Turn Signal Indicator Light ........................... 111
High Beam Indicator Light ............................ 111
Upshift indicator.......................................... 111
Cooling System .......................................... 112
Fuel ........................................................... 113
Clock .........................................................114
Outside Temperature................................... 114
Engine Oil Pressure ..................................... 115
Check Engine (Emission Control) .................. 116
On-Board Computer (BC)............................. 117
Warnings on the instrument panel and the
on-board computer...................................... 148
Manual Transmission, Clutch ........................ 155
Upshift indicator.......................................... 155
10_GT3_21.book Seite 9 Donnerstag, 4. Juni 2009 12:48 12
Page 66 of 251

Operation, Safety
65
Lowering front axle fPress button in the center console.
The vehicle is lowered to the basic level.
The light-emitting diode in the button and in the
tachometer goes out.
Caution!
Risk of damage through bottoming out the
vehicle.
fDo not lower the vehicle when it is positioned above an obstacle.
Notes on operation
Warning messageFront axle lift system faults are indicated by
a warning message on the on-board computer.
fPlease see the chapter “WARNINGS ON THE
INSTRUMENT PANEL AND THE ON-BOARD
COMPUTER” on Page 148.
– When raised, the damping properties of the
front axle change and noise may be heard in
the area of the front axle coil springs during
steering movements.
– The doors must be closed when lowering the
front axle.
–The blowing-off procedure may result in
system-related hissing noise. This does not
represent a malfunction in the lift system.– During extended vehicle immobilization, the
pressure accumulator may be completely
emptied. In this case, the first time the axle is
raised, a period of up to 2 minutes may elapse
before the vehicle height is reached and “LIFT”
is displayed.
– A flashing LED in the button indicates that the
system is currently not available. Possible
causes may be:
> Automatic overload protection is active.
The system will be available again
following a brief cooling-down phase.
The cooling-down phase may be
extended when outside temperatures
are very high.
> The speed threshold of 30 mph
(50 km/h) has been exceeded. The
system will be available again once the
speed falls below the threshold.
> If automatic lowering is actuated by
exceeding a speed of approx. 30 mph
(50 km/h) in combination with hard
acceleration, the required lowering
duration may mean that “LIFT not
lowered” is displayed. The display goes
out again as soon as the front axle has
been completely lowered.
10_GT3_21.book Seite 65 Donnerstag, 4. Juni 2009 12:48 12
Page 100 of 251

Automatic air conditioning system, Heated rear window/Door mirror heating
99
Setting temperaturefPress button F upwards or downwards
respectively.
To suit personal comfort, the interior temperature
can be adjusted between 61 °F and 85 °F/16 °C
and 29.5 °C.
Recommendation: 72 °F/22 °C.
If “LO” or “HI” appears on the display, the system
is operating at maximum cooling or heating
power.
Automatic control is no longer active.
Note
If the preselected temperature is changed, the
blower speed can increase automatically in
automatic mode.
The desired temperature is reached more quickly
this way.
Sensors
To avoid affecting the performance of the air-
conditioning system:
fDo not cover the sun sensor on the instrument
panel or the temperature sensor C.fPress button A (switch on or off).
The windshield is defogged or defrosted as
quickly as possible.
Air flows to the windshield only.
The light-emitting diode in the button lights up.
AC OFF – switching compressor for air-
conditioning system on and offThe air-conditioning compressor switches off
automatically at temperatures below approx.
37 °F/3 °C and cannot be switched on, even
manually.
Whenever outside temperatures exceed approx.
37 °F/3 °C, the air-conditioning compressor is
always switched on in automatic mode.
The compressor can be switched off to save fuel,
but control comfort is then limited:
fPress AC OFF button D.
The compressor is switched off.
The light-emitting diode in the button lights up.
fIf the interior temperature is too high, switch
compressor back on or press AUTO button.
To dry incoming air in damp weather, do not
switch off the air-conditioning compressor.
This prevents fogging of windows.fPress button K upwards or downwards respec-
tively.
The preset blower speed is increased or decre-
ased.
The speed stages are indicated by a bar display.
If the button is pressed downwards at the lowest
blower stage, the blower and automatic control
are switched off. “OFF” will appear on the display
field.
Pressing the button upwards or pressing the
AUTO button switches the blower and automatic
control back on again.
Warning!
Risk of accident due to impaired vision,
resulting in serious personal injury or death.
In recirculating-air setting, the windows may
fog up.
fOnly select recirculating-air setting for short
periods.
fIf the windows fog up, switch recirculating-air
setting off immediately by pressing the
circulating-air button again and select the “Defrost windshield” function.
Defrosting the windshield
Adjusting blower speed
Recirculating-air setting
10_GT3_21.book Seite 99 Donnerstag, 4. Juni 2009 12:48 12
Page 101 of 251

100
Automatic air conditioning system, Heated rear window/Door mirror heating Switching recirculating-air setting on or off
fPress button E.
The outside-air supply is interrupted and only
the inside air is circulated.
The light-emitting diode in the button lights up.
Over approx. 37 °F/3 °C
If the air-conditioning compressor was off, it
switches on automatically. The duration of recircu-
lating-air setting is not limited.
Below approx. 37 °F/3 °C
The air-conditioning compressor is switched off.
Recirculating-air setting is automatically ended
after approx. 3 minutes.
Air distributionThe individual air distributions can be combined as
desired.
Recommended setting in Summer:
Air distribution to central and side vents.
Recommended setting in Winter:
Air distribution to footwell and windshield.fPress button H.
The air flows to the footwell.
The selection appears on the display panel.
fPress button I.
The air flows from the central and side vents.
Vents must be open.
The selection appears on the display panel.
fPress button J.
The air flows to the windshield.
The selection appears on the display panel.
Note on operation
fOn vehicles with the Sport Chrono Package
Plus, individual air conditioning settings can be
stored on your vehicle key.
Please see the chapter “Individual Memory” in
the separate PCM Owner’s Manual.
General instructions for air-conditioning
compressor– Can switch off briefly if engine is under an
extreme load to ensure sufficient engine
cooling.
– Switches off automatically at temperatures
below approx. 37 °F/3 °C and cannot be
switched on, even manually.
– Operates most effectively with windows
closed.
If the car has been in the sun for a long time, it
is a good idea to ventilate the interior briefly
with the windows open.
– Depending on the outside temperature and
humidity, condensation can drip from the
evaporator and form a pool under the vehicle.
This is normal and not a sign of leakage.
– If uncooled air flows out when the lowest
temperature has been set, switch off the air-
conditioning compressor and have the fault
repaired at an authorized Porsche dealer. Air distribution to footwell
Air distribution to central and side
vents
Air distribution to windshield
10_GT3_21.book Seite 100 Donnerstag, 4. Juni 2009 12:48 12
Page 104 of 251

Instruments, On-Board Computer, Warnings
103 Instruments, On-Board Computer, Warnings
Instrument Panel USA Models...................... 104
Instrument Panel Canada Models ................. 106
Engine Oil Temperature .............................. 108
Automatic Speed Control Indicator light ....... 108
Instrument Illumination................................ 108
Trip Odometer ........................................... 109
Speedometer ............................................. 110
Changing over between Miles / Kilometers ... 110
Tachometer ............................................... 111
Turn Signal Indicator Light .......................... 111
High Beam Indicator Light ........................... 111
Upshift indicator ......................................... 111
Cooling System.......................................... 112
Fuel........................................................... 113
Clock ........................................................ 114
Outside Temperature.................................. 114
Engine Oil Pressure .................................... 115
Check Engine (Emission Control) ................. 116
On-Board Computer (BC)............................. 117
Warnings on the instrument panel and the
on-board computer ..................................... 148
10_GT3_21.book Seite 103 Donnerstag, 4. Juni 2009 12:48 12
Page 105 of 251

104
Instruments, On-Board Computer
Instrument Panel USA Models Also refer to the corresponding chapters in
the Owner’s Manual.
1.Engine oil temperature gauge
2.Speedometer with analogue display
3.Tire pressure warning light
4.Turn signal indicator light, left
5.Tachometer
6.High beam indicator light
7.Turn signal indicator light, right
8.Upshift indicator
9.Cooling system
Temperature gauge, warning light
10.Fuel
Level gauge, warning light
11.Engine oil pressure gauge
12.Adjustment button for instrument illumination
and trip counter
13.Odometer and daily trip mileage display
14.Automatic speed control indicator light15.Light sensor for instrument illumination
16.Airbag warning light
17.Check Engine warning light
(Emission control warning light)
18.Central warning light
19.On-board computer display
20.Porsche Stability Management
PSM Multifunctional light
21.Brake warning light
22.Safety belt warning light
23.ABS warning light
24.Clock and outside temperature display
25.Adjustment button for clockWhen the ignition is switched on, the warning
lights light up for a lamp check.
Note
Warnings that have been given are stored in the
appropriate control unit memory and can be read
out at an authorized Porsche dealer.
This information can help to warn you about situa-
tions which may be hazardous to you or your car. 10_GT3_21.book Seite 104 Donnerstag, 4. Juni 2009 12:48 12
Page 107 of 251

106
Instruments, On-Board Computer
Instrument Panel Canada Models Also refer to the corresponding chapters in
the Owner’s Manual.
1.Engine oil temperature gauge
2.Speedometer with analogue display
3.Tire pressure warning light
4.Turn signal indicator light, left
5.Tachometer
6.High beam indicator light
7.Turn signal indicator light, right
8.Upshift indicator
9.Cooling system
Temperature gauge, warning light
10.Fuel
Level gauge, warning light
11.Engine oil pressure gauge
12.Adjustment button for instrument illumination
and trip counter
13.Odometer and daily trip mileage display
14.Automatic speed control indicator light15.Light sensor for instrument illumination
16.Airbag warning light
17.Check Engine warning light
(Emission control warning light)
18.Central warning light
19.On-board computer display
20.Porsche Stability Management
PSM Multifunctional light
21.Brake warning light
22.Safety belt warning light
23.ABS warning light
24.Clock and outside temperature display
25.Adjustment button for clockWhen the ignition is switched on, the warning
lights light up for a lamp check.
Note
Warnings that have been given are stored in the
appropriate control unit memory and can be read
out at an authorized Porsche dealer.
This information can help to warn you about situa-
tions which may be hazardous to you or your car. 10_GT3_21.book Seite 106 Donnerstag, 4. Juni 2009 12:48 12
Page 113 of 251

112
Instruments, On-Board Computer
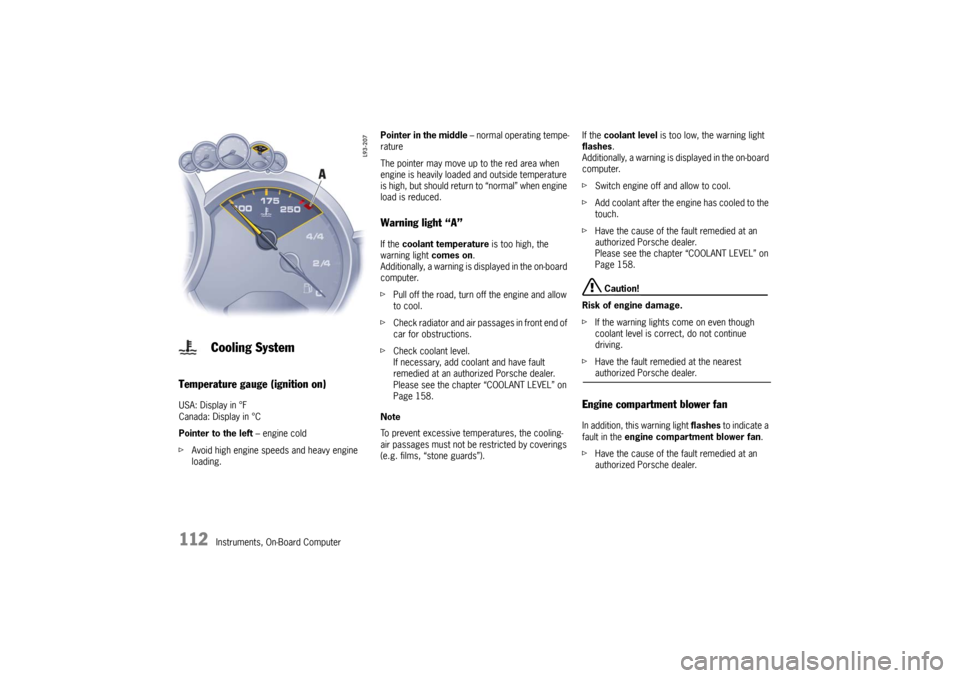
Temperature gauge (ignition on) USA: Display in °F
Canada: Display in °C
Pointer to the left – engine cold
fAvoid high engine speeds and heavy engine
loading. Pointer in the middle – normal operating tempe-
rature
The pointer may move up to the red area when
engine is heavily loaded and outside temperature
is high, but should return to “normal” when engine
load is reduced.
Warning light “A” If the coolant temperature is too high, the
warning light comes on.
Additionally, a warning is displayed in the on-board
computer.
fPull off the road, turn off the engine and allow
to cool.
fCheck radiator and air passages in front end of
car for obstructions.
fCheck coolant level.
If necessary, add coolant and have fault
remedied at an authorized Porsche dealer.
Please see the chapter “COOLANT LEVEL” on
Page 158.
Note
To prevent excessive temperatures, the cooling-
air passages must not be restricted by coverings
(e.g. films, “stone guards”). If the coolant level is too low, the warning light
flashes.
Additionally, a warning is displayed in the on-board
computer.
fSwitch engine off and allow to cool.
fAdd coolant after the engine has cooled to the
touch.
fHave the cause of the fault remedied at an
authorized Porsche dealer.
Please see the chapter “COOLANT LEVEL” on
Page 158.
Caution!
Risk of engine damage.
fIf the warning lights come on even though
coolant level is correct, do not continue
driving.
fHave the fault remedied at the nearest authorized Porsche dealer.
Engine compartment blower fan In addition, this warning light flashes to indicate a
fault in the engine compartment blower fan.
fHave the cause of the fault remedied at an
authorized Porsche dealer.
Cooling System
10_GT3_21.book Seite 112 Donnerstag, 4. Juni 2009 12:48 12
Page 159 of 251

158
Maintenance, Car Care
Coolant LevelfPlease see the chapter “EXERCISE EXTREME
CAUTION WHEN WORKING ON YOUR VEHICLE”
on Page 157.
The cooling system is filled at the factory with a
permanent coolant.
It provides year-round protection from corrosion
and freezing down to –31 °F/–35 °C
.
fOnly use antifreeze authorized by Porsche.
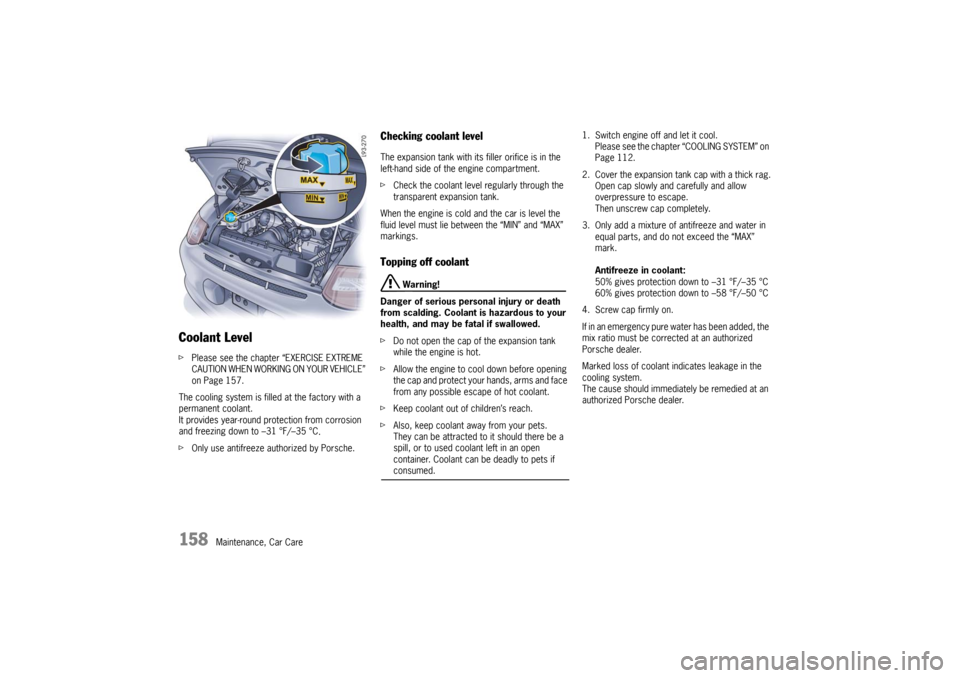
Checking coolant level The expansion tank with its filler orifice is in the
left-hand side of the engine compartment.
fCheck the coolant level regularly through the
transparent expansion tank.
When the engine is cold and the car is level the
fluid level must lie between the “MIN” and “MAX”
markings. Topping off coolant
Warning!
Danger of serious personal injury or death
from scalding. Coolant is hazardous to your
health, and may be fatal if swallowed.
fDo not open the cap of the expansion tank
while the engine is hot.
fAllow the engine to cool down before opening
the cap and protect your hands, arms and face
from any possible escape of hot coolant.
fKeep coolant out of children’s reach.
fAlso, keep coolant away from your pets.
They can be attracted to it should there be a
spill, or to used coolant left in an open
container. Coolant can be deadly to pets if consumed.1. Switch engine off and let it cool.
Please see the chapter “COOLING SYSTEM” on
Page 112.
2. Cover the expansion tank cap with a thick rag.
Open cap slowly and carefully and allow
overpressure to escape.
Then unscrew cap completely.
3. Only add a mixture of antifreeze and water in
equal parts, and do not exceed the “MAX”
mark.
Antifreeze in coolant:
50% gives protection down to –31 °F/–35 °C
60% gives protection down to –58 °F/–50 °C
4. Screw cap firmly on.
If in an emergency pure water has been added, the
mix ratio must be corrected at an authorized
Porsche dealer.
Marked loss of coolant indicates leakage in the
cooling system.
The cause should immediately be remedied at an
authorized Porsche dealer.
10_GT3_21.book Seite 158 Donnerstag, 4. Juni 2009 12:48 12