start stop button PORSCHE 944 1987 1.G Owners Manual
[x] Cancel search | Manufacturer: PORSCHE, Model Year: 1987, Model line: 944, Model: PORSCHE 944 1987 1.GPages: 66, PDF Size: 3.3 MB
Page 6 of 66

NEVER invite car theft! An unlocked car with the key in the ignition switch invites car theft. A steering wheel lock and a buzzer alarm are standard equipment in your Porsche. The
buzzer will sound if you open the driver's door
while the key is still in the ignition lock. It is your reminder to pull the key out of the ignition lock and to lock the doors.
Always remove the ignition key, especially
if children are left unattended in the
vehicle. Unsupervised use of any vehicle
key may cause serious personal injury.
NEVER leave your vehicle unattended with
the key in the ignition lock. Take the key
and lock the doors.
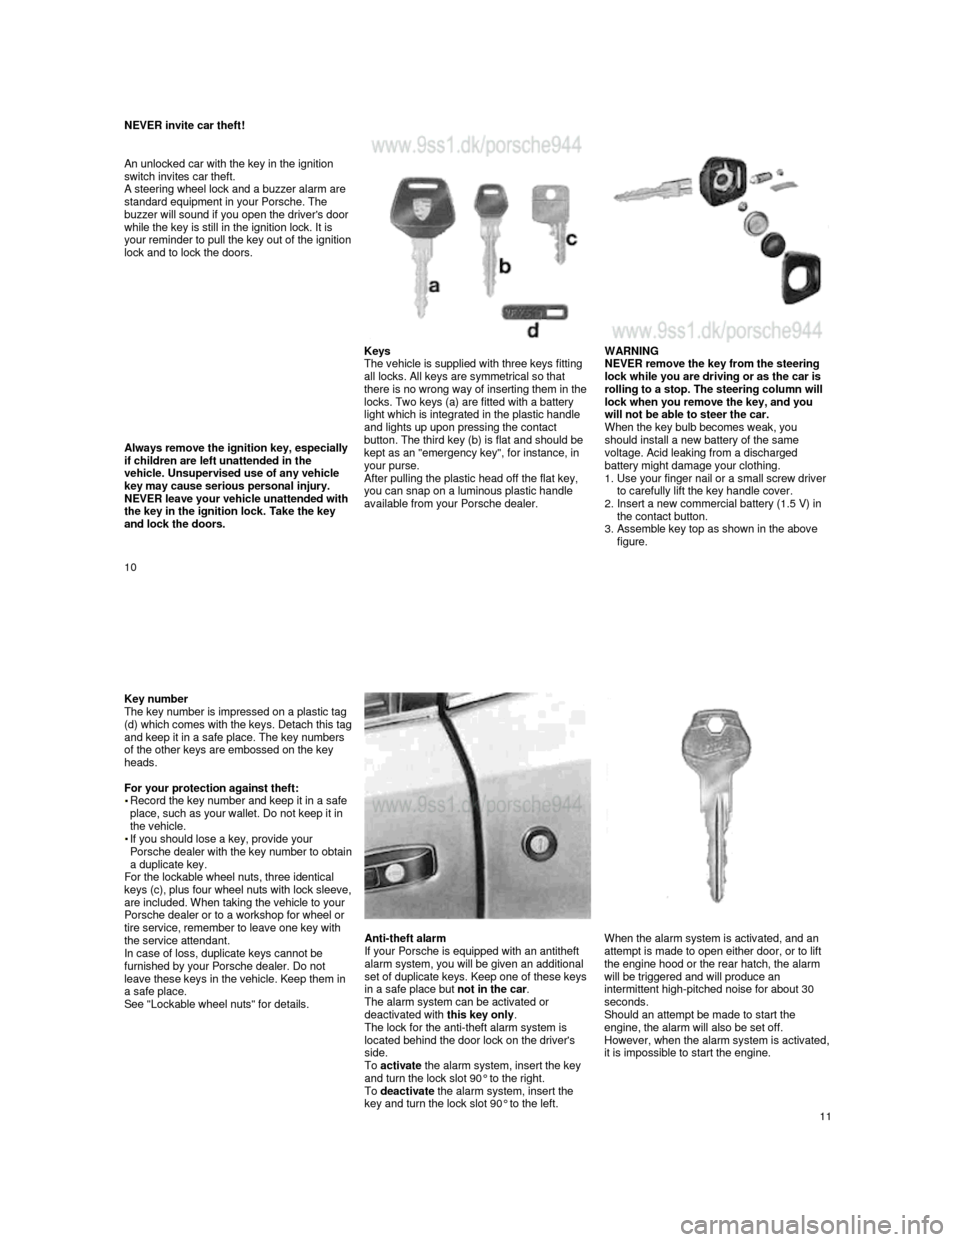
Keys
The vehicle is supplied with three keys fitting
all locks. All keys are symmetrical so that
there is no wrong way of inserting them in the
locks. Two keys (a) are fitted with a battery
light which is integrated in the plastic handle
and lights up upon pressing the contact
button. The third key (b) is flat and should be
kept as an "emergency key", for instance, in
your purse.
After pulling the plastic head off the flat key, you can snap on a luminous plastic handle
available from your Porsche dealer.
WARNING NEVER remove the key from the steering
lock while you are driving or as the car is
rolling to a stop. The steering column will
lock when you remove the key, and you
will not be able to steer the car.
When the key bulb becomes weak, you
should install a new battery of the same
voltage. Acid leaking from a discharged
battery might damage your clothing.
1.
Use your finger nail or a small screw driver
to carefully lift the key handle cover.
2.
Insert a new commercial battery (1.5 V) in
the contact button.
3.
Assemble key top as shown in the above figure.
10
Key number
The key number is impressed on a plastic tag
(d) which comes with the keys. Detach this tag and keep it in a safe place. The key numbers
of the other keys are embossed on the key
heads.
For your protection against theft:
Record the key number and keep it in a safe
place, such as your wallet. Do not keep it in
the vehicle.
If you should lose a key, provide your Porsche dealer with the key number to obtain a duplicate key.
For the lockable wheel nuts, three identical
keys (c), plus four wheel nuts with lock slee
ve, are included. When taking the vehicle to your
Porsche dealer or to a workshop for wheel or
tire service, remember to leave one key with
the service attendant.
In case of loss, duplicate keys cannot be
furnished by your Porsche dealer. Do not
leave these keys in the vehicle. Keep them in
a safe place.
See "Lockable wheel nuts" for details.
Anti-theft alarm
If your Porsche is equipped with an antitheft
alarm system, you will be given an additional
set of duplicate keys. Keep one of these keys
in a safe place but not in the car.
The alarm system can be activated or
deactivated with this key only.
The lock for the anti-theft alarm system is
located behind the door lock on the driver's
side.
To activate the alarm system, insert the key
and turn the lock slot 90° to the right.
To deactivate the alarm system, insert the
key and turn the lock slot 90° to the left.
When the alarm system is activated, and an
attempt is made to open either door, or to lift
the engine hood or the rear hatch, the alarm
will be triggered and will produce an intermittent high-pitched noise for about 30
seconds.
Should an attempt be made to start the
engine, the alarm will also be set off.
However, when the alarm system is activated, it is impossible to start the engine.
11
Page 14 of 66

The brake warning light on the dashboard will go out after the engine is started and the
parking brake is fully released.
WARNING
Release the parking brake fully. A partially engaged brake will overheat the rear
brakes, reduce their effectiveness and
cause excessive wear.
Always set the parking brake when parking your car. Move the selector lever
to "P" (Automatic transmission) or move
the gearshift lever to reverse or first gear
(Manual transmission). On hills also turn
the wheels toward the curb.
WARNING Failure of one brake circuit will impair the
braking capability resulting in an
increased stopping distance.
If one brake circuit has failed, the other will
still operate. However, you will notice an
increased pedal travel when you step on the
brake. Should you encounter such
experience, bring your vehicle safely to a full
stop.
Avoid driving the vehicle and instead have it towed to the nearest authorized Porsche
dealer.
Brake Pedal
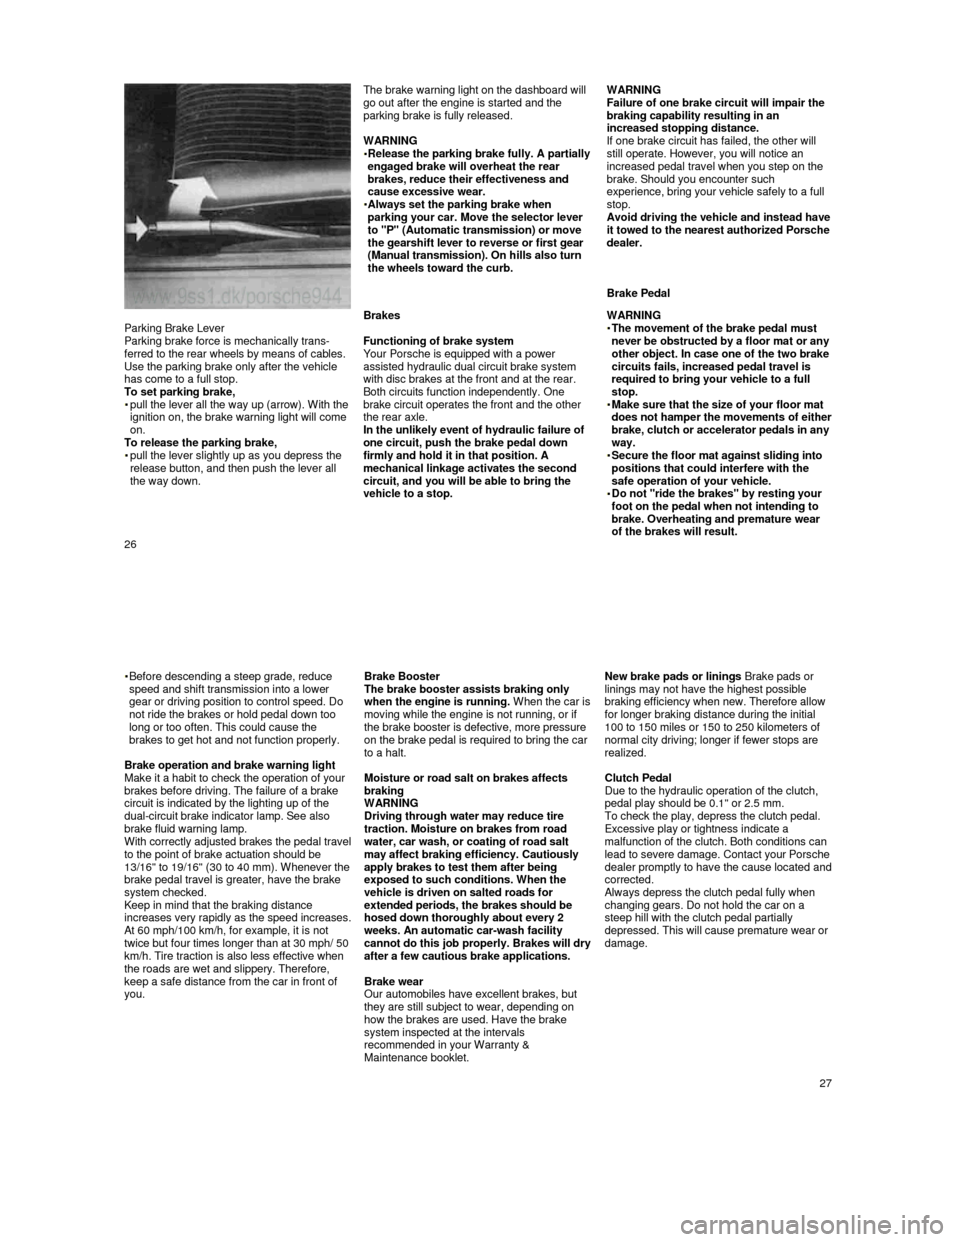
Parking Brake Lever
Parking brake force is mechanically trans-
ferred to the rear wheels by means of cables.
Use the parking brake only after the vehicle
has come to a full stop.
To set parking brake,
pull the lever all the way up (arrow). With the ignition on, the brake warning light will come
on.
To release the parking brake,
pull the lever slightly up as you depress the
release button, and then push the lever all
the way down.
Brakes
Functioning of brake system
Your Porsche is equipped with a power
assisted hydraulic dual circuit brake system
with disc brakes at the front and at the rear. Both circuits function independently. One
brake circuit operates the front and the other
the rear axle.
In the unlikely event of hydraulic failure of
one circuit, push the brake pedal down
firmly and hold it in that position. A
mechanical linkage activates the second
circuit, and you will be able to bring the
vehicle to a stop.
WARNING
The movement of the brake pedal must never be obstructed by a floor mat or any
other object. In case one of the two brake
circuits fails, increased pedal travel is
required to bring your vehicle to a full
stop.
Make sure that the size of your floor mat does not hamper the movements of either brake, clutch or accelerator pedals in any
way.
Secure the floor mat against sliding into positions that could interfere with the
safe operation of your vehicle.
Do not "ride the brakes" by resting your foot on the pedal when not intending to
brake. Overheating and premature wear
of the brakes will result.
26
Before descending a steep grade, reduce
speed and shift transmission into a lower
gear or driving position to control speed. Do
not ride the brakes or hold pedal down too
long or too often. This could cause the
brakes to get hot and not function properly.
Brake operation and brake warning light
Make it a habit to check the operation of your
brakes before driving. The failure of a brake
circuit is indicated by the lighting up of the
dual-circuit brake indicator lamp. See also
brake fluid warning lamp.
With correctly adjusted brakes the pedal travel to the point of brake actuation should be
13/16" to 19/16" (30 to 40 mm). Whenever the brake pedal travel is greater, have the brake
system checked.
Keep in mind that the braking distance
increases very rapidly as the speed increases. At 60 mph/100 km/h, for example, it is not twice but four times longer than at 30 mph/ 50
km/h. Tire traction is also less effective when
the roads are wet and slippery. Therefore,
keep a safe distance from the car in front of
you.
Brake Booster The brake booster assists braking only
when the engine is running. When the car is moving while the engine is not running, or if
the brake booster is defective, more pressure
on the brake pedal is required to bring the car
to a halt.
Moisture or road salt on brakes affects
braking
WARNING
Driving through water may reduce tire
traction. Moisture on brakes from road
water, car wash, or coating of road salt
may affect braking efficiency. Cautiously
apply brakes to test them after being
exposed to such conditions. When the
vehicle is driven on salted roads for
extended periods, the brakes should be
hosed down thoroughly about every 2
weeks. An automatic car-wash facility
cannot do this job properly. Brakes will dry after a few cautious brake applications.
Brake wear
Our automobiles have excellent brakes, but
they are still subject to wear, depending on
how the brakes are used. Have the brake
system inspected at the intervals
recommended in your Warranty &
Maintenance booklet.
New brake pads or linings Brake pads or
linings may not have the highest possible
braking efficiency when new. Therefore allow
for longer braking distance during the initial
100 to 150 miles or 150 to 250 kilometers of
normal city driving; longer if fewer stops are
realized.
Clutch Pedal
Due to the hydraulic operation of the clutch,
pedal play should be 0.1" or 2.5 mm.
To check the play, depress the clutch pedal.
Excessive play or tightness indicate a
malfunction of the clutch. Both conditions can
lead to severe damage. Contact your Po
rsche dealer promptly to have the cause located and corrected. Always depress the clutch pedal fully when changing gears. Do not hold the car on a
steep hill with the clutch pedal partially
depressed. This will cause premature wear or
damage.
27
Page 21 of 66

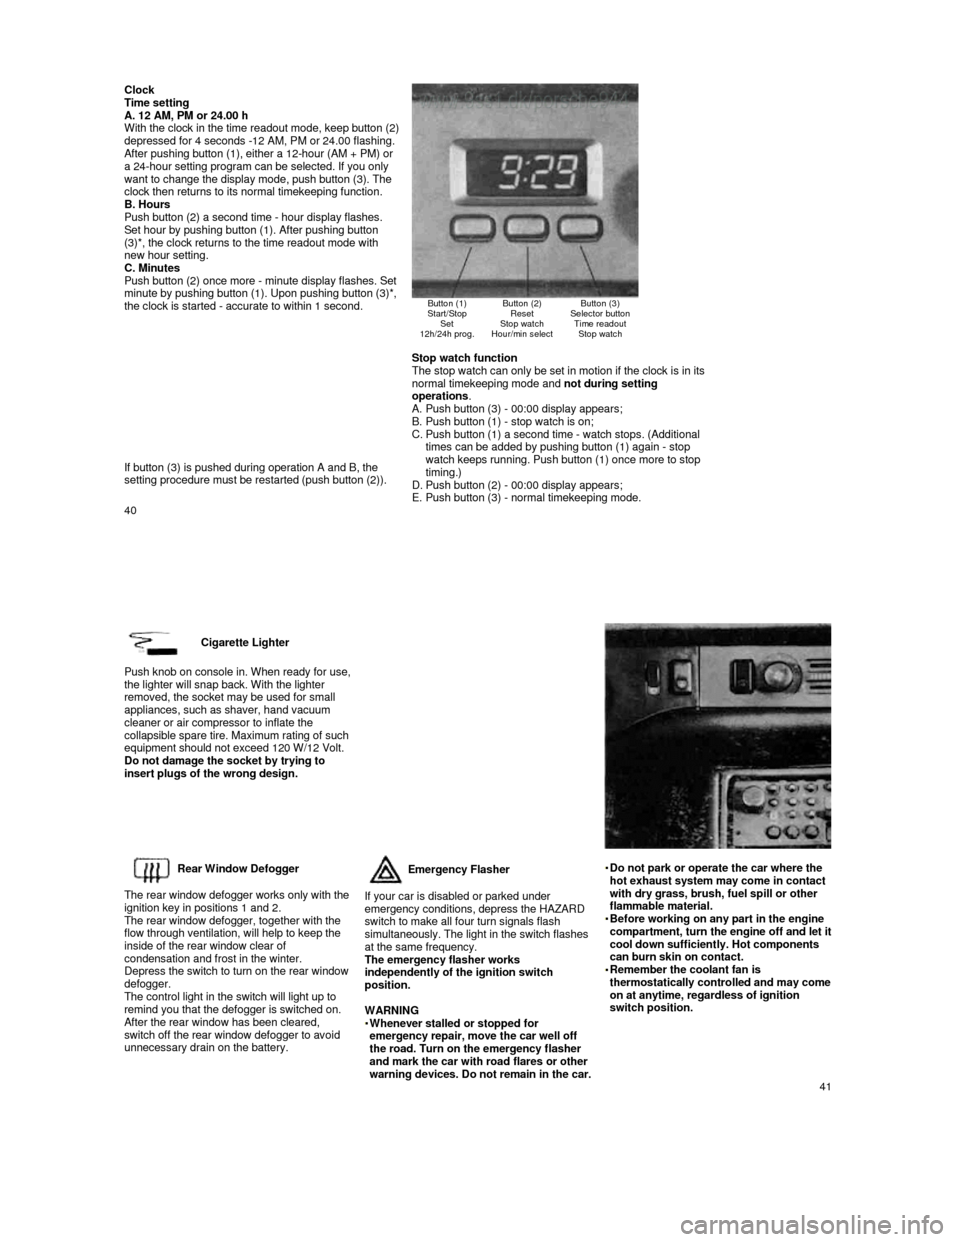
Clock Time setting
A. 12 AM, PM or 24.00 h
With the clock in the time readout mode, keep butto n (2) depressed for 4 seconds -12 AM, PM or 24.00 flashin g. After pushing button (1), either a 12-hour (AM + PM) or
a 24-hour setting program can be selected. If you o nly
want to change the display mode, push button (3). The
clock then returns to its normal timekeeping functi on.
B. Hours
Push button (2) a second time - hour display flashe s.
Set hour by pushing button (1). After pushing butto n
(3)*, the clock returns to the time readout mode wi th
new hour setting.
C. Minutes
Push button (2) once more -
minute display flashes. Set minute by pushing button (1). Upon pushing button ( 3)*, the clock is started - accurate to within 1 second.
Button (1)
Start/Stop Set
12h/24h prog.
Button (2) Reset
Stop watch
Hour/min select
Button (3)
Selector button Time readout Stop watch
If button (3) is pushed during operation A and B, t he
setting procedure must be restarted (push button (2 )).
Stop watch function
The stop watch can only be set in motion if the clo ck is in its
normal timekeeping mode and not during setting
operations .
A. Push button (3) - 00:00 display appears;
B. Push button (1) - stop watch is on;
C. Push button (1) a second time - watch stops. (Addit ional
times can be added by pushing button (1) again - st op
watch keeps running. Push button (1) once more to s top timing.)
D. Push button (2) - 00:00 display appears;
E. Push button (3) - normal timekeeping mode.
40
Cigarette Lighter
Push knob on console in. When ready for use, the lighter will snap back. With the lighter
removed, the socket may be used for small
appliances, such as shaver, hand vacuum
cleaner or air compressor to inflate the
collapsible spare tire. Maximum rating of such
equipment should not exceed 120 W/12 Volt.
Do not damage the socket by trying to
insert plugs of the wrong design.
Rear Window Defogger
The rear window defogger works only with the
ignition key in positions 1 and 2.
The rear window defogger, together with the
flow through ventilation, will help to keep the
inside of the rear window clear of
condensation and frost in the winter.
Depress the switch to turn on the rear window
defogger.
The control light in the switch will light up to
remind you that the defogger is switched on.
After the rear window has been cleared, switch off the rear window defogger to avoid
unnecessary drain on the battery.
Emergency Flasher
If your car is disabled or parked under
emergency conditions, depress the HAZARD
switch to make all four turn signals flash
simultaneously. The light in the switch flashes
at the same frequency.
The emergency flasher works
independently of the ignition switch
position.
WARNING
Whenever stalled or stopped for emergency repair, move the car well off
the road. Turn on the emergency flasher
and mark the car with road flares or other
warning devices. Do not remain in the car.
Do not park or operate the car where the hot exhaust system may come in contact
with dry grass, brush, fuel spill or other
flammable material.
Before working on any part in the engine compartment, turn the engine off and let it cool down sufficiently. Hot components
can burn skin on contact.
Remember the coolant fan is thermostatically controlled and may come on at anytime, regardless of ignition
switch position.
41
Page 28 of 66

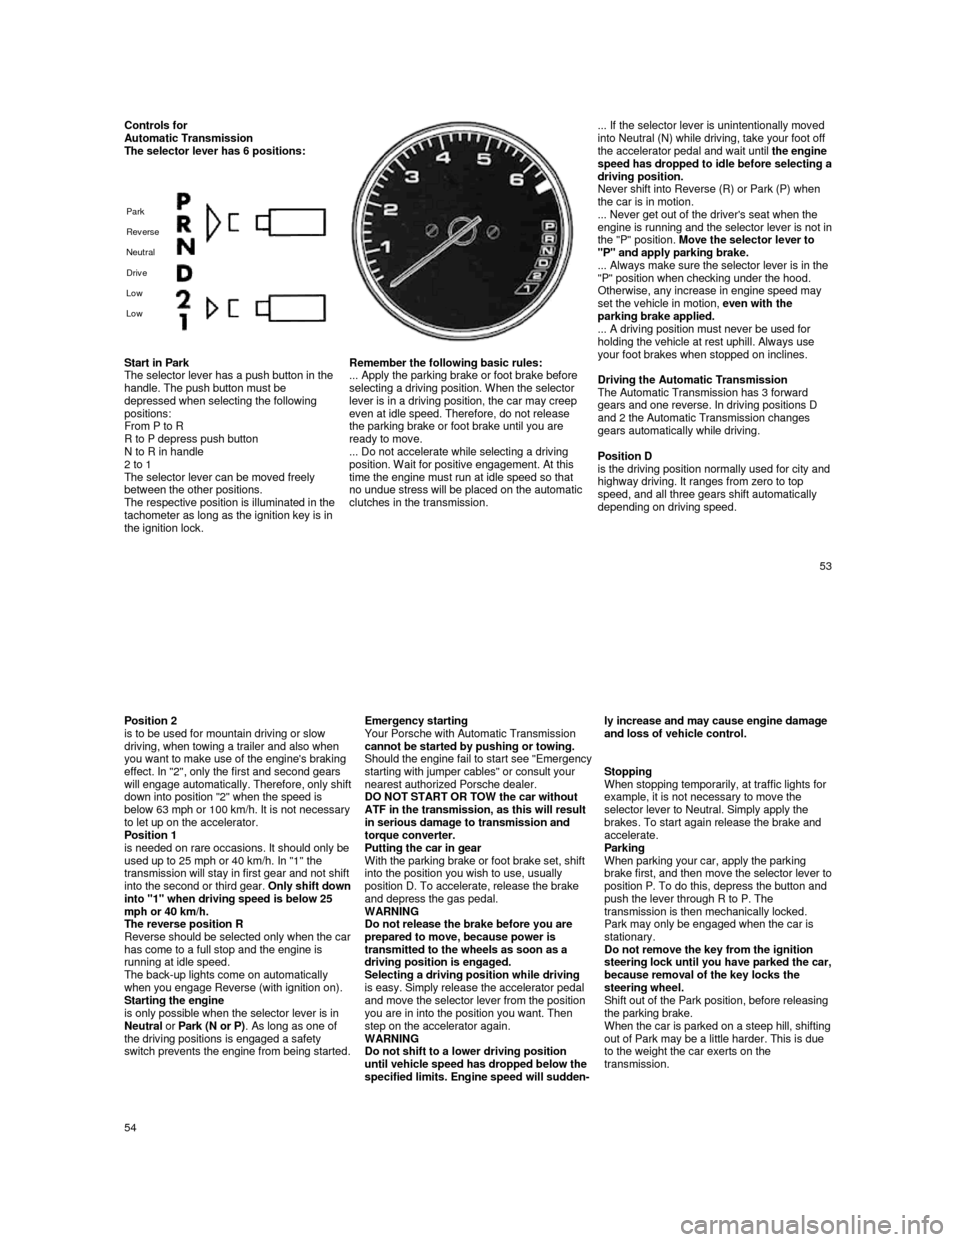
Controls for Automatic Transmission
The selector lever has 6 positions:
Park
Rev erse
Neutral
Driv e
Low
Low
... If the selector lever is unintentionally mo ved
into Neutral (N) while driving, take your foot off
the accelerator pedal and wait until the engine
speed has dropped to idle before selecting a driving position.
Never shift into Reverse (R) or Park (P) when
the car is in motion.
... Never get out of the driver's seat when the
engine is running and the selector lever is not in the "P" position. Move the selector lever to
"P" and apply parking brake.
... Always make sure the selector lever is in the
"P" position when checking under the hood.
Otherwise, any increase in engine speed may
set the vehicle in motion, even with the
parking brake applied.
... A driving position must never be used for
holding the vehicle at rest uphill. Always use
your foot brakes when stopped on inclines.
Driving the Automatic Transmission
The Automatic Transmission has 3 forward
gears and one reverse. In driving positions D
and 2 the Automatic Transmission changes
gears automatically while driving.
Position D
is the driving position normally used for city and highway driving. It ranges from zero to top
speed, and all three gears shift automatically
depending on driving speed.
Start in Park
The selector lever has a push button in the
handle. The push button must be
depressed when selecting the following
positions:
From P to R
R to P depress push button
N to R in handle
2 to 1
The selector lever can be moved freely
between the other positions.
The respective position is illuminated in the tachometer as long as the ignition key is in
the ignition lock.
Remember the following basic rules:
... Apply the parking brake or foot brake before
selecting a driving position. When the selector
lever is in a driving position, the car may creep
even at idle speed. Therefore, do not release
the parking brake or foot brake until you are
ready to move.
... Do not accelerate while selecting a driving
position. Wait for positive engagement. At this
time the engine must run at idle speed so that
no undue stress will be placed on the automatic
clutches in the transmission.
53
Position 2
is to be used for mountain driving or slow
driving, when towing a trailer and also when
you want to make use of the engine's braking
effect. In "2", only the first and second gears
will engage automatically. Therefore, only shift down into position "2" when the speed is below 63 mph or 100 km/h. It is not necessary to let up on the accelerator.
Position 1
is needed on rare occasions. It should only be
used up to 25 mph or 40 km/h. In "1" the
transmission will stay in first gear and not shift
into the second or third gear.
Only shift down into "1" when driving speed is below 25
mph or 40 km/h.
The reverse position R
Reverse should be selected only when the car has come to a full stop and the engine is
running at idle speed.
The back-up lights come on automatically
when you engage Reverse (with ignition on). Starting the engine
is only possible when the selector lever is in
Neutral or Park (N or P) . As long as one of
the driving positions is engaged a safety
switch prevents the engine from being started.
Emergency starting
Your Porsche with Automatic Transmission
cannot be started by pushing or towing.
Should the engine fail to start see "Emergency starting with jumper cables" or consult your
nearest authorized Porsche dealer.
DO NOT START OR TOW the car without
ATF in the transmission, as this will result
in serious damage to transmission and
torque converter.
Putting the car in gear
With the parking brake or foot brake set, shift
into the position you wish to use, usually
position D. To accelerate, release the brake
and depress the gas pedal.
WARNING
Do not release the brake before you are
prepared to move, because power is
transmitted to the wheels as soon as a
driving position is engaged.
Selecting a driving position while driving
is easy. Simply release the accelerator pedal
and move the selector lever from the position
you are in into the position you want. Then
step on the accelerator again.
WARNING
Do not shift to a lower driving position
until vehicle speed has dropped below the
specified limits. Engine speed will sudden-
ly increase and may cause engine damage and loss of vehicle control.
Stopping
When stopping temporarily, at traffic lights for
example, it is not necessary to move the
selector lever to Neutral. Simply apply the
brakes. To start again release the brake and
accelerate.
Parking
When parking your car, apply the parking
brake first, and then move the selector lever to position P. To do this, depress the button and
push the lever through R to P. The
transmission is then mechanically locked.
Park may only be engaged when the car is
stationary.
Do not remove the key from the ignition
steering lock until you have parked the car, because removal of the key locks the
steering wheel.
Shift out of the Park position, before releasing
the parking brake.
When the car is parked on a steep hill, shifting
out of Park may be a little harder. This is due
to the weight the car exerts on the
transmission.
54