PORSCHE CAYNNE 2004 1.G Owners Manual
Manufacturer: PORSCHE, Model Year: 2004, Model line: CAYENNE, Model: PORSCHE CAYENNE 2004 1.GPages: 379, PDF Size: 13.91 MB
Page 331 of 379
Minor Repairs
331
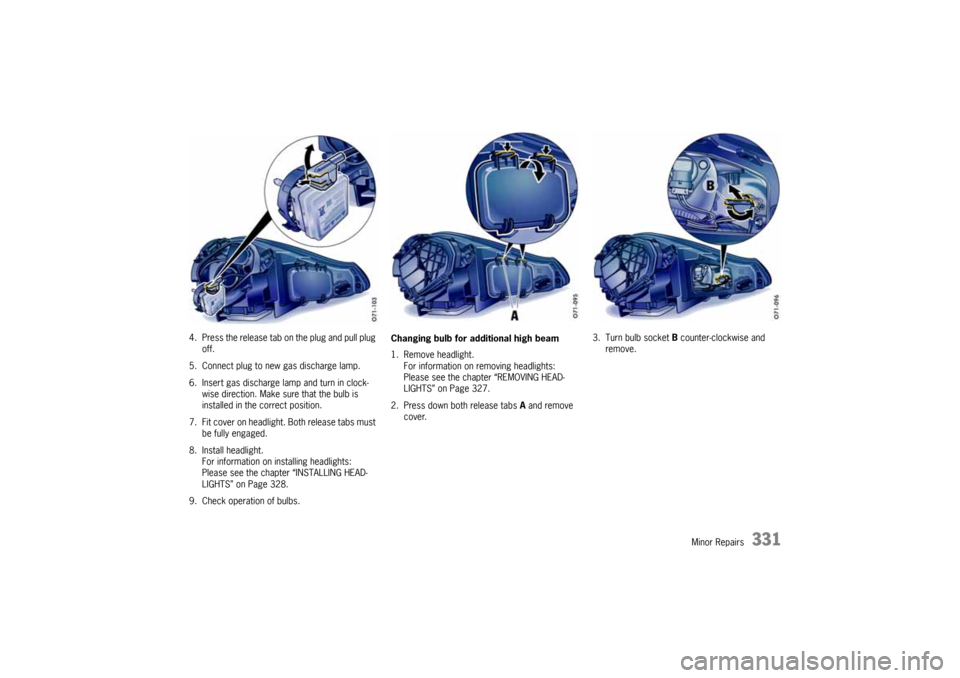
4. Press the release tab on the plug and pull plug
off.
5. Connect plug to new gas discharge lamp.
6. Insert gas discharge lamp and turn in clock-
wise direction. Make sure that the bulb is
installed in the correct position.
7. Fit cover on headlight. Both release tabs must
be fully engaged.
8. Install headlight.
For information on installing headlights:
Please see the chapter “INSTALLING HEAD-
LIGHTS” on Page 328.
9. Check operation of bulbs.Changing bulb for additional high beam
1. Remove headlight.
For information on removing headlights:
Please see the chapter “REMOVING HEAD-
LIGHTS” on Page 327.
2. Press down both release tabs A and remove
cover.3. Turn bulb socket B counter-clockwise and
remove.
10_Cayenne_21_KW17.book Seite 331 Donnerstag, 9. April 2009 3:33 15
Page 332 of 379
332
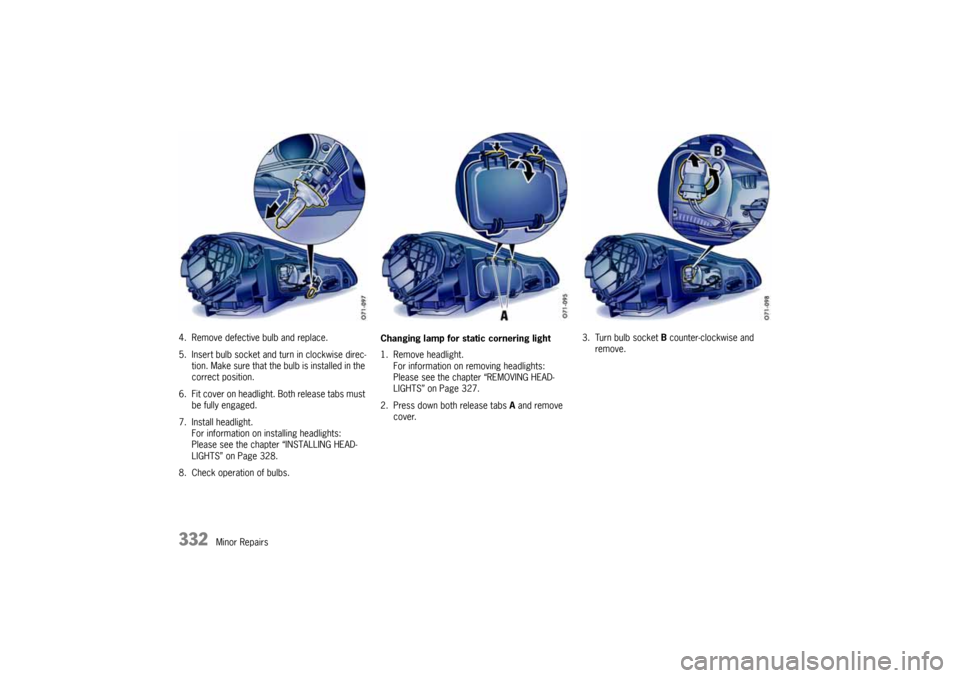
Minor Repairs 4. Remove defective bulb and replace.
5. Insert bulb socket and turn in clockwise direc-
tion. Make sure that the bulb is installed in the
correct position.
6. Fit cover on headlight. Both release tabs must
be fully engaged.
7. Install headlight.
For information on installing headlights:
Please see the chapter “INSTALLING HEAD-
LIGHTS” on Page 328.
8. Check operation of bulbs.Changing lamp for static cornering light
1. Remove headlight.
For information on removing headlights:
Please see the chapter “REMOVING HEAD-
LIGHTS” on Page 327.
2. Press down both release tabs A and remove
cover.3. Turn bulb socket B counter-clockwise and
remove.
10_Cayenne_21_KW17.book Seite 332 Donnerstag, 9. April 2009 3:33 15
Page 333 of 379
Minor Repairs
333
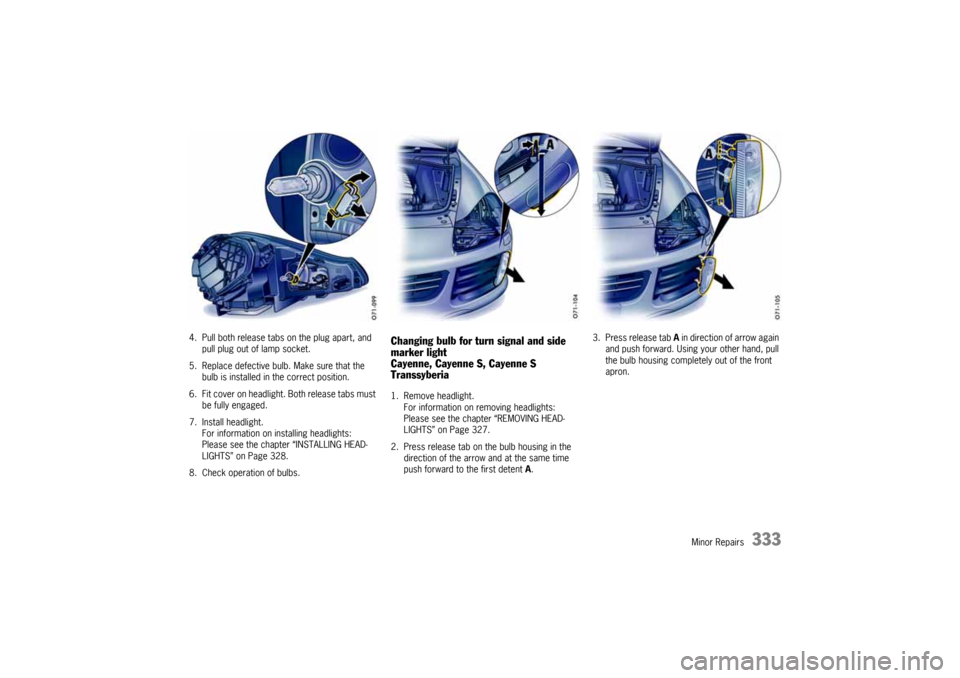
4. Pull both release tabs on the plug apart, and
pull plug out of lamp socket.
5. Replace defective bulb. Make sure that the
bulb is installed in the correct position.
6. Fit cover on headlight. Both release tabs must
be fully engaged.
7. Install headlight.
For information on installing headlights:
Please see the chapter “INSTALLING HEAD-
LIGHTS” on Page 328.
8. Check operation of bulbs.
Changing bulb for turn signal and side
marker light
Cayenne, Cayenne S, Cayenne S
Transsyberia1. Remove headlight.
For information on removing headlights:
Please see the chapter “REMOVING HEAD-
LIGHTS” on Page 327.
2. Press release tab on the bulb housing in the
direction of the arrow and at the same time
push forward to the first detent A.3. Press release tab A in direction of arrow again
and push forward. Using your other hand, pull
the bulb housing completely out of the front
apron.
10_Cayenne_21_KW17.book Seite 333 Donnerstag, 9. April 2009 3:33 15
Page 334 of 379
334
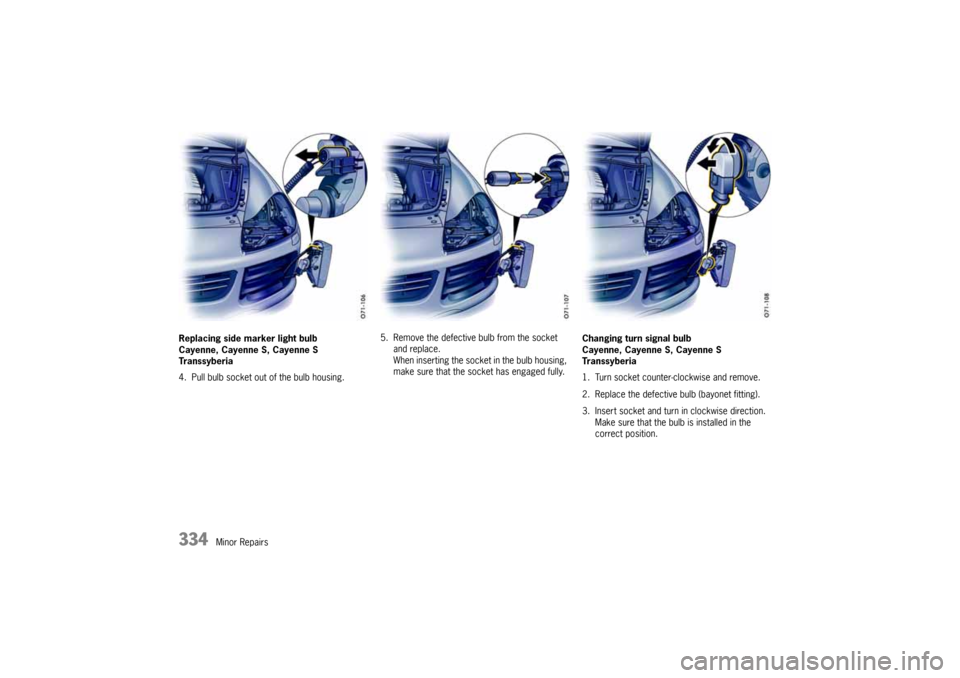
Minor Repairs Replacing side marker light bulb
Cayenne, Cayenne S, Cayenne S
Transsyberia
4. Pull bulb socket out of the bulb housing.5. Remove the defective bulb from the socket
and replace.
When inserting the socket in the bulb housing,
make sure that the socket has engaged fully.Changing turn signal bulb
Cayenne, Cayenne S, Cayenne S
Transsyberia
1. Turn socket counter-clockwise and remove.
2. Replace the defective bulb (bayonet fitting).
3. Insert socket and turn in clockwise direction.
Make sure that the bulb is installed in the
correct position.
10_Cayenne_21_KW17.book Seite 334 Donnerstag, 9. April 2009 3:33 15
Page 335 of 379
Minor Repairs
335
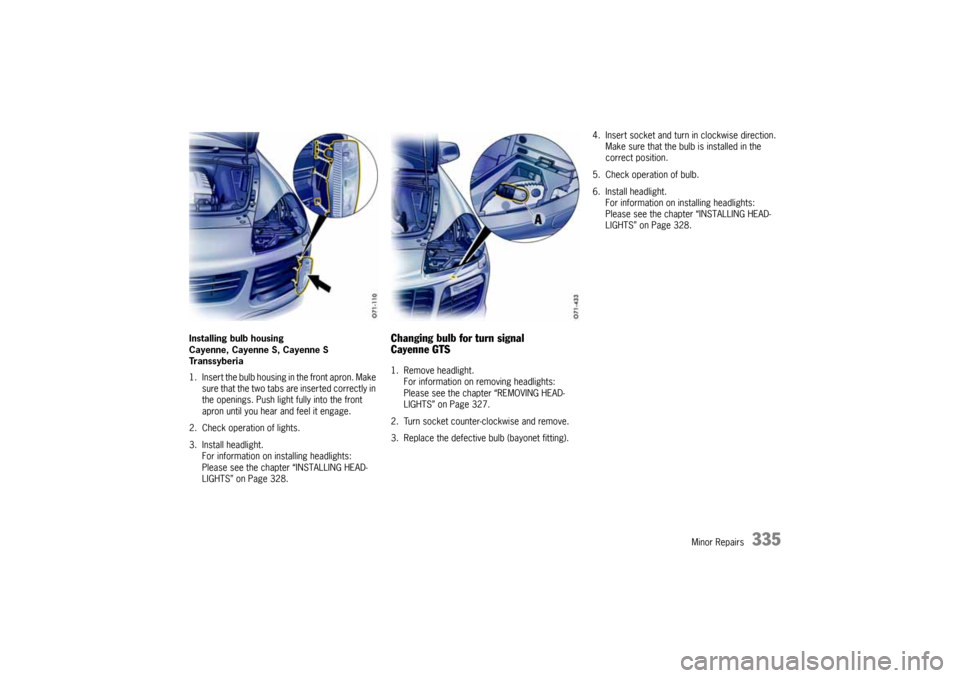
Installing bulb housing
Cayenne, Cayenne S, Cayenne S
Transsyberia
1. Insert the bulb housing in the front apron. Make
sure that the two tabs are inserted correctly in
the openings. Push light fully into the front
apron until you hear and feel it engage.
2. Check operation of lights.
3. Install headlight.
For information on installing headlights:
Please see the chapter “INSTALLING HEAD-
LIGHTS” on Page 328.
Changing bulb for turn signal
Cayenne GTS1. Remove headlight.
For information on removing headlights:
Please see the chapter “REMOVING HEAD-
LIGHTS” on Page 327.
2. Turn socket counter-clockwise and remove.
3. Replace the defective bulb (bayonet fitting).4. Insert socket and turn in clockwise direction.
Make sure that the bulb is installed in the
correct position.
5. Check operation of bulb.
6. Install headlight.
For information on installing headlights:
Please see the chapter “INSTALLING HEAD-
LIGHTS” on Page 328.
10_Cayenne_21_KW17.book Seite 335 Donnerstag, 9. April 2009 3:33 15
Page 336 of 379
336
Minor Repairs
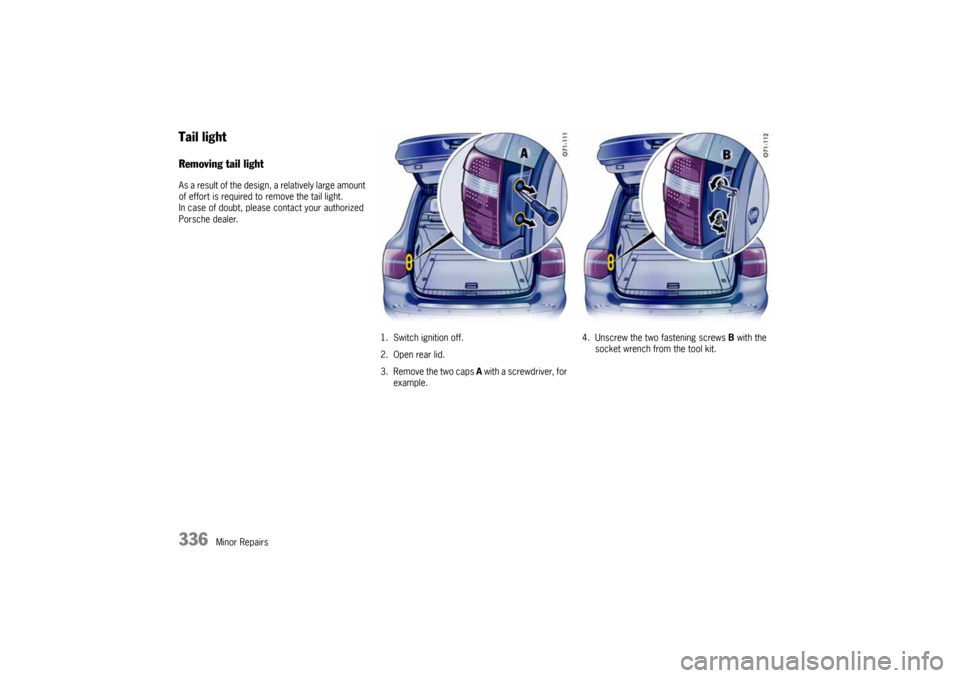
Tail lightRemoving tail lightAs a result of the design, a relatively large amount
of effort is required to remove the tail light.
In case of doubt, please contact your authorized
Porsche dealer.
1. Switch ignition off.
2. Open rear lid.
3. Remove the two caps A with a screwdriver, for
example.4. Unscrew the two fastening screws B with the
socket wrench from the tool kit. 10_Cayenne_21_KW17.book Seite 336 Donnerstag, 9. April 2009 3:33 15
Page 337 of 379
Minor Repairs
337
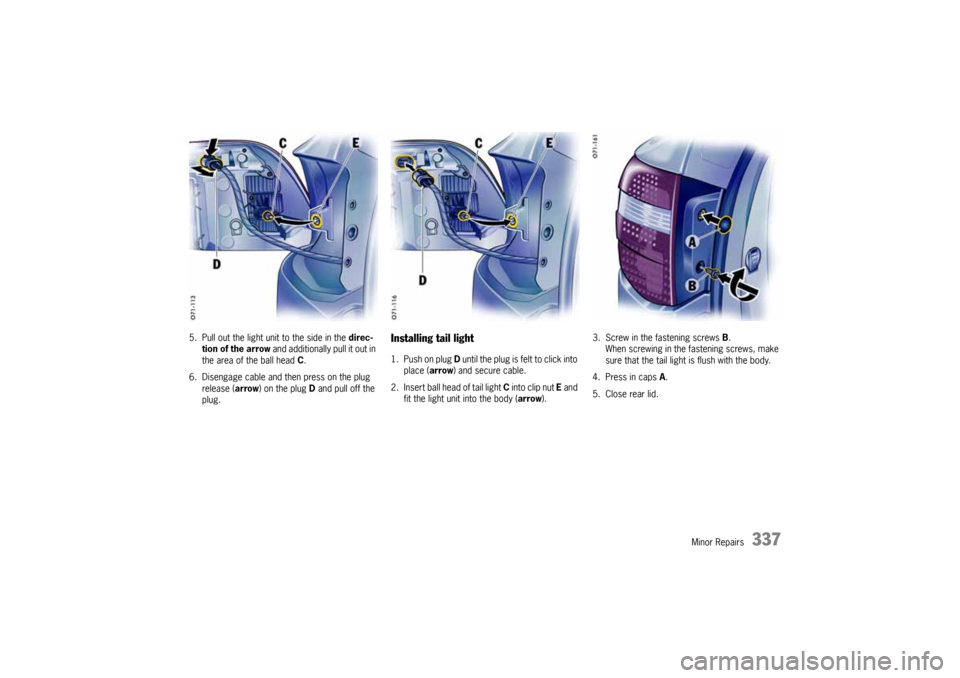
5. Pull out the light unit to the side in the direc-
tion of the arrow and additionally pull it out in
the area of the ball head C.
6. Disengage cable and then press on the plug
release (arrow) on the plug D and pull off the
plug.
Installing tail light1. Push on plug D until the plug is felt to click into
place (arrow) and secure cable.
2. Insert ball head of tail light C into clip nut E and
fit the light unit into the body (arrow).3. Screw in the fastening screws B.
When screwing in the fastening screws, make
sure that the tail light is flush with the body.
4. Press in caps A.
5. Close rear lid.
10_Cayenne_21_KW17.book Seite 337 Donnerstag, 9. April 2009 3:33 15
Page 338 of 379
338
Minor Repairs
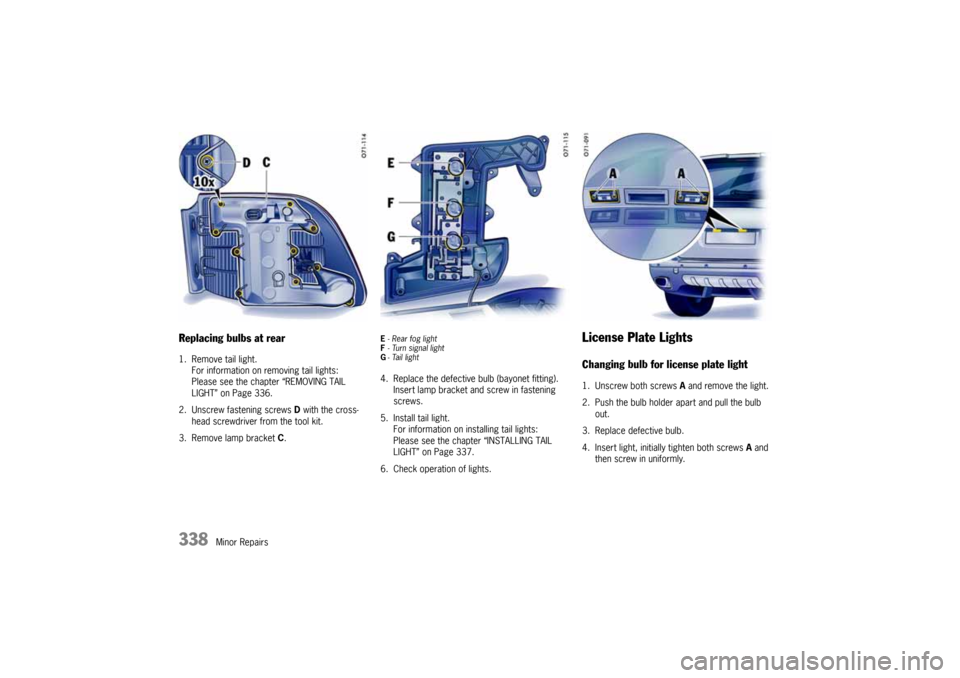
Replacing bulbs at rear1. Remove tail light.
For information on removing tail lights:
Please see the chapter “REMOVING TAIL
LIGHT” on Page 336.
2. Unscrew fastening screws D with the cross-
head screwdriver from the tool kit.
3. Remove lamp bracket C.
E- Rear fog light
F- Turn signal light
G- Tail light4. Replace the defective bulb (bayonet fitting).
Insert lamp bracket and screw in fastening
screws.
5. Install tail light.
For information on installing tail lights:
Please see the chapter “INSTALLING TAIL
LIGHT” on Page 337.
6. Check operation of lights.
License Plate LightsChanging bulb for license plate light1. Unscrew both screws A and remove the light.
2. Push the bulb holder apart and pull the bulb
out.
3. Replace defective bulb.
4. Insert light, initially tighten both screws A and
then screw in uniformly.
10_Cayenne_21_KW17.book Seite 338 Donnerstag, 9. April 2009 3:33 15
Page 339 of 379

Minor Repairs
339
Headlight AdjustmentfCheck tire pressure and adjust if necessary.
fPlease see the chapter “TIRE PRESSURES,
COLD (68 °F/20 °C)” on Page 354.
fPlease see the chapter “REPLACING BULBS”
on Page 326.Adjustment
The adjustment is made with the vehicle ready to
drive and the fuel tank completely filled.
T h e d r i ve r ' s s e a t m u s t b e l o a d e d b y a p e r s o n o r a
165lbs. (75kg) weight and the tire pressures must
meet the prescribed values. After being loaded,
the car must be rolled a few meters so that the
suspension can settle.
For checking the headlight adjustment, the verti-
cal position of the cutoff of the lowbeam (see fig.)
has to be projected on a vertical screen (wall) in
distance of 24.6 ft. (7.5 m) from the front lens of
the headlamp.The correct position of the cutoff is
3.0 in. (7.5 cm) at 24.6 ft. or 7.5 m (0.4°) below
a horizontal line, x cm from ground to the center
of the headlamp lens.
Lateral adjustment of the headlights should be
carried out at a specialist workshop with an optical
adjustment unit.
Distance
Visual aim shall be performed at not less than
24.6 ft. (7.5 m) (this value is a rounded down con-
version from the 25-foot distance typical of field
aim using a screen). The 24.6 ft. (7.5 m) distance
is measured from the headlamp lens to the
viewing screen.
Floor
The surface upon which the vehicle rests is flat
and approximately level.
Screen
The screen upon which headlamp beams are pro-
jected is perpendicular to the floor and the
vehicle's longitudinal axis, flat, uniformly light in
color, unobstructed, and wide and high enough to
accommodate the vehicle beam patterns to be
aimed.
The screen should be wide enough to provide at
least 3.3 ft. (1 m) of space outboard of the
vehicle's headlamp spacing.
10_Cayenne_21_KW17.book Seite 339 Donnerstag, 9. April 2009 3:33 15
Page 340 of 379
340
Minor Repairs
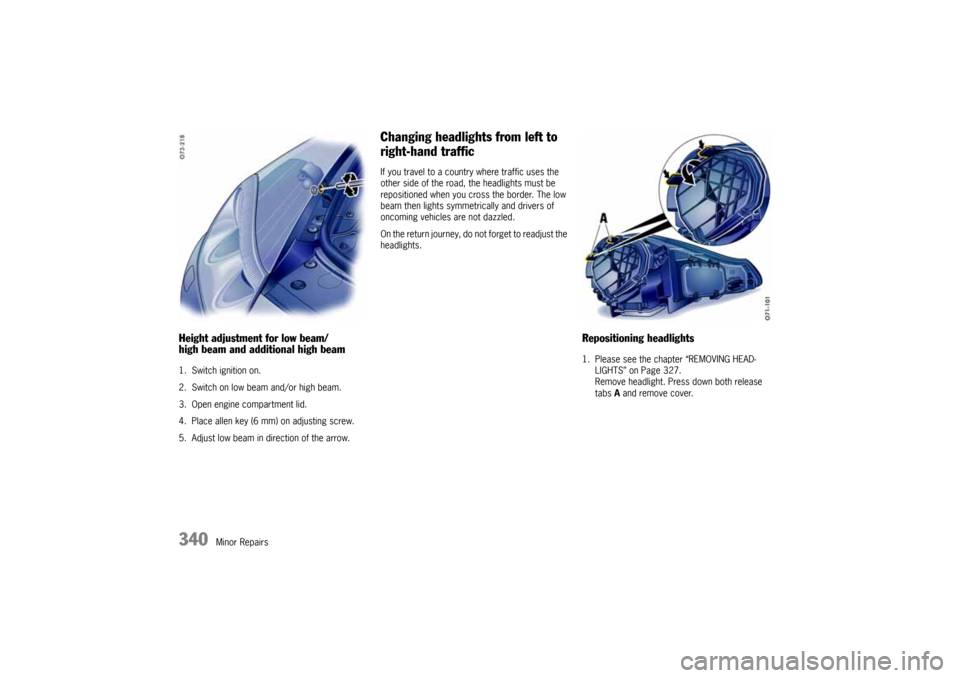
Height adjustment for low beam/
high beam and additional high beam1. Switch ignition on.
2. Switch on low beam and/or high beam.
3. Open engine compartment lid.
4. Place allen key (6 mm) on adjusting screw.
5. Adjust low beam in direction of the arrow.
Changing headlights from left to
right-hand trafficIf you travel to a country where traffic uses the
other side of the road, the headlights must be
repositioned when you cross the border. The low
beam then lights symmetrically and drivers of
oncoming vehicles are not dazzled.
On the return journey, do not forget to readjust the
headlights.
Repositioning headlights1. Please see the chapter “REMOVING HEAD-
LIGHTS” on Page 327.
Remove headlight. Press down both release
tabs A and remove cover.
10_Cayenne_21_KW17.book Seite 340 Donnerstag, 9. April 2009 3:33 15