PORSCHE CAYNNE S 2006 1.G Owners Manual
Manufacturer: PORSCHE, Model Year: 2006, Model line: CAYENNE S, Model: PORSCHE CAYENNE S 2006 1.GPages: 420, PDF Size: 3.81 MB
Page 331 of 420
Practical Tips, Minor Repairs
331
Spare wheel
Warning!
Risk of accident. The wheel and tire size and
the tire quality of the spare wheel and normal
wheel may differ.
If a spare wheel that differs from the normal
tires is used, this may impair the driving
behavior.
fThe spare wheel must be used only over short
distances in cases of emergency.
For safety reasons, replace the tires before
the wear indicators appear (webs in the tire
grooves, 1/16 in. (1.6 mm) high).
fNever deactivate the Porsche Stability
Management (PSM) system.
fIf the tire on the spare wheel is older than
4 years, the spare wheel should be used only
in the event of a flat.
fAvoid hard acceleration and high cornering
speeds.
The maximum permitted speed is 50 mph
(80 km/h) if the mounted spare wheel differs
from the other three wheels on the car. This
maximum speed must not be exceeded
because of altered driving characteristics and
for reasons of wear.
fDo not use a spare wheel from a different vehi-
cle type.
fDo not mount the spare wheel from your car on a different vehicle.Removing spare wheel
Warning!
Danger of injury if the spare wheel is
removed improperly.
fRemove the spare wheel only when the spare
wheel bracket is locked.
fRemove the spare wheel from the spare wheel
bracket with care. The wheel is very heavy [approx. 77 lbs. (35 kg)].
1. Unscrew all five wheel bolts.
2. Remove the top wheel bolt.
Remove assembly aid from the tool kit and
screw in instead of the wheel bolt.
Remove the remaining wheel bolts.
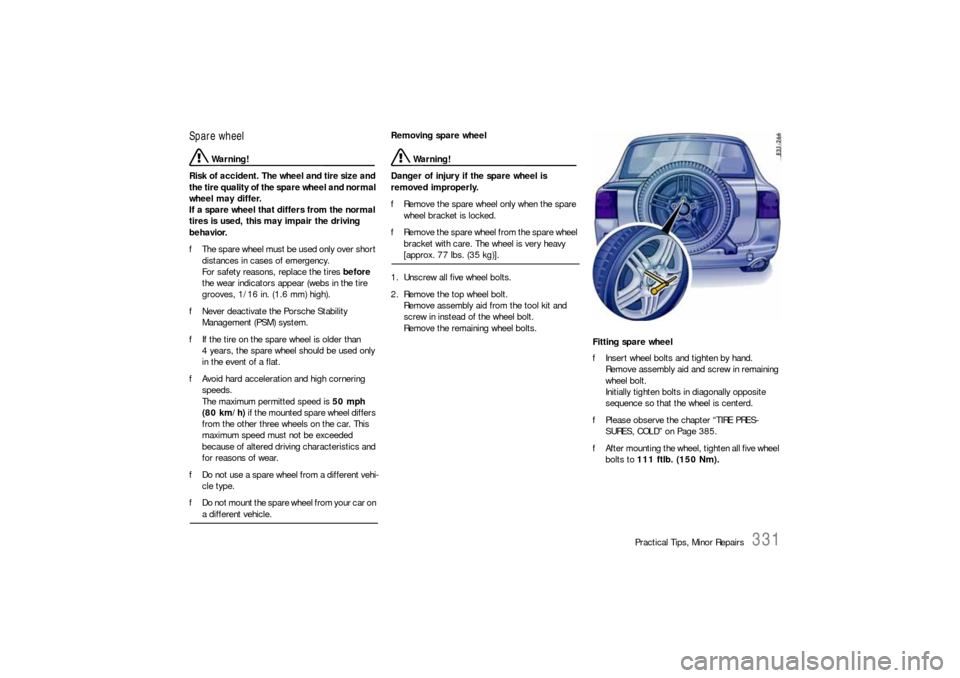
Fitting spare wheel
fInsert wheel bolts and tighten by hand.
Remove assembly aid and screw in remaining
wheel bolt.
Initially tighten bolts in diagonally opposite
sequence so that the wheel is centerd.
fPlease observe the chapter “TIRE PRES-
SURES, COLD” on Page 385.
fAfter mounting the wheel, tighten all five wheel
bolts to 111 ftlb. (150 Nm).
Page 332 of 420
332
Practical Tips, Minor Repairs
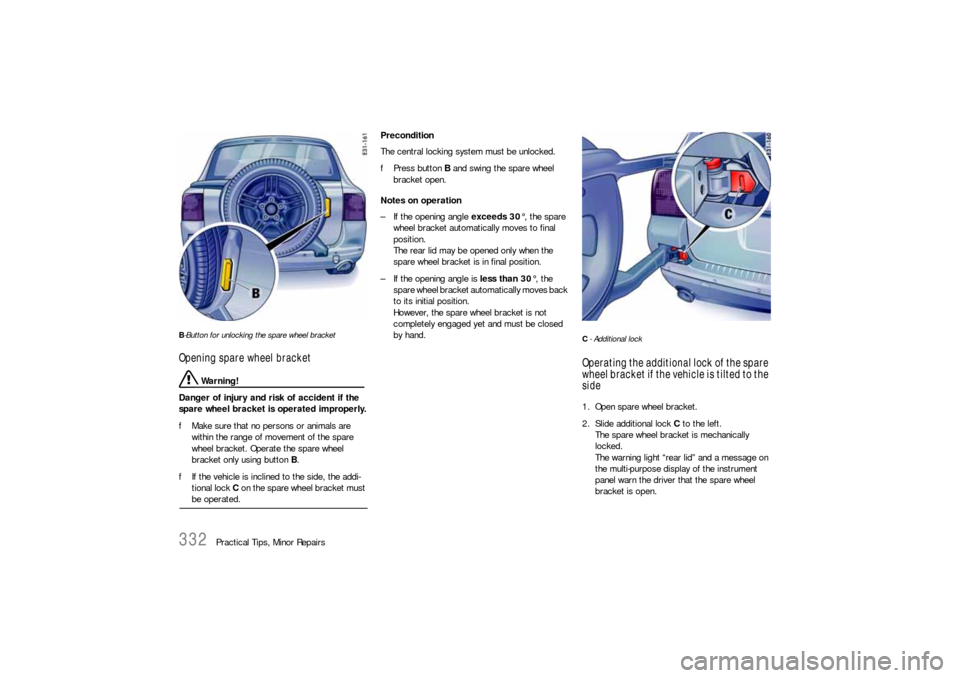
B-Button for unlocking the spare wheel bracketOpening spare wheel bracket
Warning!
Danger of injury and risk of accident if the
spare wheel bracket is operated improperly.
fMake sure that no persons or animals are
within the range of movement of the spare
wheel bracket. Operate the spare wheel
bracket only using button B.
fIf the vehicle is inclined to the side, the addi-
tional lock C on the spare wheel bracket must be operated.Precondition
The central locking system must be unlocked.
fPress button B and swing the spare wheel
bracket open.
Notes on operation
– If the opening angle exceeds 30°, the spare
wheel bracket automatically moves to final
position.
The rear lid may be opened only when the
spare wheel bracket is in final position.
– If the opening angle is less than 30°, the
spare wheel bracket automatically moves back
to its initial position.
However, the spare wheel bracket is not
completely engaged yet and must be closed
by hand.
C- Additional lock Operating the additional lock of the spare
wheel bracket if the vehicle is tilted to the
side1. Open spare wheel bracket.
2. Slide additional lock C to the left.
The spare wheel bracket is mechanically
locked.
The warning light “rear lid” and a message on
the multi-purpose display of the instrument
panel warn the driver that the spare wheel
bracket is open.
Page 333 of 420
Practical Tips, Minor Repairs
333
Closing spare wheel bracket
Warning!
Danger of injury and risk of accident if the
spare wheel bracket is operated improperly.
fOperate the spare wheel bracket only using
button B.
fIf the vehicle is tilted to the side, more effort
will be required to swing the spare wheel
bracket.
fMake sure that no persons or animals are
within the range of movement of the spare wheel bracket.
1. Check whether additional lock C is engaged. If
necessary, slide additional lock C to the right.
2. Swing spare wheel bracket closed with force.
3. Check lock and observe indication on the multi-
purpose display of the instrument panel.
The indicator light must go out when the spare
wheel bracket is locked.
Automatic locking
In the multi-purpose display of the instrument
panel, you can set different variants of locking and
unlocking the doors and the rear lid as well as the
check-back signal when locking and unlocking the
vehicle and save them on the respective remote
control.
fPlease observe the chapter “TAILGATE” on
Page 119.
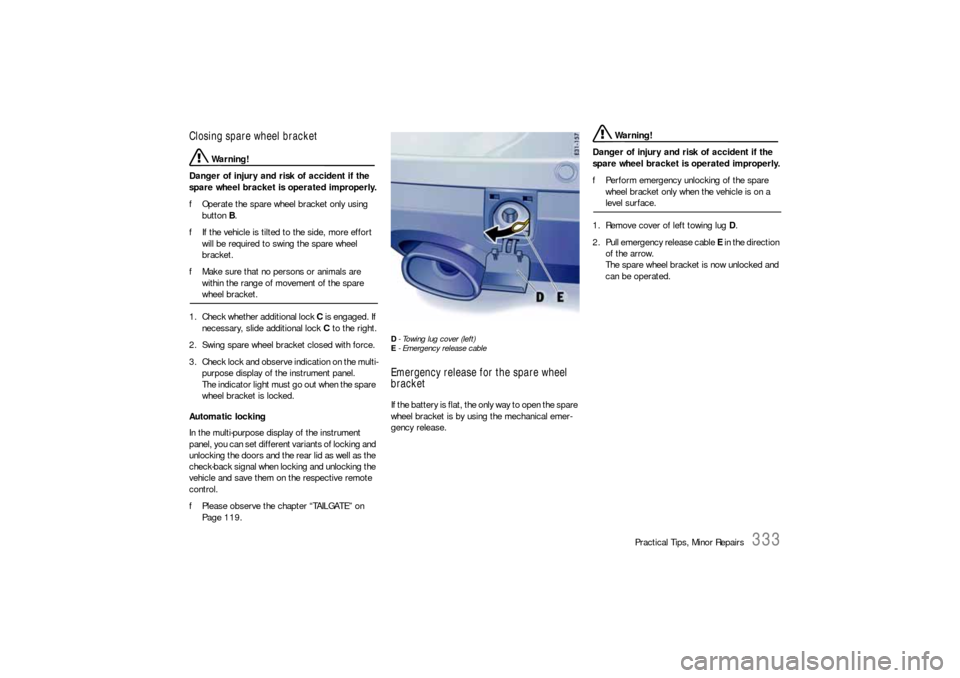
D- Towing lug cover (left)
E- Emergency release cableEmergency release for the spare wheel
bracketIf the battery is flat, the only way to open the spare
wheel bracket is by using the mechanical emer-
gency release.
Warning!
Danger of injury and risk of accident if the
spare wheel bracket is operated improperly.
fPerform emergency unlocking of the spare
wheel bracket only when the vehicle is on a level surface.
1. Remove cover of left towing lug D.
2. Pull emergency release cable E in the direction
of the arrow.
The spare wheel bracket is now unlocked and
can be operated.
Page 334 of 420
334
Practical Tips, Minor Repairs
Electrical SystemIn order to avoid damage and faults in electrical or
electronic systems, electrical accessories should
be installed at your authorized Porsche dealer.
fUse only accessories authorized by Porsche.
Warning!
Risk of short circuit and fire.
Replacing fuses or relays with engine running
or the ignition on could cause electrical
shock.
fDisconnect the battery during all work on the electrical system.
RelaysRelays should be checked or changed only by an
authorized workshop.Alarm system, central lockingThe status of the central locking and alarm system
is not changed by disconnecting the battery.
When the battery is disconnected, the alarm
system ceases to function.
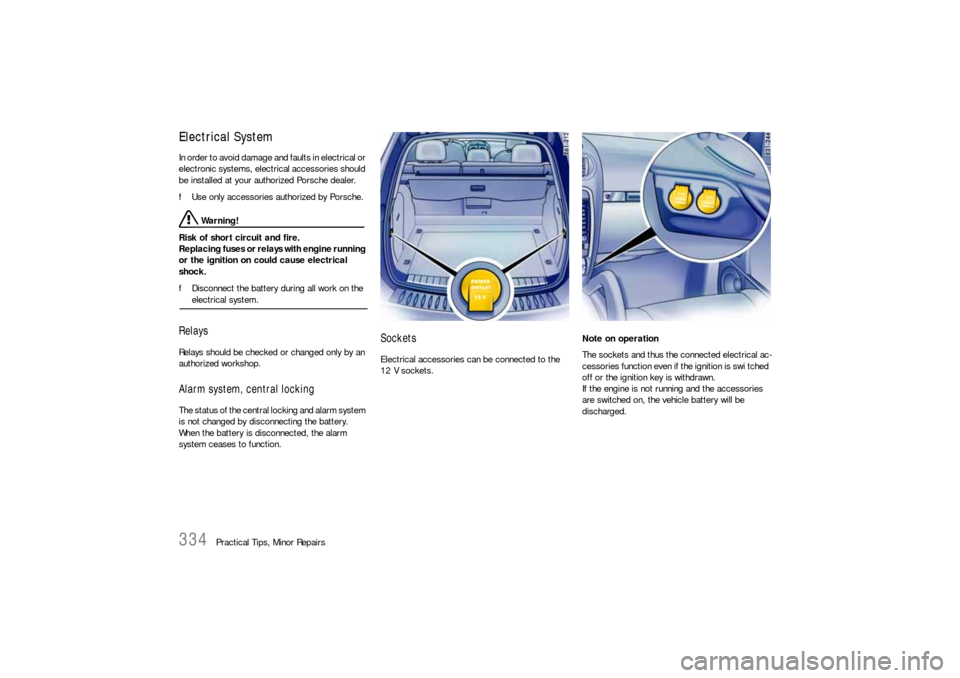
SocketsElectrical accessories can be connected to the
12 V sockets.Note on operation
The sockets and thus the connected electrical ac-
cessories function even if the ignition is swi tched
off or the ignition key is withdrawn.
If the engine is not running and the accessories
are switched on, the vehicle battery will be
discharged.
Page 335 of 420
Practical Tips, Minor Repairs
335
Changing fusesIn order to prevent damage to the electrical
system due to short circuits and overloads, the in-
dividual circuits are protected by fuses.
One fuse box is in the engine compartment. Two
additional fuse boxes are located in the outer ends
of the dashboard.
1. Switch off the consumer with the defective
fuse. Before replacing a fuse, switch off all
electrical consumers and remove the ignition
key.
2. Open the fuse-box lid.
3. Remove the corresponding fuse from its slot to
check it using the plastic gripper.
A blown fuse can be identified by the melted
metal strip.
4. Replace only with fuses of the same rating.
Note
If a fuse blows repeatedly, please consult an au-
thorized Porsche dealer immediately, so that the
short circuit can be located and corrected.
Never try to “repair“ fuses: you may cause serious
damage to other parts of the electrical system.
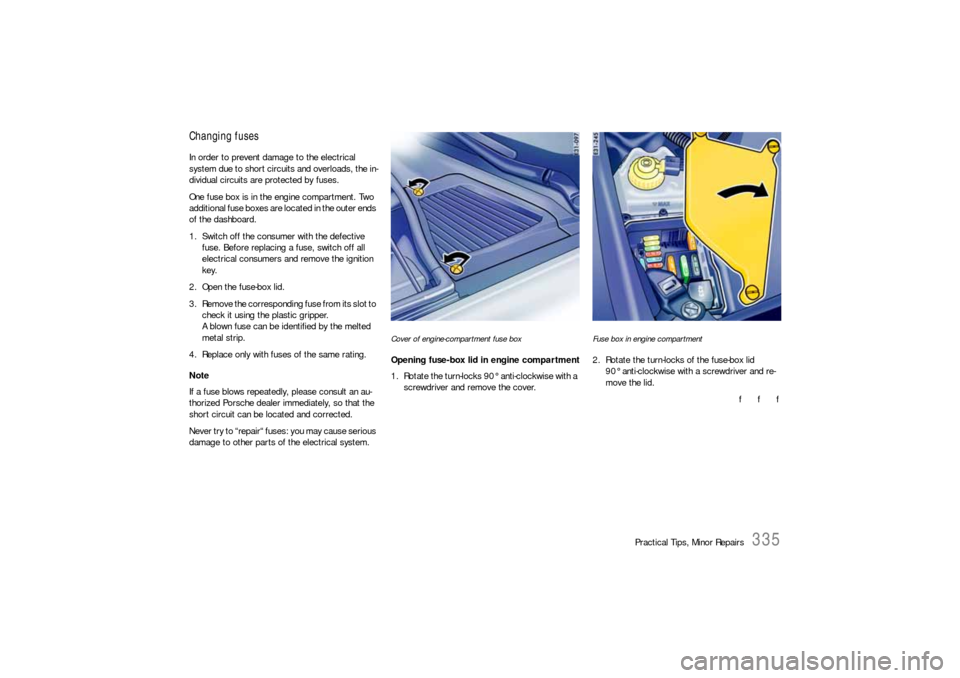
Cover of engine-compartment fuse boxOpening fuse-box lid in engine compartment
1. Rotate the turn-locks 90° anti-clockwise with a
screwdriver and remove the cover.
Fuse box in engine compartment2. Rotate the turn-locks of the fuse-box lid
90° anti-clockwise with a screwdriver and re-
move the lid.
f f f
Page 336 of 420
336
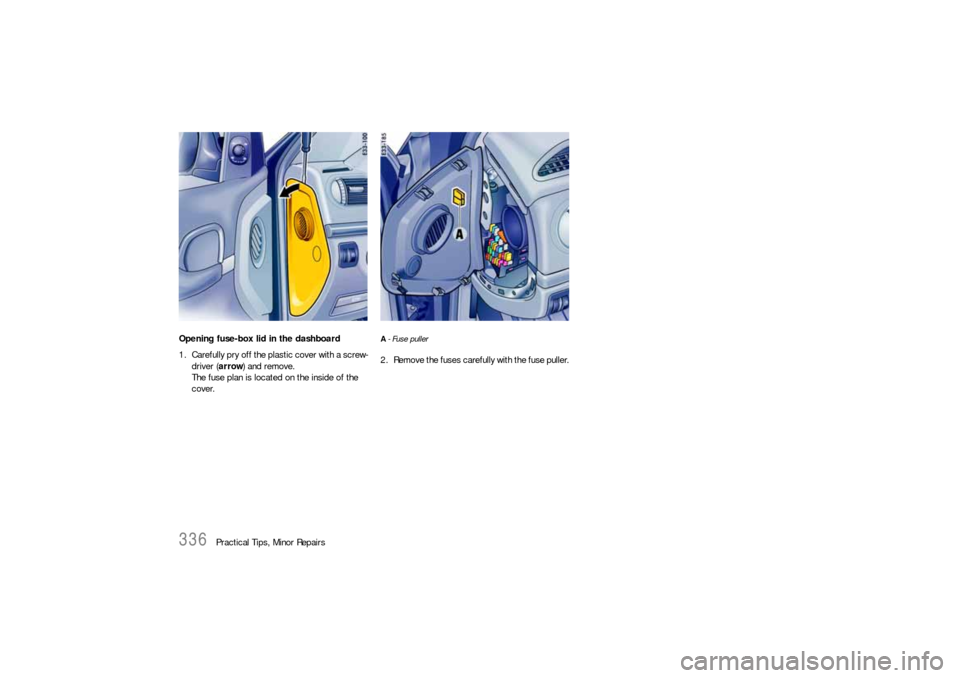
Practical Tips, Minor Repairs Opening fuse-box lid in the dashboard
1. Carefully pry off the plastic cover with a screw-
driver (arrow) and remove.
The fuse plan is located on the inside of the
cover.
A- Fuse puller2. Remove the fuses carefully with the fuse puller.
Page 337 of 420
Practical Tips, Minor Repairs
337
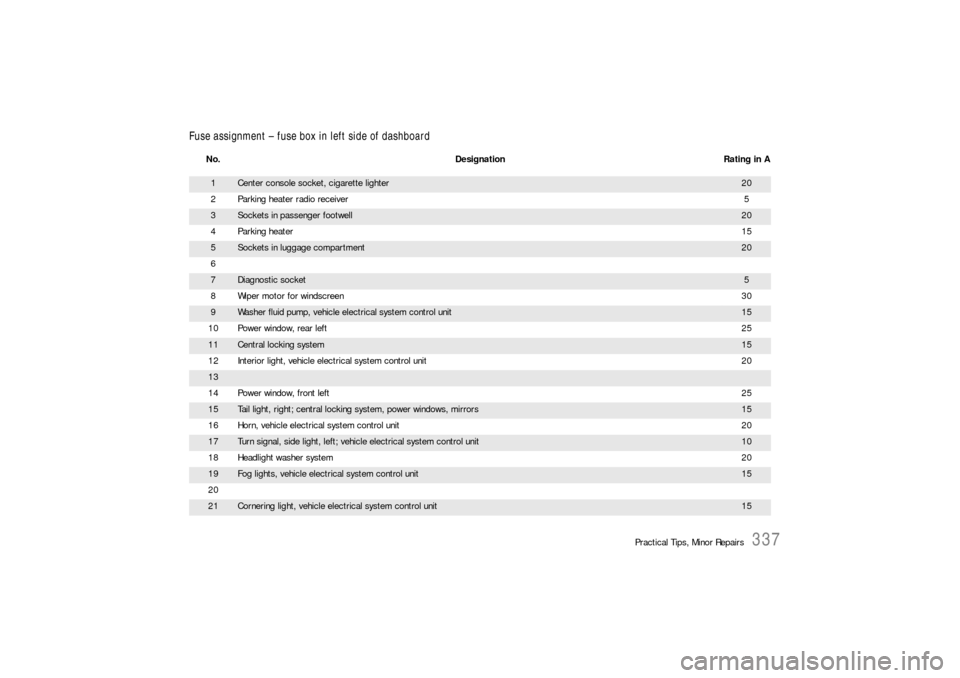
Fuse assignment – fuse box in left side of dashboard
No. Designation Rating in A1
Center console socket, cigarette lighter
20
2 Parking heater radio receiver5
3
Sockets in passenger footwell
20
4 Parking heater15
5
Sockets in luggage compartment
20
6
7
Diagnostic socket
5
8 Wiper motor for windscreen30
9
Washer fluid pump, vehicle electrical system control unit
15
10 Power window, rear left25
11
Central locking system
15
12 Interior light, vehicle electrical system control unit20
1314 Power window, front left2515
Tail light, right; central locking system, power windows, mirrors
15
16 Horn, vehicle electrical system control unit20
17
Turn signal, side light, left; vehicle electrical system control unit
10
18 Headlight washer system20
19
Fog lights, vehicle electrical system control unit
15
20
21
Cornering light, vehicle electrical system control unit
15
Page 338 of 420
338
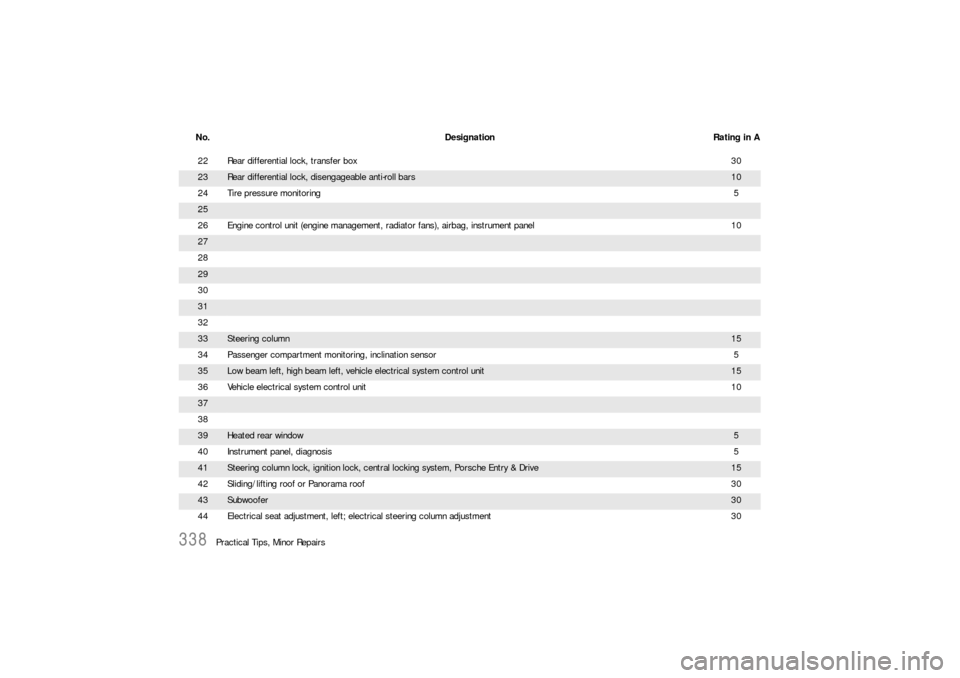
Practical Tips, Minor Repairs 22 Rear differential lock, transfer box30
23
Rear differential lock, disengageable anti-roll bars
10
24 Tire pressure monitoring5
2526 Engine control unit (engine management, radiator fans), airbag, instrument panel 1027282930313233
Steering column
15
34 Passenger compartment monitoring, inclination sensor5
35
Low beam left, high beam left, vehicle electrical system control unit
15
36 Vehicle electrical system control unit10
373839
Heated rear window
5
40 Instrument panel, diagnosis5
41
Steering column lock, ignition lock, central locking system, Porsche Entry & Drive
15
42 Sliding/lifting roof or Panorama roof30
43
Subwoofer
30
44 Electrical seat adjustment, left; electrical steering column adjustment 30 No. Designation Rating in A
Page 339 of 420
Practical Tips, Minor Repairs
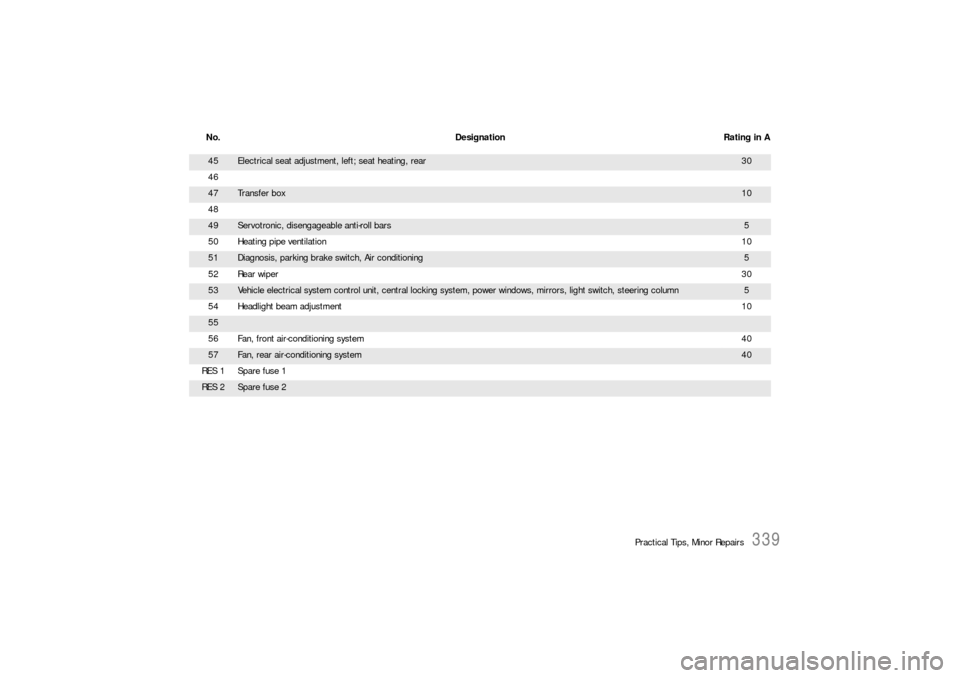
339
45
Electrical seat adjustment, left; seat heating, rear
30
46
47
Transfer box
10
48
49
Servotronic, disengageable anti-roll bars
5
50 Heating pipe ventilation10
51
Diagnosis, parking brake switch, Air conditioning
5
52 Rear wiper30
53
Vehicle electrical system control unit, central locking system, power windows, mirrors, light switch, steering column
5
54 Headlight beam adjustment10
5556 Fan, front air-conditioning system4057
Fan, rear air-conditioning system
40
RES 1 Spare fuse 1
RES 2
Spare fuse 2
No. Designation Rating in A
Page 340 of 420
340
Practical Tips, Minor Repairs
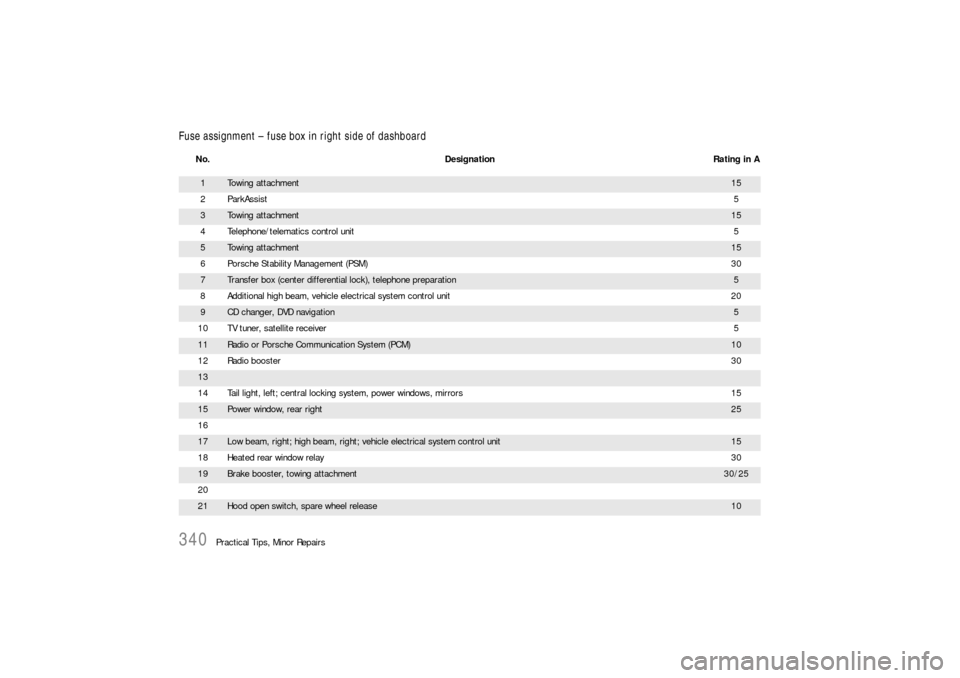
Fuse assignment – fuse box in right side of dashboard
No. Designation Rating in A1
Towing attachment
15
2 ParkAssist5
3
Towing attachment
15
4 Telephone/telematics control unit5
5
Towing attachment
15
6 Porsche Stability Management (PSM)30
7
Transfer box (center differential lock), telephone preparation
5
8 Additional high beam, vehicle electrical system control unit 20
9
CD changer, DVD navigation
5
10 TV tuner, satellite receiver5
11
Radio or Porsche Communication System (PCM)
10
12 Radio booster30
1314 Tail light, left; central locking system, power windows, mirrors 1515
Power window, rear right
25
16
17
Low beam, right; high beam, right; vehicle electrical system control unit
15
18 Heated rear window relay30
19
Brake booster, towing attachment
30/25
20
21
Hood open switch, spare wheel release
10