fuse PORSCHE CAYNNE TURBO 2006 1.G Owners Manual
[x] Cancel search | Manufacturer: PORSCHE, Model Year: 2006, Model line: CAYENNE TURBO, Model: PORSCHE CAYENNE TURBO 2006 1.GPages: 387, PDF Size: 8.44 MB
Page 13 of 387

Controls, Safety, Instruments
13
In the driver's seat...fCheck operation of the horn.
fPosition seat for easy reach of foot pedals and
controls.To reduce the possibility of injury from
the airbag deployment, you should always sit
back as far from the steering wheel as is prac-
tical, while still maintaining full vehicle control.
fAdjust the inside and outside rear view mirrors.
fBuckle your safety belts.
fCheck operation of the foot and parking brake.
fCheck all warning and indicator lights with igni-
tion on and engine not running.
fStart engine and check all warning displays for
warning symbols.
fNever leave an idling car unattended.
fLock doors from inside, especially with chil-
dren in the car to prevent inadvertent opening
of doors from inside or outside. Drive with
doors locked.
On the road...fNever drive after you have consumed alcohol
or drugs.
fAlways have your safety belt fastened.
fAlways drive defensively.
Expect the unexpected.
fUse signals to indicate turns and lane changes.
fTurn on headlights at dusk or when the driving
conditions warrant it.
fAlways keep a safe distance from the vehicle in
front of you, depending on traffic, road and
weather conditions.
fReduce speed at night and during inclement
weather.
Driving in wet weather requires caution and re-
duced speeds, particularly on roads with
standing water, as the handling characteristics
of the vehicle may be impaired due to hydro-
planing of the tires.
fAlways observe speed limits and obey road
signs and traffic laws.
fWhen tired, get well off the road, stop and take
a rest. Turn the engine off. Do not sit in the ve-
hicle with engine idling.
Please observe the chapter “ENGINE EX-
HAUST” on Page 6.fWhen parked, always set the parking brake.
Move the Tiptronic selector lever to “P“.
On hills also turn the front wheels toward the
curb.
fWhen emergency repairs become necessary,
move the vehicle well off the road. Turn on the
emergency flasher and use other warning de-
vices to alert other motorists. Do not park or
operate the vehicle in areas where the hot ex-
haust system may come in contact with dry
grass, brush, fuel spill or other flammable ma-
terial.
fMake it a habit to have the engine oil checked
with every fuel filling.
Page 46 of 387

46
Controls, Safety, Instruments
Safety Belts
Danger!
Always make sure your and your passengers'
safety belts are properly fastened while the
vehicle is in motion.
Failure to follow safety belt warnings may re-
sult in serious personal injury or death.
fFor your and your passengers' protection, use
safety belts at all times while the vehicle is in
motion.
fUse appropriate child restraint systems for all
small children.
Proper wearing of safety belts
fS a f e t y b e l t s m u s t b e p o s i t i o n e d o n t h e b o d y a s
to restrain the upper body and lap from sliding
forward. Improperly positioned safety belts
can cause serious personal injury in case of an
accident.
fThe shoulder belt should always rest on your
upper body. The shoulder belt should never be
worn behind your back or under your arm.
fFor maximum effectiveness, the lap belt
should be worn low across the hips.
fPregnant women should position the belt as
low as possible across the pelvis. Make sure it
is not pressing against the abdomen.
fBelts should not be worn twisted.fDo not wear belts over rigid or breakable
objects in or on your clothing, such as eye
glasses, pens, keys, etc. as these may cause
injury.
fSeveral layers of heavy clothing may interfere
with proper positioning of belts.
fBelts must not rub against sharp objects or
damage may occur to the belt.
fTwo occupants should never share the same
belt at the same time.
Care and maintenance
fKeep belt buckles free of any obstruction that
may prevent a secure locking.
fBelts that have been subjected to excessive
stretch forces in an accident must be inspect-
ed or replaced to ensure their continued effec-
tiveness in restraining you.
The same applies to belt tensioner systems
which have been triggered. In addition, the an-
chor points of the belts should be checked.
fIf safety belts do not work properly, see your
authorized Porsche dealer immediately.
fI f t h e b e l t s s h o w d a m a g e t o w e b b i n g , b i n d i n g s ,
buckles or retractors, they should be replaced
to ensure safe operation.
fDo not modify or disassemble the safety belts
in your vehicle.fThe belts must be kept clean or the retractors
may not work properly.
Please observe the chapter “CAR CARE IN-
STRUCTIONS” on Page 273.
fNever bleach or dye safety belts.
fDo not allow safety belts to retract until they
are completely dry after cleaning or this may
cause damage to the belt.
Page 74 of 387
74
Controls, Safety, Instruments
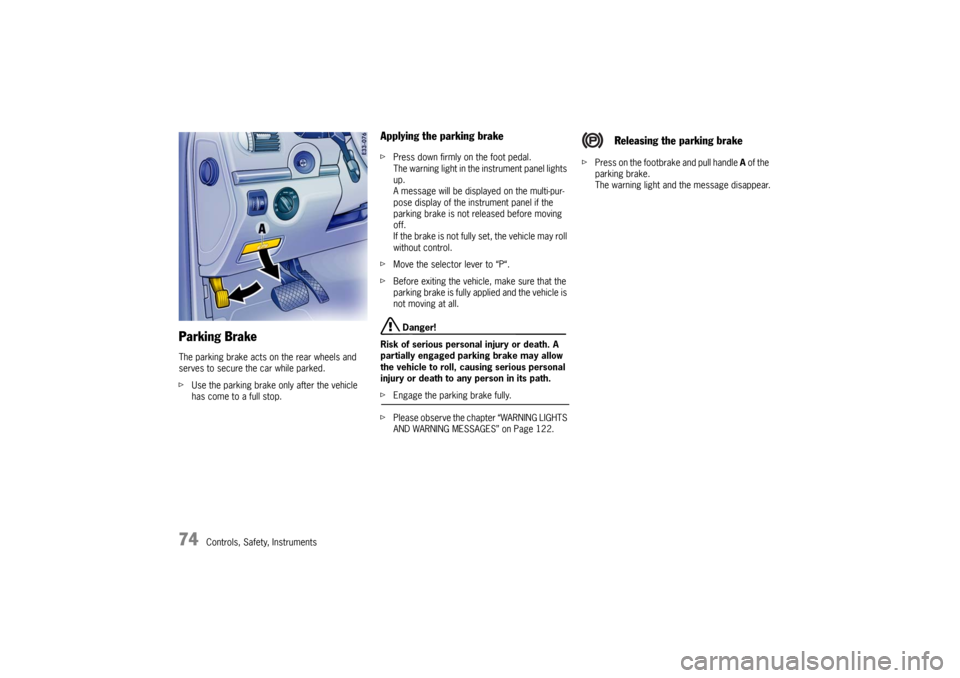
Parking BrakeThe parking brake acts on the rear wheels and
serves to secure the car while parked.
fUse the parking brake only after the vehicle
has come to a full stop.
Applying the parking brakefPress down firmly on the foot pedal.
The warning light in the instrument panel lights
up.
A message will be displayed on the multi-pur-
pose display of the instrument panel if the
parking brake is not released before moving
off.
If the brake is not fully set, the vehicle may roll
without control.
fMove the selector lever to “P“.
fBefore exiting the vehicle, make sure that the
parking brake is fully applied and the vehicle is
not moving at all.
Danger!
Risk of serious personal injury or death. A
partially engaged parking brake may allow
the vehicle to roll, causing serious personal
injury or death to any person in its path.
fEngage the parking brake fully.
fPlease observe the chapter “WARNING LIGHTS
AND WARNING MESSAGES” on Page 122.fPress on the footbrake and pull handle A of the
parking brake.
The warning light and the message disappear.
Releasing the parking brake
Page 95 of 387
Controls, Safety, Instruments
95
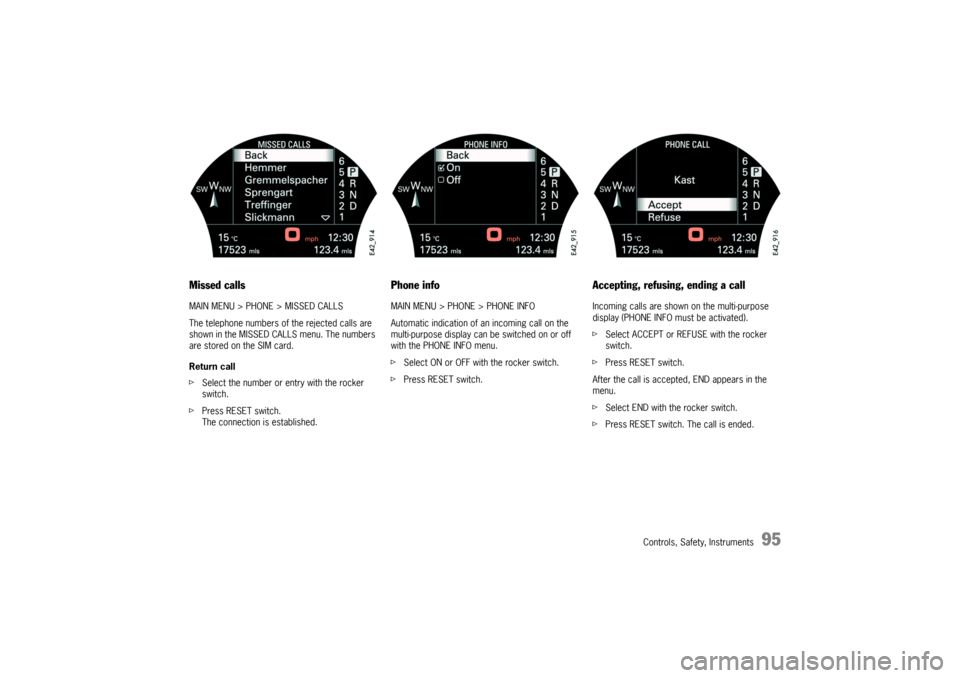
Missed callsMAIN MENU > PHONE > MISSED CALLS
The telephone numbers of the rejected calls are
shown in the MISSED CALLS menu. The numbers
are stored on the SIM card.
Return call
fSelect the number or entry with the rocker
switch.
fPress RESET switch.
The connection is established.
Phone infoMAIN MENU > PHONE > PHONE INFO
Automatic indication of an incoming call on the
multi-purpose display can be switched on or off
with the PHONE INFO menu.
fSelect ON or OFF with the rocker switch.
fPress RESET switch.
Accepting, refusing, ending a callIncoming calls are shown on the multi-purpose
display (PHONE INFO must be activated).
fSelect ACCEPT or REFUSE with the rocker
switch.
fPress RESET switch.
After the call is accepted, END appears in the
menu.
fSelect END with the rocker switch.
fPress RESET switch. The call is ended.
Page 101 of 387
Controls, Safety, Instruments
101
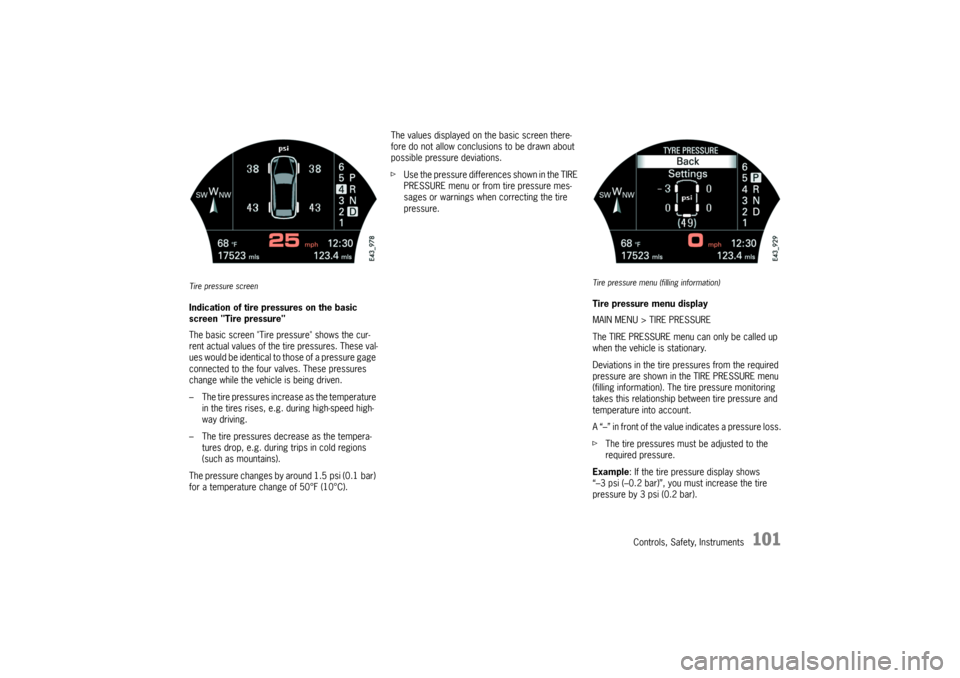
Tire pressure screenIndication of tire pressures on the basic
screen "Tire pressure"
The basic screen "Tire pressure" shows the cur-
rent actual values of the tire pressures. These val-
ues would be identical to those of a pressure gage
connected to the four valves. These pressures
change while the vehicle is being driven.
– The tire pressures increase as the temperature
in the tires rises, e.g. during high-speed high-
way driving.
– The tire pressures decrease as the tempera-
tures drop, e.g. during trips in cold regions
(such as mountains).
The pressure changes by around 1.5 psi (0.1 bar)
for a temperature change of 50°F (10°C).The values displayed on the basic screen there-
fore do not allow conclusions to be drawn about
possible pressure deviations.
fUse the pressure differences shown in the TIRE
PRESSURE menu or from tire pressure mes-
sages or warnings when correcting the tire
pressure.
Tire pressure menu (filling information)Tire pressure menu display
MAIN MENU > TIRE PRESSURE
The TIRE PRESSURE menu can only be called up
when the vehicle is stationary.
Deviations in the tire pressures from the required
pressure are shown in the TIRE PRESSURE menu
(filling information). The tire pressure monitoring
takes this relationship between tire pressure and
temperature into account.
A “–” in front of the value indicates a pressure loss.
fThe tire pressures must be adjusted to the
required pressure.
Example: If the tire pressure display shows
“–3 psi (–0.2 bar)”, you must increase the tire
pressure by 3 psi (0.2 bar).
Page 171 of 387
Controls, Safety, Instruments
171
Emergency operation of the Panorama
roof systemUse emergency operation only under exceptional
circumstances if the electric emergency closing
function cannot be implemented and the end
position cannot be stored.
fBefore using emergency operation, please
check whether the fuse is defective. After the
fuse has been changed, the limit positions of
the panorama roof system will have to be
stored again.
Danger!
Danger of injury and risk of damage when
closing the roof.
fTake care to ensure that nobody can be injured
when the roof elements are activated.
fDo not operate the Panorama roof system with
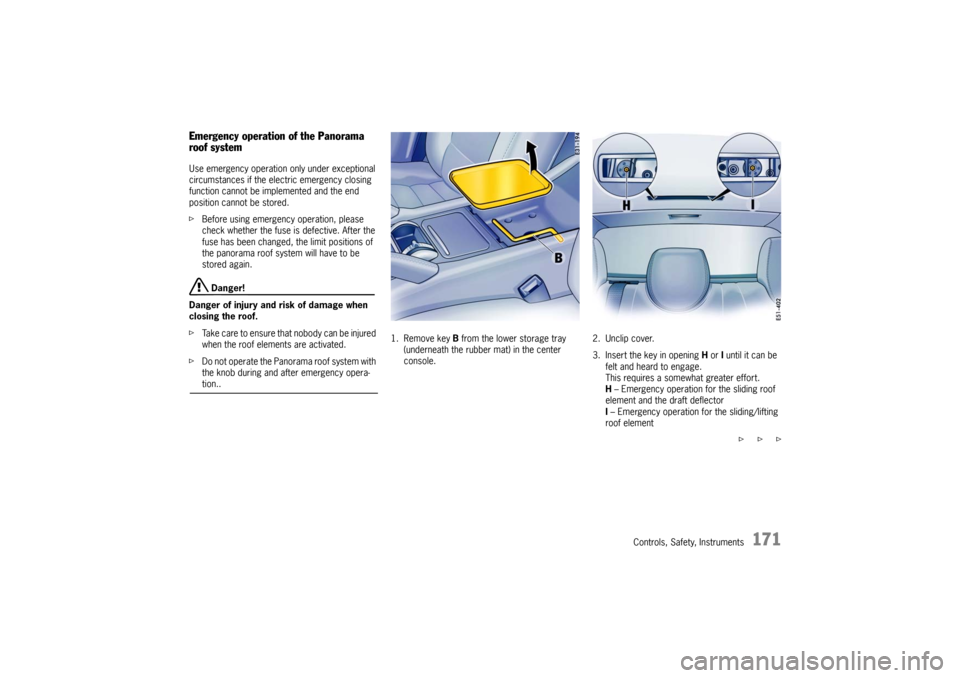
the knob during and after emergency opera-tion..1. Remove key B from the lower storage tray
(underneath the rubber mat) in the center
console.2. Unclip cover.
3. Insert the key in opening H or I until it can be
felt and heard to engage.
This requires a somewhat greater effort.
H – Emergency operation for the sliding roof
element and the draft deflector
I – Emergency operation for the sliding/lifting
roof element
f f f
Page 184 of 387

184
Controls, Safety, Instruments
Compact disc player
Caution!
To avoid damage to compact disc player and
discs.
fUse only compact discs labeled as shown, hav-
ing no dirt, damage or warpage.
fNever attempt to disassemble or oil any part
of the player unit. Do not insert any object oth-
er than a disc into the slot.Remember there are
no user-serviceable parts inside the compact
disc player.
fDo not allow the disc to sustain any finger-
prints, scrapes or stickers on the surfaces.
This may cause poor sound quality.
Hold the disc only on the edge or center hole.
fWhen not in use, take the disc out of the player,
put the disc back into its case and store it
away from dust, heat, damp and direct sun-
light.
Leaving the disc on the dashboard in the sun
can damage the disc.fIf the disc gets dirty, clean the disc by wiping
the surfaces from the center to the outside in
a radial direction with a soft cloth.
Do not use a conventional record cleaner or
anti-static record preservative.
Disc cleaners are available in audio stores.
Page 206 of 387
206
Controls, Safety, Instruments
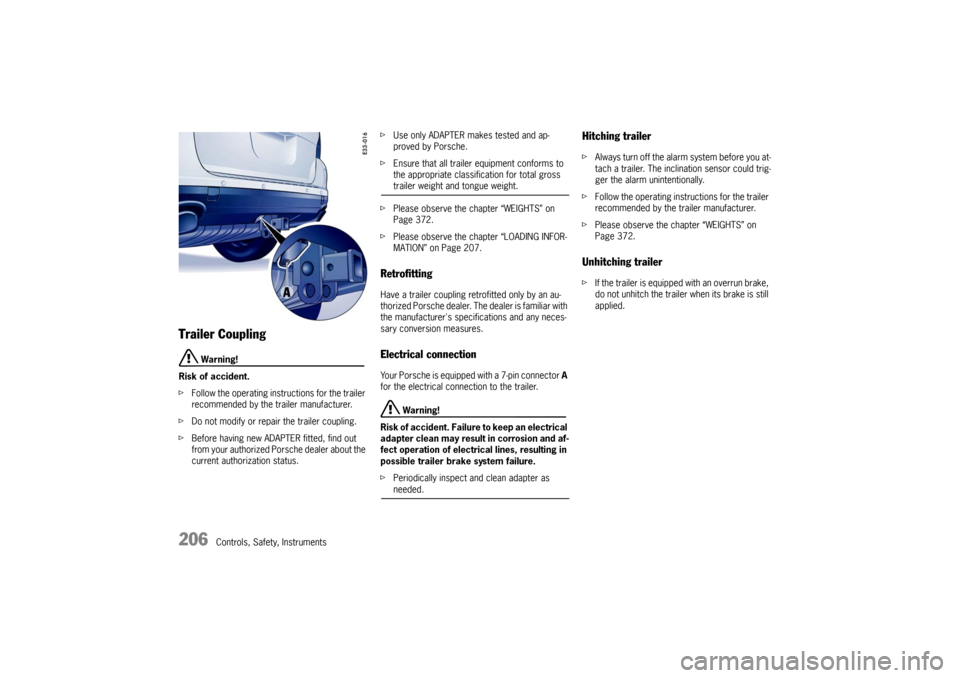
Trailer Coupling
Warning!
Risk of accident.
fFollow the operating instructions for the trailer
recommended by the trailer manufacturer.
fDo not modify or repair the trailer coupling.
fBefore having new ADAPTER fitted, find out
from your authorized Porsche dealer about the
current authorization status.fUse only ADAPTER makes tested and ap-
proved by Porsche.
fEnsure that all trailer equipment conforms to
the appropriate classification for total gross
trailer weight and tongue weight.
fPlease observe the chapter “WEIGHTS” on
Page 372.
fPlease observe the chapter “LOADING INFOR-
MATION” on Page 207.
RetrofittingHave a trailer coupling retrofitted only by an au-
thorized Porsche dealer. The dealer is familiar with
the manufacturer's specifications and any neces-
sary conversion measures.Electrical connectionYour Porsche is equipped with a 7-pin connector A
for the electrical connection to the trailer.
Warning!
Risk of accident. Failure to keep an electrical
adapter clean may result in corrosion and af-
fect operation of electrical lines, resulting in
possible trailer brake system failure.
fPeriodically inspect and clean adapter as needed.
Hitching trailerfAlways turn off the alarm system before you at-
tach a trailer. The inclination sensor could trig-
ger the alarm unintentionally.
fFollow the operating instructions for the trailer
recommended by the trailer manufacturer.
fPlease observe the chapter “WEIGHTS” on
Page 372.Unhitching trailerfIf the trailer is equipped with an overrun brake,
do not unhitch the trailer when its brake is still
applied.
Page 209 of 387

Controls, Safety, Instruments
209
Stowing load in the vehicle
Warning!
Danger of injury.
An unsecured or incorrectly positioned cargo
can slip out of place or endanger the vehicle
occupants during braking, direction changes
or in accidents.
Never transport objects which are not se-
cured.
fAlways transport cargo in the cargo area, nev-
er in the passenger compartment (e.g. on or in
front of the seats).
fSupport the cargo on the seat backrests when-
ever possible. Always lock the backrests into
place.
fPlace the cargo behind unoccupied seats
whenever possible.
fStow heavy objects as close to the front of the
cargo area as possible, with lightweight ob-
jects behind them.
fThe cargo must never project over the top
edge of the seat backrest.
fAlways protect the passenger compartment
with a luggage safety net and a luggage
compartment cover.
Do not drive with objects on top of the luggage
compartment cover.fIf the rear seats are not occupied, the back-
rests can be additionally secured with the safe-
ty belts. Simply cross the outer safety belts
and insert each into the opposite buckle.
fMake sure that the load cannot damage the
heating filaments of the rear window and the
TV antenna of the side window.
Luggage net
fLuggage must be stowed completely covered
by the luggage net.
The luggage net can prevent only lightweight
objects from slipping.
Tie-down belts
fDo not use elastic belts or straps to tie down
a load.
fDo not place belts and straps over sharp edg-
es.
fObserve the directions for use and information
for the tie-down equipment.
fUse only belts with a tear strength of at least
1543 lbs. (700 kg) and a maximum width of
1in. (25mm).
fCross the belts over the load.Driving
fThe car's handling changes depending on the
vehicle load. Adapt your driving style to the
changed driving behavior.
fDo not exceed the maximum gross weight and
the axle load.
fPlease observe the chapter “WEIGHTS” on
Page 372.
fNever drive with the rear window or rear lid
open.
Exhaust gases can enter the passenger
compartment.
fAdapt the tire pressure to the load.
fPlease observe the chapter “TIRE PRESSU-
RES, COLD” on Page 370.
Page 216 of 387

216
Shifting Gear, Traction Systems
D - Automatic selection mode (in the road
driving program)The functions of selector lever positions D and M
differ in the on-road program, High Range, and in
the off-road program, Low Range.
fUse selector lever position D for “normal” driv-
ing.
The gears are shifted automatically according
to the accelerator position and speed.
Depending on the way the vehicle is driven and on
the resistance (e.g. uphill), the gear-changing
points are shifted towards higher or lower engine-
speed ranges. Movement of the accelerator,
driving speed, longitudinal and lateral acceleration
and the road profile all have an influence on the
gear-changing characteristic.
When PSM is switched off, transmission gear
changes are done at higher engine speeds.
Unwanted upward shifts, e.g. before corners, are
prevented by swiftly releasing the accelerator ped-
al.
Depending on lateral acceleration, upward chang-
es on corners are not made until the engine-speed
limit is reached.
During braking, and depending on the amount of
deceleration, the Tiptronic changes down earlier.
For subsequent cornering, the right gear is en-
gaged when pressure is applied to the brakes be-
fore the corner.The corner is taken in the right gear, and when you
accelerate out of the corner you do not have to
change down.
Moving off
In 2nd gear, the vehicle moves off with the throttle
only slightly open. Move off in 1st gear with the
throttle open wider or when the engine is cold.
When PSM is switched off, the car generally
moves off in 1st gear.
Shifting gear on the steering wheel
By shifting gear with the rocker switches on the
steering wheel, you can temporarily change from
automatic selection mode D to manual selection
mode M.
Advantages
– Shifting down before corners and on entering
built-up areas.
– Shifting down on downward slopes (engine
braking).
– Shifting down for brief spurts of acceleration.
– Selecting 1st or 2nd gear for moving off.
The manual selection mode remains engaged:
– For cornering (depending on the lateral accel-
eration) and overrunning,
– When the vehicle is stationary (e.g. at a junc-
tion).The system leaves manual selection mode:
– automatically after around 8 seconds
(unless car is cornering, overrunning or
stationary),
– if you depress the accelerator to kickdown.
Temporary change-down
Precondition
– Speed is higher than approx. 33 mph
(54 km/h).
fDepress accelerator quickly.
The Tiptronic changes temporarily to the sport-
iest gear-changing map, i.e. to the highest pos-
sible gear-changing points. Correspondingly,
the transmission shifts down immediately by
one, two or three gears.
Ending the function
fRelease the accelerator markedly (by approx.
25%).